Trim piece turned nightmare

The friendliest place on the web for anyone who enjoys boating.
If you have answers, please help by responding to the unanswered posts.

MisfitManaged

Newbie
Joined
Dec 13, 2022
Messages
3
Hello, I decided that I needed to repaint the trim piece on my Marine trader. Found the caulking in rough shape while preparing to paint so started removing it to find this mess. I've tried filling the holes with Butyl tape, multiple different caulks(all were acrylic latex variations) and even liquid nails. None of which will harden! I've ripped it out 3 times now. Made sure it was clean and dry and now looking for suggestions. Although, obviously in the picture, it's not cleaned. .
 

Attachments

  • IMG_20221213_145335443.jpg
    IMG_20221213_145335443.jpg
    80.3 KB · Views: 85
  • IMG_20221213_145322759.jpg
    IMG_20221213_145322759.jpg
    90.8 KB · Views: 90
Greetings,
Welcome aboard. Another picture at more distance may prompt suggestions. "Trim piece" could mean anywhere on the boat. Hull? Cabin? Transom"


Edit: Butyl tape is not supposed to harden. What exactly are you trying to do?
 
I wouldn't use caulk of any kind, Not even 4200 or 5200. Use fiberglass autobody repair or best yet "marineTec".

pete
 
I can't tell what I am looking at here? Perhaps that picture is upside-down and it is where the cap rail sits on the gunwale? I really can't tell.

If that is the cap rail, it looks like the fiberglass underneath made need some attention vs just caulking the gap.

As RT Firefly asked, a picture that provides the context would be great.
 
Agree, where exactly is this trim piece? Above or below the waterline? What is the material, fiberglass? Caulks and butyl are not what I would go with. I would grind or sand off the loose stuff and then I would probably use thickened epoxy and then paint it to keep the UV off it.
 
Looks to me like the trim around the base of the flybridge fairing, with Silicone caulk doing what silicone does, separating from one or both pieces and from itself, but adhering where you don't want it to adhere and f***ing up the adherence of any other caulking materials that you try to do the job with.
That whole piece of teak (Painted by someone allergic to re-varnishing) needs to come off, then the whole Fly to cabin connection can be re-done properly.
 
Sorry, this is not a photo of my boat because it's dark now, however, this is the piece I'm talking about.Screenshot_2022-12-13-20-15-32-590~2.jpeg
 
BTW, I am a single female and this is my first boat. So, don't talk to me like I'm an idiot, but also talk to me like I'm an idiot. If that's possible ;)
 
I like the way you put that!:D

We'll try and talk to you like you're new to boating, but otherwise an intelligent individual . . . kind of like each and every one of us, even the "old timers" on this forum were at one time. . . . smart, but new to boating. Well, the smart part may be stretching it a little for a few of us . . . :angel:

On to your issue. Like others have recommended, thickened epoxy, with fibers, or cut up bits of fiberglass cloth if possible. Since it's on a vertical service, you'll have to use tape to hold it in place while it cures, possibly requiring several layers to get the thickness you need.
 
West System has quite a few decent videos.

https://www.youtube.com/playlist?list=PLKrXmm9fNk0b_btfL4THlghAT6ciaY3hB

Decent video that quickly describes thickening. You are looking for a filler, not a bonding blend.


Full disclosure: Im not great at this stuff, but I am not awful. It can be tough to keep the area free of sags and drips. Tape will not keep epoxy from sagging, so make it thick for your vertical surface.

Good luck -

Peter
 
Epoxy and thickner will become one of your best friends as you work on the boat. West Epoxies has excellent support.
 
If there has been any silicone applied to the surfaces you are trying to get covered, pretty much nothing will stick to the surface until all traces of silicone are gone. You may even have to remove the surface altogether and rebuild it. What would I do? I would remove some or all of the trim piece to find out what is going on under it. Chances are the area under it needs to be cut away and replaced in some areas, and covering it over would not stop the spread of the "cancer." When I found such areas on my 1972 Grand Banks, I would fashion a piece of plywood to rough shape and soak it and the surrounding wood with clear penetrating epoxy sealer (CPES) to permanently block water intrusion. Then I attached the new piece using West System Epoxy resin with filler material thickening the resin to a peanut butter consistency. Using a wide trowel to slather the mixture into place followed up with sanding the area to baby-butt smoothness and painting gave a better-than-original repair. To reattach the trim piece or newly fabricated trim pieces, first soak it/them in CPES, dry fit them in place with pre-drilled holes and the proper screws. Remove them and apply a good sealant like 3M 4200 (not 5200 because that stuff is forever glue) or even use butyl tape if that pleases you and them screw the trim piece back down. Done and dusted. :socool:
 
Julie
Welcome aboard TF. You should get some worthwhile suggestions here and kudos to you for the intro. My translation: you are new to boating and boat repairs but willing & capable of learning. There is nothing wrong with that... we all started somewhere.
However, a fair warning that some simply can't resist taking a cheap shot.

As a preface I've done a little bit of fiberglass repair but by no means an expert at it.
My $0.02...
Is this simply a void (possibly a molding defect?) or is there a separation of the upper & lower sections of the picture that needs reinforcing to hold permanently?
Can you get access to the backside from the FB? (inside a locker, behind seating, etc?

If you can access the inside I would do some grinding & repair / stiffening from the inside prior to filling & finishing from the outside. Reinforcing will help prevent further problems and if hidden you don't need to be too fussy with finishing of the inside "patch"
What I would be concerned about is putting a lot of effort into filling & finishing outside and have the repair crack due to movement between the upper & lower portions.
If it is simply a void in the molding filling as others suggested may be all that's needed
 
If I were in same position. I'd recommend getting a sack of "Rapid Set" mortar from building supply yard [maybe local HD stocks it??].

1. Fully clean out area to be filled.

2. With light spray bottle dampen the inside of the opening [damp not soaking wet]. Make sure it stays just slightly damp during this material's installation/application.

3. Well mix small amount of Rapid Set [2 to 3 cups in shallow plastic container] to a pourable chocolate pudding texture. Then, let it stand-still [i.e. slacken] for 2 to 5 minutes. Add tiny more water if needed till it loosens-up again. If I were you, having no experience yet utilizing this fast setting, super hard cement based polymer added construction filler mixture... I'd take some time on a piece of plywood [or other flat surface] mixing and "playing" with it a bit while you get to know its nature, needs and qualities.

4. Once mixed correctly, with putty knife, immediately begin squeegeeing it deeply into the slightly damp crack. Work fast... it sets in few minutes [activated set speed depends on temp, wind, humidity].

5. Repeat 1 - 4 till cracks are completely filled. Be sure to try to not get it bulging outside the "plane" of the edge to adjacent material. At correct working thickness/stiffness it does not sump easily. If it does slump to a bulge... soon after it first hardens use edge of putty knife to cut it's face-edge back to being flush with adjacent planes.

After entire area has been filled cover the surface with water proof paint/coating. Apply finish material for visuals/use-needs... as desired.

PM me if you'd like to learn more!

Welcome, Good Luck and Cheers!! - Art

:dance: :D :speed boat:
 
Last edited:
Fill the gap with brick mortar eh? That's one I would have never considered. You've done this with success?
 
Fill the gap with brick mortar eh? That's one I would have never considered. You've done this with success?

I can't possibly imagine.

Mortar has about 10% the tensile or flexural strength and 20% the shear strength as it does compressive strength.

In other words you can pile weight upon it or otherwise compress it, but twist it or pull it or bend it....not nearly so much.

And then even the best mortars aren't adhesives or adhesive.fillers. I don't know the numbers, but even with the polymer add mix, they aren't epoxy or resin.

And wood and fiberglass? They love to twist and bend. And wood loves to shrink and grow and change shape with moisture.

In everything from foundations to walls to surface treatments to ferrocement boat hulls..the metal mesh or rebar what keeps the internals of the cement in compression so it doesn't fall apart.

Mortar won't adhere well to fiberglass and if it did it'd crack and fail. It'll stick better to wood...but I have no idea whether it woukd crack or fall off or both...but suspect one or the other wood happen as the wood changed with the wide swings of outdoor humidity and moisture.

Hate to say it...but not seeing it.
 
Last edited:
Greetings,
Ms. MM. Aaahh....I see now. Thanks for the panorama picture. OK. A couple of things:


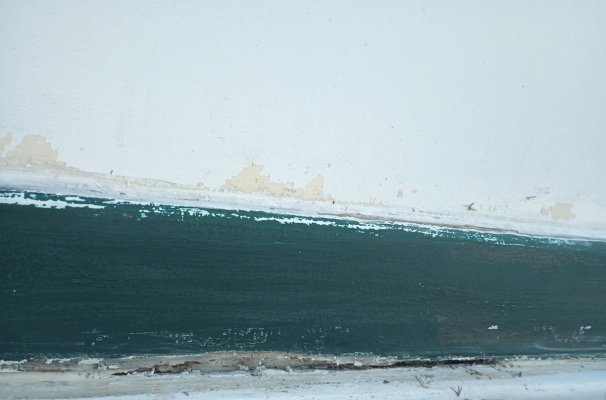
It appears your "void" is at the intersection of the vertical side of your fly bridge (green) and the horizontal upper deck (white), the transition being covered by your "trim" piece. It also appears there was a, now non-existant, piece of wood that used to be in the "void" as evidenced by the remnants in the far left of the pictures.


The trim piece is most probably only cosmetic meant to hide or pretty-up that vertical to horizontal transition so IMO not absolutely necessary. The void used to be filled with the now missing/rotted out section of wood and glassed over before the trim was applied at the factory.


Several approaches have been suggested...(Mr. A. Concrete???? I see where you're coming from and your approach does have some merit but NOT in this case IMO) and ALL have been dependent on cleaning out that void as well as possible. Clean, clean, clean. The integrity of the final repair is MOST dependent on eliminating any and all contamination (old caulk, loose wood, loose fiber-glass reinforced plastic (FRP)).


I always try to use the Goldilocks approach on removal of material to gain access to areas to be repaired. Not too much, not too little, just right.


So.....Tool time. What have you got for tools and what is your experience (no time like the present to learn)?


Since it appears to be a smallish area, you might get by with cleaning it out with a Dremel type tool using burrs. Example ONLY!!!


iu


Then again, you might have to beg, borrow or steal heavier duty equipment.


If you haven't got one already, invest in a half decent wet/dry shop vac. You WILL need it for numerous jobs.


Be patient, go slowly, keep the area dry (rain) and don't hesitate to keep asking questions.


Edit: IF you happen to have ANY silicone products aboard. THROW THEM ASHORE NOW!!!
 
Last edited:
Greetings,
Mr. A. I've used "Rapid Set" on quite a few home projects, several of which have involved wood/concrete etc. repairs. As I said above. I know where you're coming from. It's a good product but I really think there are better approaches to Ms. MM's problem.
 
West System has quite a few decent videos.

https://www.youtube.com/playlist?list=PLKrXmm9fNk0b_btfL4THlghAT6ciaY3hB

Decent video that quickly describes thickening. You are looking for a filler, not a bonding blend.


Full disclosure: Im not great at this stuff, but I am not awful. It can be tough to keep the area free of sags and drips. Tape will not keep epoxy from sagging, so make it thick for your vertical surface.

Good luck -

Peter

This is a good way for new boaters to learn about epoxy. I find the west system very convenient with lots of educational videos and a very long shelf life.

Note, epoxy can be difficult to sand. It’s often easier to add more than to remove too much.
 
Greetings,
Mr. t. West System IS a good product BUT it develops that amine? ketone? blush upon curing which inhibits re-coating unless cleaned very well. There are similar less expensive products that work just as well without that extra step. Can't remember which ones but they have been mentioned several times in various TF posts.


As far as bonding vs filling...I think it's both. Perhaps a thickened epoxy with cloth would be in order.
 
Last edited:
Yes, there is an amine blush with West epoxy. Just wash it with freshwater and scrub it with a brush. Rinse it off and let it dry.
 
Im going to offer a different product suggestion for that. If that’s just a trim piece pulling away and there’s no structural damage behind it, you can fill it. If you want to be sure it hardens, you do need a two part product. I like a seam sealer like this:https://www.amazon.com/LORD-Fusor-10-1oz-Sealer-Medium/dp/B00B3HXUAG
Just clean all the old sealant off the surface, do a solvent wipe, and squirt this stuff in. You can smooth the surface, wait a few minutes for it to harden, and paint right over it.
Fusor products are top notch. They require a special gun to dispense it but the small one isn’t too expensive.

We don’t really know what your skill set is, and some epoxy repairs may seem a little daunting. I like to do proper repairs, but I have a wide skill set.
If you just want to stabilize the area and make it look better, the seam sealer will do the trick.
 
OMG! This thread has the more advice that I would call 'wrong' than ANYTHING I have seen on TF!

Trim is 'trim' and it often is only esthetic. But that trim might be protecting places where water could get into the boat - meaning into the 'walls' - where it will cause rot and major failure of the structure.

As in almost all boat repairs the only way to do it right is to take the entire boat apart and rebuild it correctly. On a practical level you just need to keep water from getting into screw holes etc.

Don't freak out about it!

Generally a very good way to clean something for repair is acetone and bronze wool or a green scrubby pad. That will get that awful silicone out. Get heavy dishwashing gloves for when you use the acetone. Then cover up those gaps with Sikaflex 291 or anything that is NOT permanent. Don't use the epoxy until you are doing a permanent repair.

I would say to do the above even if there is evidence that you need a bigger repair (the fiberglass is really easy to push in, it sounds hollow when you knock on it, the deck above is 'bouncy' etc).

Just stop things from getting worse (keep water from getting in) and make it look okay.

Then use and enjoy your boat!

That spot has clearly been a problem for years and it can stay a problem for more years without you doing much (or anything) about it. And if a major repair is needed in that spot then a major repair is probably needed in lots of places. And it has needed those repairs for years and it can keep needing them for years.

Use your boat and enjoy it!!

When you are ready to address those major repairs SELL THE BOAT and buy one that does not need those major repairs.
 
Julie (MisfitManaged) we know that you are a lady, and have a Marine Trader trawler. What is your level of comfort working with power tools, fiberglass and wood work? What year is the boat.

Next I feel that this is a "covering board" for the transition between the flying bridge fiberglass (possible molding but also plywood covered with fiberglass for the side of the flying bridge.) The area below this is the actual roof of the cabin top of the pilot house/salon of the boat.

To remove this is fairly difficult. It is probably screwed in from the outside and just is a cosmetic covering. So you are looking for a semi permeant cosmetic solution. The wood may be teak, which is an oily wood and does not adhere to other materials as well as most other wood. This was caulked at the builders and most likely a number of other times during the boat's life.

As noted by many, you will have to get any trace of previous caulking materials (especially any silicone or silicone complex materials) out of the void before it can be filled semi permanently. I would start with a sharp putty knife and scrape along the top, removing both old paint and old caulking material. Go from each end of the void. I have a number of sharp carving tools, which I used for this type of work--thin knife blades, gouges, small scrapers etc. The average boat owner does own such tools so you may have to fabricate or adapt an old pearing knife which has been sharped to an edge which will get into the grove and pull out material. I also have several Dremel tools, and even larger motors with flexible shafts which take bits to get into tight places. If using a Dremel Tool, I would be using their flexible shaft to get the angle more acute into the slot you are cleaning out. Be cautions, you can removed a lot of material rapidly if you are not careful. Also the oscillating saws which are made by many companies now (Fein tools was one of the first and still is the best). I have several, and they have very fine tooth blades which will work scraping into this void.

I would favor filling with thickened West system epoxy (This is what I have worked with for many years and keep around my shop. There area other epoxy cheaper and just as good.). I use fumed silica, (Cabosil) and West Systems (no relation to West Marine) medium density filler. You can make this with enough cabosil that it will be very thick. The more Cabosil, the more difficult it will be to fair after it has set up.

Avoid "Bondo" or any auto body type of filler. These will fail in the marine environment.

I would also like to see a photo several feet off, looking at the area below this--ie the cabin top. This will either verify or disprove my postulate that this is a covering board over the joint between the flying bridge side and roof of the trawler. Let us know how it is going. There is going to be no "short cut".
 
I agree with Mr. RTFirefly, your problem area appears to be at the joint between the vertical side of the fly bridge and the horizontal surface of an edge of the narrow deck piece. I’m not sure whether the issue extends beyond the photos you submitted, but the area in y9ur photo ought to be dug out with a Dremel type tool, cleaned with acetone and repaired with fiberglass.

It’s difficult to tell whether much cloth is needed, but once you have exposed the damaged area, you can decide how extensive a repair is needed. And yes, in my opinion, I would want to use some form of West systems epoxy. They make small repair kits with cloth, thickener, etc that you can buy.

Let us know how you finally make out. And welcome. Alex
 
Greetings,
I've noticed that Ms. MM has not posted for almost a week. Hopefully we have not alienated her already (usually takes either an anchor or illicit political thread).


Hello Ms. MM....


iu
 
I had the same rotted trim and ripped it all off. It's purely decorative and to hide the joint between the 'house' and the flybridge.
It's maybe not the easiest of jobs, but once off you can hide the joint with a plastic strip, which will be maintenance free.
 
Back
Top Bottom