Need an indicator light

The friendliest place on the web for anyone who enjoys boating.
If you have answers, please help by responding to the unanswered posts.

PMF1984

Guru
Joined
Sep 10, 2016
Messages
639
Location
United States
Vessel Name
Wanderer
Vessel Make
Pilgrim 40
Seems easy, just look on Google. but my eyes are now falling out of my head and my ADHA keeps kicking in after trying to find the "right" thing.

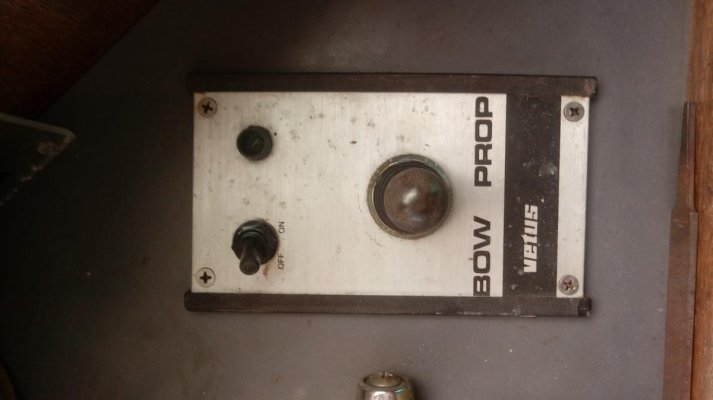
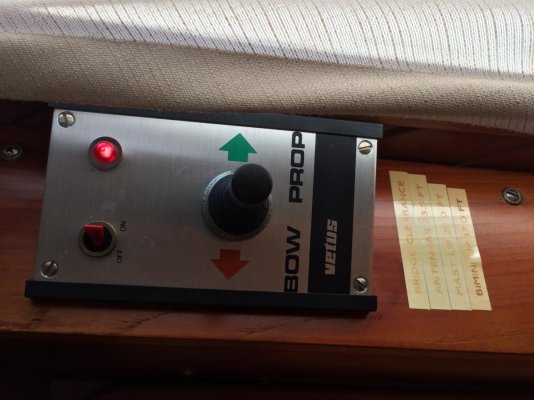
I have an old Vetus Bow thruster control unit with a dead- really broken off raised lens - indicator light.

The original OEM replacement is no longer available.

I have three options.

1. Purchase new controls and and adaptor for the old hole. about 350$US and really it does't solve the hole adaptation issue. So I still have to mess with it somehow to make it all work.

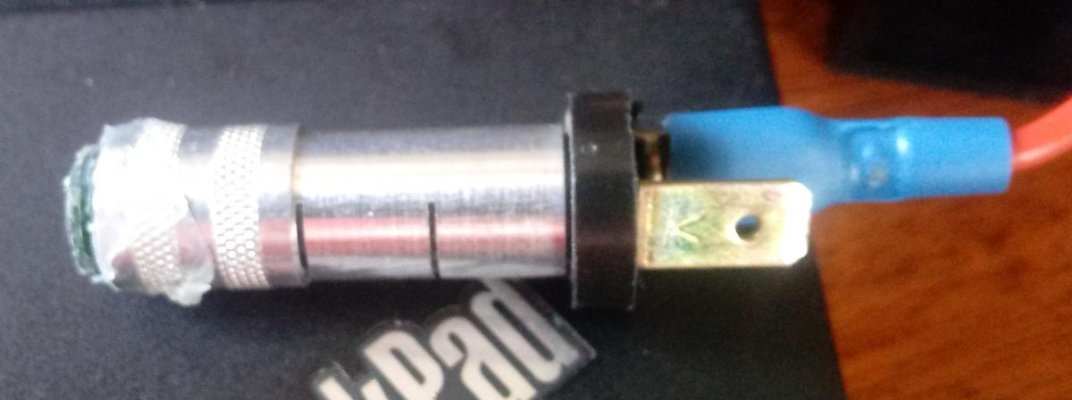
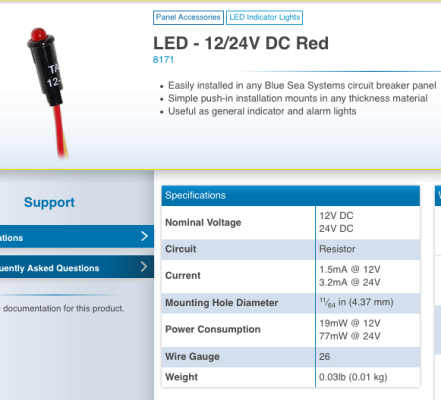
2. Buy a new indicator light. I looked on Google and found several that were almost right but not really. The hole is 9mm. The light is mounted on an AL plate so the black anodized steel and chrome plated brass lights are not the best. Also the blade should match, if I want to be picky.

3. Grind down my green plastic stub and glue on a flat piece of green see tough plastic (which I'm leaning to.)

Thoughts?

John
 

Attachments

  • Controls.jpg
    Controls.jpg
    57.3 KB · Views: 26
  • Vetus_indicator_light.jpg
    Vetus_indicator_light.jpg
    49.5 KB · Views: 27
Thanks guys,

Looking at this more and more, I have enough of a plastic stubb to flatten out the stubb and glue a small 3/8" square piece of plastic over it. I can put an o-ring on the back to waterproof. Just need a scrap of plastic.
 
Allied or Newark electronics or Mouser Electronics. Mine was broke when we bought Irish Lady. Simple replacement. There are hundreds available to choose from for less than $10.
Here is the one I bought:


https://www.alliedelec.com/product/vcc-visual-communications-company-/6091m1-12v/70130293/

I added my own quick connect terminals.

Its a:
"panel mount indicator"
12-14 VDC
LED (I chose red)
0.250" slip on connectors
Can't remember the hole size. Easy to solve with a drill bit. There is nothing critical about the placement
 
Last edited:
Thanks guys,

Looking at this more and more, I have enough of a plastic stubb to flatten out the stubb and glue a small 3/8" square piece of plastic over it. I can put an o-ring on the back to waterproof. Just need a scrap of plastic.
For less than 5 bucks for a well done repair, don't do it cheap, one day it will bite you.

L
 
You likely will spend more time trying to find a piece of green plastic than simply biting the bullet and perusing the Newark or Digikey or Mouser cataloges. Order a spare when you do decide.
Just , as mentioned, measure what you have..
 
Seems easy, just look on Google. but my eyes are now falling out of my head and my ADHA keeps kicking in after trying to find the "right" thing.

Too funny as I could have written the same thing this morning!

Since I think (?) you got an answer, I hope it's okay to add on to your thread (vs. starting a new identical one).

I have a Vitrifrigo refrigerator with a Danfoss/Secop BD35 compressor. There is an option to add an LED light across two of the terminals on the compressor electronic control, and then this light will send flash patterns to indicate an error (and which error it is). These terminals are both on the "12 volt" part of the compressor.

The LED doesn't need to fit any certain hole. I will just put it in the compressor area.

The BD35 manual says it should be a "10mA" LED. No other parameters are mentioned.

I have a few spares of Blue Sea 12v indicator lights (normally on circuit breaker panels), and the spec says "1.5 mA @ 12v." It also says these can be used as indicator lights on the Blue Sea site.

But why the 10mA spec from Danfoss? BTW, one of the terminals you hook said indicator light to is the normal 12v positive terminal on the compressor controller.

I know I could just wing it but like the OP I want to understand it better.

PS: Sorry, I don't see how to change the spacing of my two attachments, and they are running together. The top part with the red box is from the Danfoss manual, and the bottom is from Blue Sea's website.
 

Attachments

  • Danfoss LED.png
    Danfoss LED.png
    29.5 KB · Views: 23
  • Blue Sea LED.png
    Blue Sea LED.png
    76.9 KB · Views: 24
Last edited:
Get one of those little tin hole covers and forget about the light. Unless you have a 200 foot yacht anyone who can not tell from the noise when your bow thruster is engaged is probably deaf.

pete
 
Get one of those little tin hole covers and forget about the light. Unless you have a 200 foot yacht anyone who can not tell from the noise when your bow thruster is engaged is probably deaf.

pete


Pete,
Lol,

This is for the “on” switch that powers the solenoid. Just tells you you are ready to go, so don’t bump the controls.

The top of the green lens is raised above the control panel, so it probably got its top knocked off in the Gulf Stream when the PO went to the Bahamas.

John
 
Last edited:
Photo of control with light from Post#5
 

Attachments

  • IMG_0627.jpg
    IMG_0627.jpg
    114.9 KB · Views: 20
Archie,

That was just mean. My wife said "Why doesn't your look like that?"

My paint, especially the green and red are pretty faded. As I indicated, my indicator light is/was green.

I noticed you have an aftermarket switch. I have a switch with a rubber boot on the FB, at this point both switches have been replaced. The original switch had a 10 amp fuse or circuit breaker built in.

That line protection was too far from the unit to provide real protection, so I put a fuse within a couple of feet of the unit. (Also had trouble finding a replacement toggle thta included the circuit breaker).

The solenoid is still available as is the Elfin contact block that is the basis of the joystick switch.

Nice pic.

John
 
That is the lower station in the cabin. The FB station looked much worse including a broken power switch. I changed the indicators on both.
 
Back
Top Bottom