Bleeding hydraulic steering: add bleed valves?

The friendliest place on the web for anyone who enjoys boating.
If you have answers, please help by responding to the unanswered posts.

socalrider

Guru
Joined
Feb 14, 2020
Messages
1,012
Location
usa
Vessel Name
SEA WOLF
Vessel Make
1979 CHB 41 Trawler
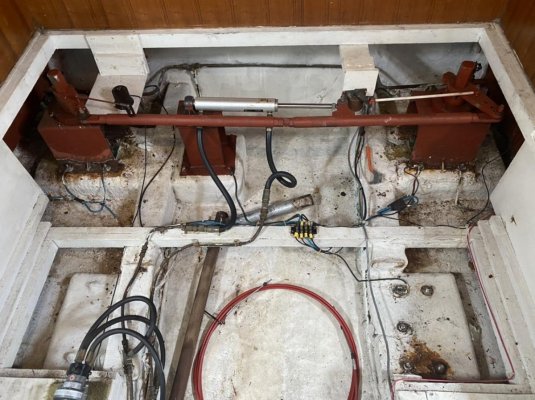
Finally got my new Raymarine autopilot installed and plumbed the pump into my hydraulic system where the old Navico pump used to live. Now I've gotta bleed the system & get it set up.

In preparation for this I learned that my Wagner 700 hydraulic ram does not have any bleed nipples (from my research they're usually opposite the hydraulic fittings). Some boats appear to have these plumbed in via a T-fitting there.

Are they necessary? A couple of people have said that one can bleed the system from the upper helm, burping the air out from the port and starboard side by just alternating lock to lock and applying a bit of extra pressure at the stops.

I've also heard running the autopilot while turning the wheel in the opposite direction works. The steering was fine before so it must be possible to bleed without these fittings!

On the one hand, I'd love to spend fewer hours running around town tracking down fittings. On the other hand, if I've already got the system open this is the time to do it. What's the TF collective wisdom on the utility of bleed fittings?
 

Attachments

  • D9DF0CB8-B785-48F4-A352-B6B4AFA64D59.jpg
    D9DF0CB8-B785-48F4-A352-B6B4AFA64D59.jpg
    166.1 KB · Views: 63
I'd think you could crack the fittings a little bit and accomplish the same thing as a bleed screw.
Somebody just posted a guide to bleed a hydraulic steering system on another post.
 
I'd think you could crack the fittings a little bit and accomplish the same thing as a bleed screw.
Somebody just posted a guide to bleed a hydraulic steering system on another post.

Yeah for sure I could crack the fittings; that's how I always did it for my motorcycle brakes - the bleed valve is just there to reduce the mess.

I'm curious about the possibility of doing it without cracking fittings or using a bleed valve though - it's a different design than motorcycle brakes, and it seems possible to purge the air just by working the helm to its stops as described above. But I don't quite understand the helm valving well enough to know for sure. Would be really nice to be able do this with just one person if it's really that easy.

I also found a kink in the copper tubing, so going to replace that section too... probably just go with slightly longer 1/4"NPT hydraulic hoses all the way to the autopilot T fittings. There have to be twenty couplings from the ram to those T's right now!
 
It's doubtful you would ever get the air to purge by working the helm back and forth. The length of the lines from the helm to the cylinder would probably have more capacity than the stroke of the cylinder so the air would always stay. Like mentioned above, just crack the lines one at a time until the air is gone. You'll definitely want to find a friend to help with this project... it's damn near impossible do to it by yourself!
 
Bleeding procedures vary with the manufacturer and model of the ram, helm unit(s) and electric pump. Best to get the installer's manual for your system and follow the instructions. Some systems can be bled after filling by turning the helm full left / right repeatedly. I know this to be true from experience with older Wagner, Capilano and Hynautic systems. Some have bleed ports, some do not. Some require bleeding of the lines and manual helms before the electric pump. Some can use the electric pump to bleed the entire system.
 
THe oil lines enter the cylinder from below meaning, to me, you will have a VERY TOUGH time purging the actual cylinder of all air. Yes, you will get a bunch but At some point there will be a bubble that will not come out.

Dismount the cylinder and turn it upside down so the oil lines enter from the top. To get a constant rise drop the cylinder in the bilge to get the rise.

THen start the purging of the system.

My cylinder was mounted like yours and it had to be flipped to purge the cylinder and the lines and ensure they stayed purged.

Bleed fittings would help the process as the air would not have to go all the way back to the pump.
Another point I see is the one line is a curleque. Curleques will trap air making a purge difficult. Get rid of that curleque. The bleed fitting may be made to help there. Use some hydraulic fittings , tees, elbows and re aim the hose so the curl is gone. Or get/make a shorter hose.
 
Last edited:
THe oil lines enter the cylinder from below meaning, to me, you will have a VERY TOUGH time purging the actual cylinder of all air. Yes, you will get a bunch but At some point there will be a bubble that will not come out.

Dismount the cylinder and turn it upside down so the oil lines enter from the top. To get a constant rise drop the cylinder in the bilge to get the rise.

THen start the purging of the system.

My cylinder was mounted like yours and it had to be flipped to purge the cylinder and the lines and ensure they stayed purged.

Bleed fittings would help the process as the air would not have to go all the way back to the pump.
Another point I see is the one line is a curleque. Curleques will trap air making a purge difficult. Get rid of that curleque. The bleed fitting may be made to help there. Use some hydraulic fittings , tees, elbows and re aim the hose so the curl is gone. Or get/make a shorter hose.

Thanks a ton for this.

My cylinder rotares around the shaft - is there any reason to dismount rather than just spin it?

Got it plumbed up this afternoon with some new longer hydraulic lines replacing the old kinked copper section. There are no SeaStar bleed fittings in town, so u made do with a 1/4 NPT brass T Mounted to the top of the ram, with an NPT plug and the hydraulic line. I’ll bleed It tomorrow through the plug unless I can find a better bleed fitting.
 
It looks like the cylinder is higher than the supply line that run across the bilge cross braces. The cylinder needs to be below those lines. Spinning so the hoses are at the top will help but there will still be air that will be tough to get to move out.

I still suggest dropping the cylinder in the bilge.

Ideally you want a constant rise from the cylinder to the air evacuation point.

At some point once the bulk of the purging is done you will need to take the boat out for a run and crank the wheel side to side while checking fluid level. THe boat pitching and rolling will aid hugely in getting the last of the air out.
 
The helm pumps are easy to bleed, but you need to get any air out of the lines and cylinder. Air has to compress before it moves the oil along the lines. The rudder will feel loose and you won't get full rudder. Air also will defeat the autopilot.
You have to add tees so you can have a bleed valve or by the parts from Wagner. The easy way is to bleed the helm pump per the instructions. Then use a vacuum pump to bleed the lines/cylinder one line at a time. You can do it by yourself. I use a power vacuum pump, but a hand pump made for brake bleeding works well. Bleed until no air bubble come out. Keep oil in the upper helm pump, don't draw in air. The hand pump is under $25 on eBay.
 

Attachments

  • Vac Brake Bleeder_sm.jpg
    Vac Brake Bleeder_sm.jpg
    67.8 KB · Views: 24
  • wa-brochure-filling-700-series-cylinders.pdf
    295.2 KB · Views: 13
  • N Cylinder Installation Manual.pdf
    353.3 KB · Views: 11
Thanks again guys - I have the Seastar and Wagner manuals and will follow the bleed procedures there & for the autopilot pump.

I managed to find a couple of 1/8" NPT bleed fittings meant for brake calipers that I can plumb into the T fittings, so that should make the process easier. Hope to get it done this evening. Moving the ram lower in the bilge is a non-trivial job so I'll try this first & address later if I have issues.
 
I have the same cylinder as yours and face the same challenge. Mine is for one rudder only but still bleeding it is a dirty job.
My own procedure is the following.
First to bleed the lines I put both end (on the rudder side) in a transparent jug (big one) with some hydraulic oil in it. My wife turn the wheel on the upper station in one direction until I get no more bubble in the jug (of course providing oil from the upper helm). Then same in the other direction. Then with the cylinder fully closed in one direction, after having reconnected the line, I pump oil until it is fully open. Then reconnect the other line and do the same in the opposite direction. When this done I redo the same process but cracking open one fitting so any air can goes out if any, then close it and then the other one.
And of course I use a lot if oil absorbing pads and rags so not to pour oil everywhere.

The day I replace that cylinder I will ensure I have an easy bleeding setup as there is no pleasure doing this!

L
 
At least you have easy access to it. Mine I have to hang down into the lazarette from the aft cabin berth. Last time I almost wasn’t able to slide back up onto the berth...
 
The day I replace that cylinder I will ensure I have an easy bleeding setup as there is no pleasure doing this!

That sounds rotten!

It seems that the new ones are the same as the old ones, just with a T-fitting including bleed valve on the port. You should be able to retrofit - that's what I've done (results TBD).
 
So far so good - I think I have it all buttoned up with no more bubbles. Got the autopilot set up as well and used the pump to help purge. Haven't taken her out yet.

Weird Autopilot thing (standalone Raymarine EV150): during setup it successfully moved the rudder to port and starboard. But for some reason if I change my heading to starboard, it steers the rudder to port. Also goes to port if I change heading to port. Any ideas? Would this still happen if the boat was actually moving?

I had to move on to other stuff, but will get back to it tomorrow.
 
Instead of adding bleed valves, if you were to add something a bypass valve makes more sense. The bypass valve just lets fluid flow past the cylinder so you can use a helm pump to bleed by just turning the wheel in each direction as much as you like. Another added benefit is that it also allows you to move the rudder manually if you needed to do so, if you had an emergency tiller for instance. My Capilano system has the bypass valve built in and is used for both bleeding and emergency tiller operation.
 
Back
Top Bottom