Seacock Model Chapter 2 and 3

The friendliest place on the web for anyone who enjoys boating.
If you have answers, please help by responding to the unanswered posts.

firstbase

Guru
Joined
Nov 6, 2016
Messages
1,644
Location
United States
Vessel Name
Black Eyed Susan
Vessel Make
Grand Banks 42' Classic
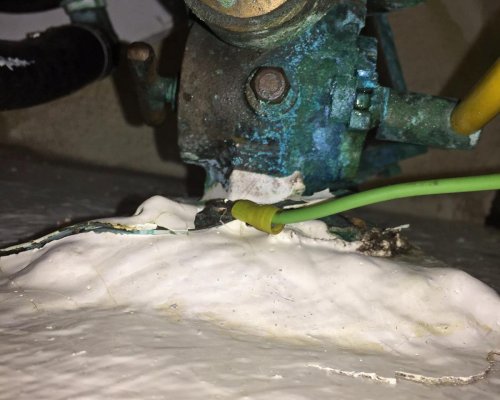
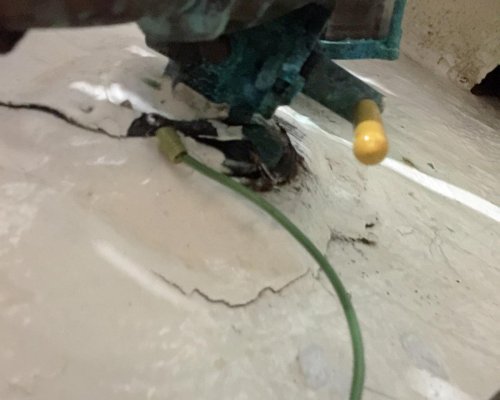
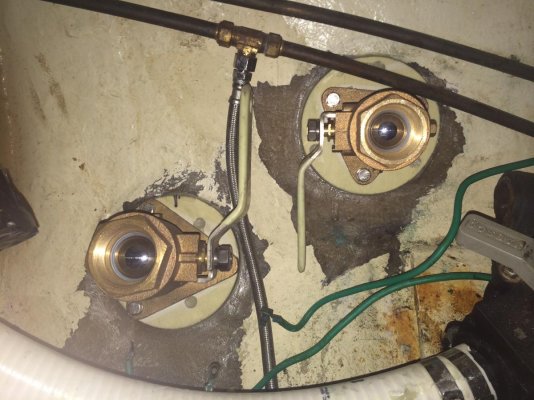
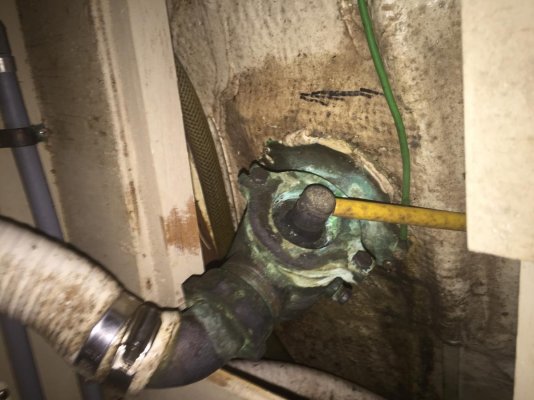
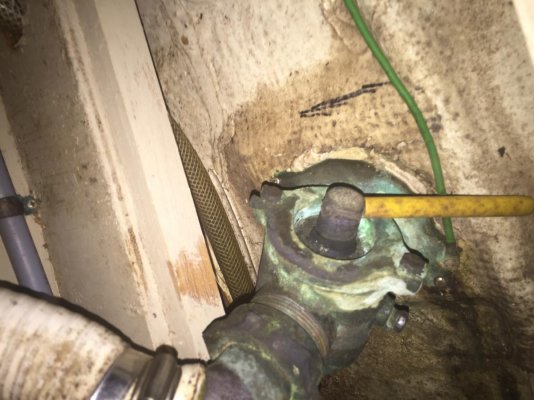
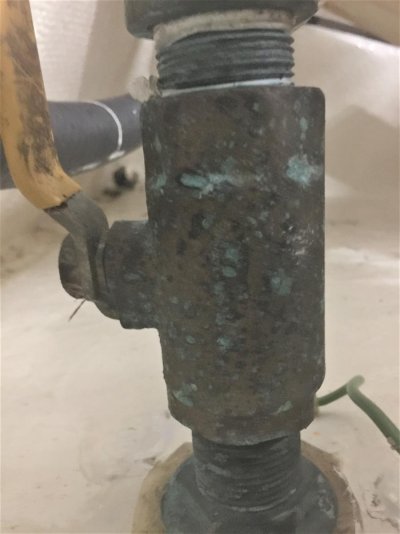
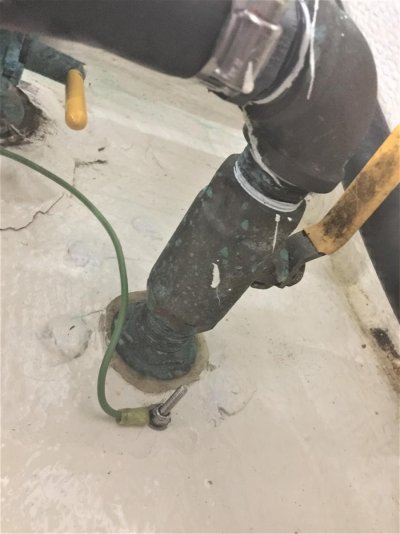
Two more seacocks that I need to identify in order to service. not the greatest pictures but maybe enough for you experts to identify. First two pics are of the seacock in the head. Any idea on model number or what I need to service? Rubber plug or bronze ball? The second two pics, the longer tall one, is leading to the SA1000. Any idea on model number or what I need to service it?

I believe both are 1" and should be circa 1987. Everything else is Groco so imagine these are too?

Appreciate everyone putting up with my newbieness. Thanks!
 

Attachments

  • IMG_2773.jpg
    IMG_2773.jpg
    116.4 KB · Views: 122
  • IMG_2772.jpg
    IMG_2772.jpg
    121.7 KB · Views: 117
  • IMG_2769.jpg
    IMG_2769.jpg
    83.1 KB · Views: 90
  • IMG_2768.jpg
    IMG_2768.jpg
    93.7 KB · Views: 364
Last edited:
The bottom pic is a ball valve on a through hull...not a good scenario.

Suggest replacing it with a real seacock setup ASAP.
 
The bottom pic is a ball valve on a through hull...not a good scenario.

Suggest replacing it with a real seacock setup ASAP.


Thanks for the hint. Bows the time as I am pulling it in 2 weeks and this seacocks is pretty much out in the open and easy to access. The ones in the head not so much. Can you educate me on the why of this? Also, what would you replace with?
 
Plenty of info on thevweb about real seacocks.

A ball valve is usually tapered threads and a through hull straight threads... so it is just barely screwed on.....

Plus as the through hull ages, there is very little metal where the threads are cut. A little bump, it breaks off with no easy to shut down the flow of water without driving something into the broken piece.

A true seacock is robust and attached to the hull for strength and water integrity.
 
I think I understand what you are saying. The current one is simply threaded down on top of a tapered thread through hull. So replace it with something like what is shown in the head which is A more solid one piece construction. Although not actually one piece.
 
Agree with Psneeld, and LarryM posts a great link on thru-hulls. Would also like to point out that in the bottom (last) photo there appears to be quite a bit of lifting/separation of the fiberglass surrounding the other thru-hull in the photo (back left). Check to make sure this is adhered properly.

attachment.php


Todd
 
Yes I noticed that as well. I also have the only GB42’ that I have ever seen that has labels on the hull showing a hoist operator where to put the straps for lifting. I have a theory on what caused the delam by this through hull. But not sure. Having that looked at as well.
 
Picture one & two show an old Groco seacock. It uses a rubber plug that rotates to open or close.

They are no longer available but I would contact Groco to find out if the plugs are still available as a repair part.

They were good seacocks, well built of good materials. Just got superceded with a new design.

The rubber plugs would harden and if not exercised regularily then a bulge would form on the plug which could make it difficult to operate. The bulge could be sanded off but if the plug has hardened too much then it may not work as well as it should.

If plugs are not available then replace them if your plugs are too far gone.
Try cleaning them up before replacing.


Photo three & four show as PSNeeld said, a ball valve attached to a through hull.

Much better is a real seacock.


One more thing I will warn about is the nipple I see between the ball valve and the elbow. It is very hard to find seawater resistant nipple these days. They used to be available. Be vary cautious about them. There is red brass also called 85-15-15-15 brass which is good but other brasses are asking for trouble. Best to avoid nipples entirely unless you can be sure of the content alloy.
 
Last edited:
Thanks for the response. Will just replace as I am out of the water and will be doing other work such as looking into this, pics below.

This is a better pic from lower angle of the SVS750 strainer and seacock, the one that has delamination around it. It was for the freezer which is now removed and the seacock remains closed. Am probably going to put a freezer in (according to my wife I am) at some point so am thinking about keeping it in place. However, you can see what looks like fiberglass/resin build up around it. Very odd. Have no idea what the story is but can't imagine that this is the right way to fix it. I checked tonight and the area around the base is moist. That's not good.
 

Attachments

  • IMG_2782b.jpg
    IMG_2782b.jpg
    114.2 KB · Views: 64
  • IMG_2780b.jpg
    IMG_2780b.jpg
    92.6 KB · Views: 73
The other seacocks all have a nice rectangular/square backing plate that is neatly under the fiberglass. This one has, to me, been added to. Globbed on from what I can see. I think the delamination is from that and not the hull. Still would like to know..why? Is it possible that a strap over the through hull when lifting caused enough pressure to push on this and do harm or am I offbase on that? Just keep seeing those "Lift Here" labels on the hull...
 
Last edited:
I think you should budget for new seacocks. At thirty years old your rubber plugs are at the end of their life expectancy and Groco hasn't made the replacements in about twenty years.

If you can't replace all of your seacocks at once, at least replace those ball valves screwed onto thru-hulls. That's a very weak set up.

You can probably re-use the thru-hull fittings, if they are long enough. The Groco imported seacocks, FBV series, are a good value. The Groco BV series American made seacocks are about as good as you can get, but more expensive.

Use of the Groco BB series Backing Block makes an easy and strong installation.

I'd also plan to replace that seacock with what looks like epoxy putty mounded up around it. Don't now what's going on there and if you're going to take it off to see what is going on, you might as well replace it.

Contact Roddy or Victor at my old company for a quote on your new seacocks. I think they've still got really good prices on Groco products.
 
Thanks Parks. I have budgeted for them if need be. There are only 4 and then this rogue ball valve setup so not going to break the bank. Just trying to get a few extra years out of whatever I can. Right now I'm on the mission from good to figure out the mound o' glob. Funny, I have looked at it quite a few times and could see the delamination. Not what I want but wasn't too concerned about it, fix it later. then when I took that low angle picture this weekend it sure opened my eyes. Can't really tell it is that rough from looking down on it.
 
Parks, I assume that the new bolt pattern will not match the old so when I replace the seacocks I should plan on filling/fairing and then drill new holes?

Also, the strainers, any reason not to reuse them? Assume they will fit on new seacocks? Do they screw on or do I have to buy a seacock/strainer combo?
 
Last edited:
The hole pattern for the rubber plug seacocks will not match the new triangular base seacocks. If you use the Groco backing blocks, you won't need to drill holes through your hull. The backing blocks have threads in them that allow you to bolt the seacock to them without going through the hull. Just fill the old bolt holes with epoxy putty (Marine Tex) and bond the backing block over them.

I don't think you'll be able to use the strainers that are directly on top of the seacocks. As I recall those are one piece castings incorporating the seacock and bottom plate of the strainer. The BVS strainer / Seacock is the current replacement for those.
https://www.groco.net/products/raw-water-strainers/basket-strainer/bvs-series-valve-strainer-combo

Another option would be to install regular seacocks and mount strainers (ARG series) on a nearby bulkhead. This might be cheaper than buying the combo units.

Another option is to eliminate internal strainers. Just use external strainers with small holes to prevent grass and plastic from getting into the system.
This is the external strainer to use if you decide to go that way. https://www.groco.net/products/raw-water-strainers/hull-strainer/aphs-series
I had one of these on my engine intake and noticed I didn't have to clean the internal strainer anymore. I hadn't eliminated the internal strainer yet when Irma took the boat.

As long as the rubber plug in your old seacocks is soft enough to seal when you tighten the T-bolt, they will keep working. I don't think they will fail catastrophically, so you don't need to be as concerned about them as you do about those ball valves on top of the thru-hull fittings.
 
Slept on this overnight and woke up with the thought that 30 years is about as long as I can ask ANY part to last so will look at complete replacements of the seacocks and strainers. The timing is right and why lose the chance to upgrade when I have the boat out. You are correct, the strainer/seacocks I have are one piece. No saving the strainer and putting on top of a new seacock. Replacing the ball valve arrangement appears to be a fairly simple task.

Have a question on the Groco BB backing plate. I have glassed in plates already which are in good shape. Not sure about the one with the mound of resin/glass but that is a separate issue. Is it ok to place the Groco plate on top of the good plates that are already there? Assume that I would have to replace the through hulls as they may not be long enough?

Appreciate all of the knowledge sharing. My knowledge of boat plumbing is less than my knowledge of marine diesels which is about 10% of what I need to know.

If the backing plates are wood—especially plywood—I’d replace them. I replaced all 13 under-the-water-line through hulls and Groco rubber plug seacocks on our ‘87 Defever for some of the same reasons you’re dealing with. Most of the original backing plates looked good, but were delaminating beneath the paint/gelcoat. Some were soggy and I could rip them out by hand.

If you want to increase your knowledge, there’s nothing better than Rod’s Compass Marine articles; they were the bible for my refit. I used the Groco composite backing plates (purchased from Parks) because they won’t absorb moisture and, when epoxied in place, make a very strong foundation for the flanged adapters/seacock valves without drilling extra holes in the hull.
 

Attachments

  • 1A3F7E37-D00F-4F8D-BF2C-9679B1DEADAF.jpg
    1A3F7E37-D00F-4F8D-BF2C-9679B1DEADAF.jpg
    158 KB · Views: 66
  • B2D7DC82-4556-4754-90E6-E4ED444E5989.jpg
    B2D7DC82-4556-4754-90E6-E4ED444E5989.jpg
    147.2 KB · Views: 62
As with most projects this keeps growing. Your picture of 12 thru hulls and seacocks is bit intimidating!

Removing the old glassed in backing plate, assuming it is in good shape and not deteriorating to the point it can be ripped off by hand, is simply grinding cutting chiseling until gone?
 
I agree with Angus about the backing plates.
Angus I remember that order. Thanks!

Thirty years ago it was pretty common to use plywood backing blocks. They are probably pretty bad by now. Use a cheap wood chisel to remove most and a disc grinder to get a reasonably flat surface for the Groco backing blocks.

Parks has it right. (My pleasure, Parks.) The thickened epoxy will fill minor voids and irregularities after you remove the old backing plates and makes for a very robust connection for the new backing plates to the hull. I was intimidated by the job at first but after doing one (following Compass Marine’s step-by-step-step) it was pretty easy.
 

Latest posts

Back
Top Bottom