screw mounting in cored deck

The friendliest place on the web for anyone who enjoys boating.
If you have answers, please help by responding to the unanswered posts.
Thanks Mike,

Yeah, I was hoping to get up your way last year but COVID nixed that. So far it doesn’t look good for this year either. I’m taking a couple weeks in August and if we can’t get to BC, I’ll putz around the South Sound again this year.

I keep playing with different ideas based on all the good ideas that folks are giving me. I have plenty of time as the new RIB won’t be available until August (hopefully) so I can experiment in the mean time.
 
I did a couple more tests today. I used the West Systems 404 thickener. I also used some 1/4-20 x 1.75” set screws that I set in the epoxy to cast the threads. This made it easy to use to the mounting bracket to properly get the screws centered and aligned. It worked well other than….

I leveled the surface of the epoxy even with the surface of the wood. However as the epoxy set, it sunk down below the surface by maybe 3/16”.

Any idea how/why the epoxy contracted like that?
 
You probably didn’t get the hole filled completely and the thickened epoxy settled into the hole some. There is a bit of shrinkage with epoxy but nowhere near that much.
 
I did a couple more tests today. I used the West Systems 404 thickener. I also used some 1/4-20 x 1.75” set screws that I set in the epoxy to cast the threads. This made it easy to use to the mounting bracket to properly get the screws centered and aligned. It worked well other than….

I leveled the surface of the epoxy even with the surface of the wood. However as the epoxy set, it sunk down below the surface by maybe 3/16”.

Any idea how/why the epoxy contracted like that?

Did you work any bubbles out? Rod Collins (Mainsail) recommends poking around the fresh epoxy inside the cavity with a piece of weed whacker string to get any trapped air out.
 
You probably didn’t get the hole filled completely and the thickened epoxy settled into the hole some. There is a bit of shrinkage with epoxy but nowhere near that much.


Did you work any bubbles out? Rod Collins (Mainsail) recommends poking around the fresh epoxy inside the cavity with a piece of weed whacker string to get any trapped air out.


Yeah, I did poke, prod, twist and swirl a toothpick around in the cavity before inserting the wetted screw into place. It could be that I wasn’t diligent enough doing that. I bet that both of the above could be the reason. Thanks
 
I did a couple more tests today. I used the West Systems 404 thickener. I also used some 1/4-20 x 1.75” set screws that I set in the epoxy to cast the threads. This made it easy to use to the mounting bracket to properly get the screws centered and aligned. It worked well other than….

I leveled the surface of the epoxy even with the surface of the wood. However as the epoxy set, it sunk down below the surface by maybe 3/16”.

Any idea how/why the epoxy contracted like that?
Could be a void or gap in the core that the epoxy slowly filled while setting. I've had that issue before.
 
Could be a void or gap in the core that the epoxy slowly filled while setting. I've had that issue before.


Yup. However in this case it was just a test in a piece of 2 x 12, so there shouldn’t be voids. My guess is that I need to be more careful about making sure the thickened epoxy fill all the space without bubbles.
 
Probably too late for my two cents, but rather than drill and fill, I simply used 4200 to attach 1" G10 drilled and tapped for mounting bolts. The G10 is only loaded in shear for my application and 4200 is more than strong enough. My cabin roof is balsa cored and I didn't want to put any holes through it.

It's been there for eight years now and appears to be as sturdy as the day I mounted it. Additionally the G10 spreads the load over a little more of the roof so I feel it's a better method (for my application). If I want to remove it, I can saw it off with spectra fishing line and the roof is still intact.
 
Dave,
Do you have pre-fab bunks for the tender or are you going to make them?

You could take a pair of 2x6 boards and wrap them in fiberglass, and then tab them to the deck, with no deck fasteners and no deck intrusions. Just epoxy the encapsulated boards parallel to give you a chock for your tender, and if someone else didn't like them, cut them loose with a grinder.

Your eye bolts could also be screwed to a starboard block with the nut countersunk and then epoxy the block to the deck.

If you choose to use the method of replacing the coring with epoxy, warm the area and that will speed curing of the epoxy and also make the epoxy a little less thick, so it will auto-level, filling the void in coring. You want good adhesion with the coring since that is your water tight barrier. You might squirt in some un-thickened epoxy first, then push the thickened epoxy into the hole, so the thin epoxy would be a gap filler that thickened epoxy won't go in.
 
I leveled the surface of the epoxy even with the surface of the wood. However as the epoxy set, it sunk down below the surface by maybe 3/16”.

Any idea how/why the epoxy contracted like that?

I usually let the thickened epoxy make a small "muffin top." Then even after any settling it's still slightly proud of the surface. When it's in the green stage (hard cheese), I then slice it off perfectly flush with a sharp chisel.

That said, if I understand you correctly you have a screw in the center of the area so maybe you can't chisel flush (?).

A couple of other tips are to not whip a bunch of air into the mix as you are stirring it together, and to, if possible, fill from the bottom of the hole (in your case you probably can't literally do that, but you can put the tip of a syringe or pastry piping bag down at the bottom perhaps when you start out).

Also, and again this may not work for your situation, I will sometimes drill a small relief hole in a blind hole situation. Say if there is a place off to the side or above that will end up being covered up with a backing plate or piece of hardware. Then the air can come out that hole and once epoxy mix follows then the air is out.

Even with all that though, I don't think I'd have consistent luck if trying to fill a hole to "flat" and then not have it change at all in flatness (hence the muffin-top and chisel slice).
 
Dave,
Do you have pre-fab bunks for the tender or are you going to make them?

You could take a pair of 2x6 boards and wrap them in fiberglass, and then tab them to the deck, with no deck fasteners and no deck intrusions. Just epoxy the encapsulated boards parallel to give you a chock for your tender, and if someone else didn't like them, cut them loose with a grinder.

Your eye bolts could also be screwed to a starboard block with the nut countersunk and then epoxy the block to the deck.

If you choose to use the method of replacing the coring with epoxy, warm the area and that will speed curing of the epoxy and also make the epoxy a little less thick, so it will auto-level, filling the void in coring. You want good adhesion with the coring since that is your water tight barrier. You might squirt in some un-thickened epoxy first, then push the thickened epoxy into the hole, so the thin epoxy would be a gap filler that thickened epoxy won't go in.


One of the goals was to be able to have as clear a deck as possible when the dinghy wasn’t being stored up there. I initially was going to go with the removable Weaver chocks. However, the plate that is left on the deck would still be nasty to hit with a bare foot.

I ended up going with Versachocks. I think the rails will work well but I can also create my own supports using the Versachock system. The rails they have are just Starboard that is screwed into place. I like the design of the base as it won’t be like stepping on a Lego with bare feet.
 
Dave, I think you had too much filler in the glue. Everyone has a fixation on over thickening the epoxy. Let me quote from the West people: "While certain fillers will increase the density of epoxy, this does not correlate to higher physical properties or increased adhesion strength. Epoxy is strongest without filler added to it." If the glue is too viscous the epoxy will move marginally into the end grain over a short period of time after you have leveled the surface off; giving the later impression of shrinkage. WEST SYSTEM and other Epoxies have a very low percentage of shrinkage. <.01%. The epoxy glue for casting needs to be quite runny. You don't need to poke, twist and prod for bubbles. As long as you have mixed it carefully, you pour it in and let it set. Look back at the last photo of the sample I did. It is level with the surface. Also note there is about 2-mm of soakage into the timber. Below the surface right down to the bottom of the casting the timber is end-grain and the soak depth is even greater. The amount of penetration depends mostly on how the wood fibers are oriented. Face grain will not absorb nearly as much epoxy as end grain. But since Epoxy has very high strength and excellent adhesion, it strengthens the wood and makes it waterproof. By having the glue reasonably runny that absorption take place quickly and the surface will remain level. (I have later cut down sample castings to check the radiation depth of the absorption. Usually about 1/4" in ply.) Looking at the Versachocks system I believe you could use my 3/4" washer method and the complete casting surface would be covered by the Versachocks bases. I always use the masking tape for the reasons I explained. Furthermore when I trowel off cast glue the thickness of the tape pretty well compensates for that minute shrinkage (0.01%) Regards Ron
 
Definitely go with the filled epoxy. A following recommendation was giving to me by an experienced ship wright.
If your drilling a 1/2 hole, take a nail and bend a 3/8” right angle into the nail. Mount into the chuck of a small drill. Insert this nail with the bend into the hole and essentially route out the underside of the core just below the fiberglass deck so that epoxy just doesn’t fill the hole but also the void underneath the fiberglass deck. This adds significant strength.

I’ve utilized this method a couple of times with excellent results.
 
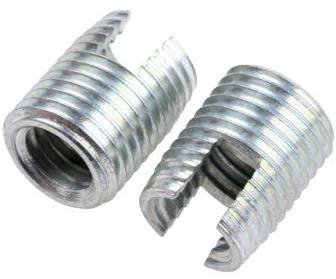
How about this, in SS:

The large diameter of the insert spreads the load. A machine screw allows easy seemly & disassembly without weakening attachment point. You can also use epoxy on the insert for greater strength and better sealing of the wood.
 

Attachments

  • images.jpg
    images.jpg
    12 KB · Views: 80
Last edited:
Seems like a whole bunch of stress to me. Why don’t you just relax and go for a nice cruise in that beautiful boat you have. The way you all were analyzing things you think you were sending a man to Mars
 
Seems like a whole bunch of stress to me. Why don’t you just relax and go for a nice cruise in that beautiful boat you have. The way you all were analyzing things you think you were sending a man to Mars

Why a judgemental tone?

There are lots of different types of people and situations.

--- Maybe he cannot cruise right now for other reasons (recovering from surgery or, taking care of a relative, etc.). So this is a way he can interact with his boat.

--- Maybe he just likes to experiment and learn things? (I know I do.)

--- Or maybe he's doing both concurrently so already is taking out his beautiful boat.
 
Seems like a whole bunch of stress to me. Why don’t you just relax and go for a nice cruise in that beautiful boat you have. The way you all were analyzing things you think you were sending a man to Mars


Several reasons….

1. I’m afraid of my wife. If I screw it up, I will have to deal with the consequences.
2. I’d like to do the best possible job that I can.
3. I like to learn about stuff and TF has a wealth of very smart and experienced folks to learn from.
4. I still work for a living so don’t have the opportunity to get out on the boat.
5. The dinghy won’t be available for at least another month so I have time to figure it out.
 
Seems like a whole bunch of stress to me. Why don’t you just relax and go for a nice cruise in that beautiful boat you have. The way you all were analyzing things you think you were sending a man to Mars

Why? Because over analyzing trivial details is relaxing. It's a boat. Do whatever you want to it. No stress,. No drama. (and I only sent things to the moon. Worked on LEM, Polaris subs and missiles, Shuttle, GPS satellites. Enjoy it just as much now as I did then)
 
Last edited:
Very late follow-up. Life has derailed this project along with most other things boating.

I am finally getting around to doing this. So far it is going ok but I have had a lot of drp in the level of the epoxy in some of the holes. I think there may be some voids in the e plywood.

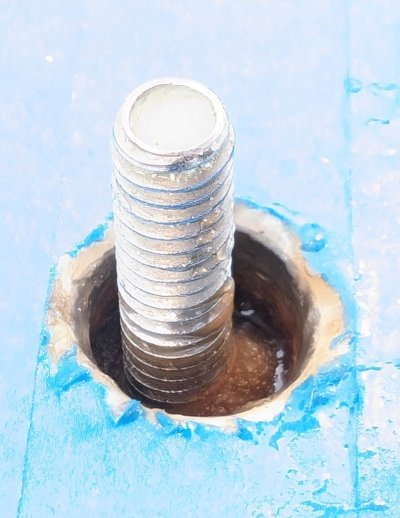
This time I kept filling the hole until it would take anymore then added the bolt and then more epoxy. 30 minutes later it looked like this.

That is a 1/4" sacrificial bolt. I estimate that the epoxy sunk just about a 1/4".

So after it sets completely, should I top off that casting?
 

Attachments

  • PXL_20240503_205046941.jpg
    PXL_20240503_205046941.jpg
    124.9 KB · Views: 13
Before you add more epoxy you should clean the amine blush off the existing epoxy. Take plain water and a small scrub brush and scrub it completely with the water. Then flush with more fresh water. Vacuum out all the water that you can and set a fan blowing into the hole to dry it out completely. Then proceed with filling the hole. The new epoxy won’t stick well to the amine blush if not washed off.
 
Before you add more epoxy you should clean the amine blush off the existing epoxy. Take plain water and a small scrub brush and scrub it completely with the water. Then flush with more fresh water. Vacuum out all the water that you can and set a fan blowing into the hole to dry it out completely. Then proceed with filling the hole. The new epoxy won’t stick well to the amine blush if not washed off.
Thanks Dave, I didn't know that. I will do that.
 
Very timely thread for me as I just mounted dinghy chocks and tie downs on the foredeck of my boat. I was only able to through-bolt the bow tie-down (through the windlass mounting pad). Through bolting was not practical in the other locations.

I used the West System method of bonding hardware with epoxy. I filled the holes with West System Six 10, which comes in a caulking tube and is thickened to the right consistency. It's pricey at about $30/tube but the project required less than one tube.

 
Hi dhays Guru, I am a life-long sailor on the Australian Coast. Along with over 50 years of sailing I have built many vessels. I see you have received numerous good ideas. But the following is by far the best way to fix fittings of any type to a deck. Particularly when the deck is cored. Even with foam coring this works well. I suggest you do a trial run using a bit of scrap timber; pine-board etc. Instructions: This involves casting in female threads for the chosen male screws or bolts. In this case we choose threaded bolts (or machine screws) Firstly chose the appropriate fixing bolts. Lets say 1 inch or 1 1/2 inch X 5/16" threaded bolts (Plus further length for the thickness of the chocks. choose ones with a reasonably course thread) in 316 stainless steel. The length depends on the thickness of available deck. At the same time buy the appropriate stainless washers to suite. But also buy another 316 stainless washer for each bolt. These need to have an OD or 1 inch and an ID of 5/16". Such washers will be available at specialist stainless fitting suppliers. Next center-punch where each bolt is to go. Then take a speed drill bit of 1 inch diameter (you know the flat drill bits) and drill out the holes to a suitable depth for the bolts. 1 inch or 1 1/2 inch deep. Take each of the bolts and grease their threads with any automotive grease or just Vaseline. Don't overfill the threads. You only need a smear on them - so wipe away any excess with your finger. Mix some good quality epoxy glue and 3/4 fill each hole with the glue.
Place the 1 inch diameter (1" OD) washers into the hole on top of the glue. Push the greased bolt into the washer making sure to keep the bolt vertical. You can use you fingers or small screw drivers to push the large washer further down into the glue. These washers ensure the bolt is kept center in the hole. Use a chisel or putty knife to neatly fill the hole around the remainder of the threaded bolt, to bring the top of the glue to the level of the deck. You should have sufficient length of bolt protruding from the glue to accommodate the thickness of your RIB chocks. Let the whole lot set for 24 hours. Then the bolts will unscrew quite easily. Later bolt down the RIB chocks with the bolts. Place the small stainless washers under the head of the bolts. These bolts will never come free. The surface tension between the epoxy glue plug and the deck material is enormous. For instance with the 1 1/2 inch depth of glue the surface area is about 5 1/2 square inches of surface tension. I have done this hundreds of time always with success. The threads in the glue are enormously strong.
Any questions just ask. Regards RonT
Can you do as you outlined but before pouring in the epoxy install the bolt head first then the washer. Fill with the thickened epoxy. This will now act like a stud. The washer will act as an anchor to keep the bolt centered in the hole and add resistance to keep the bolt from pulling thru the epoxy. You will just need to use a nut.
 
On my mainship 350 I too have a cored deck. I will be mounting the factory optional mooring bit. It has 6 vertical holes (3) per side that bolts thru the anchor locker I will be able to install a full backing plate at this location with 3/8 stainless bolts.
The deck is another story. There is no access to the back side for a backing plate. This location takes 4-7/16 bolts thru the foot of the mooring bit. I will be installing EZ Loc stainless steel external/internal threaded inserts similar to what is pictured in post #75. Mine are 1-1/2 inch long and 5/8 inch external diameter meant to be used with 7/8 inch bolts. I will drill four 1-1/4 inch holes in the deck, hollow out a pocket in the deck coring and fill with epoxy thickened with west systems 404 filler. I will have the threaded inserts bolted in place on the mooring bit using greased bolts. I will then install this as it will be when permantly installed. I will let everything set up several hours then disassemble and fill the holes completely if needed.
 
Guess I'm a bit confused. What is the bolt in there for? Typically, you would seal up the bottom of the hole with duct tape, or some other means and pot the hole up to the top, keep adding as needed until it gels. Then redrill as needed once it's cured. I wouldn't worry too much about amine blush for this sort of thing, it's just potting not a structural feature. If you are concerned about amine blush, switch to MAS epoxies which are amine free, they also have a low viscosity product that will wick well into any core material.
 
A little more on thickened epoxy. Is the premixed Six/10 just as strong as mixing up a batch with 404 thickener?
 
"The Six10 Epoxy formulation is a good balance between the elongation and toughness of G/flex® and the strength and stiffness of our 105 Resin-based epoxies"......From the West Systems website
 
An interesting characteristic of Six 10 is that it becomes thinner in shear as it is worked or dispensed through the mixing tube but begins to thicken as it is no longer worked. So you can tool a fillet smoothly, but it will not sag if applied horizontally.
 
Back
Top Bottom