OP
OP
Waterant
Senior Member
Initial Disassembly, Flywheel and V-Pulley Removal, Mounting on Stand
Disassembly of the engine looks complex but actually was pretty straightforward (except for the damper plate and V-puller removal described below).
You just follow section 10.3 in the service manual.
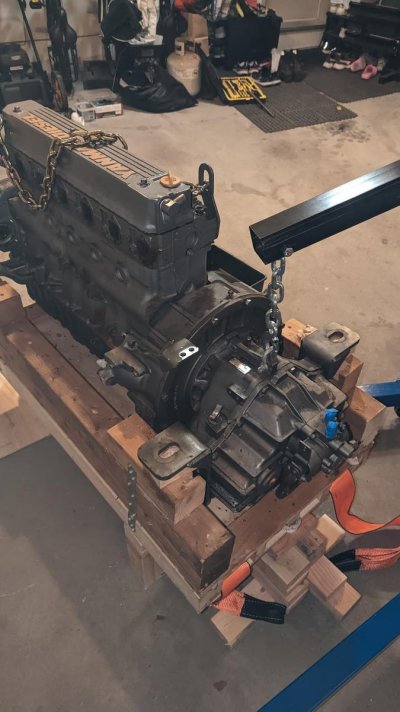
In our boat, before we lifted the engine, I removed everything in advance just because i had time during the summer, and everything will have to be removed anyway. This did reduce the weight you need to handle but does not reduce the dimensions because everything is sitting inside the engine mounts outer width and inside the head cover vertical clearance:

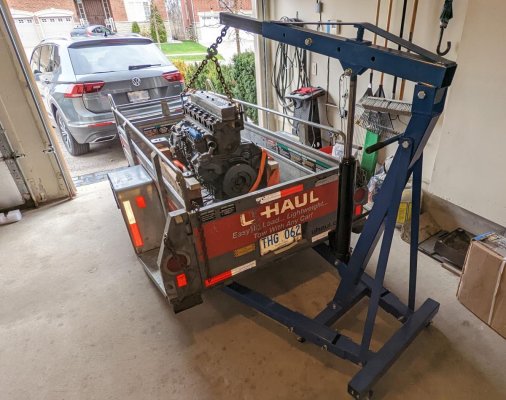
After I got the trailer with the engine into the garage, we used the engine crane to get the engine on its base off the trailer (see photo).
Next was removing the gearbox and the same engine crane was used for that. The gearbox weights around 250LB
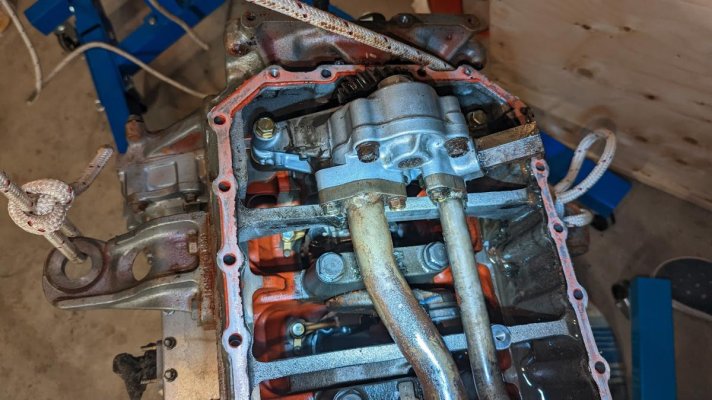
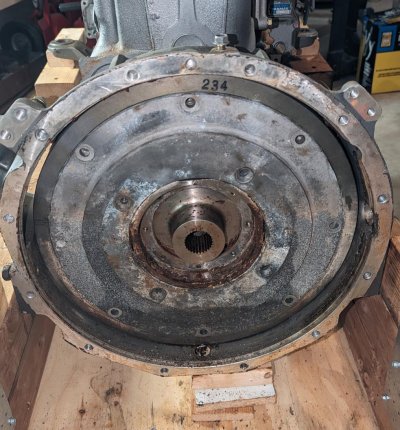
Damper Plate Removal
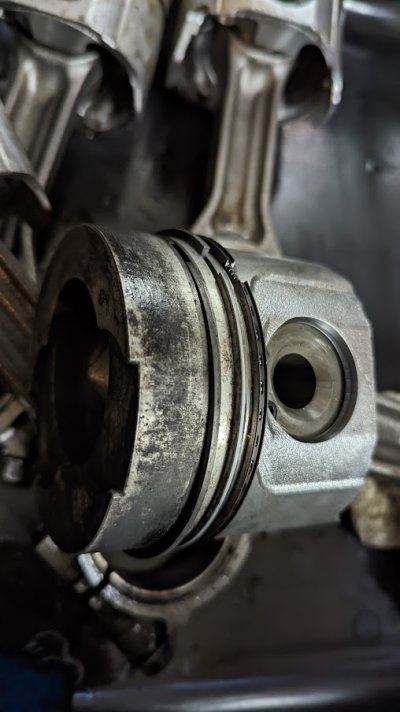
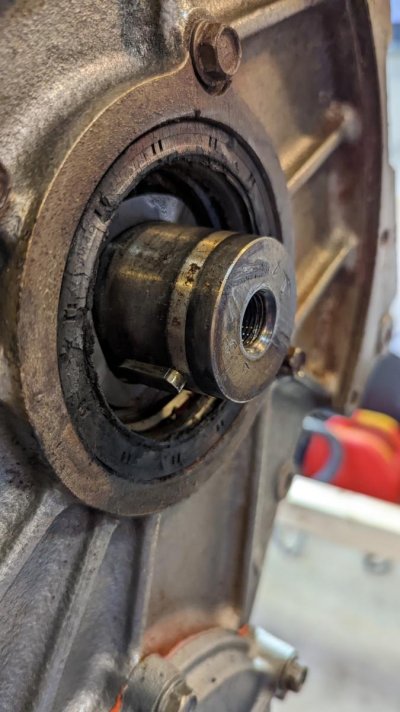
A tricky part was removing the damper plate, which is recessed inside the flywheel (see photo). There is no obvious way to pull it from there because it's not mounted on the surface of the flywheel like on my previous engines but is sitting inside of it.
I removed all the bolts and pushed the smaller coupling (where the gearbox shaft was inserted) inside by half an inch. got a screwdriver into slots between that coupling and the damper plate and was able to pry it out little by little. Do not get too excited because this plate looks aluminum and you need to take care not to damage it.
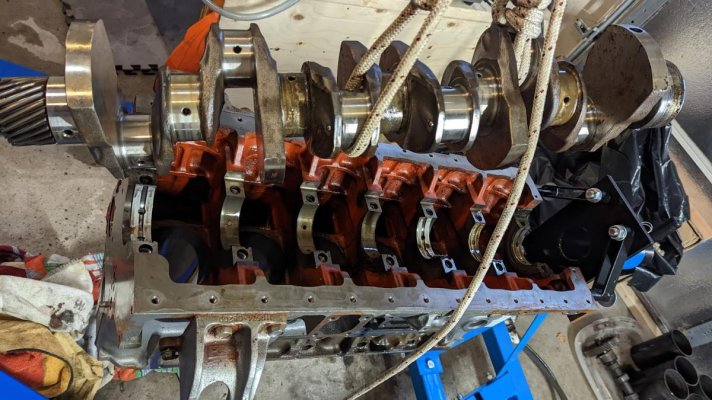
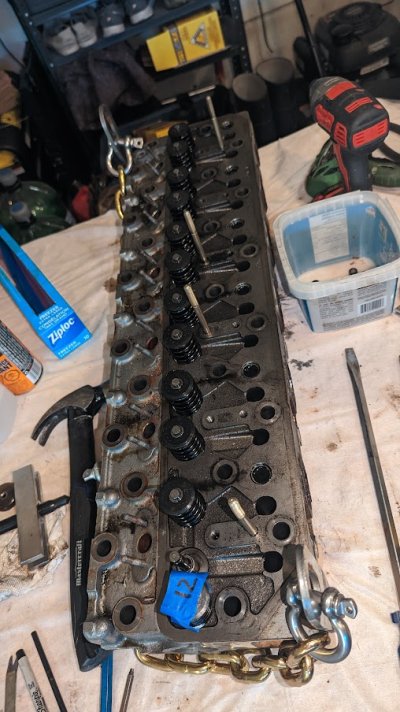
After removing this plate, flywheel and flywheel cover, we mounted the block on the engine stand with 4x M10x100mm bolts which went into the holes used to attach the flywheel cover.
That 1T engine mounts from PrincessAuto (it looks exactly like the one from Harbour Freight) is a bit underbuilt for this engine and you need 2 people to rotate the block even when you have a stripped-down block on it. but it works and is much easier to work on the engine when you can rotate it around from time to time.
The next challenging part of this project was removing the V-pulley from the crankshaft. I have a whole separate thread about it and here is the summary:
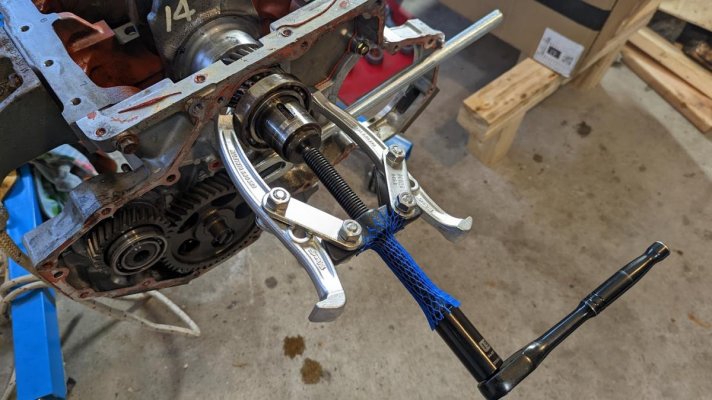
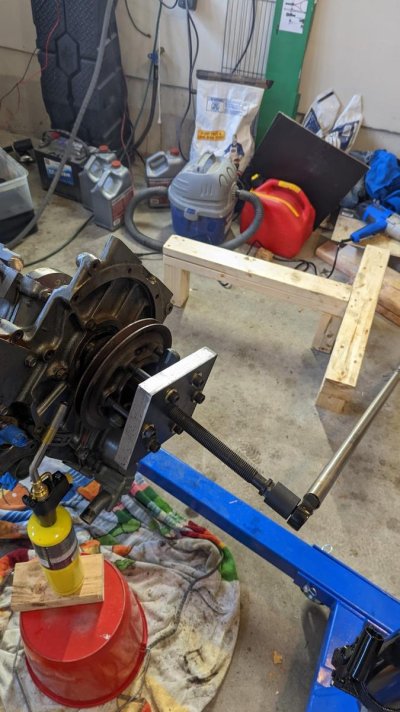
V-Pulley Removal
Took me 3 weeks of heating and pulling with different gadgets including a 10T hydraulic jack to get that v-belt pulley off the shaft. Hopefully, yours will be easier to remove.
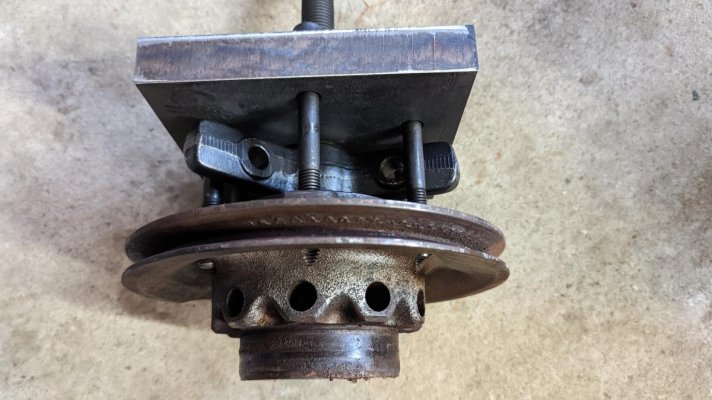
Save $400!- I started with using a large 8" 3-jaw pulley with jaws pulling on the pulley back wall and the middle screw pushing against the bolt screwed into the shaft. That bolt has a small punch in the middle so it looks like this is how it is supposed to be done by design.
That did not work - i broke off the piece from the pulley and f*ed up the bolt's thread (I guess I did not tighten that bolt enough in the shaft thread)
The bolt is cheap but the new pulley is $400 which is a bit disappointing because this damage could be avoided.
This is how we did that:
1) Got the best torch i could find: Bernzomatic TS8000
https://www.amazon.ca/Bernzomatic-TS8000-Intensity-Trigger-Start/dp/B0019CQL60
I can confirm it runs much hotter than a less expensive torch i used before using from the same MAP bottle. Without a large Oxy - Acetylene setup, which i could not find for rent and is expensive for a one-time job, TS8000 is the next best thing.
Do not bother with small Map/Oxy torches with small bottles - i tried it - the flame is very small and does not heat much.
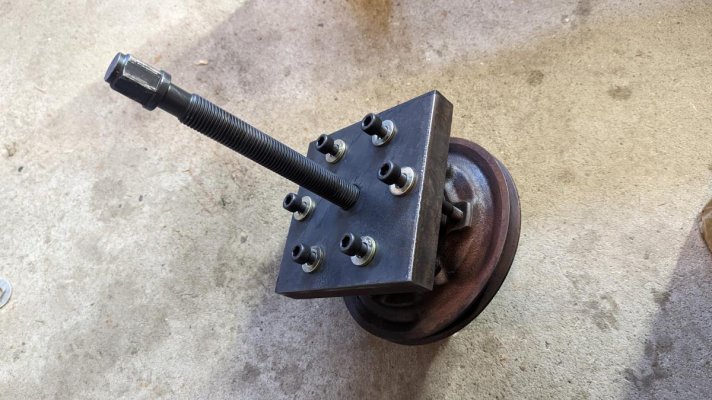
2) I got a custom plate made from 1" thick steel with 6 bolt holes and 1 large middle hole for the central push screw.
3) The plate was screwed to the pulley by 6x M10x100mm bolts class 12. Class 8.8 I tried before just bent. Also, 6 screws vs 2 helped to make more even pull. We tried a smaller plate with only 2 screws and the plate was getting bent.
4) Used the largest pulley remover screw we could find. It's 8", one from Princess Auto.
https://www.princessauto.com/en/8-in-3-jaw-gear-puller/product/PA0008045992
it weighs something like 10LB and is a beast, but it could not do this job on its own without the plate - just broke a piece off the pulley.
6) I put as much tension as we could on the screw and heat the pulley for a few minutes to 150-200C all around
7) Started putting more pressure on the screw with 1/2 wrench and 5' pipe over it while lightly taping with a small hummer around the pulley.
8) A bang and we are off
I think the faster heating and huge force of the 5' pipe did the trick, but you need the hardware to sustain this force, so nothing breaks before the pulley moves.
Disassembly of the engine looks complex but actually was pretty straightforward (except for the damper plate and V-puller removal described below).
You just follow section 10.3 in the service manual.
In our boat, before we lifted the engine, I removed everything in advance just because i had time during the summer, and everything will have to be removed anyway. This did reduce the weight you need to handle but does not reduce the dimensions because everything is sitting inside the engine mounts outer width and inside the head cover vertical clearance:
- Drained oil, coolant, and raw water
- Disconnected the feed and return fuel lines, raw water line, throttle control and external wiring.
- Removed the turbo and mixing elbow
- Removed intercooler
- Removed oil cooler
- Removed fresh water cooler
- Removed gear oil cooler
- Removed alternator
- Removed starter
- Removed all the hoses, tubes, and wiring i could get to.
- Removed the bolts connecting the shaft coupling
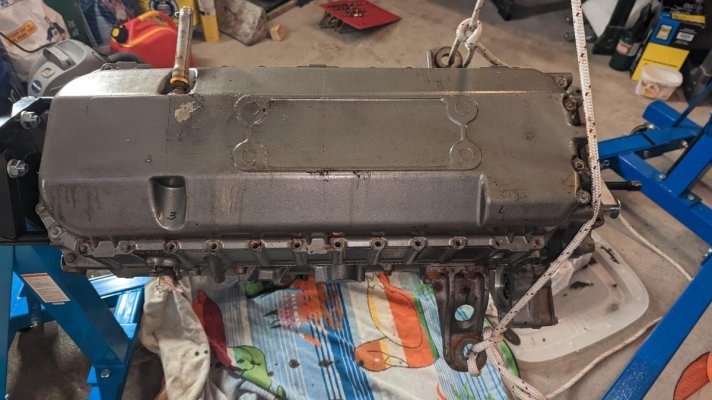
The engine had only gearbox attached, the head, a high-pressure pump, and a front gear assembly with V-Pulley.
After I got the trailer with the engine into the garage, we used the engine crane to get the engine on its base off the trailer (see photo).
Next was removing the gearbox and the same engine crane was used for that. The gearbox weights around 250LB
Damper Plate Removal
A tricky part was removing the damper plate, which is recessed inside the flywheel (see photo). There is no obvious way to pull it from there because it's not mounted on the surface of the flywheel like on my previous engines but is sitting inside of it.
I removed all the bolts and pushed the smaller coupling (where the gearbox shaft was inserted) inside by half an inch. got a screwdriver into slots between that coupling and the damper plate and was able to pry it out little by little. Do not get too excited because this plate looks aluminum and you need to take care not to damage it.
After removing this plate, flywheel and flywheel cover, we mounted the block on the engine stand with 4x M10x100mm bolts which went into the holes used to attach the flywheel cover.
That 1T engine mounts from PrincessAuto (it looks exactly like the one from Harbour Freight) is a bit underbuilt for this engine and you need 2 people to rotate the block even when you have a stripped-down block on it. but it works and is much easier to work on the engine when you can rotate it around from time to time.
The next challenging part of this project was removing the V-pulley from the crankshaft. I have a whole separate thread about it and here is the summary:
V-Pulley Removal
Took me 3 weeks of heating and pulling with different gadgets including a 10T hydraulic jack to get that v-belt pulley off the shaft. Hopefully, yours will be easier to remove.
Save $400!- I started with using a large 8" 3-jaw pulley with jaws pulling on the pulley back wall and the middle screw pushing against the bolt screwed into the shaft. That bolt has a small punch in the middle so it looks like this is how it is supposed to be done by design.
That did not work - i broke off the piece from the pulley and f*ed up the bolt's thread (I guess I did not tighten that bolt enough in the shaft thread)
The bolt is cheap but the new pulley is $400 which is a bit disappointing because this damage could be avoided.
This is how we did that:
1) Got the best torch i could find: Bernzomatic TS8000
https://www.amazon.ca/Bernzomatic-TS8000-Intensity-Trigger-Start/dp/B0019CQL60
I can confirm it runs much hotter than a less expensive torch i used before using from the same MAP bottle. Without a large Oxy - Acetylene setup, which i could not find for rent and is expensive for a one-time job, TS8000 is the next best thing.
Do not bother with small Map/Oxy torches with small bottles - i tried it - the flame is very small and does not heat much.
2) I got a custom plate made from 1" thick steel with 6 bolt holes and 1 large middle hole for the central push screw.
3) The plate was screwed to the pulley by 6x M10x100mm bolts class 12. Class 8.8 I tried before just bent. Also, 6 screws vs 2 helped to make more even pull. We tried a smaller plate with only 2 screws and the plate was getting bent.
4) Used the largest pulley remover screw we could find. It's 8", one from Princess Auto.
https://www.princessauto.com/en/8-in-3-jaw-gear-puller/product/PA0008045992
it weighs something like 10LB and is a beast, but it could not do this job on its own without the plate - just broke a piece off the pulley.
6) I put as much tension as we could on the screw and heat the pulley for a few minutes to 150-200C all around
7) Started putting more pressure on the screw with 1/2 wrench and 5' pipe over it while lightly taping with a small hummer around the pulley.
8) A bang and we are off
I think the faster heating and huge force of the 5' pipe did the trick, but you need the hardware to sustain this force, so nothing breaks before the pulley moves.
Attachments
-
 Engine crane.jpg176.6 KB · Views: 34
 -
 Removing the gearbox.jpg101.4 KB · Views: 34
 -
 Getting to flywheel bolts.jpg202.4 KB · Views: 35
 -
 PXL_20221128_165922774.jpg122.9 KB · Views: 38
 -
 PXL_20221128_172012326.jpg116.3 KB · Views: 34
 -
 PXL_20221128_172026347.jpg146.1 KB · Views: 38
 -
 PXL_20221128_172206048.jpg100.3 KB · Views: 34