 |
|
05-31-2018, 10:40 AM
|
#21
|
Guru
City: Concrete Washington State
Vessel Name: Willy
Vessel Model: Willard Nomad 30'
Join Date: Oct 2007
Posts: 18,655
|
I worked at Uniflite in the 70’s. Worked on the line installing rudder ports, stuffing boxes and engine aluminum beds. Lots of fairly heavy grinding fo fit the engine frame. The itching was awful. Later I worked in engineering.
__________________
Eric
North Western Washington State USA
|
|
|
05-31-2018, 10:47 AM
|
#22
|
Guru
City: Palm Coast, FL
Vessel Name: Coquina
Vessel Model: Lagoon 380
Join Date: Jan 2017
Posts: 2,506
|
Quote:
Originally Posted by Nomad Willy
I worked at Uniflite in the 70’s. Worked on the line installing rudder ports, stuffing boxes and engine aluminum beds. Lots of fairly heavy grinding fo fit the engine frame. The itching was awful. Later I worked in engineering.
|
Was it Uniflite that advertised fire resistant hull layups? Must be special resin.
|
|
|
05-31-2018, 02:03 PM
|
#23
|
Guru
City: Concrete Washington State
Vessel Name: Willy
Vessel Model: Willard Nomad 30'
Join Date: Oct 2007
Posts: 18,655
|
DD,
Yes it was later that they had the blister problem. Never heard the word “blister” during that time. I was working in the printing trade by then down at the so end of Lake Union at Craftsman Press in Seattle. They printed the TVGuide then.
But I never had any reason to know about the retardent resin and had no interest as well. But in the shop I only worked on the 26’ Motor Whaleboat so I suppose it was fire retardent resin.
The Uniflite was a wonderful boat if you didn’t mind buying and burning lots of fuel. Most of the 42 footers had twin 6-71’s.
__________________
Eric
North Western Washington State USA
|
|
|
06-01-2018, 05:49 AM
|
#24
|
Guru
Join Date: Oct 2007
Posts: 22,553
|
"Was it Uniflite that advertised fire resistant hull layups? Must be special resin."
Military boats and charter boats above a 6 pack,( Subchapter T ), are required to use FR (fire retardant) resin,.
The CG requires an inspector on site as samples are pulled , then sends then off to their lab.
The concept is Oak burns at a rate of 100, most polly resin at about 500 , so the requirement is the FR must burn at 100 or less.
The same FR resin is used in factory ducts , where the burn rate is kept down to 15 or 20 with the use of chemicals .
The good news is FR resin is very little extra cost for the hull builder,
the bad news is FR is toxic as it is being burned.
Most FR will only be burned in the presence of a fire source .
After '73 when the first oil shock raised oil prices the materials in all resin became poorer in quality , blisters became common.
Sad that in raising resin prices from 20c a pound to 75c a pound the quality was not maintained.
|
|
|
06-01-2018, 06:57 AM
|
#25
|
Senior Member
City: tallahassee
Vessel Model: 1979 Mainship 34
Join Date: Aug 2016
Posts: 415
|
I like mat with a top layer of cloth so I don't have to do much grinding.
I don't cover myself head to toe. An ice cold shower will remove it from your pores.
I hate resin. No matter how thick the gloves or how careful I am it always ends up on me.
Also I always seem to be working when it's hot and in the sun(too much humidity early).
|
|
|
06-01-2018, 09:01 PM
|
#26
|
Guru
City: San Francisco
Join Date: Apr 2018
Posts: 2,803
|
There are tricks to cut down on the grinding and finishing. Also the mess.
For the grinding, the best professional shops always cover the laminate with peel ply as the last step. This is wet out just like it was the last layer of fiberglass. When all is cured, it peels off the surface by hand. The advantage is since it is very fine grained cloth, it holds all the nubs and fishhooks down, smooths the edges, eliminates many of the fisheyes, etc. Well done, the result needs little or no finishing.
For mess, on small jobs, wet the cloth/mat/stitchply/whatever on a table, then move it to the job. Here's an example of the steps:
1) take a piece of 6 mil clear plastic, tape it over the repair. Use a sharpie to draw the outline of the piece of fiberglass you want, leaving a good border on the plastic.
2) set up a table and lay another 6 mil clear plastic piece on it, bigger than the repair.
3) cut a piece of fiberglass larger than the repair, put it on the plastic, mix some resin, pour it on the glass. Lay the first piece of plastic (with the outline) on top. Squeegee the resin around with a dry squeegee on top of the plastic. So far you haven't touched the resin. You can move resin to dry areas, or squeegee excess off to the side. If you don't have enough, lift the top plastic and pour some more resin on. Because you are rubbing on the plastic, not the glass, it won't tear apart and wrinkle up and get unruly.
4) When you have the glass wet out and squeegeed to a nice resin ratio (the minimum to still have it wet is usually preferred) take some metal scissors (no plastic handles) and cut out the shape you drew, right through both pieces of plastic and the wet glass. This is the first time you will need gloves, and maybe only one. Throw the scissors in the pan of acetone you have ready (no plastic handles....).
5) carry the piece to the repair location, flip it upside down and peel the bottom piece of plastic. Paint a thin coating of neat resin on the repair area, then slap the piece on the repair. Squeegee down if necessary or smooth by hand, then peel the top piece of plastic. If it is dripping with resin, you didn't get it dry enough in step 3-4. Repeat if more layers are necessary.
6) put peel ply over the whole thing and squeegee down, wetting a little more if necessary to get completely wet. Leave a couple of inches of dry peel ply hanging off it every direction.
7) Have a beer and let it go off. Peel the peel ply. Fish your scissors and squeegees out of the pan of acetone.
Many variations of this for various situations, for example you can wet out many layers (I've done 8 - 10 at a time), tapering to the outside, all at once on the first go. Do the first, peel up the top plastic and lay another on, etc.
|
|
|
06-02-2018, 01:09 AM
|
#27
|
Guru
City: Queensland
Vessel Model: Milkraft 60 converted timber prawn trawler
Join Date: Jul 2016
Posts: 5,128
|
Have a roll of stitched 440gsm double bias and 30 litres of epoxy onboard at all times on this and my previous 2 boats.
Stitched double bias is the easiest of glass to use, the 45/45 lay allows it to go around complex shapes and radius with ease.
I always get a thin screed of filler on when the resin has kicked.
Much rather sand filler than grind glass.
|
|
|
06-02-2018, 07:46 AM
|
#28
|
Guru
City: Palm Coast, FL
Vessel Name: Coquina
Vessel Model: Lagoon 380
Join Date: Jan 2017
Posts: 2,506
|
Quote:
Originally Posted by DDW
There are tricks to cut down on the grinding and finishing. Also the mess.
For the grinding, the best professional shops always cover the laminate with peel ply as the last step. This is wet out just like it was the last layer of fiberglass. When all is cured, it peels off the surface by hand. The advantage is since it is very fine grained cloth, it holds all the nubs and fishhooks down, smooths the edges, eliminates many of the fisheyes, etc. Well done, the result needs little or no finishing.
For mess, on small jobs, wet the cloth/mat/stitchply/whatever on a table, then move it to the job. Here's an example of the steps:
1) take a piece of 6 mil clear plastic, tape it over the repair. Use a sharpie to draw the outline of the piece of fiberglass you want, leaving a good border on the plastic.
2) set up a table and lay another 6 mil clear plastic piece on it, bigger than the repair.
3) cut a piece of fiberglass larger than the repair, put it on the plastic, mix some resin, pour it on the glass. Lay the first piece of plastic (with the outline) on top. Squeegee the resin around with a dry squeegee on top of the plastic. So far you haven't touched the resin. You can move resin to dry areas, or squeegee excess off to the side. If you don't have enough, lift the top plastic and pour some more resin on. Because you are rubbing on the plastic, not the glass, it won't tear apart and wrinkle up and get unruly.
4) When you have the glass wet out and squeegeed to a nice resin ratio (the minimum to still have it wet is usually preferred) take some metal scissors (no plastic handles) and cut out the shape you drew, right through both pieces of plastic and the wet glass. This is the first time you will need gloves, and maybe only one. Throw the scissors in the pan of acetone you have ready (no plastic handles....).
5) carry the piece to the repair location, flip it upside down and peel the bottom piece of plastic. Paint a thin coating of neat resin on the repair area, then slap the piece on the repair. Squeegee down if necessary or smooth by hand, then peel the top piece of plastic. If it is dripping with resin, you didn't get it dry enough in step 3-4. Repeat if more layers are necessary.
6) put peel ply over the whole thing and squeegee down, wetting a little more if necessary to get completely wet. Leave a couple of inches of dry peel ply hanging off it every direction.
7) Have a beer and let it go off. Peel the peel ply. Fish your scissors and squeegees out of the pan of acetone.
Many variations of this for various situations, for example you can wet out many layers (I've done 8 - 10 at a time), tapering to the outside, all at once on the first go. Do the first, peel up the top plastic and lay another on, etc.
|
Thats a great piece. Thanks. Especially relevant to using chopped mat, maybe a bit less so when using stitched biax, that tends to stay together better when pushed around.
|
|
|
06-02-2018, 10:22 AM
|
#29
|
Guru
City: San Francisco
Join Date: Apr 2018
Posts: 2,803
|
Stitched 45/45 biax is great stuff for general use. There are versions with a light mat stitched to one side, this is said to improve interlayer bonding, though it also reduces the ability of the Double Bias material to conform to compound curves.
I rarely use mat for anything, mat will get very unruly as the binders in it break down from the wet out. That is also what makes it conform to any shape. The stitched cloths tend to stay together better than the other types, but I still use the 6 mil poly sheet method on smaller pieces. To patch a small hole, a piece about the size of a half dollar works well, and in small sizes like that even DB stitched cloth can come apart or distort enough to be unrecognizable.
|
|
|
06-05-2018, 05:45 AM
|
#30
|
Member
City: Wakefield, RI
Join Date: Apr 2018
Posts: 15
|
Best tip I ever got for cutting any fiberglass matt is a roller cutter! Works like a pizza cutter! Best investment when doing glass work. Can be picked up at any fabric store!! Lay the glass on a piece of scrap plywood and roll.....works great for making those strips for fillets.
|
|
|
06-05-2018, 09:34 AM
|
#31
|
Moderator Emeritus
City: Au Gres, MI
Vessel Name: Black Dog
Vessel Model: Formula 41PC
Join Date: Jul 2015
Posts: 19,122
|
We are in the process of painting our boat now. Have done a lot of fiberglass work. Lots of spyder cracks from PO docking disability. Ground them out and used mat with polyester resin before filling. I use 1708 and epoxy if the repairs are structural. Really have not had a problem with the dust and the grinding, no itching. We are going to spray the hull and sundeck sideboards next week. Then install 10 more new portholes and reinstall the swim platform and a bunch of rails.
|
|
|
06-05-2018, 10:26 AM
|
#32
|
Senior Member
City: Alexander
Join Date: Aug 2017
Posts: 152
|
You haven’t lived till you use a chopper gun.
|
|
|
06-05-2018, 11:17 AM
|
#33
|
Member
City: Smithville
Vessel Name: Fool Moon
Vessel Model: 36 Mainship Nantucket
Join Date: Jan 2017
Posts: 19
|
Quote:
Originally Posted by Sugardog
You haven’t lived till you use a chopper gun.
|
I worked in a ski boat manufacturer for a few years as an Mfg Engineer. I always found an excuse to avoid the lamination shop, never even came near the evil chopper gun!
|
|
|
06-07-2018, 08:47 PM
|
#34
|
Guru
City: Madeira Beach, FL
Vessel Name: Seaweed
Vessel Model: Schucker mini-trawler
Join Date: Oct 2011
Posts: 1,186
|
Okay, here's Algae: I pulled out the various patches such as silicone, LifeCalk, LifeSeal, RTV (hey, if it was an adhesive or had plug potential I added it, especially as the tubes were near the end and in danger of hardening. I'd rather use something than throw it away. There's epoxy (I think) there too on the inside. Goodness knows what all else has been patched on it over the years.
Here she is in her naked scruffiness:
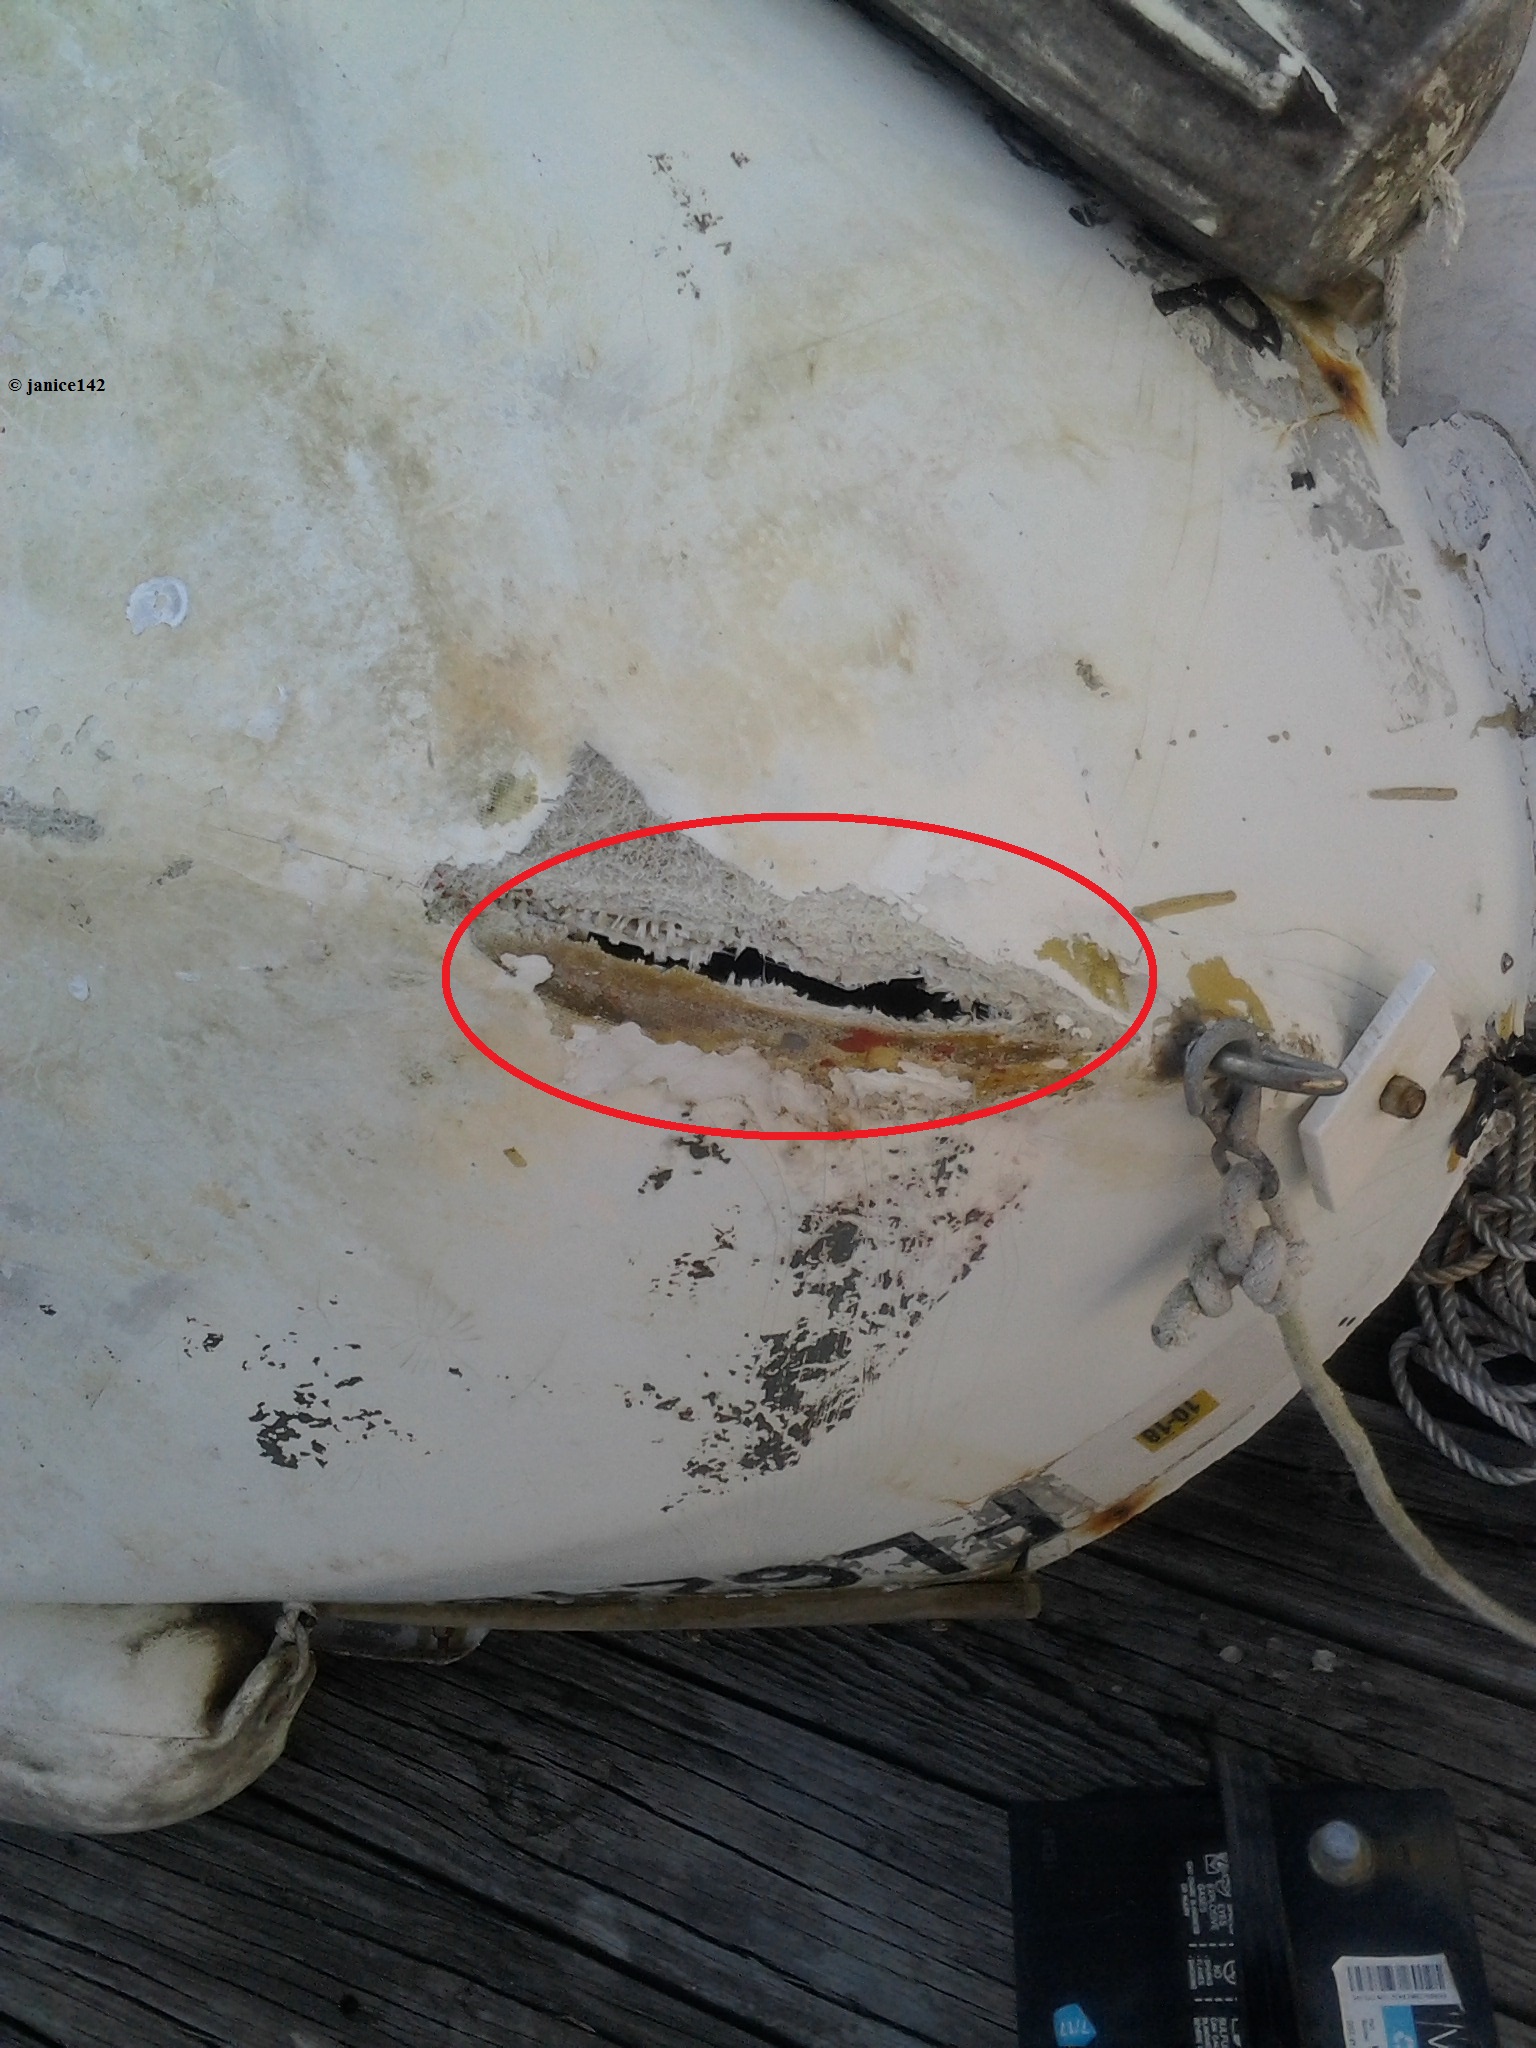
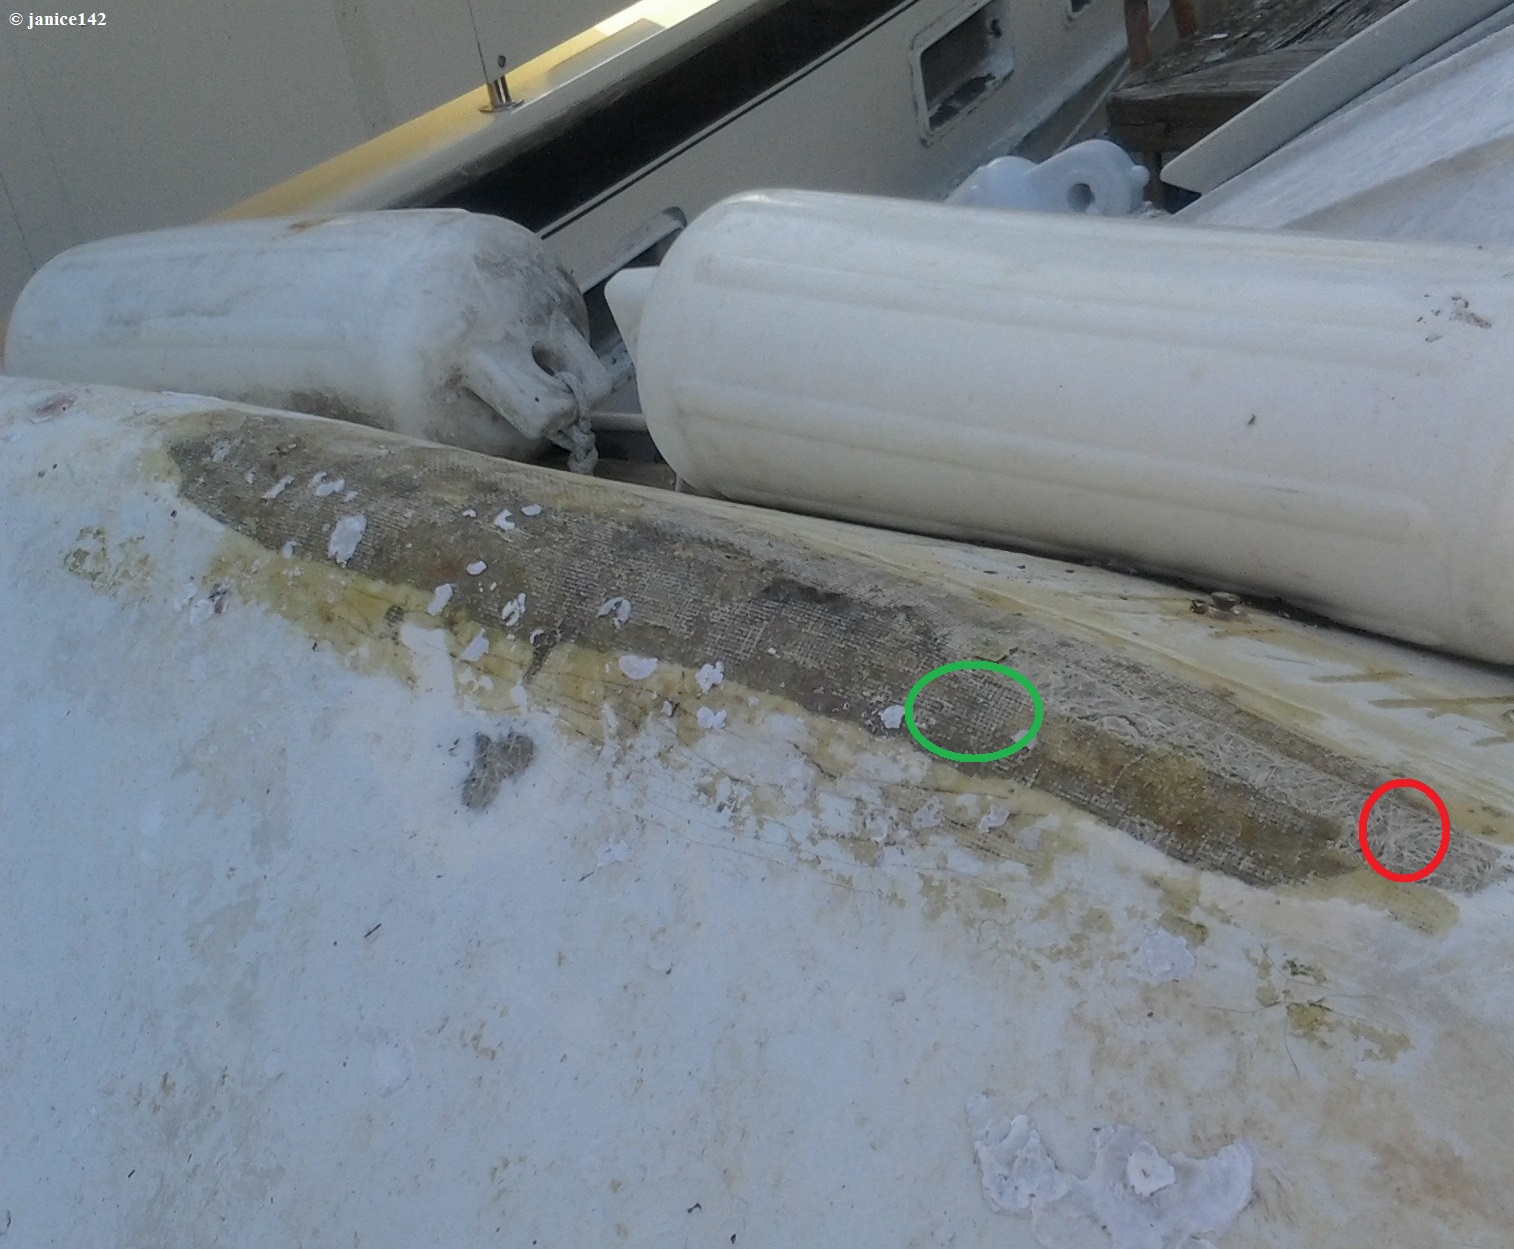
That is the worst. There are other areas of wear:
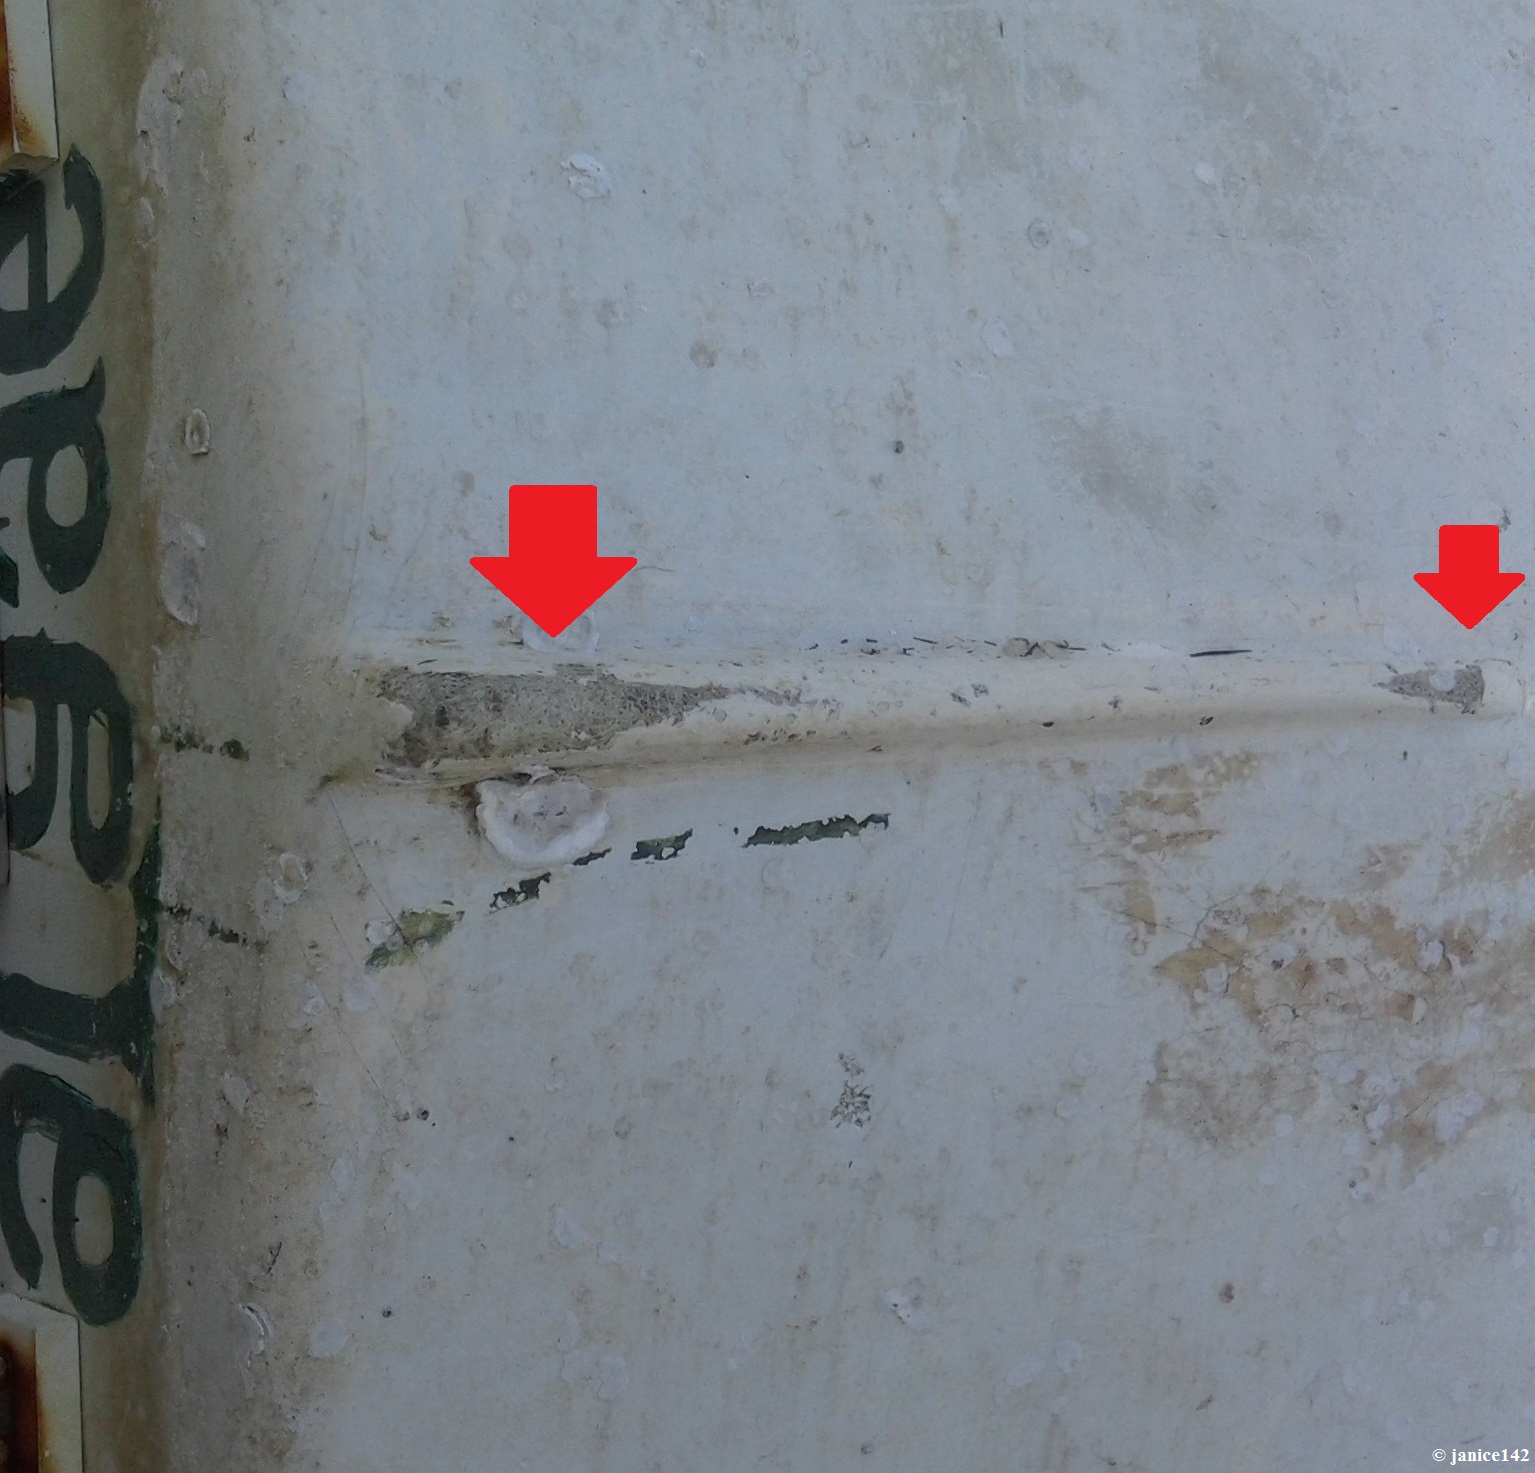
And along the side:
As you can well imagine, this Good Idea (fix the dinghy) has turned into a Project. I've got Flex caulk (apparently it's advertised on TV) and that stuff is looking better and better.
Algae is a 1972 hard dink. She's had a rough life. I love her though frankly there are issues. She's flexing in the middle (seats hold her together and those need to be braced again) ... however I don't want to give up on her.
With the Flex stuff I can make her Good Enough.
That said, there is a fiberglass supply shop here in St. Pete and I've got an offer for a ride to it one day next week.
The Plan, written in beach sand on a rising tide, is to buy some sort of mat and/or roving and epoxy or polyester resin (whichever is least expensive) and patch her. I'm not sanding. I do not sand fiberglass. Ever.
So a smooth as silk finish is unlikely.
And, to complicate further, I have zero bottom paint left. I am planning on having Seaweed's bottom done in a few months so will have paint then for Algae. The diver (former/since replaced with new diver) was supposed to be keeping Algae scraped. You an see oysters that I have to beat off near her keel.
Anyway, that's my problem of the week. Algae.
One more picture of my girl. And really, I'm rather ashamed to admit I let her get this bad. Sigh.
To fix the major split at the bow, use what?
And is it okay to just add epoxy or polyester resin over the areas where the gelcoat has disappeared? Then add plain old paint until I can afford some real bottom paint? I'll have extra when I do Seaweed next so I am trying to hold off on that purchase.
For the record, the bottom paint that was on Algae has worn away over the past half dozen years. She has been dragged up on beaches and rocks lots of times. I've scraped Algae's bottom within a inch of her life numerous times.
And thanks for any insight you can provide.
The multi-step thing show above is for perfection. I don't have the energy for that. I am hoping for Good Enough. What say you?
|
|
|
06-08-2018, 05:24 AM
|
#35
|
Guru
Join Date: Oct 2007
Posts: 22,553
|
"And is it okay to just add epoxy or polyester resin over the areas where the gelcoat has disappeared?"
Polly resin is for creating polly boats.....It is not a glue .
The repairs are done with epoxy . Paint covers the repair .
|
|
|
06-08-2018, 05:46 AM
|
#36
|
Guru
City: Ft Pierce
Vessel Name: Sold
Vessel Model: Was an Albin/PSN 40
Join Date: Oct 2011
Posts: 26,873
|
Janice....I hate sanding and gringing too....but unless you get to good clean fiberglass in the dingy hull....the chances of a patch lasting are pretty low in my exoerience. Sure, good epoxy may hang on for a yearvor two, but it starts perling back where it tried to stick to the dirty glass.
As far as the split in the front, you can use almost anything to build across the gap. Just build it to a reasonabke thickness as long as Algae is a slow speed dingy. A lot of matt isnt compatable fully with epoxy, yes it can be used, but it has binders in it that only disdolve in poly or vinylester resin making it hard to work with epoxy. Almont any cloth would work for this small repair.
Just overlap the layers a couple inches past the damaged part.
|
|
|
06-08-2018, 10:57 PM
|
#37
|
Guru
City: Madeira Beach, FL
Vessel Name: Seaweed
Vessel Model: Schucker mini-trawler
Join Date: Oct 2011
Posts: 1,186
|
Quote:
Originally Posted by psneeld
Janice....I hate sanding and gringing too....but unless you get to good clean fiberglass in the dingy hull....the chances of a patch lasting are pretty low in my exoerience. Sure, good epoxy may hang on for a yearvor two, but it starts perling back where it tried to stick to the dirty glass.
As far as the split in the front, you can use almost anything to build across the gap. Just build it to a reasonabke thickness as long as Algae is a slow speed dingy. A lot of matt isnt compatable fully with epoxy, yes it can be used, but it has binders in it that only disdolve in poly or vinylester resin making it hard to work with epoxy. Almont any cloth would work for this small repair.
Just overlap the layers a couple inches past the damaged part.
|
Thanks. Although I was hoping to avoid sanding (ugh!) if it must be done to get a good adhesion...
And thank you for the advice re mat... You're quite correct that Algae is a slow boat. I have literally been adding goop to that hole in the bow for three or four years. It is getting worse (who'd a thunk that?!?) so it's time to do a more permanent repair.
I remember laying glass when I was very young.
Now there is some sort of roller gizmo however I don't remember that. I thought I used a small jar or perhaps a pipe filled with lead. It was heavy and got out the bubbles. But that's been over fifty years...
I'll do a bit more research but appreciate the shopping list more than you'll know. It shouldn't take much product. And I do like Algae. She's a good dinghy so I want to take better care of her.
She's 46 years old now and it's time to spiffy her up a bit.
Thanks psneeld for the info. I appreciate it.
|
|
|
06-09-2018, 05:08 AM
|
#38
|
Guru
Join Date: Oct 2007
Posts: 22,553
|
Just a tool choice for folks that need to cut a fiberglass item.
A jig saw with an abrasive blade creates the least dust and itch factor.
|
|
|
06-09-2018, 07:41 AM
|
#39
|
Guru
City: Palm Coast, FL
Vessel Name: Coquina
Vessel Model: Lagoon 380
Join Date: Jan 2017
Posts: 2,506
|
a one piece tyvek suit with attached hood and booties. Good dust mask. No itching, but you may overheat in direct sun!
|
|
|
 |
|
Thread Tools |
Search this Thread |
|
|
Display Modes |
Linear Mode
|
Posting Rules
|
You may not post new threads
You may not post replies
You may not post attachments
You may not edit your posts
HTML code is Off
|
|
|
|
» Trawler Discussions |
|
|
|
|
|
|
|
|
|
|
|
|
|
|
|
|
|
|