Water Tanks - Discharge Valve Connection

The friendliest place on the web for anyone who enjoys boating.
If you have answers, please help by responding to the unanswered posts.

Oil Gypsy

Veteran Member
Joined
Sep 25, 2019
Messages
53
Location
Canada
Vessel Name
Dauntless
Vessel Make
Grand Banks 36 Classic #248
Hi,


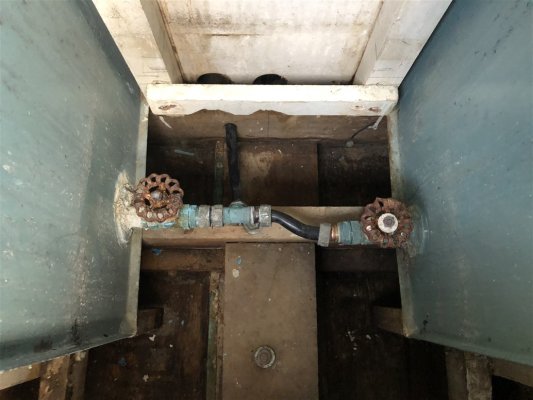
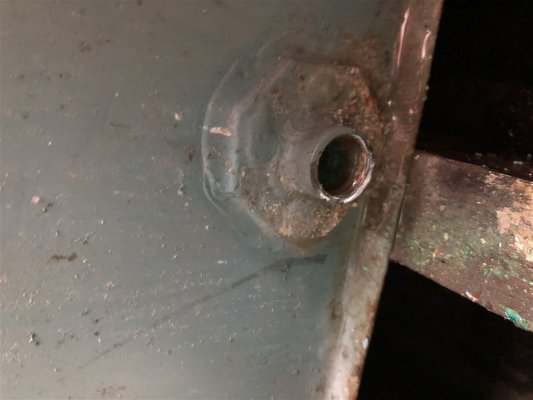
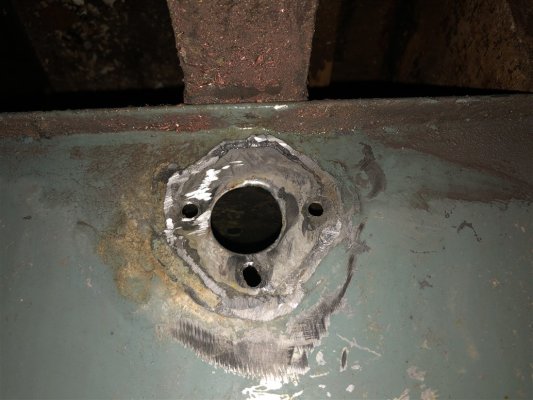
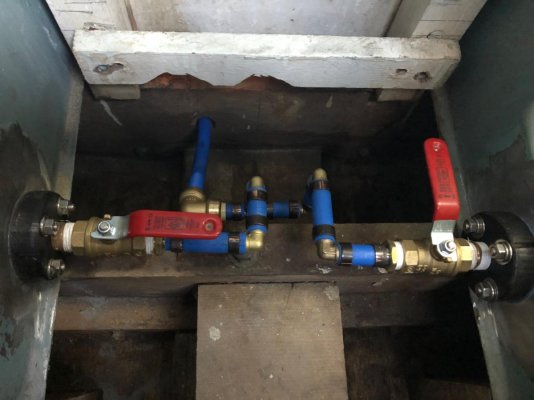
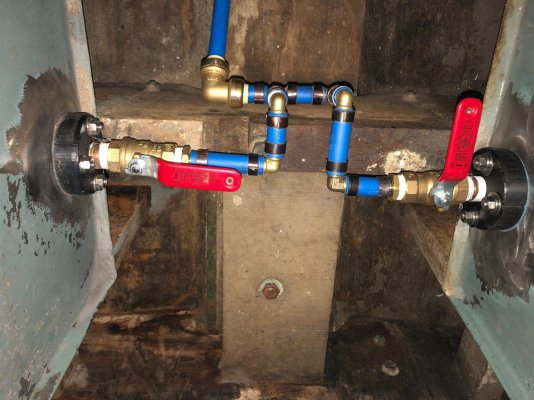
On my 1971 Grand Banks 36 I have been trying to refurbish the domestic water system. While removing the tanks side discharge valves it became apparent that all was not well, the valves could not be closed and the fittings seemed heavily corroded. The boat is equipped with 2 x 85 Gall stainless steel tanks, the discharge fitting seems to consist of an external brass fitting riveted and braised to the side of the tank with threaded female connection to install the valve.


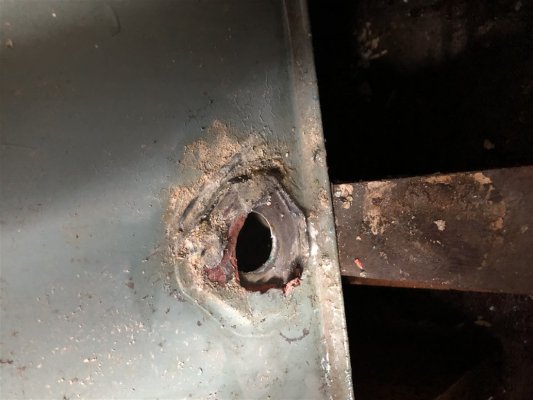
On the port tank the fitting seems to have suffered from some form of electrolysis, while attempting to unscrew the old valve the fitting disintegrated, I'm left with a 1" hole and three smaller holes where the rivets were installed.


Has anyone faced this problem and what fitting have you used to replace the original.


Thanks
 

Attachments

  • Tank Connection.jpg
    Tank Connection.jpg
    153.3 KB · Views: 46
  • Second Tank Fitting.jpg
    Second Tank Fitting.jpg
    133.7 KB · Views: 47
  • Fitting Removed.jpg
    Fitting Removed.jpg
    193.9 KB · Views: 45
  • Damaged Side Connection.jpg
    Damaged Side Connection.jpg
    149.1 KB · Views: 42
try a 1" ss pipe flange it will be about 4" across / rubber gasket/ Mark were the damage is on the flange/ drill extra holes into the flange so you have 6 or more, as equidistant as you can. Drill appropiate size holes for # 14 self tappers. Use a good flexible sealant, once installed bush the flange down to your desired size.
 
Thanks for the post. My 1979 spigot feels and looks little punky. Fix does not sound too bad. I'll probably wait until catastrophic failure before fixing it.
 
Haven't dealt with that problem exactly, but have worked with a similar problem with needing to put an access port into my SS freshwater tank to fish out pieces of a corroded tank sensor a PO had put in the tank, then needing to patch up the hole on the top of the tank where the old sender was. NWD has a very large SS tank that goes nearly across the beam in the lazarrette, and the lazarrette hatch is barely big enough for me to crawl through. Any work done on that tank will be in situ... In our case a PO had used a sensor with a float/arm which ulitimately corroded and dropped into the bottom of the tank, which is about 32 inches tall, and the sensor itself corroded as well - I think it was pot metal or aluminum so over year electrolysis got it. Patching the hole for the sensor was a plate and some of the self tapping screws and a rubber gasket - its the top of the tank and there is little stress/worry for the self tapping screws. But to clean the corroded pieces out of the bottom of the tank, I needed to put an access port in the tank about 1/3 of the way off the bottom....Installing the access port was very doable for me with a pencil, a pattern, drill and a jigsaw. On to your problem:

I'm guessing pulling the tanks and having something welded on might not be possible...they look pretty thin wall in the first place.

In a similar vein to Martin J's SS pipe flange, here is another available product out there...Do you have access ports in the tank nearby that you could use to add these dandies? They are a type of bulkhead fitting - pricey at $120 a piece, but able to be installed in the boat, assuming you have the interior access to get the gasket, inner plate and nuts on.

SS Threaded Pipe Fitting.png

https://www.mcmaster.com/3129N14/

This particular piece has 1/2" FPT ready to go.

You would need the access port to be able install and to tighten the nuts. The EPDM gaskets are made for potable water systems.

You can get 6" SS access ports to install yourself into the tank, assuming you have a place near enough those fittings, again pricey at $200... but if the tanks are in good enough shape everywhere else...

plate6.gif

Seabuilt - Access Plate Systems

There's also the possibility of a bulkhead fitting with a flange large enough to take in all the small holes, but I would think that trying to get the single hole for it just right would be a nightmare. Again though, that type of fitting needs the interior access.

Good luck!
 
Last edited:
The pipe flange idea sounds good. Use plenty of 5200 or RV gasket material on it and it should outlive you.

Some people worry that if their water tank fails the boat will sink. Even if both tanks fail at once you are still safe. Remember that your boat is already carrying the 300 gallons just fine. A total tank failure merely relocates the water within your boat.

pete
 
Hi Oil Gypsy,

Not being intimately familiar with the GB36 water tank installation on your boat, I'm assuming that removing the tanks for repair is a not your first choice. If it is, then reef both tanks out of the boat, and make your repairs on the hard. As this is seldom an easy option with tankage, then you're left with an in-situ repair.

As described by Fractalphreak, Seabuilt (Seabuilt - Access Plate Systems) makes a 6" access plate that allows installation from one side of a tank, after a 4" hole is sawcut through the tank. Given you have a stainless steel tank (exact alloy unknown), I would suggest you select the stainless version of the Seabuilt access plate.

Then, take the cover plate to a machine shop and have them install a 1/2" NPT weld bushing in the cover, as close to the bottom as possible, without compromising the gasket.

Using a holesaw mounted on a right-angle drive adapter, HOPEFULLY you will have enough space between your tanks to drill your 4" through-hole such that it removes your failed existing brazed (bizarre! Ya gotta love the early oriental marine fabrication techniques!) flange fitting.

With the Seabuilt access plate installed from the outside of the tank, you now have a 1/2" NPT fitting into your tank, which you can re-plumb to your water system. And I would consider valves on your water tank(s) as redundant and unnecessary. It's trivial to dump even 170 gal of water into you bilge, should you have to service the tanks in the future.

Finally, I'd recommend doing this fix to both tanks, as if one's gone bad, the other is sure to follow. While it may be possible to butch up a cheaper fix using pipe flanges and lots of 5200, personally, I'd only want to repair these tanks once. To paraphrase the Canadian celebrity Mike Holmes "...Do it once, do it right".

Regards,

Pete
 
Hello everyone and thanks for the reply's and suggestions. I have two 85 gallon tanks and they look original, the problem was initially with only one tank but as soon as I tried to screw in a new valve to the second tank the fitting failed. In the end I made my own flanges from starboard, the external part of the flange was 3" diameter with four holes for bolts and I made an internal flange with 4 bolts countersunk into another 3" diameter piece of starboard, the countersunk bolts were epoxied into the fitting, I used rubberised gasket material on both the internal and external flanges.

I replaced all the pipework to the pump with pex, it was a bit of a nuisance that the two flanges were not in line and installing an elbow didn't solve the problem. Im pleased with the results and have no leaks and it saved me from having to remove the tanks


.
 

Attachments

  • 3BEBC9A8-A38D-4CFD-808A-994A8E5574BF.jpg
    3BEBC9A8-A38D-4CFD-808A-994A8E5574BF.jpg
    96 KB · Views: 22
  • D229EA45-1902-4DA2-9465-6C789774AE46.jpg
    D229EA45-1902-4DA2-9465-6C789774AE46.jpg
    153.7 KB · Views: 28
  • E4598C0A-EAFA-4B90-9C0E-A17B7BB1949C.jpg
    E4598C0A-EAFA-4B90-9C0E-A17B7BB1949C.jpg
    118.2 KB · Views: 25
Hello everyone and thanks for the reply's and suggestions. I have two 85 gallon tanks and they look original, the problem was initially with only one tank but as soon as I tried to screw in a new valve to the second tank the fitting failed. In the end I made my own flanges from starboard, the external part of the flange was 3" diameter with four holes for bolts and I made an internal flange with 4 bolts countersunk into another 3" diameter piece of starboard, the countersunk bolts were epoxied into the fitting, I used rubberised gasket material on both the internal and external flanges.

.

Nicely done! :thumb: You basically made that mcmaster & carr piece out of starboard! I take it you did have access ports then, made it much easier. What's holding the copper pipe into the starboard, did you thread the starboard?

One concern for you to consider for long tern durability - starboard is HDPE, a relatively harder but still kinda soft waxy thermoplastic. You have a pretty decent amount of weight in brass valve and pipe fitting there, and I would watch for stripping threads/cracking of the starboard due to both vibration and differences in expansion due to heating/cooling of the materials. That starboard looks pretty thick so I doubt it would happen fast...but...My past life in manufacturing marine water and holding tanks urges caution mixing metal and plastic for longevity.
 
Back
Top Bottom