Dinghy Chocks install

The friendliest place on the web for anyone who enjoys boating.
If you have answers, please help by responding to the unanswered posts.

firstbase

Guru
Joined
Nov 6, 2016
Messages
1,644
Location
United States
Vessel Name
Black Eyed Susan
Vessel Make
Grand Banks 42' Classic
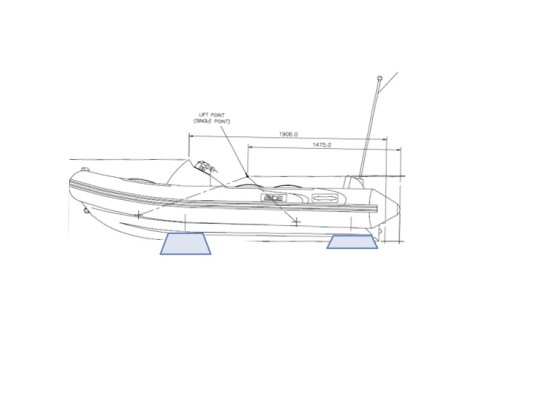
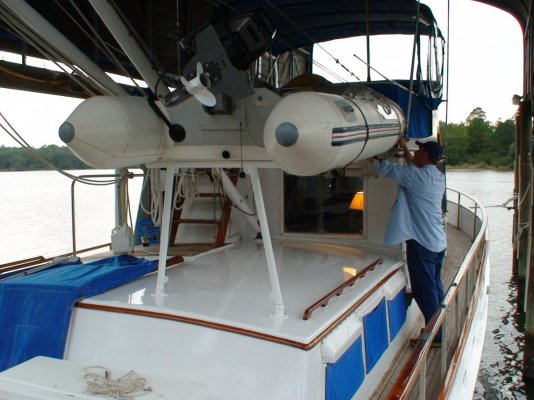
I am reworking my dinghy chocks on the top of the after cabin. Bought a new dinghy and the PO's old setup doesn't work anymore. It's an 8.5' RIB to be stored on deck without the motor.

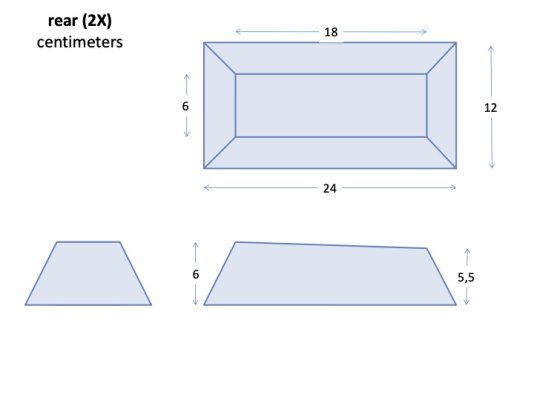
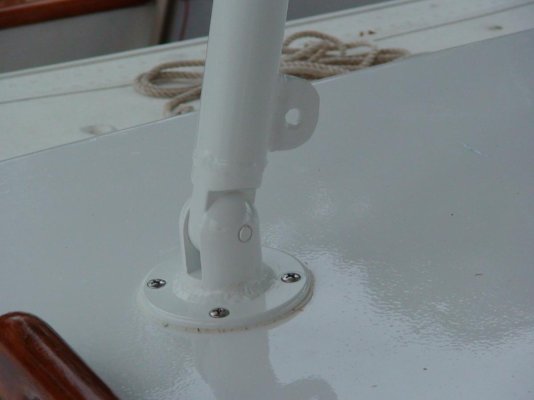
I purchased 4 8" Weaver swivel dinghy chocks. There is a plate to be mounted that allows the actual chock to slide in and out for removal. The plate has 3 holes for screws on each side. My question is what is the best way to mount that flat plate? I have no idea of the thickness of the aft cabin roof (1987 GB 42).

I was thinking about using 3M 5200 under the plate with screws on each side but not sure 1) what length to use without going through the cabin top and 2) what length would be adequate to keep the plate in place.

The other option would be to 5200, or 5200 and screw, in a 2" thick block of wood to the cabin top and attach the plate on top of that block. However, using 5200 and screws would be much the same as just screwing it down w/o the block. The PO's setup uses blocks but they are in the wrong positions. Not sure how they are fastened as he Awlgripped them.

Any suggestions? I'm probably overthinking this!
 
Don’t use 5200, you can damage the boat if you ever have to remove them and there’s no need. Use 4200.
 
Don’t use 5200, you can damage the boat if you ever have to remove them and there’s no need. Use 4200.

Thanks. Any thoughts on the screw length? I have no idea of the thickness of the cabin top and can't find any areas that give me a hint of what it is.
 
I would think that you could use something about 3/4” longer than the chock thickness and not get into trouble. When you drill check out how far the drill bit goes in before it goes through and that will give you an idea how thick the glass is. Assuming that the bottom of the deck isn’t the visible interior cieling. And I would guess in the Classic GB they are not built like that.
 
I am guessing, but I would assume that the deck is 1/8"-1/4" fiberglass over 3/4" marine plywood. I would simply mount the chocks by drilling the screw holes 3/4" deep into the deck, remove them, then drill over sized holes, fill with filled epoxy, re-drill the proper size pilot holes and mount. Use poly sulfide sealant if you feel the need. If you just drill and seal, you will have to re-bed the chocks periodically or risk water penetration and core rot down the road.
 
Hi Firstbase.

No, you certainly are not overthinking this issue. I get weak in the knees anytime I contemplate permanently attaching ANYTHING to the deck of my boat via screws. Deck leaks are insidious and often remain undetected until major damage to the substructure has occurred, or you get rainwater dripping on your pillow at night. @#$%^&.

I mounted four of the removable Weaver dinghy chocks using Weld Mount acrylic adhesive onto the top deck of my Pacific Trawler 40. I used the acrylic adhesive in conjunction with their stud mounts, which obviate drilling into the deck. Obviously waterproof, and given there are six studs per chock, plenty strong when properly bonded to the gel coated fiberglass deck. Rigorous adherence to preparation and application instructions for the adhesive was required, but it was a pretty simple job. No sign whatsoever of the studs breaking free from the deck.

Personally, I would not trust 3M4200 to bond the chock bases to the gelcoat, as it's a caulk, not an adhesive. And while 3M5200 may well work fine even without screws, you would never, ever remove the chock bases in the future without damage to the gelcoat. Nor would I trust 3M5200 to bond just the Weld Mount studs alone, as the shear strength of 5200 is a far cry from acrylic epoxy.

mounts: Weld Mount - Stainless Stud Fasteners
adhesive: Weld Mount - Adhesives

Regards,

Pete
 
Thanks for the comments, much appreciated. Yes, the GB42 aft cabin deck can't be seen from inside the stateroom as it has a headliner. I feel sure it is at least 3/4" plywood w/fiberglass on top. I don't think (hope) it would take anything longer than 3/4" screws to adequately hold the chocks on deck. That's why I mentioned using an adhesive under the chocks. A little more holding ability. Again, I may be overthinking and worrying too much.
 
Hi Firstbase.

No, you certainly are not overthinking this issue. I get weak in the knees anytime I contemplate permanently attaching ANYTHING to the deck of my boat via screws. Deck leaks are insidious and often remain undetected until major damage to the substructure has occurred, or you get rainwater dripping on your pillow at night. @#$%^&.

I mounted four of the removable Weaver dinghy chocks using Weld Mount acrylic adhesive onto the top deck of my Pacific Trawler 40. I used the acrylic adhesive in conjunction with their stud mounts, which obviate drilling into the deck. Obviously waterproof, and given there are six studs per chock, plenty strong when properly bonded to the gel coated fiberglass deck. Rigorous adherence to preparation and application instructions for the adhesive was required, but it was a pretty simple job. No sign whatsoever of the studs breaking free from the deck.

Personally, I would not trust 3M4200 to bond the chock bases to the gelcoat, as it's a caulk, not an adhesive. And while 3M5200 may well work fine even without screws, you would never, ever remove the chock bases in the future without damage to the gelcoat. Nor would I trust 3M5200 to bond just the Weld Mount studs alone, as the shear strength of 5200 is a far cry from acrylic epoxy.

mounts: Weld Mount - Stainless Stud Fasteners
adhesive: Weld Mount - Adhesives

Regards,

Pete

I like that idea. Thanks.

Two issues really. One is the chocks for support. The second is something to tie down the dingy, unless there are rails handy for the task. How strong is this stuff? Sufficiently strong to tie down the dingy to the chocks?
 
Hi Firstbase.

No, you certainly are not overthinking this issue. I get weak in the knees anytime I contemplate permanently attaching ANYTHING to the deck of my boat via screws. Deck leaks are insidious and often remain undetected until major damage to the substructure has occurred, or you get rainwater dripping on your pillow at night. @#$%^&.

I mounted four of the removable Weaver dinghy chocks using Weld Mount acrylic adhesive onto the top deck of my Pacific Trawler 40. I used the acrylic adhesive in conjunction with their stud mounts, which obviate drilling into the deck. Obviously waterproof, and given there are six studs per chock, plenty strong when properly bonded to the gel coated fiberglass deck. Rigorous adherence to preparation and application instructions for the adhesive was required, but it was a pretty simple job. No sign whatsoever of the studs breaking free from the deck.

Personally, I would not trust 3M4200 to bond the chock bases to the gelcoat, as it's a caulk, not an adhesive. And while 3M5200 may well work fine even without screws, you would never, ever remove the chock bases in the future without damage to the gelcoat. Nor would I trust 3M5200 to bond just the Weld Mount studs alone, as the shear strength of 5200 is a far cry from acrylic epoxy.

mounts: Weld Mount - Stainless Stud Fasteners
adhesive: Weld Mount - Adhesives

Regards,

Pete


Ah, another idea I hadn't thought of, or knew about, thanks. If 5200 is hard to remove I imagine that the Weld Mount would really be impossible. I'm not so worried about that although it's a bit rude to future owners who want to change the setup again. No holes in the deck is a very attractive option of course. I assume you cut the mounts down so they aren't proud of the mounting plate, put a cap on them?

On the ties downs, I have some options nearby but I doubt I will escape without having to install several strap loops or pad eyes, probably forward and aft. PO didn't have any.

How old is your 42? Is the location of your mounting issue part of a molded house, or is your boat old enough that it was built of plywood, then covered with a skin of FG? Or maybe yours is before GB changed over from wood construction to FG? Knowing that construction will help in determining the best way to mount, for weight bearing only, or for tie down pads.
Can you pull down the headliner inside? If so, through bolting pad eyes for tie downs, and through bolting for your Weaver Pads, will be superior to gluing.
For the next owner, through bolt holes are easy to repair, maybe easier than removing an epoxy or 5200 type adhesive. All you need is to chamfer the hole edges and fill with thickened resin or epoxy, finishing with a matching gelcoat.
 
Ah, another idea I hadn't thought of, or knew about, thanks. If 5200 is hard to remove I imagine that the Weld Mount would really be impossible. I'm not so worried about that although it's a bit rude to future owners who want to change the setup again. No holes in the deck is a very attractive option of course. I assume you cut the mounts down so they aren't proud of the mounting plate, put a cap on them?

On the ties downs, I have some options nearby but I doubt I will escape without having to install several strap loops or pad eyes, probably forward and aft. PO didn't have any.

Hi firstbase. Removal of the acrylic epoxy-mounted studs is not difficult. Application of heat via a propane torch to the stud, which transmits this heat to the stud base, softens the epoxy enough to remove the stud. And, if sufficient heat is applied, the softened epoxy "puddle" can be judiciously scraped off the gelcoat.

Regarding the stud length, yes, they are trimmed to length prior to attachment, so the mounting plate can be secured with cap screws after the epoxy has cured.

And I had sufficient faith in the strength of this attachment that I used the mounts themselves as tie down locations for my dinghy straps. My dinghy (a 11'AB w/30HP outboard) weighed in at 540 lbs. It went absolutely nowhere, even in severe weather.

Regards,

Pete
 
Can you pull down the headliner inside? If so, through bolting pad eyes for tie downs, and through bolting for your Weaver Pads, will be superior to gluing.
For the next owner, through bolt holes are easy to repair, maybe easier than removing an epoxy or 5200 type adhesive. All you need is to chamfer the hole edges and fill with thickened resin or epoxy, finishing with a matching gelcoat.

Hi Keith. Yes, I agree, IF the headliner can be easily removed and reinstalled. Proper through-bolting is always stronger (but not necessarily superior) than either screws or adhesives. Emphasis on "proper". The hitch in the git-along is (unfortunately, I'm not familiar with firstbase's GB aft-cabin overhead in particular) is multifold. Issues include core material, standoff distance between the headliner and the overhead to accommodate adequate backing, leaking, and dealing with the headliner itself. It isn't straightforward to do a proper installation of deck hardware, particularly in way of the interior of the cabin. There are probably more ways to accomplish this feat than Carter has pills. Nor is it particularly straightforward to remove and repair ANY deck hardware, whether it be through bolted, screwed, or bonded. But I'll surface mount any hardware that is appropriate, long before I'll put holes in my boat.

I HATE a wet pillow!

Regards,

Pete
 
Hi firstbase. Removal of the acrylic epoxy-mounted studs is not difficult. Application of heat via a propane torch to the stud, which transmits this heat to the stud base, softens the epoxy enough to remove the stud. And, if sufficient heat is applied, the softened epoxy "puddle" can be judiciously scraped off the gelcoat.

Regarding the stud length, yes, they are trimmed to length prior to attachment, so the mounting plate can be secured with cap screws after the epoxy has cured.

And I had sufficient faith in the strength of this attachment that I used the mounts themselves as tie down locations for my dinghy straps. My dinghy (a 11'AB w/30HP outboard) weighed in at 540 lbs. It went absolutely nowhere, even in severe weather.

Regards,

Pete

Many thanks. Best solution I've seen.
 
How old is your 42? Is the location of your mounting issue part of a molded house, or is your boat old enough that it was built of plywood, then covered with a skin of FG? Or maybe yours is before GB changed over from wood construction to FG? Knowing that construction will help in determining the best way to mount, for weight bearing only, or for tie down pads.
Can you pull down the headliner inside? If so, through bolting pad eyes for tie downs, and through bolting for your Weaver Pads, will be superior to gluing.
For the next owner, through bolt holes are easy to repair, maybe easier than removing an epoxy or 5200 type adhesive. All you need is to chamfer the hole edges and fill with thickened resin or epoxy, finishing with a matching gelcoat.

It's a 1987 42' Classic. Looks to me like fiberglass over plywood. Really don't want to mess with the headliner unless I absolutely had to for some major reason. This is an 8.5' RIB with no outboard when it is on deck. 150lbs or so. Not much weight to it.
 
My woodie cabin top is 1/2" plywood (maybe less in metric). I had a chimney hole to plug. It does have a skin of glass factory installed. I do not see any reason for 3/4" as was mentioned.

Also, I placed my dingy on the deck to determine what/where to put chocks and it fit so well without, that is how it rides. One pontoon on hand rail, the other loosely on rails of slider hatch so hatch can be opened with dingy on top.

Thanks, Steve. Much different setup on my 42. I need chocks of some sort.
 
On my earlier boat, a 1979 GB Classic, I built chocks out of teak blocks as shown below.

I simply attached the blocks to the cabin top with Sika 291 which is a sealant and light adhesive.

My dinghy was quite heavy so I tied it down with straps to two eye-pads, one in the cabin top and one in the cabin back. The eye pads were attached with fasteners.

For a light dinghy you could avoid the pad-eyes and simply fasten it with straps to the hand-rails.
 

Attachments

  • chocks 1.jpg
    chocks 1.jpg
    26.1 KB · Views: 12
  • chock 3.jpg
    chock 3.jpg
    27.9 KB · Views: 10
It's a 1987 42' Classic. Looks to me like fiberglass over plywood. Really don't want to mess with the headliner unless I absolutely had to for some major reason. This is an 8.5' RIB with no outboard when it is on deck. 150lbs or so. Not much weight to it.

We cruise with a 1975 GB 42 (same construction as yours) and spend a lot of happy hour and meal times out back, so I know that deck won't flex with two adults on it. Your proposed weight will not deflect it a bit. You just need some way to be sure your dinghy pads don't move and the tie downs don't pull up.
For the tie downs, you can screw them into the aft vertical wall below the dinghy, and the fwd ones can go into the back wall of the saloon, below the window, so as to get a 90° pull across the screws instead of a vertical pull on them, and you would avoid having to pull the headliner down.
 
Last edited:
I wonder if a drywall stud finder would be of any use to find the rafters? which are an additional 1-1/2 approx into which to screw a wood screw. Or all the wat through then pushing a bolt from inside to lessen the look inside.
 
Here is what I did on my GB42 to improve the view aft from the pilot bench I had installed at the lower station. The space under the dink turned out to be great for bicycle stowage on top of rubber mats.
 

Attachments

  • CALYPSO Lower Sta helm seat for GB42.jpg
    CALYPSO Lower Sta helm seat for GB42.jpg
    98.9 KB · Views: 15
  • Dinghy rack from stb qtr.jpg
    Dinghy rack from stb qtr.jpg
    126.9 KB · Views: 16
Thanks, Rich. How did you anchor the frame to the cabin top? And, have to ask, how did you get it up there on top?!?! I don't see a davit...???
 
Thanks, Rich. How did you anchor the frame to the cabin top? And, have to ask, how did you get it up there on top?!?! I don't see a davit...???

The forward end was anchored to the flying bridge deck with a huge bolt, and the aft posts were also secured with three through bolts each going through the cabin top and a couple of foot-square chunks of inch-thick red oak. The whole rig was mocked up from PVC pipe and them delivered to the welder to duplicate it out of aluminum.
 
Thanks, Rich. How did you anchor the frame to the cabin top? And, have to ask, how did you get it up there on top?!?! I don't see a davit...???

I failed to fully answer your question. I used the installed mast and boom to hoist the dink up the additional 24 inches to my new rack. I was a bit more hoisting to raise it up that high but an absolute breeze to get it off because I only hoisted it and inch or so to clear the dinghy rack before swinging it to the stbd side and booming down ending with the dink right at the rail ready to lower to the water. I installed multi-sheave blocks on both the topping lift and the lowering tackle to gain a bit more mechanical advantage and added a pair of small sheet winches to the mast and boom to make it even easier.

My brother has just added a "J" davit and electric winch to handle his heavier dinghy up to the cabin top of his GB42. With a bit taller "J" davit the same could have been done to accommodate the raise rack I preferred.
 

Attachments

  • Dinghy rack footer.jpg
    Dinghy rack footer.jpg
    54.3 KB · Views: 8
  • Boom winch.jpg
    Boom winch.jpg
    127.4 KB · Views: 10
Thanks, Rich. A solution that never occurred to me. Would be nice to open up that space underneath the dinghy.
 

Latest posts

Back
Top Bottom