1976 Marine Trader 36 Europa Sedan project boat

The friendliest place on the web for anyone who enjoys boating.
If you have answers, please help by responding to the unanswered posts.
Next I want to talk about the galley.

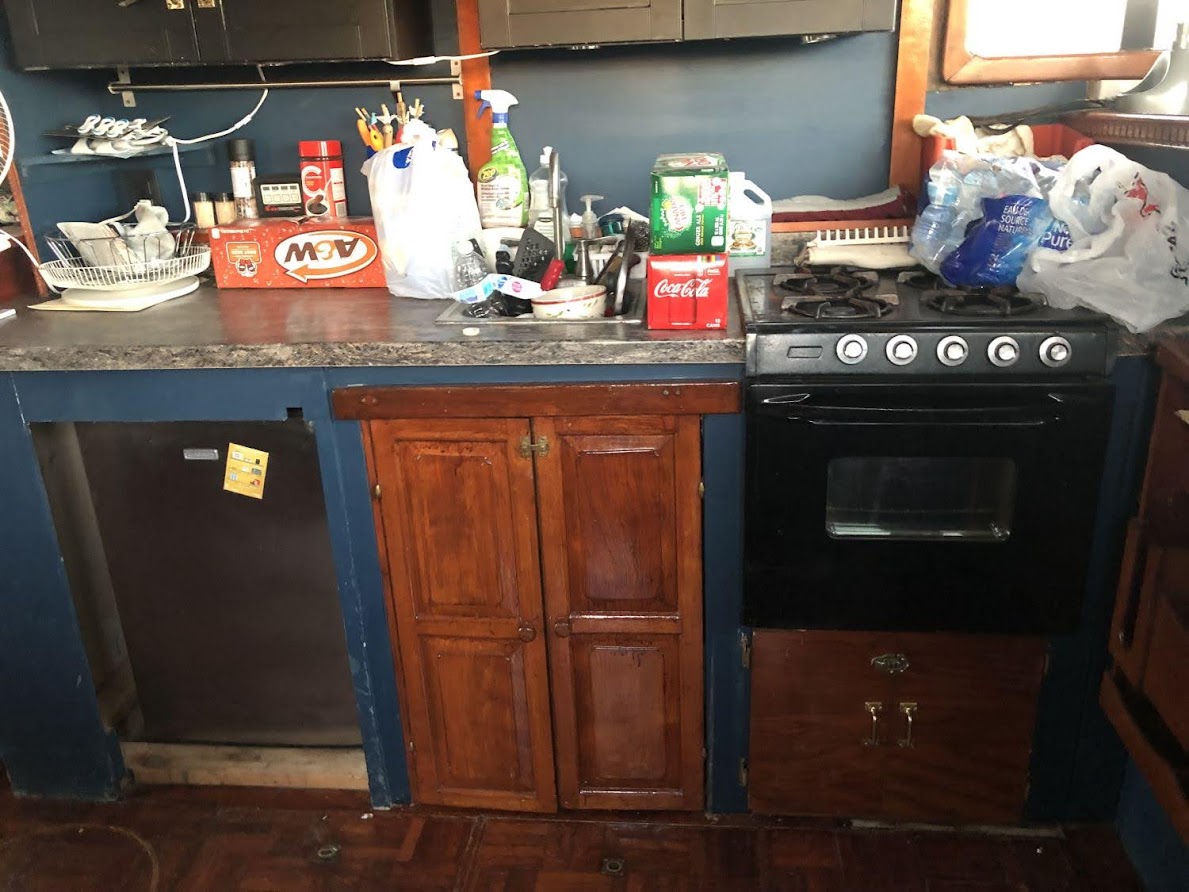
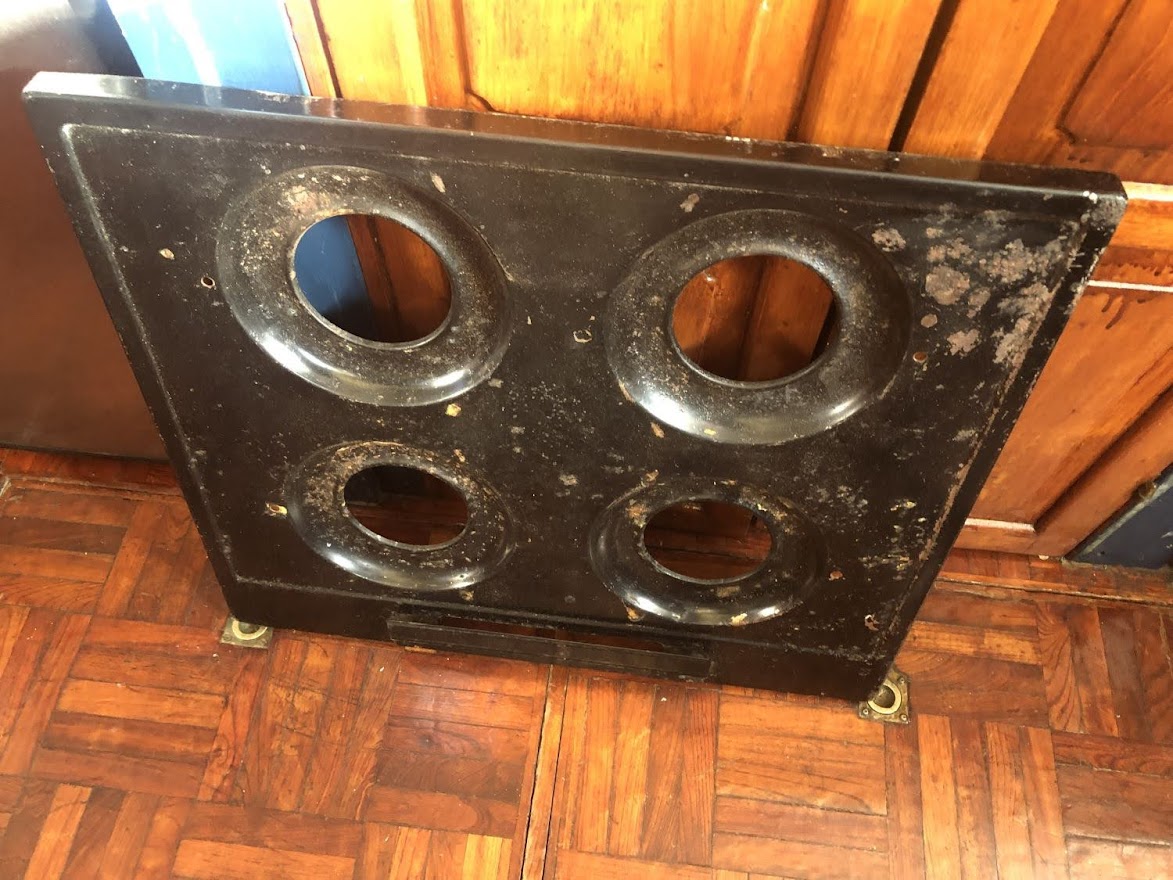
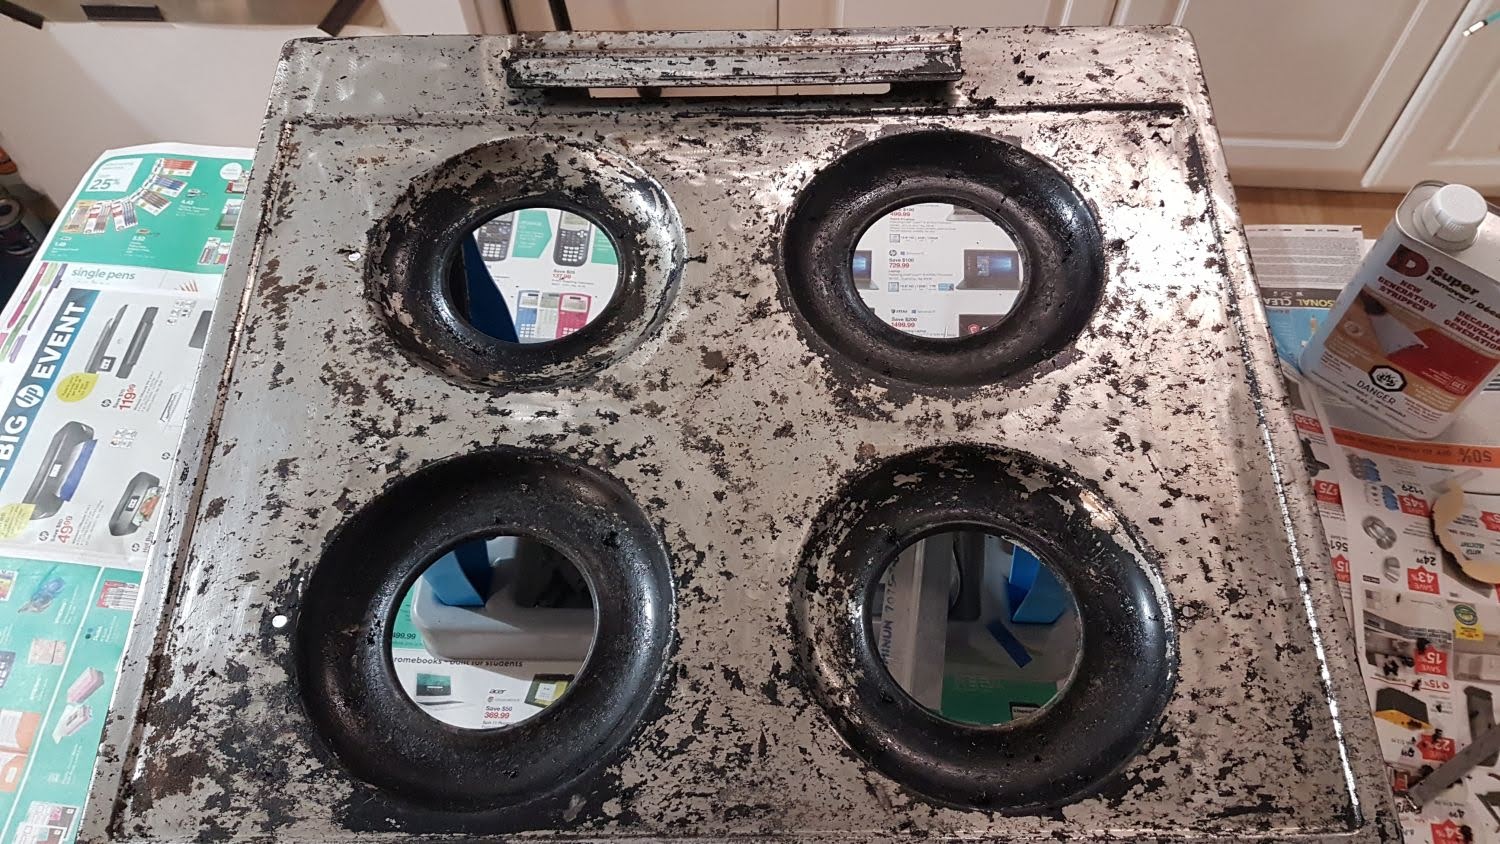
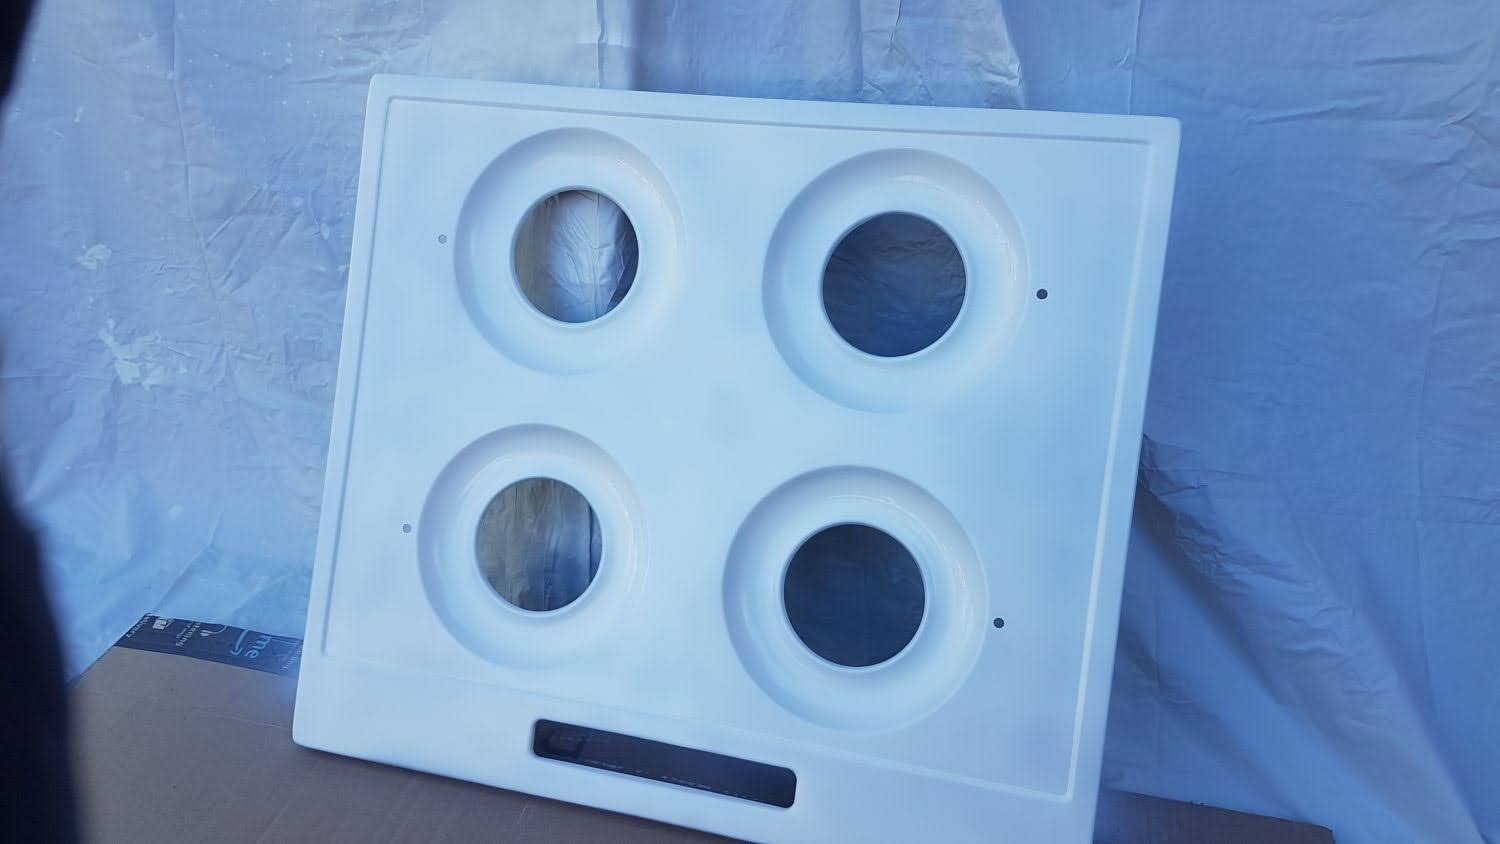
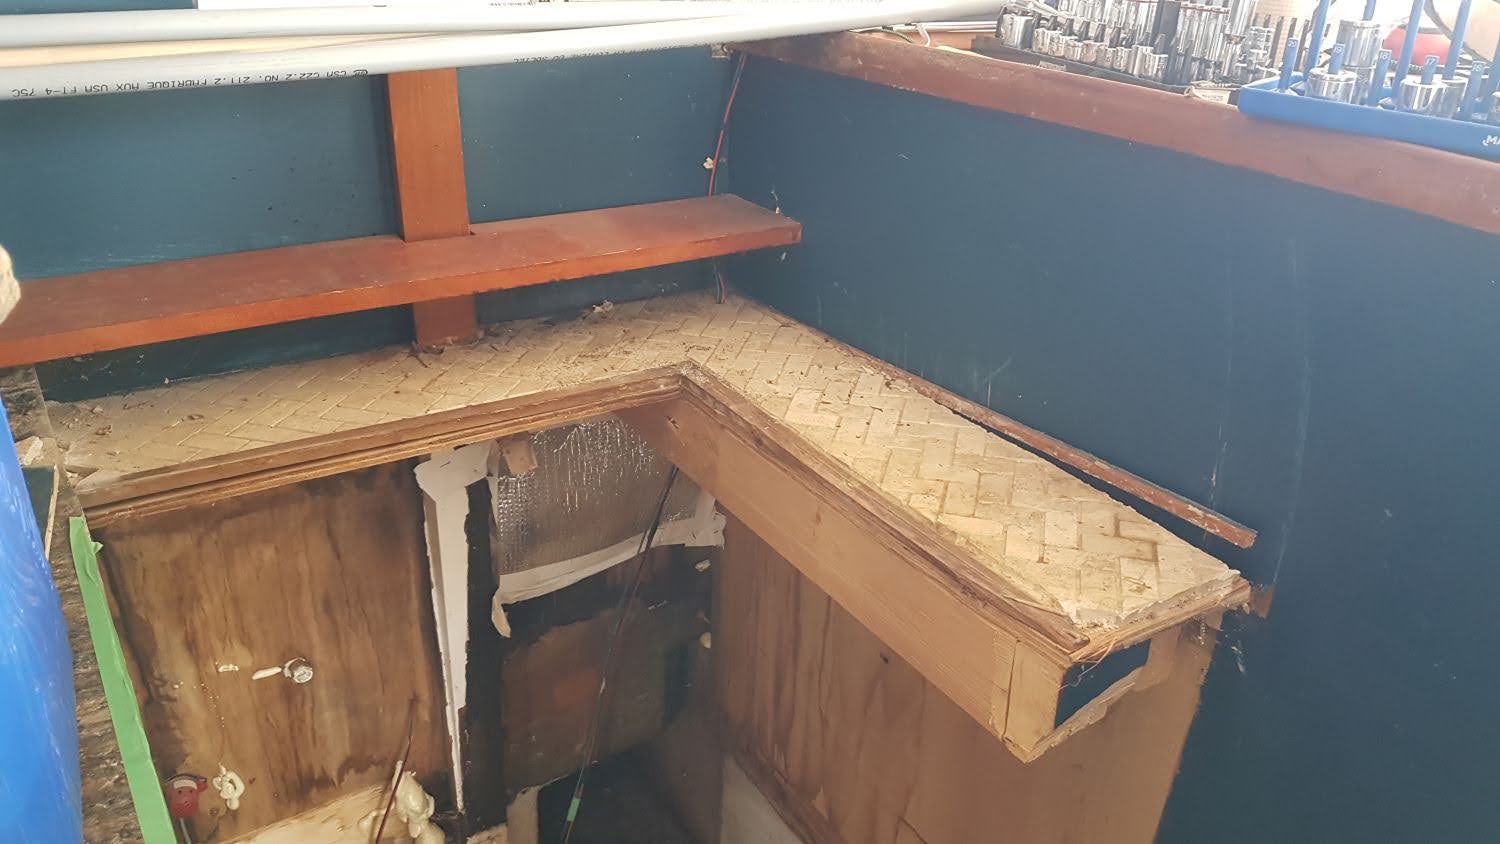
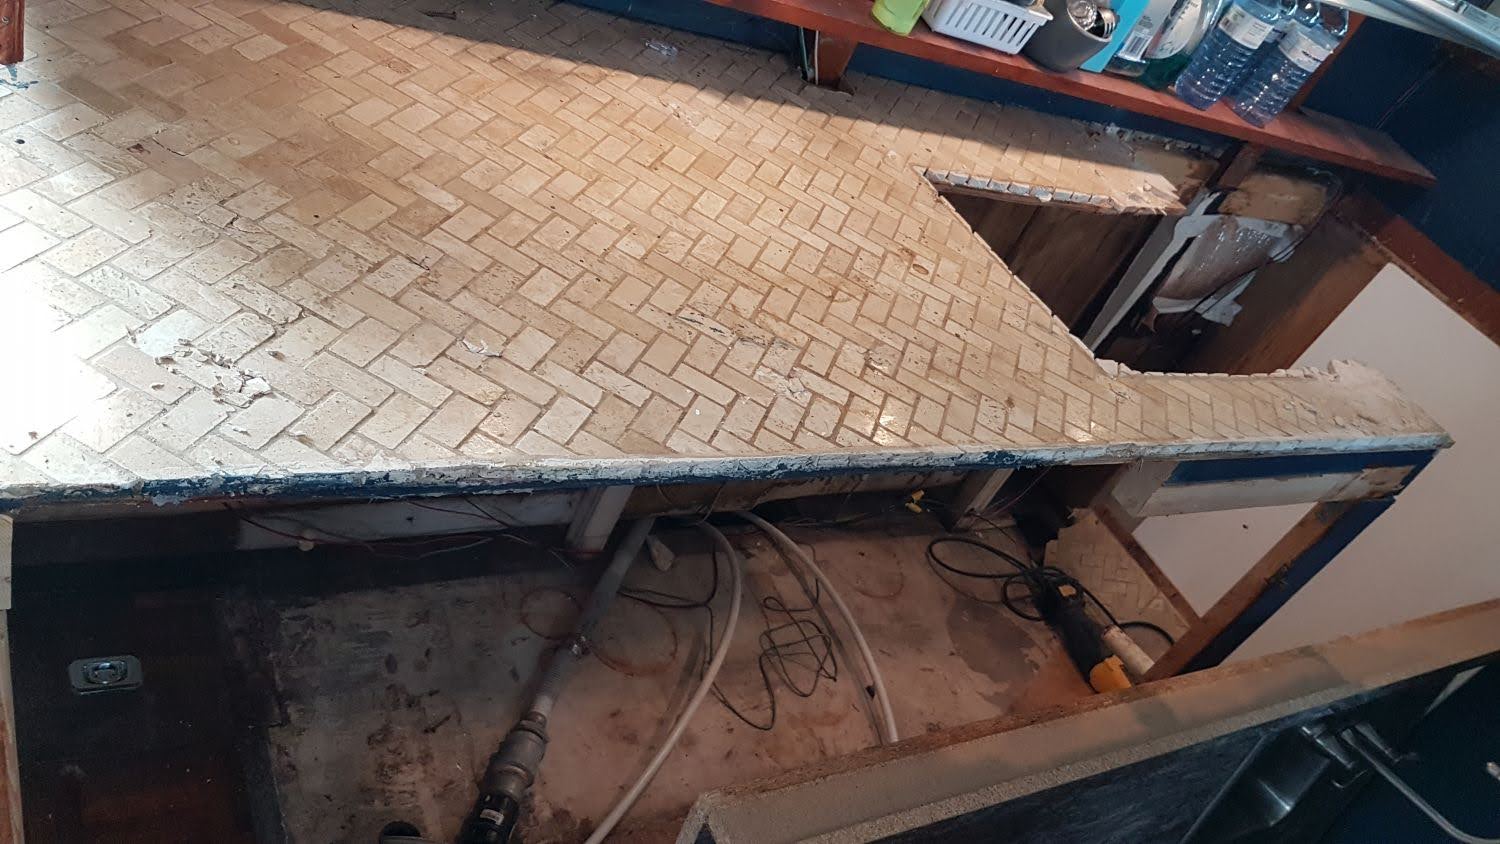
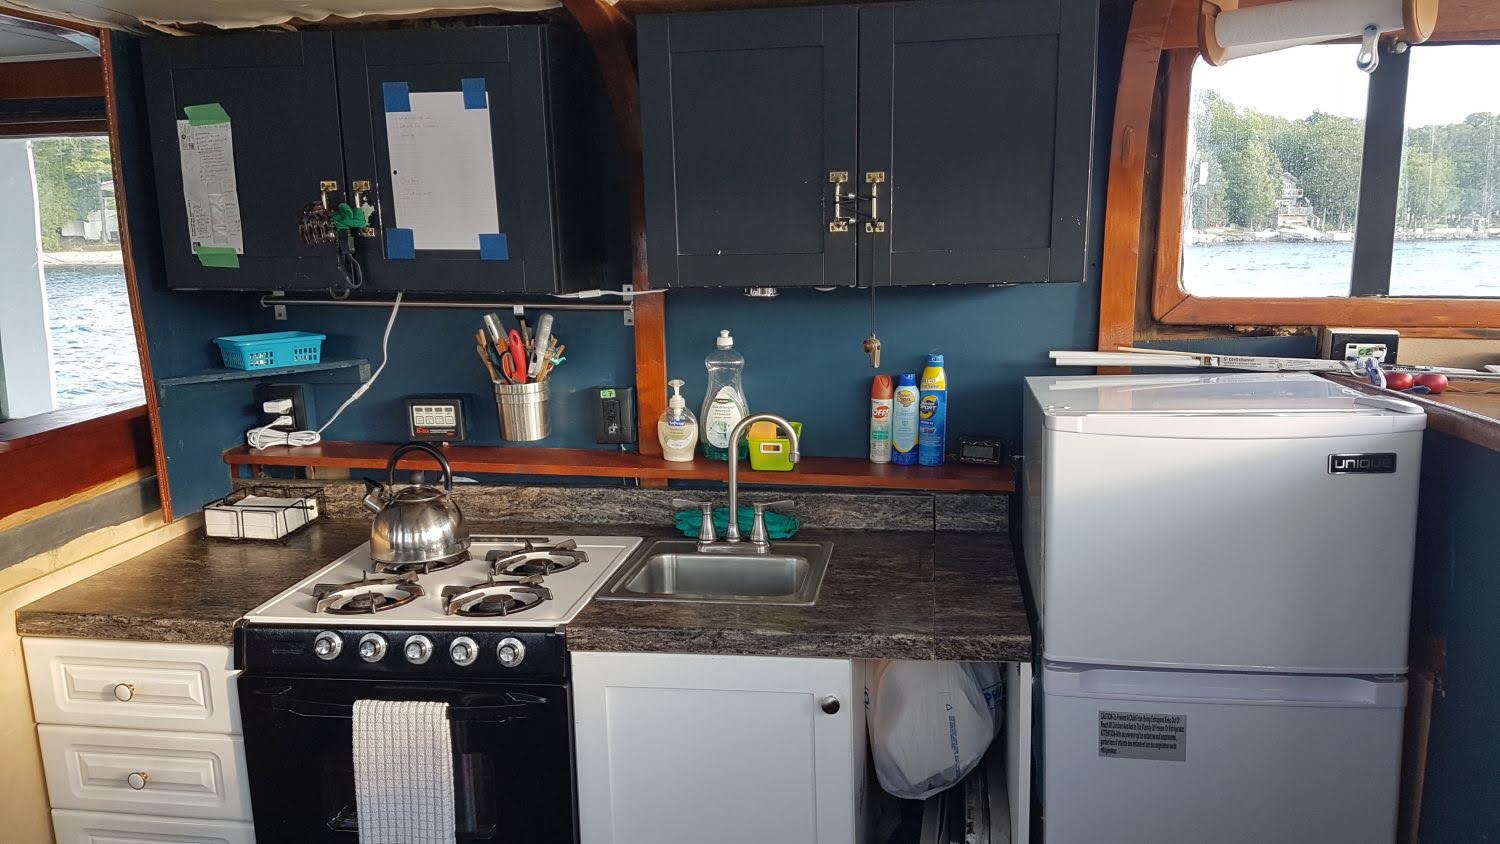
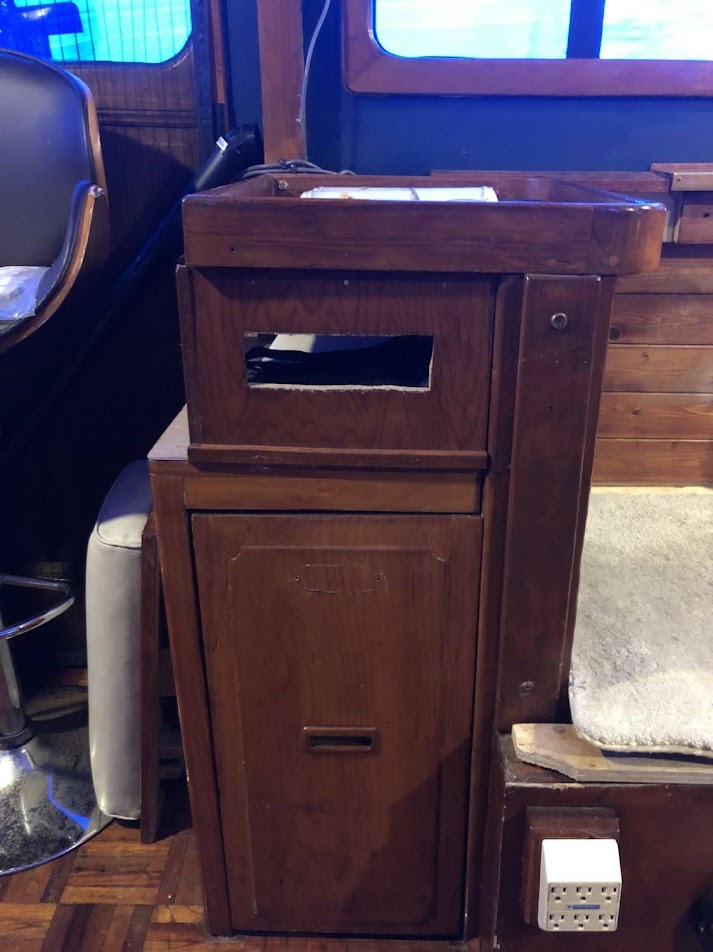
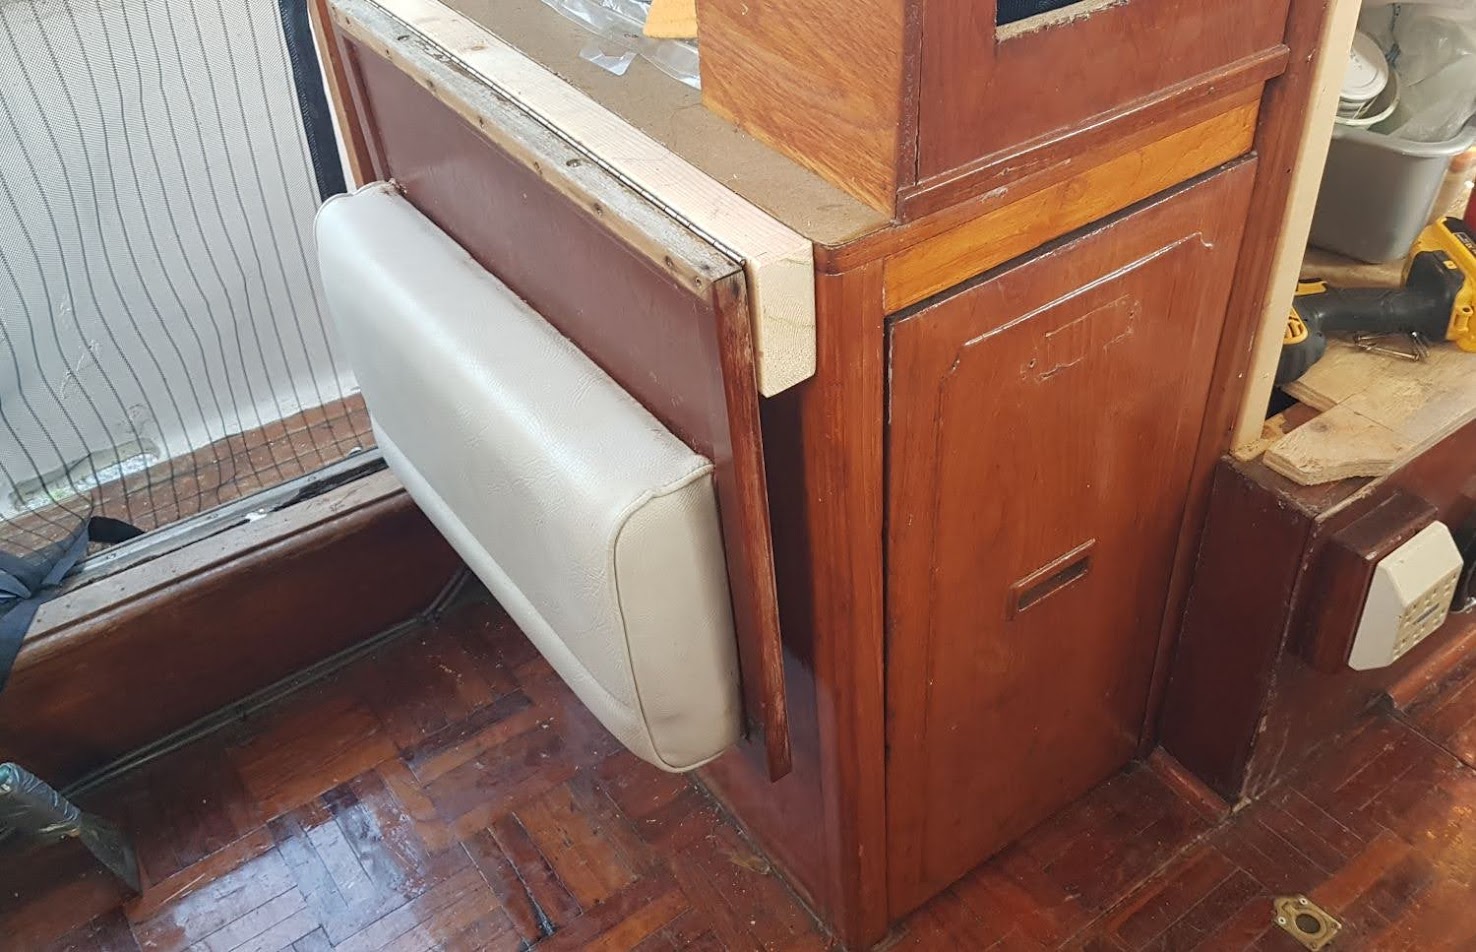
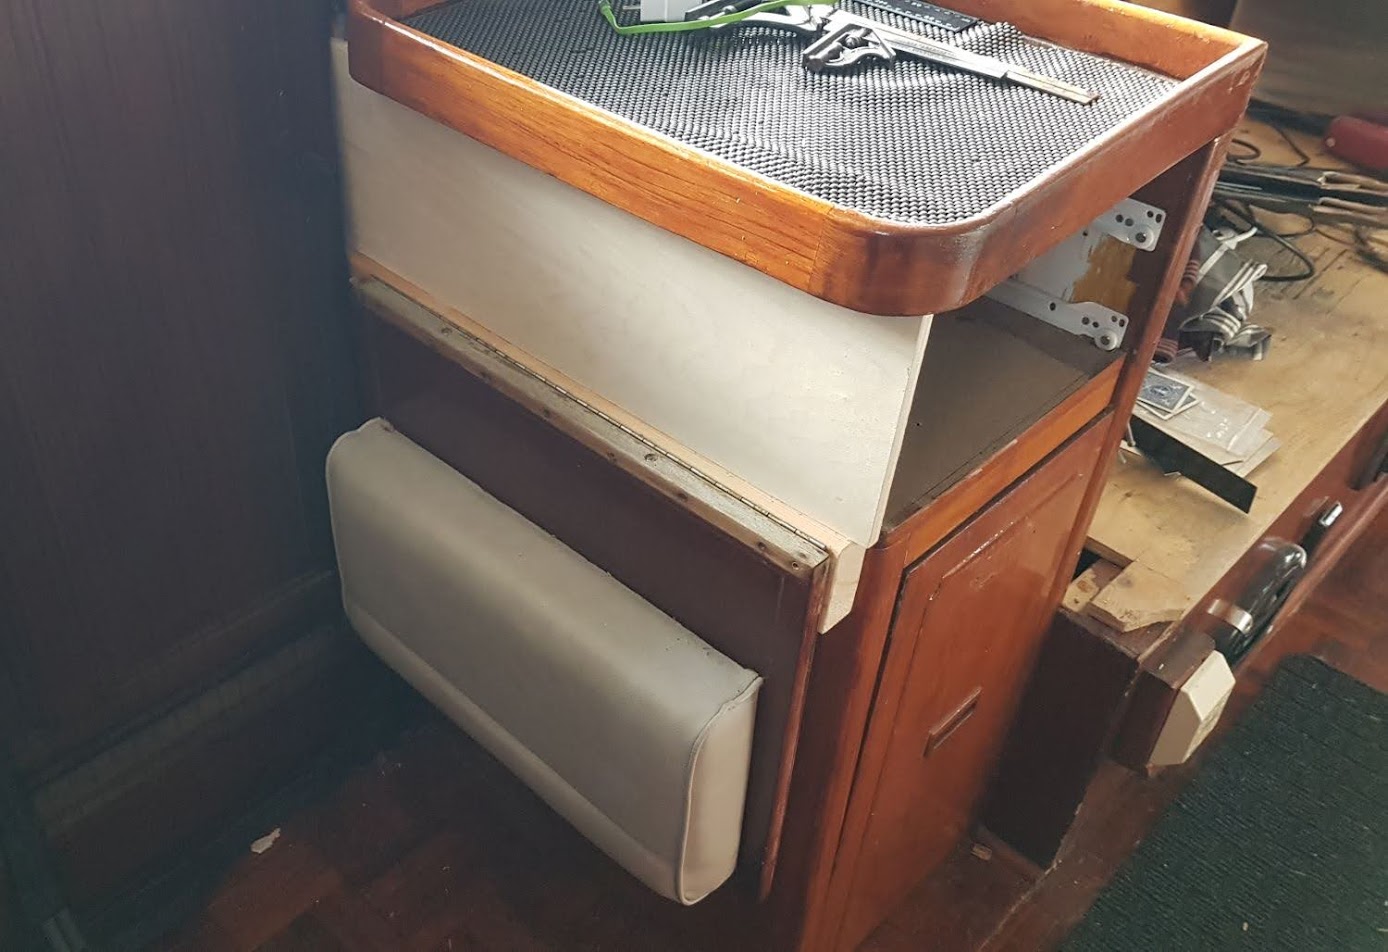
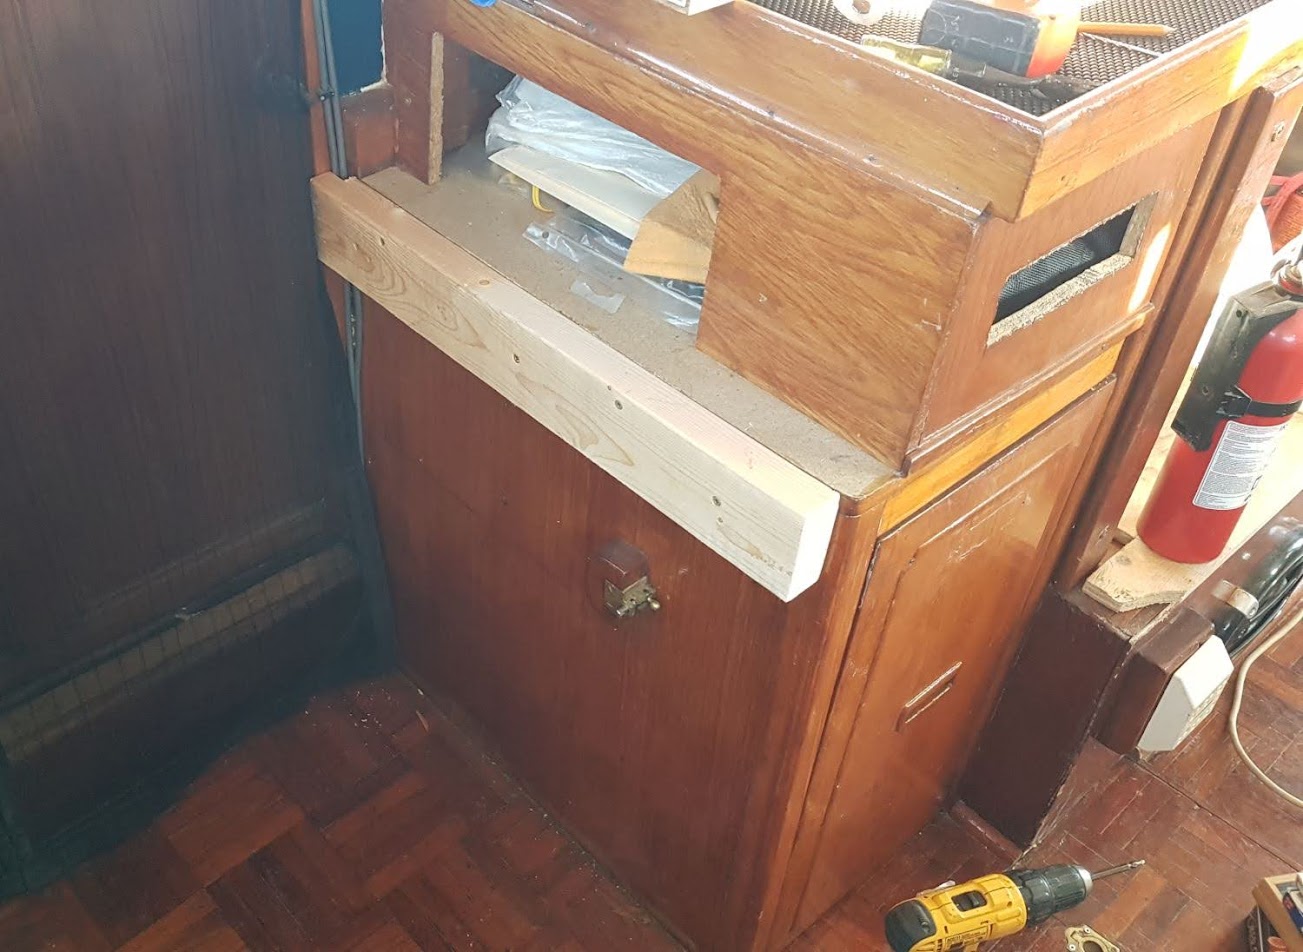
Here is a photo of the galley as it appeared when we purchased the boat. In the bottom left is a bar fridge, 110 volt ac. It didn't fit properly and we weren't sure how we were going to power it. In the center the two large doors open to a cavernous space. There were no shelves and no organization whatsoever. Basically whatever you put in there we'll just go to the ground level. The doors underneath the stove were equally useless. Basically the entire cabinet behind both sets of doors was one big space. No shelves no nothing. Very awkward to store anything. Where is the cutlery to be kept?
AMWts8A0zfH2JEZsc-jn7zPJOWZr-ys9u3aIgffgfvymVhU43KJdvJy93GjFYtkN1bXaeLXiE1LHCA5_L-ompZtDuSup7MNqhYp6kGo53oii14xP0BYstDFSd9GF6-7EBgEs8TS2rgSTSB5q7D2C8eZ7TDvm=w1189-h892-s-no


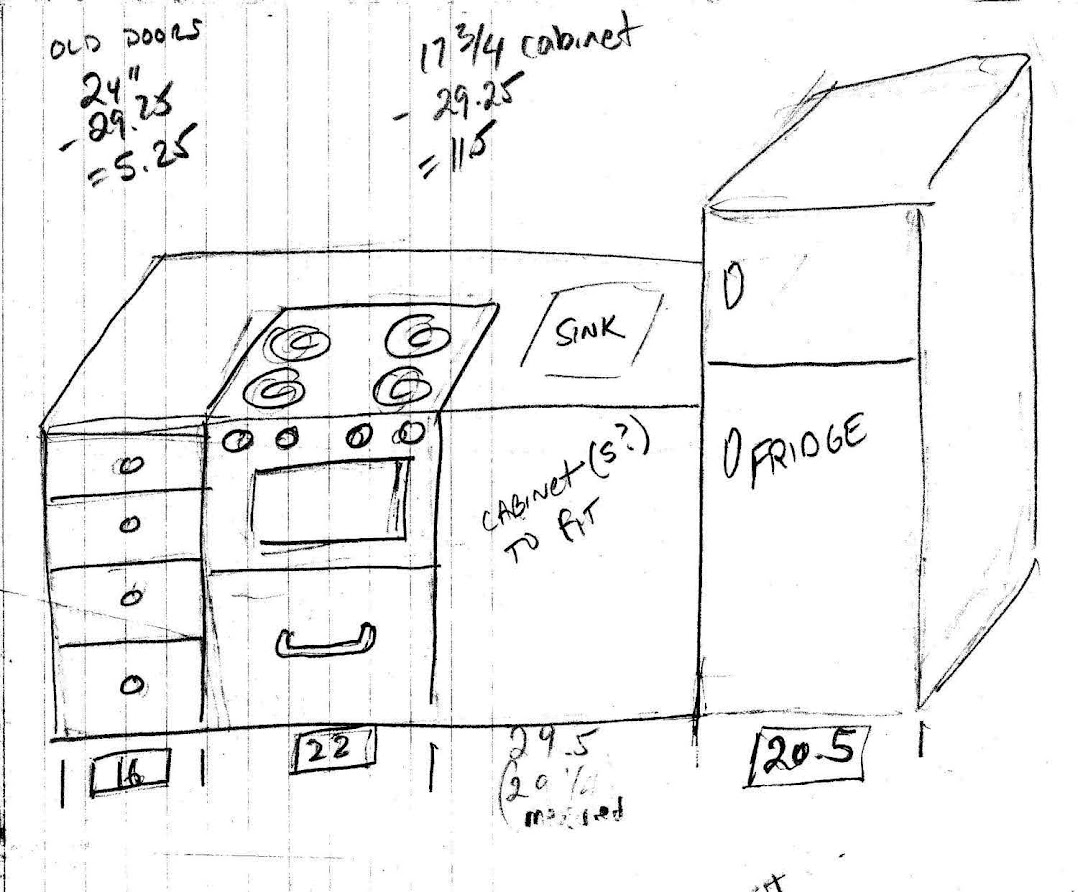
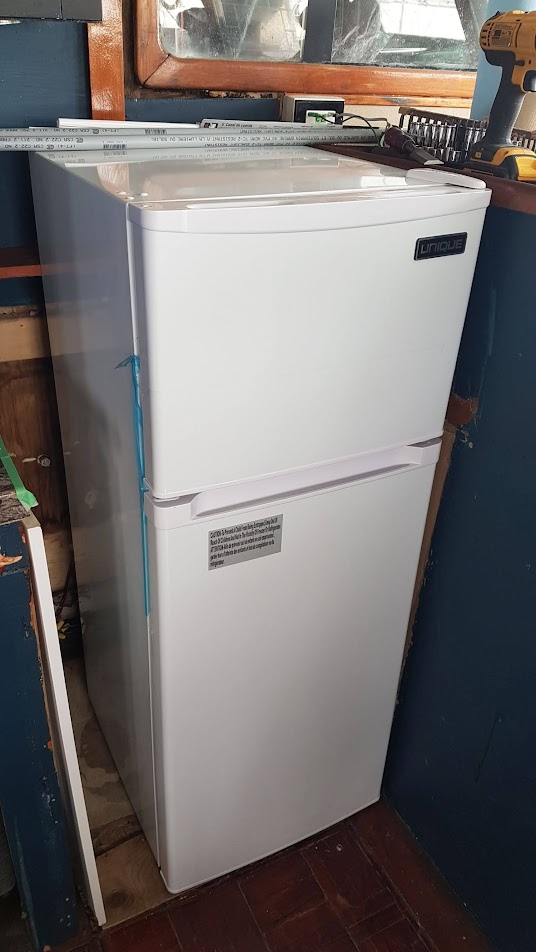
One of the first things we wanted was a larger fridge. The fridge would have to go on the far right so that it butts up against the High counter that I guess is the dash of the boat. That leaves us with the remaining space for cabinetry. In my previous posts I show the 12V fridge that we ended up purchasing in February 2022. With the dimensions of the fridge in hand, the only place it was going to go was on the far right. So that was our staring point.

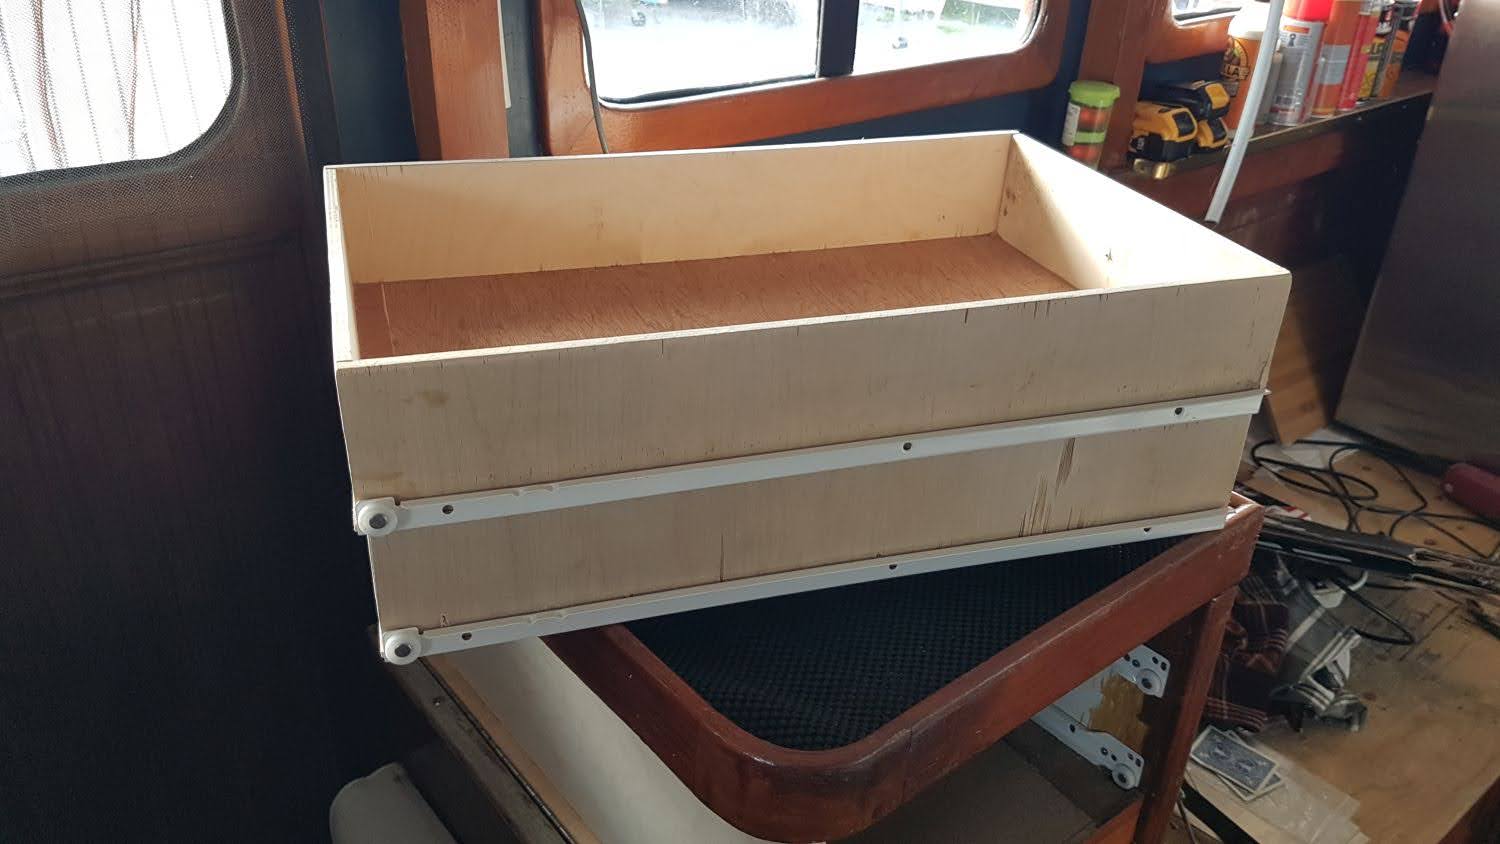
One of the prerequisites for my wife was to have some sliding drawers for cutlery utensils etc etc. We happened to be at our local re-store and found a kitchen cabinet with four drawers. We purchased that for about 20 bucks. With the dimensions of the fridge, stove and drawers in hand, the Admiral came up with the initial concept for what our kitchen would look like. Sketch one.
AMWts8Bd4rHOEWmIKwY-m5D6wwTuOGNZGypTnwRJNSAjaJB0Ri9vOtN9g0GTaO5zQN1mPq_Q8mWIvdHXw1VlRcfFtOAljeujDHuoSBR34F_SPZTqTSqQ-Rkf0JiKfFxtiZdpAioN9_GBF1sZgWYizMvOvnxv=w1047-h892-s-no


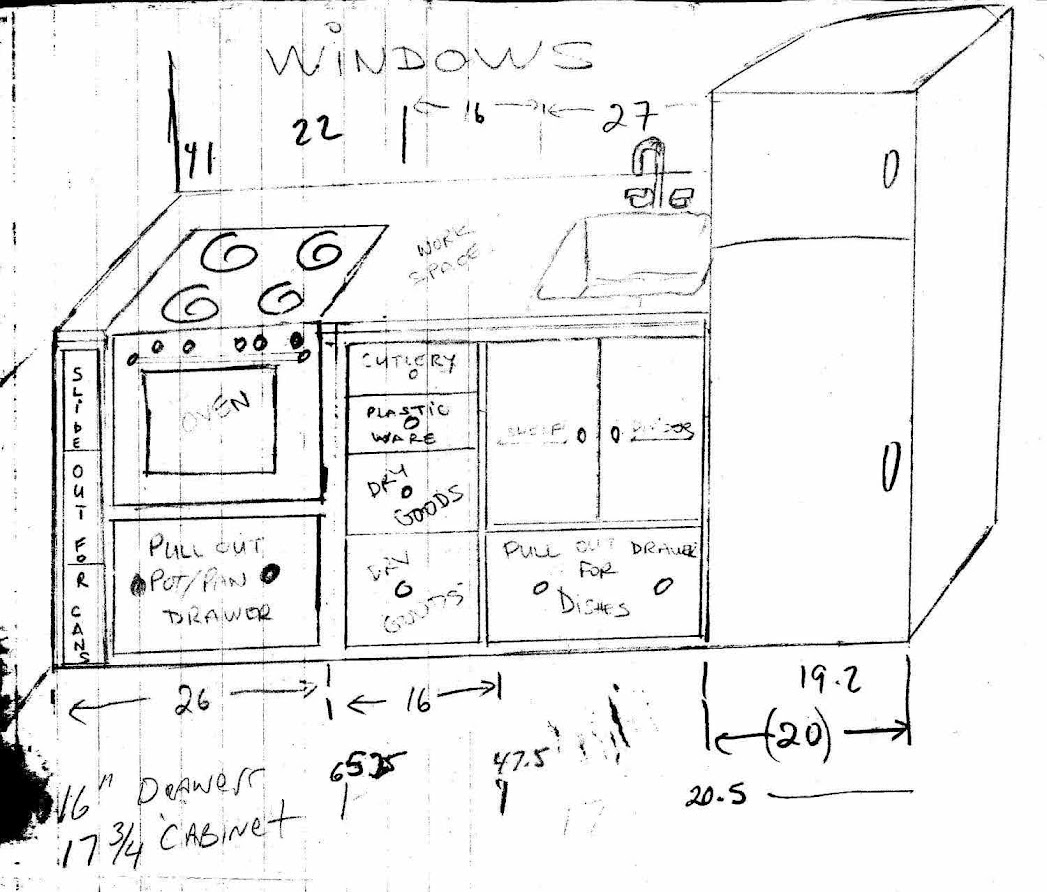
In this initial concept, we wanted a slide out on the left for cans, then the stove, then the sliding drawers, and the remaining space (whatever Dimensions was left over) would be would be for some kind of cabinets under the sink.

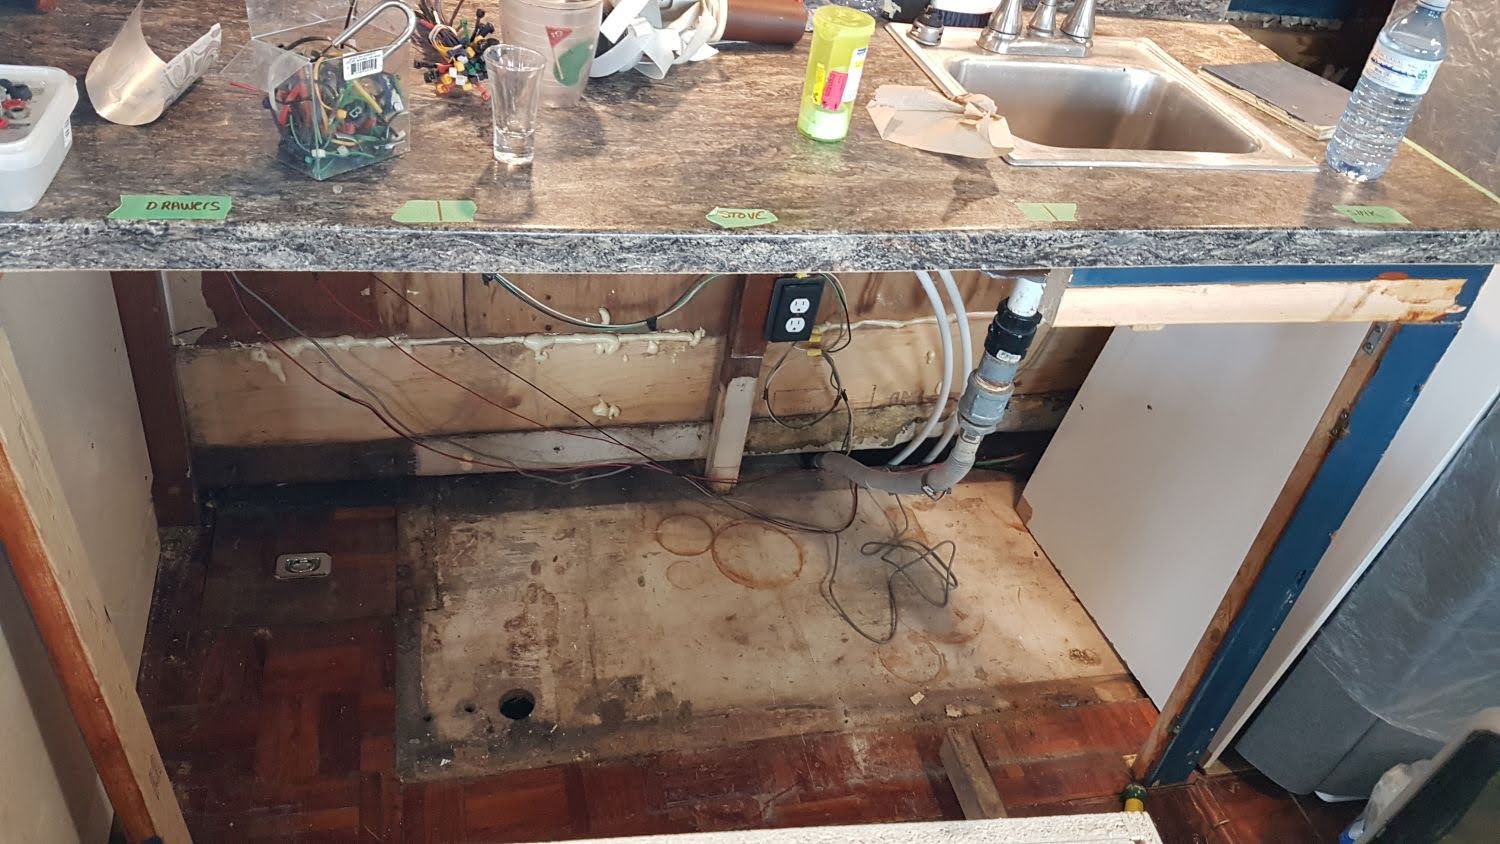
The second option was to have the sliding drawers adjacent to the fridge and push the stove to the far left. This would maximize counter space. We were also thinking of maximizing the counter space by having the sink directly over the sliding drawers. This would mean sacrificing the first drawer in the cabinet and some creative plumbing, but we would still have three drawers remaining and a large counter space.
AMWts8DwUF6Hwnsp7kW6qiQZqMus7K3GBU3Dd-a60l3zeaICx2glnrJ9y2cBOh6lXLuotMtDzcRgwoa6oG2fQTQCFl5XMrn1-XzHX9cwF_q8izkQYNDu3BCiQbm8JQANUiSwPaUDB6X2yMXr2bYo_h_mQwIn=w1051-h892-s-no


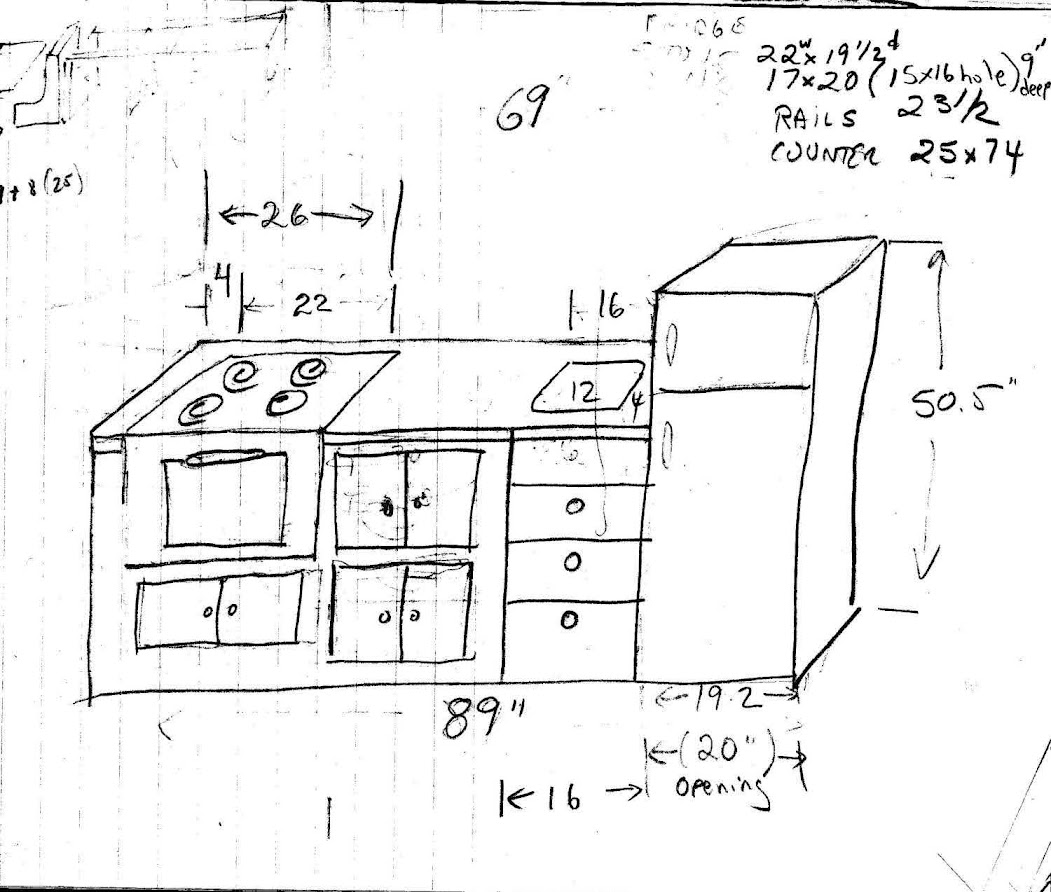
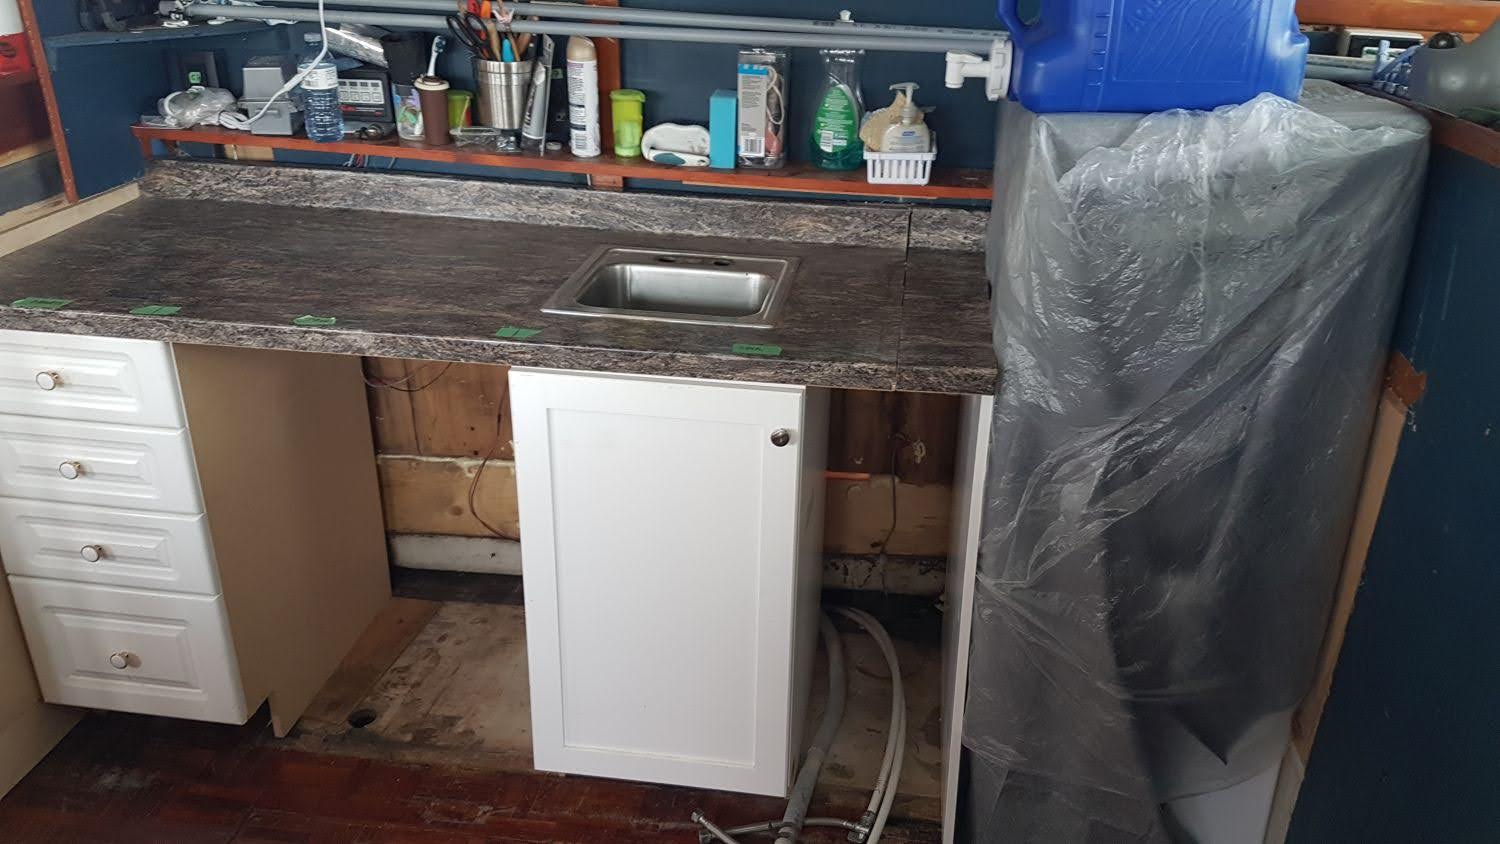
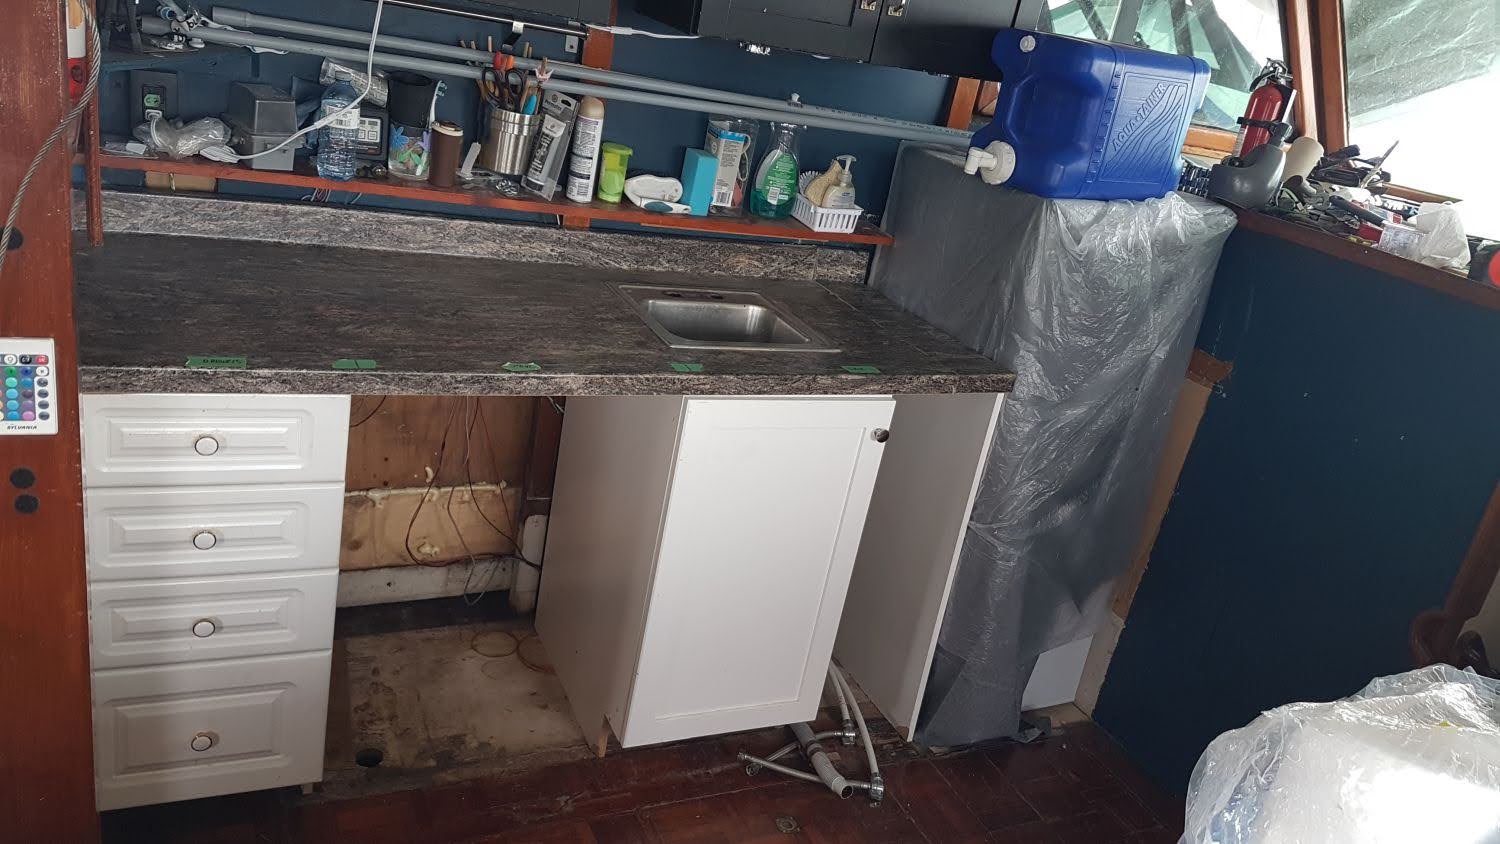
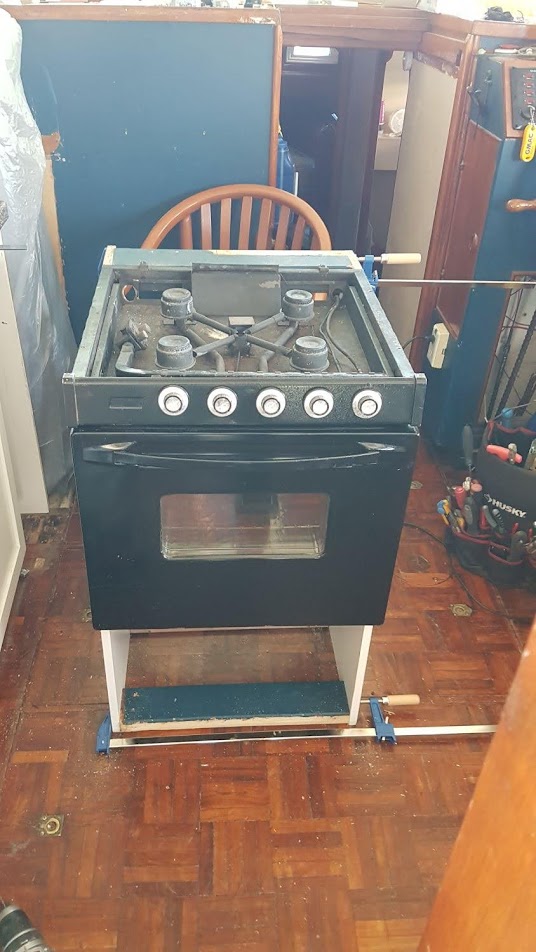
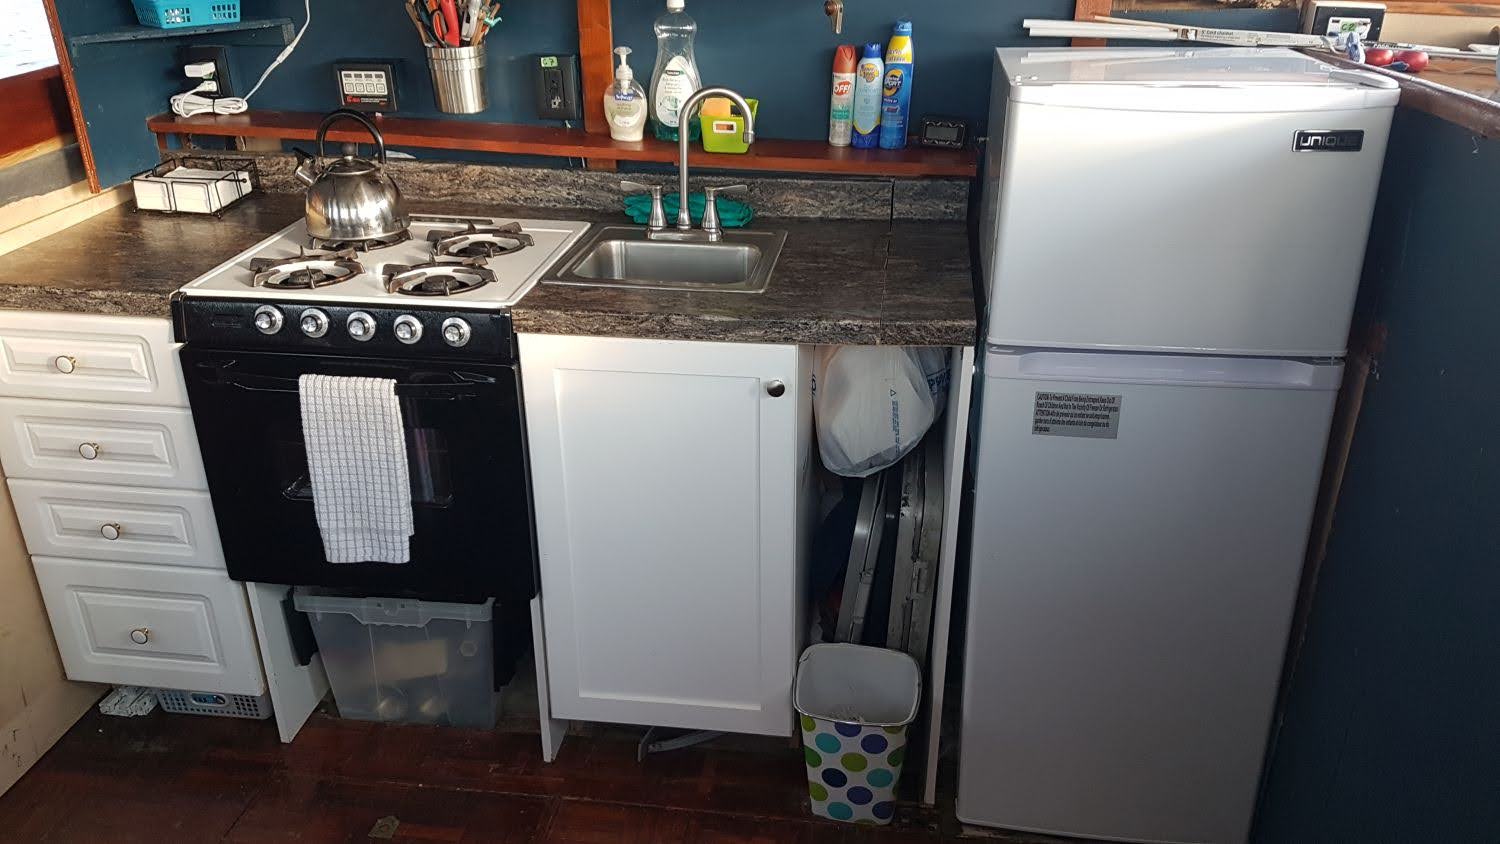
This is the final concept we came up with and what we eventually installed in the boat in the spring of 2022. We put the sliding drawers on the far left with the stove adjacent to it, then the cabinets and the sink between the stove and the fridge. We knew the dimensions of the drawers, the stove, and the fridge. That left us with whatever was left for cabinets. Not knowing what cabinets we were going to get, we just left this as a potential Improvement area. More Galley updates in the next post! :)
AMWts8DtTp-2hHnQCkWh7AoCmOujaljQv2Ly6uWcas5JhN_vJunqOgtnao7Rco9jFKk1rXLbu9P88aLRicduf3WTECSQTVXOCNv7hMS3q01EBUvNQ_wtbeGSZ9l7u02WrTHOiT0QtgT9RFA6H5LbOR7XqQZP=w1078-h892-s-no
 
Last edited:
I'll say.
Having done all that research, I can emphatically state that there's no reason to ever have a propane fridge on a boat. Given the convenience of 12 volt electric fridges, also 24 volt, there's no need to go propane. Plus given that most people have moderate size house banks, and the advent of easy solar, there's no reason to not go with a battery powered fridge.

My only comment on your consumption analysis is that it doesn't reflect size. My apartment refrigerator has similar consumption numbers including the inverter if you factor in size (mine is 10 cuft.). Watts per cubic foot should be part of the benchmark.

Ted
 
My only comment on your consumption analysis is that it doesn't reflect size. My apartment refrigerator has similar consumption numbers including the inverter if you factor in size (mine is 10 cuft.). Watts per cubic foot should be part of the benchmark.

Ted

Hi Ted. Yes, for apples to apples comparison, watts/CuFt would be a good stat. In the future, that would be good to know.

At the time, that wasn't on my radar. What I was most concerned with is "How much of a dent will this make in my battery bank?". Now that I have one season of operation under my belt, I have a greater understanding of the power generation abilities of my boat, as well as the power drain.

Having just bought the boat at that time, there were a lot of unknowns last year. Our biggest concern was to be able to live on the boat at anchor indefinitely. When it came to looking for a replacement fridge, the daily power draw from the fridge was all that was on my mind at the time....:hide:

The good news is, based on my calculations for battery and solar, we declined the extra cost of shore power at our marina last summer, and do not plan on opting-in(nor paying) for shore power this year either. In our first year of operation (2022), after launch, we practically lived on the boat all summer without going into any power deficit.
 
Before I get to the gutting of the galley, I would like to address what we had to do with the stove, specifically the stove-top

The Admiral was grossed out with the condition of the stove top. It looked like some years ago, it was hastily painted in black spray paint directly over rust and even food and grease residue on the stove top. Over time, the rust reared it ugly head again. It looked terrible. We brought it home last winter because we knew this was something we could do over the winter months. It turns out I didn't get to it until the spring a week before we unwrapped the boat.
AMWts8AbnDmiLhf9gSL7bJ-wIZGPuFD2QZ5D2WvxSPWXZ1mV2d9CjT3lHaM6y9u0kFn-otADH9SrfETmVIcRSvUD4-FPwDvzypu9sBWupH8zdHQouTrn5chaa3ayzbLPb8G8PoHirMF-EDUq5taoFMst_0G6=w1173-h880-s-no


My first step was to remove all the spray painted paint from the stove top. I used an odorless paint stripper and had to do several applications to completely remove as much of the paint as possible. There was also a lot of underlying rust that would also need to be cleaned up. All that "black stuff" in the burners is grease, baked on food and rust that was painted over. It took several attempts to get that crud off!
AMWts8A7fYjtDQBUar3NfiaIokeeIh3rupPHMRncnMvrPC1REKKIwWzhkTSRm7h4ToH-2njGvH2gPWISKG9xQX8nYTL1RZdP6WtFSqkc0HjG-jJ_YzxQAnTM27Ww_zMeCzH8kBDI7SnTz-1hA6p1CaAiWfTx=w1500-h844-s-no


After several steps of paint removal, I started sanding the surface with both orbital sander and hand sanding, slowly moving to ever finer grit. In this photo it looks terrible, however the surface is actually quite smooth.
AMWts8AHHlyR1Ok-KJPpdoeky8k5DhoijlMi5QvbgYmgy77el9w_Z_3BEvssX0KEqsBqdXFVOI-23cw0IxLRaQKbBOzQroFQWlEivoaOBk7iplWlyEG4ctVhdgkN6WShGEhoAi3J1h-dLbljY5W4okqEHJLI=w1500-h844-s-no


Here is the first coat of high temperature enamel. It looks amazing compared to what it looked like at the beginning. The stove was entirely black and the Admiral wanted it all in white. We did the stove top, but the stove itself was still at the boat. Our plan was to paint the rest of the stove white if we had time. "If we had time......" LOL... Yeah right...:rolleyes::rolleyes:
Once we got to the boat in May 2022 and started work, little did we realize how busy we would be.:eek:
AMWts8CXSI4Z7Gxui6JAL6Dm8HyyYfFG20XIhD9yjT8LodsP2_HwblRo9Fc_gvVZVo4mmP1SGfQBUNgsJxRtSc1Xx22kHUbyldJfEYZQLNkcltltJhYF0IkIAK-4uGuO_3oOTZeOgdrc5ZnEdMt2YpDQLX2l=w1500-h844-s-no
 
Last edited:
In the spring of 2022, replacing the galley was a priority job, since our new fridge would not fit anywhere in the current layout. First job was to remove the stove and make room for the fridge which was going to go in the spot at the stove first occupied.
AMWts8D4CXGje4-r3d8kDFNIoK7yPWvwm67KDzu7fcW0focOXFG5xCN9YXtiZQNp8TdeyBOp2J0xLe_2AubIUmN5QYQRJPw6C_Jzm_hV53XJy2nuUiC5qx4X_WBNJ_kfMN112Q5OOlM_XZ97mo92VyVcX0p0=w536-h952-s-no


Removing the countertop proved to be a real challenge.
Once we started tearing things apart, I discovered that the existing countertop was built on top of another countertop. This countertop was ceramic tile and grouted I would discover later that this thing weighed a ton. For the moment, the first step was to make room for the fridge. The fridge was sitting in the back of my pickup truck, and I knew that as we started construction on the boat it might become more difficult to install the fridge later. So I decided to tackle this job first.
AMWts8A8H4Y8MJ8dq2GlW_uo6ABksJZm2Q-xt-WXnbZ2s6ydDVs8p53Sp2HvXF0q9d86xw4AYMva4QEsHWQMN55RNey11PkMx1j_fwN27ugIELOCh2bf-kRbMidpJhRkhChlYr9xe4QiQ10AJIRkW-Ss8_zw=w1500-h844-s-no


All I wanted to do was get the fridge off the truck and into it's position. Now that the fridge was at least out of my way, more work could be done on the galley.
AMWts8ARTSMiqr4jk7EOg-FuMNwNiNYbHB48pOK3Iygc3EQHMXs24Y-jFDXLY5HnHYzDrzfcfAA49Qr_6ngTXhF3l49KdN8XpohwShLT19fW5g-gFsbvy5_WLq9ZRlhyIIjli08gRLBmRbbJDML2KyYN6xoD=w536-h952-s-no


First Step was to remove everything from the front of the galley
AMWts8CqavYlDcCOkHvHyoYHG9gpCgTFZc-_8-3aMKRfNuikbkYAqvNwGxjDfRdCGpq4P-Li1Dekz9XvJCEDelzXQmqR6z8f4D1_9IA_1j6-cs4jcOEE12xhkvlWEkbQSM5wOlCdEbl708Rj6l6ArWR19dXl=w1500-h844-s-no


I managed to get the existing countertop off, and now had the deal with this ceramic countertop. As mentioned earlier this thing was extremely heavy.
AMWts8Clg1H2372cLEzoxuCtc-ikFAZB5ts20vBTmXy-JXUwN0N6nW5tcHfvb9H8HccDP3A09tsVOL0p5vTDuXa7cjZDG7yBQ6Y_k8uLC42zLKMo49qbdOqwIQQreTl3xSlcQKITPmhxub633V7bdos30rRn=w1500-h844-s-no


Once that was gone. I installed the two cabinets that I had on hand. The sliding drawer and another cabinet we found at restore where we would position the sink underneath. I had big plans for a bigger sink which I have at home, but for the time being I thought I could recycle the existing countertop until we finalized the galley layout.
AMWts8DcgmpPkWIdpMN_dkwbxuHKj3X3beexGzcZW75oZypFONDshK63ussZFn-kpSt4AczBGgr02zgRUkN5ZARez6KZtG-mC8hl2sthfDNKZtlubN7wAdoRBzSAglNb25mpRVBjGG7gm_qHUOvfGstjCFWw=w1500-h844-s-no

AMWts8BQ6aYJG5HmROHvx4BkPwICwWTRWhT3y0LTM9-5KRFd7149FJiH4xKXRWYoIeinYVo5s1Ts-r_3Ev_djxdtuKjqGKHtllDdlnCa_1BcEpo4Yijq6HGMnPfM7f4aybe2cz57Pum7FE4GqX0DQcLRhzyF=w1500-h844-s-no


Now came time to figure out how to fit the stove. Before cutting into the countertop I wanted to make sure all the dimensions were correct so I re-measured positions of all the cabinetry using masking tape to visually represent the positions of where the cabinets will fit. This allowed me to determine the overall countertop length and still have room for the dinette.

Next I had to build a cabinet to hold the stove. The previous installation had the stove just sitting in a cutout with no side supports. I wanted to have a proper cabinet.
AMWts8Cx9vpte14pP-SbwTl-qjuzN1BDioHudUy0YdDR6HhAbUZEFqn5QjmJ1PqP9a7PzGo6yMwJwMtfxVCCxYXqPKneKr1NPFelXcMPbE6oKWTZNznGzjnkxK1mnWpbVbeq92UoJMRD-WGwxROYhYHFHyPJ=w536-h952-s-no


Once the cabinet was built the countertop could be cut and the stove inserted into the opening.
AMWts8DuiO-FkkROiP9SuZrh-adVXXYt1FEZWkbr85OxbupFxeq5hj-TO1T38I-nlf6M6wKwiJC5osgUw95fFdE4_yA3obcEVFQee1qrgTFtuwSxzxEqXXX69zjNX1O0B_LZimtQVDj95MH9sNkkkcxn1hgI=w1500-h844-s-no

There's still more work to be done in the galley, for example, to the right of the sink cabinet we plan to install another cabinet and or a sliding can drawer. A sliding drawer needs to be built for under-stove storage. The stove front still needs to be painted black but as you can see in the last photo we are already launched and enjoying the use of the boat for the remainder of the 2022 summer season.
AMWts8CTvTEBK2fnmbwbL04p3Wx4DpE43R_8_aXYxp9UPFAY16q1azyKTLTB7eZJUeU2RF2_84x_RCUD-PMIbQXcdKIDMl7x8GWKHk_s3WsiJLnDci4JlKaEvoyqG75lF3SRVbDvEL_kLUQd-g3M_IH7NuJs=w1500-h844-s-no

Next year we will replace the countertop, install a larger sink and build/install the stove drawer.

One final note to the observant: The order in which I make my catch-up posts may be out of order. In this case, I had to finish the galley BEFORE I built the dinette, because the galley dimensions had to be finalized to determine how much space was left to build the dinette (Which I posted earlier on this page)
 
This boat had a funny setup where the captain's chair is supposed to be as well as the Cabinetry immediately behind the captain. One thing I didn't like is this bar stool captain's chair that always seemed to be in the way. Not only that, but a free-standing bar-stool could be a real problem in rough water. Also, exiting the captain's door was always a problem with that chair in the way. What I really wanted was a folding chair.
AMWts8AkvLDGB7EVVUTmiZ2BTFYZpP7wwUrS5l7ALMP912JhODdxcL2jSxyGyIcBFreIzoM4fP9Oj7hhzKa082ex7oqcfkr3G_Yu1h1PqrHpzyFVLv22uilrQt5Ypv8pO1A461ToY4CcyBkGr_MWVeCOQAai=w1269-h952-s-no


Here is the cabinet directly behind the captain's chair. The lower half of the cabinet is a slide out drawer that looked like it was made for drinking glasses. I think that was original to the boat. Inside, there are about a dozen round holes in a tray that I'm guessing is made to hold stemware. Above that you can see this cut out notch for what may have been a car-radio at one time, and at right angles to that a bigger notch that just held a bunch of junk as you can see in this photo. That entire space was useless. The top tray was perfect for our Birds cage, however it projected into the seating area as you can see at the very top where the seat meets the cushion. Also the vertical piece on the very far right underneath that radius of the top tray also sticks out into the seating area. The entire configuration was uneven, staggered mess.
AMWts8BRmYLv7GETH6ZO26WgrIuzxdig_x_1nHh6Y0dqiLfyPVKqvABKjlw4TV513AMIK_SfIon8mN3wmhYaggdjEeaurh0V3y9-M2EEANkBnqPMWWuf5jELkTPJNfuKWIgI9q2TgvPWx0g5cDopfzlkyUKJ=w802-h952-s-no


Here it is from the front you can clearly see the lower cabinet, and the radio cabinet. Up top is the tray. In this photo how far it projects into the seating area. And also once again that vertical Riser on the right hand side with the two screws. That also sticks into the seating area.
AMWts8Bjm_a1C7sIzgPLOvcHpMNqGZNA6deXbR3Vl9nqnQm5zAGmMLyXn4pZkMGrKzaI2keBk7OHN_7ikUosezJFqfq65_-pcFGTpyn1qKAIzoG_FwYqgRzH_WwRyy7BMi2qjK7sO_m-cj4aJ82yM9OVzCyq=w713-h952-s-no


We were fortunate that we could go to the salvage yard and found a flip down seat cushion. I wanted to place it right here where it should be perfect height to sit on. The problem I had was it needed to clear that locking mechanism that you see in the photo below. The mechanism is to prevent the cabinet from sliding out in rough water. However the way it protruded meant that I couldn't simply the folding seat directly to the cabinet. Instead I had to get a piece of 2x4 to act as a spacer. Eventually I will stain this as you will see in future photos.
AMWts8Cz-tq9j7ZHvPrC4ggmXHPwQcx0IWMC7o8IOA8CkofdjZ_85WfLgx_bngAkrWa-XmLx2uiMf_2NXutjrw-44DxxOElP4duijtXdF13ECaEV8Hi3Q8FX8PDWj80vrqh3jVaqj9pnCzvDRegyzqJZCgzQ=w1303-h952-s-no


Here is the folding seat that we salvaged from the boat wreckers.
AMWts8DJK79MgNiIH6voeYCUzZeYU_XuV0C1sygtlQYTXwt5Y78c7AmlXco8iaR8Zwhm1sMJ5A6tjiSPf1xwRouxWB17dDWgJawCX60XRsfddlXcLRV0NS_dXhXrUXT7Z5CDWXFuxG0wTzg9dOEfZcnQVids=w1476-h952-s-no


Here's another shot of the Cabinetry only this time I reversed the top tray so that the radius is on this side, and I realigned it with the entire cabinet so that does not protrude into the seating area. As a result of these changes, the entire back side of the cabinet is now flush with the seating area behind it. As you can see in this picture, the radio cabinet us just a lot of wasted space. This boat is seriously lacking in storage space in the salon. I decided to get rid of the radio cabinet and replace it with a set of sliding drawers.
AMWts8D7BwwBQ-B1Ri9XpnekZNly67cJl5VwfmtCqADoGzOJCX80ZiiQDIEPtEX2TncJ_3uYBYoJNU0dRgIUfv-tg6yoYpfkfq8dxma4sFmVwDWJCpFmvduH5u5sySR-vS0rkM5HCWkOLITacknabYVf8nw_=w1500-h844-s-no


Next I figured out (guesstimated) the dimensions of the drawer(s) and ripped some ply of the correct height so that I can accommodate two sliding drawers. Here I am assembling the first drawer.
AMWts8CzO0it6743bbmsJLmMvHEuquF1baOko6aUsp-Uc3YflOQEjK5KahtqdJajfTVyuOJLsVIEkyaYnHbtYmTX-CJaEWlTxw3imFKtwtspUCTbD1o5L_FvQOaeqFR1aef-2dZGgpt4NqQ6HFPmdilULi1o=w1500-h844-s-no


Now that that drawer was built, I used full length sliders to calculate where to position this new piece of ply that you see on the left.
AMWts8APYpoxWxN9zoWvl86G7lycBrJyfy8MqR6GXZLr1UlMMnnQKpywYqzYq8HTt86RQub_KKtfyCFQ8bukiSiCYRsis8mcDetV3nyiHQxmx0VZKbT9ee3gNifEVDwhq5qYAjjVlL3iJEfJjuUu-Y_oJ_9O=w1500-h844-s-no


Once the dimensions were determined, I screwed everything down and reinstalled the top tray.
AMWts8AFNsYbIE8dV8cavhVoDc2nF6Qd5agQzbpqHTAIoC3y2eYJPDbF-KiN226Bfx7l5PGbv_7rsSzZSEXF4P52vXVuJ9q2M1qRSX-Ym6EqxTfiT9hQGE6tO-8EhgYkNP6v4hij9VUnik3A_tHHdmlkVA0k=w1388-h952-s-no


Two finished cabinets ready to go.
AMWts8DoayApYbyCkoO3Tc6O5O5uDkRzlzoTTCL6aegu2q2CkMtsdioxh2OjIdDWL4zR-Tb7EzR4ugxsdsHfLJrOXwCvV6-4Lvtla7mPS3rA2nmHJeO01kWniuDAlkT0lh81JvPBK1QhdftDmpVo-avbIUvk=w1500-h844-s-no


When everything was done I masked everything off and started staining.
AMWts8AMH1L-ENtC0eKsOxwu5hl8X9efbyoZ9DhJuYX5gz4axgCNHelVThjNOnY4N9dtKoyt033_sj2mvlpLLGPnby6lWC3XYDVWJeNWQxGUC_isQXrMasmEsOWACpMuAvEOrt4vPuEGXepTbGfdRMQE9v3b=w1347-h952-s-no
 
Nice!!!

When extended, how is the seat supported?
 
Nice!!!

When extended, how is the seat supported?
Ah! The million dollar question!

When I installed the fold-down seat, I didn't have an answer.
The original seat had a fold-down wooden strut, but the length of the strut is limited to the length of the seat.

When using the fold-down strut, its short length meant that the seat was only propped at a 45deg angle. Useless.

I tried to figure out some folding mechanism I could make, but could not come up with a solution. For last season, I came up with a work-around by cutting a couple of 2x4s to length that I would prop up from below that stood straight up. It worked like a chair leg, bearing the full weight of the seat as I sat on it while I ran the boat.
When not in use, I just put the pieces of 2x4 aside and folded the chair. It was good enough for the time being.

Last fall I finally came across a nice, beefy folding mechanism that would hold the chair, and ordered a set. When they arrived, boating season was over but I did have a chance to inspect them and am pleased with the strength of the material.
AMWts8BQgxa3TCru_BEXU5b6xf8TEHcLy8jU1JyLhnS1uP98PXT1RGPNIKxCcSb2geNa2myrvQJyxZ0PVs0rYI5zEGIkN0qpcSHtG9eOI3df0KPrHgOtx_z4CKAbiPYONnm8iWgXlF1SE6IGUrSF7kffRdxT=w894-h799-no


Also, as a bonus, the folding mechanism will hold the chair away from the cabinet just enough to clear the locking mechanism for the sliding drawer ergo I will be able to remove the long 2x4 I had to attach the folding chair to in this photo.
I plan to install these new brackets into the boat this spring :)
AMWts8Cz-tq9j7ZHvPrC4ggmXHPwQcx0IWMC7o8IOA8CkofdjZ_85WfLgx_bngAkrWa-XmLx2uiMf_2NXutjrw-44DxxOElP4duijtXdF13ECaEV8Hi3Q8FX8PDWj80vrqh3jVaqj9pnCzvDRegyzqJZCgzQ=w1303-h952-no
Sorry, coming in on this thread a bit late in the day, but if it is a seat that folds right down you want, I presume you had thought of, and discarded, this original idea the CHB people used..? The pole, attached to a hinge via a plate that supports the seat, , swings back flush with seatback. I'll try to fine and underneath shot.
 

Attachments

  • IMG_7778.jpg
    IMG_7778.jpg
    179 KB · Views: 16
  • IMG_0010.jpg
    IMG_0010.jpg
    85.4 KB · Views: 14
Last edited:
Sorry, coming in on this thread a bit late in the day, but if it is a seat that folds right down you want, I presume you had thought of, and discarded, this original idea the CHB people used..? The pole, attached to a hinge via a plate that supports the seat, , swings back flush with seatback. I'll try to fine and underneath shot.
This is genius. I wish I knew about this before:facepalm:

I haven't thought about it because I am new in the trawler community and haven't seen much of what's out there. I'm always looking for new things and new ideas. Thanks for sharing the CHB method! :)
 
I guess now is the time to catch everyone up on the biggest challenge we faced last year- The front deck.
It was a triple-whammy. In my frustration working on this part of the boat, about 1/2 way into the teardown of the front deck in the sweltering heat of June and July, I coined the phrase “Idiot Fiberglassing”

“Idiot Fiberglassing” is a term I use to describe someone who has a leak in their boat and decides to fix it by fiberglassing the areas that are suspected of leaking. Fair enough to want to fix a leak, but “Idiot Fiberglassing” is going through all the work and effort of applying fiberglass, but either a) not prepping, b) applying it in a sloppy manner or c) applying fiberglass in the same place as the old fiberglass, bringing it up to an abutment, but then not sealing the abutment. What is the point of fiberglassing in this manner? What a waste of time. And the boat still leaks. Hence ““Idiot Fiberglassing” I can tell you, I muttered this phrase in disgust lot under my breath for about 30 days last summer working in the boatyard under a relentless summer sun!
AMWts8DEzqajUqo1Yot0BhP1SqM9uqX1K7-Bo1xYacKIKH-LSlNUbJcRAM4YlhWLkZmAlwTJfxwU80ZONhr-pOP5J_n4rjqK6IGEIqQ5oqtpTJbt-40SbGIeKUSp8KPafX6lEIVEbLtWeqKlKIiWZYWC3wl8=w470-h834-no


The problem started with leaks into the cabin from above. The stateroom ceiling had evidence of water intrusion.
AMWts8BfZzWneentWlg9xKHlBnThXpEFVPFX4v--K-j4kJ8zl28GYUbjSQBBO3HiQJCz6RMw8hTH5GZGetTQRj75Ud9bBBfk8mS107MN6psz5thIZoPEfLq52msQvIOM7cQMKWTDT7hWD8s77hAosYRZxBs8=w1016-h572-no


Here is a good example of idiot fiberglassing. The hatch was covered in resin and cloth but not sealed. Would it have been so hard to remove the hatch, fiberglass, then butyl and replace the hatch?.... Nope. Idiot fiberglassing says: “Lets fiberglass over everything!! That should stop the leak….. Um…NO!
AMWts8C04s8p0UH2i8W1NEYl4--HvfrWxBwVO1YQvgjrv82ldIMIyv38u1pmOKnGXVAS6QPalVCVGf4tpoL7lsQA-2G1ebrqq7sX-mYDrIDgkAMWtWHn4-tUtD-tNpWXKU35bBT1Gko0rg-9mBElWckNSwop=w470-h834-no


In addition to the hatch, we knew there was leaks elsewhere in the top deck. The other area that had water damage was portions of the port side of the V berth wall.
AMWts8BYBfFIRfZ8E0equJOmIL4DzL3KH27fllvnQNj1iVkfK-umz3bW9OrU2cnsMJq35wZSBOH7wk0Pz6fpKkrNTqSOYezGQ4sQT9nY0bLQex_XEDyr7a4ZiP8_UP_U0HSOdvdxyL3cea3v3E-3HmYmjN9T=w1016-h572-no


The stateroom port wall looked to be in better shape so I hoped it would hold out for a few more years. My initial plan was remove the rotted wood, clean it up, and fiberglass the repair. Wishful thinking.
AMWts8Cyx6X9CPw8BmKNyC8LO4r4fg73g-rcmziuIB7Rlhh5__-aSDyKbC_-ZXd-OZSAkuuhrvXGm5Z_qdVQf509rjhbCiTW4zi3mKzG4pru_vLHRltywNXcipeJV0N4tibvKbx1hzS7f7KO9fH7oNqz-wH3=w1016-h572-no


Once I started working on the stateroom ceiling from the inside, I could see I had a worse problem on the port wall as well. The V berth wall was also worse than I thought. And the head, located opposite the stateroom on the port side, had evidence of water intrusion from above as well :(. Things got worse once the admiral started poking into the wood on the port wall. It looked to be in good shape and I chided her for wanting to chip out the rotten sections. It was rotten. I was hoping all I would have to do is cut out a small piece of rot and replace it. Unfortunately, the more she poked the worse it got. This was becoming a nightmare.
AMWts8CFf1Z0D2NW6X8btAj_r3qcILOc58MS0Abgpjgl-S0SAo7jo8D0ZS1aKBZ32dM6H9EFtn3-OJ2ygCupRn0vmJmuyv0Vdo1vcucxl1s2ToTs9plC1PwRXfnUWGS_sOXsrk9tqWgNHKwXU3a2g7gnIDn4=w1016-h762-no
 
Last edited:
Greetings,
Mr. M. Hoo boy! We had a similar but not as extensive a problem with our '74 Marine Trader DC. Bad fore and aft decks with rot migrating to the side cabin walls. I really hate to suggest it but I think it would be best, in the long run, to remove the FRP already applied, take out the hatches and re-build from the inside out using new structural members and new plywood for skinning. THEN apply FRP to seal the whole shebang.


I can appreciate the heat factor and THAT may be lessened by use of a tarp covering raised sufficiently so you can stand and work underneath.


I also wouldn't be so hard on yourself. NOT idiot fiberglassing, newbie fiberglassing. Looks like your resin flashed way too soon (too hot) thereby not giving you enough time to properly work it into the cloth and around the edges. The shade should help with that as well as using less catalyst hardener when mixing. You might also put your mixing pot into a larger container with ice water in it.

Hey RT. This wasn't my handiwork. This is how I got it. It was a hot mess :(

These are my catch-up posts from last summer's work.
By the way, I did end up getting some shade when the final glassing was done after the repairs were made. But I’m getting ahead of myself. More to come ;)
 
Carrying on with the deck issue, here is photo of the stateroom ceiling and the poor installation of the hatch. Inadequate support and inadequately sealed.
(the temporary light was installed by me to give me some lighting as we worked on the boat into the darkness every night last spring...)
AMWts8Cyx6X9CPw8BmKNyC8LO4r4fg73g-rcmziuIB7Rlhh5__-aSDyKbC_-ZXd-OZSAkuuhrvXGm5Z_qdVQf509rjhbCiTW4zi3mKzG4pru_vLHRltywNXcipeJV0N4tibvKbx1hzS7f7KO9fH7oNqz-wH3=w1500-h844-no


First thing I did was remove the hatch. It was a lot of work as the fiberglass was laid OVER the hatch. I used a heat gun and knife to soften the FG and cut it away from the hatch.
AMWts8DFQXlvWVfccjkvgb_UbkvhF3aYaX0fhCMvX-2LY41RIM0EQ4yZ9fOduDI3jQ2qQ3Jb2txNPtdwGQEPsil9eAGQqQOGi32I-NJbmhGB8kbBDO_vlBIz8jIlf6X502_JuWYEzZflL1Tj395T3uKtBYVr=w1500-h844-no


Next I had to tackle the diesel heater chimney in the same manner, Fiberglass was laid over everything..sheesh! This is what I meant about idiot fiberglassing not stopping the leaks. Water would still weep into the boat!
AMWts8AGnQMP0FVJcbKFwpuRhds_kx0DABEbbbjzem2n86bWbaIsthjI67Op8iaZex8hN4LhBMTk4urVdRUmPXeNU44fKLR2-RZXNDycJOKzY9dBhRc4YZ3YxO2VKv8bIdBHi3FYOZPuDETtVoUo82Rmpy52=w1500-h844-no


Here is a good shot of how well the heat-gun was at softening the FG and cutting/lifting it off.
AMWts8C9VjAE06HwY3wN1esNXGvXWjYaC6GPeuufUohnO6gIM-NJ-fxsXrapd6MYLdUL8x9T-0GO7viPMOwcaOs0McEfODdMFSjbzu_upGyuJAFl9vOGV803SRPD3o5zKPrb13zNcMXZeo4nv3yHG-AIjxLa=w1500-h844-no


I also removed all the caulking from the butterfly hatch.
AMWts8C44e6046V-wuNbnGDnxTEOvtz7X9NaZpy2Xmc2dth6OMpELogawE1nOTOSxz6czyoaEbSdy8VvDjz1t6cXX3XT1_yd7xrET-DTnIUj_GwBGu3pRBQSrxNLiN3jeg0DqIq3EEp2UKem-KR25JAy_Jfb=w1500-h844-no


AMWts8CjCdGTkQc9aIluK17fQIV3Gow926tbJNUQRdc0Ez_kVR9FYgOJ6goFi7Z0XGXIuTkYkO9lA9_Zv7A159h0q39rIQfINdXy_rrH9ui0YQ1oXV7Sd1ELKYuVLhdLK9d3GLDDsAt4ktn1L1pcmtlflj9n=w1500-h844-no


All the hatches and chimney removed. Note the flanges on either side of the top deck. I hated these stupid things as they held the water on the deck and ultimately, led to more leaks. I don't know who put them there or why, but its inadequacies will be revealed in the next few photos.
AMWts8CYj3lfQppkypg8nbqGwolSknq0doJE-GsfV9KkucWY4Rf6z_McwEPcebA7l7Ts8CQbKBhnrhLJXRwgiu3MlrpaqYzKsX4FNxdClGhOFcjFjH9KxbJooTIVXp67V-8j6M3_B7h7FVkOoZpIwjI5h9cJ=w1500-h844-no


Another look at the water dam these flanges created.
AMWts8DynEWHGLg_Zc_dc7i5hsoOpRnrLI7ovHrTFKULPDGRCSKqou1EV6lN8VoxWrtcGIS3haB3Io0Esu1IUZlGsFMXpC8XF6WbnZCZxf6WioN3pHnBrs8uhfrnQ6KC8nJ2V1wR7ooAbUW3M4cLSPhGyr8C=w1500-h844-no


A look from below. WHY??
AMWts8Cg02PM78nQxaMNEolbWgz8kFjGKU8p8Zszg6Eq6fTbbYaCpyRaGwXB6H_r7SLRCDIjhwuS7W6n3v-gqNfp3dM630uzKh_YMZQD0NlVYfVfexhZdMXTVhpwMLgEPNBZu9HgqcGTI3dAXHgDDnjQGaKw=w1500-h844-no


Removed these suckers. Good riddance. Notice the opportunity for leaks abound!
AMWts8DDMs0RSeiH4resmJuRdat8f52KviTQ3IkFw4EsKoq47csSBRglvHIh-7DDq_8wGAPSLecL-iUwuITQhdKGhvHvF5bNTDtChdZU-1xyZ66kDMmu9UdaCFaLTdHZX2URhClLIqh5VOEAVORzjq8HhMDN=w1500-h844-no
 
Still posting catch-ups from last summer's work....

Sometime in this boat's past, someone once thought of repairing the leaks and soft deck walls by adding a second piece of plywood to the side and then fiberglassing over it using fiberglass mat. As you can see on the last two slides from the previous post, the second layer of ply on the side meant there was a gap between the new ply and the top deck. I am guessing that is where the idea came to add flanges in the previous post. These flanges were screwed to the side to make up for the difference in thickness. Of course, the flange was sealed but over time it leaked again. Now that the flanges are is gone, I started removing this second layer of ply which by the way had some rot in it.
AMWts8AhtzviKIpFn6fpmfcP7sY-DkN7SCx84lm3_U21n5r3O4u18pHo7_th07sO_cJ6Oxq5p7zyaQienCDEYl-mIvmOdXnD57uj-iCmDGXa0bUmEY2p7Pz5RJhRqR3CDm1KyiPaaXTGwua-9_n02SkpVNnD=w1320-h743-s-no


Once the second layer of ply was removed, I think I'm looking at the original side. When inside the boat, there is a lot of rot in this wood.
AMWts8CJzumdcKwEJDLQPpnb66R8GgPuJKBNzkR3l1TnI5MXqRtoeTqyBxiQb26VGGdxF3oe45n5T_gYmwPXQ7qr_ZoLG6cTm1fdZbykdkqupQn3MMQAuAXhe5VjFcdSeiyzj8g6o1fhpwZL0vGGbVOB6VIR=w1320-h743-s-no


Now I'm starting to remove some of this material. Some of the open areas seen here are from when the Admiral started picking away from the inside. Back then we didn't know the true extent of the problem so, so when we got to this part here we realized the whole wall had to come out.
AMWts8Azqecd0Y0QQnDjYK43yT0xppnMNoDc2O9DyWcSMXEOnxYsiqpLpu4Dt_9XeXUOBS0gzLfcO9TKFYNwL1iaJVjtHNJt2RAjTghMsvDn1SxB5PoSRj21-obHppEOX2mv9Y5bIL3luJpp4WmsfC14dUkn=w1320-h743-s-no


I used a circular saw to cut the periphery, and started prying out the rotten wall.
AMWts8ACFJ2PrZ2-3H6dG1l6hR6OFs-ve7QiCFKsIKaeEFEIuoRwv-CQtTRoWUIUPIXZ_R0r5K0iIdI7PEUbkwgRvHoyol4AIDErcNLZUyuPhsd67LkrYOLVFzIEf9Fhi_jRIjyJWJM1AFAawaXdh-yPl2tE=w1320-h743-s-no


All the rotten sections have now been cut out. At the bottom there is a flange which is the actual fiberglass deck. Thankfully this was still solid, which created a seal from the decking to the sidewall.
AMWts8CmoOWgHa1C0XgKDdz8Vt16fky_ExKtz-07ZdBkvPllQ6kUSICDjL7KSzOWXHb_BXpOHzBj8Vfmlh_4W4qCEY3yddQrHb4CZL8DvEB_0c5zLx4BuN7OcNBD4U2yvkLDqp4dnrn4eYt2bGNzvL6nj3vP=w1320-h743-s-no


Another angle of the same cleanup. Notice the 2x4 inside the stateroom. This was put in place to act as a support from the top since the entire sidewall is now gone.
AMWts8CqVoNurBBsXCsOm1vpbNenxGMuyMyAm67zC9KV_fKGgjv-Uv-cQIMhdvKNviXUbOgvdwDfTHVpaKYYOAtuAhP8GaAUgl4m0MKa9_W4nEn0MFYYpH-ZYMJAqF9hrFF_ndgToOKKmsoihe1Ya068nw8p=w1320-h743-s-no


I decided to build up this wall using two layers of 11 mm plywood. The two layers will be glued and screwed. I found this to be very advantageous, because of the Curve that the wood is required to take would be easier into separate thinner pieces than one thick piece. Also note the conduit that I embedded into the decking. I discovered that most of the rot that was found on the previous plywood was because the wood was put into the trough of the deck. Water draining down the trough would be wicked up into the wood. By adding the conduit, it acts as a channel to drain the water down the deck and not get absorbed by the wood. Later I added drill holes to the conduit to allow water to weep in and drain.
AMWts8DEd3dp0SpyJow9uf3nTjhIwNtr3Cup5MvtECCxRJBA6CqlmJ8sPUqriEXPMa7vPEruNcwskN_O0YAYZh-mk2kTyCe-3K6LtRejBd5LqSvA9gaF7zL_FvX2TyLri21_ffSiz_OZJsUOWF27tMIvVXA3=w1320-h743-s-no


Here's a close up shot of the trough I was talking about. There is a lot of rotten dust still in there that I will clean up before installing the conduit. At some point in the next few years, all the teak decking will be removed, but for now we intend to leave it for the time being.
AMWts8D57PwERWD6-vW6M9j3fIsczVcAol-8eupOooaVO8A5U5aqz24iDrcdRcQ9tkfN5Dw5B68CNuG4WzpHvAaHyRbKmCtPc0dWTW1cWFiRFhDSB6Z1HRnoNOgaig_Q1ldqoaZT_L_AN1_d6zJmQviYaML3=w954-h743-s-no


Another shot of the conduit. The conduit is nested into the trough and does not need any glue or screws. This is the first layer of ply, there will be one more layer placed on top with staggered cuts so that the seams do not overlap.
AMWts8Cr-YO3XP_onjf1l-NNGqPkAulzx-7oU9npJ05KHvTmf83NYy6o_6zk7drUg5q743KLwkwbbOuujRS3LZ1yk-nSbQZklq8PN-tRTTpISY0iVamSA-JzEbSHUG_KQw5FtAuLhmlEqyK5heImzI2zEFCk=w1094-h567-s-no


This is the second layer of ply. It will eventually be trimmed down to the correct height.
AMWts8AxRLPjcLQsY28nZULNCHMMSEAjNz3BY6Nlg-pUtpUORdHVZ6_eJQV4iNXDHqKlHRT70sfEK3eRk9SRDH3JB1ismaQA-QzrGm2bQFQ6-yU-H2jpfHApEqPIvqLjGeutvWpHUeUm_eb1Emwpol93zH-e=w1320-h743-s-no
 
OK you impressed me.
 
OK you impressed me.
Heck, I even impressed my self.

Last year when we started working on the boat in May 2022, there was SO MUCH work to be done, there were mornings I got up and my mind was numb. I was so overwhelmed with work that I did not know where to start. I could see no end in sight and the matter of the rotten wood on the front deck over the Vberth & stateroom was not anticipated. The more we looked, the more rot had to be removed. Some days I just wanted to sit and cry. But we kept at it. Bit by bit, day by day.
Planned launch dates came and went. End of May.. HA HA.. good one! That was never going to happen. Mid June? Nope. Nowhere near done. End of June? No. that was when we started tackling this rotten wood issue. Start of July? Nope.
At that point I told my wife we were launching in mid July "I dont care what is still not finished"
We busted our buts and in mid-July, we launched. The rest of the summer on our boat was heaven.
This spring we still have more work to do.
But between now and that day, I will continue to make catch-up posts of last years work. Hope you like it :) :)
 
This post will represent the completion of one of the last major tasks on this boat for 2022. There was one more major task inside in the stateroom, but the outside had to be finished first.

From the previous post, once the sides were done and trimmed, I wanted to redo the entire top deck. Because of the staggered levels, I decided I wanted to have one smooth layer with a camber to allow rain water to just roll off the deck. To do this, I had to build this up in two layers as well. Here is the first layer which is just to raise the entire deck to the same height as the center section you see here.
You may notice that it's made up a little pieces, but that will be okay since this is just filler and the top layer will be covering all of this.
AMWts8ABMN3VML3a4AJQTK-cFJFVz3PBxCRYgoCT52L7OrlauvlSULUY7Gg-uqxJTyfCw2A7KDHDkdUK0A6W5NwSMzFbnpfmht0N11hOSV-dA-fylvMA0Rd9YSKdW1-mKs9zNkB-6Z8vKDv9BHM2xu3DUAC8=w1500-h844-s-no


The first layer is glued and screwed.
AMWts8AsozK_RlF-g6Quz-CTrNHziywHAWBEH6RwdccrbTFs4l0UKwsOpwAQxPxz8qfKft9IL2YLY-RWhZZPP5v_sbUP79THf4K14tKjG4BELwbBQJFm8Cf5TZcs05M6riVscQtJwKrAqAr3hnDoUr0CwJ5P=w1500-h844-s-no


Here is the top layer that I cut fitting almost perfectly around the butterfly hatch. To make these patterns I used roofing paper taped together and marked everything on the roofing paper in the exact same way you would template a kitchen for vinyl flooring. Then I used the pattern to trace onto plywood and cut it out.
AMWts8DndK5Zx61YhkYSWewVv_A1Qehk5ulJjEIZXtzdwg-wxnr0Ozkj-HBURxKa5vgiPBo7UV1t-m4jw7fcQUCGnUNJM9Ls0X6igpe3grEkLlxICneDPr-w60u007AtUO3qRFoojnDkgVs5gfHlaIj0Ha0T=w1500-h844-s-no


This is the top layer rough fit. The notches for the buttery fly hatch fit perfectly. There will need to be some Center sections added and unfortunately I ran out of wood on one side you can see it slightly short. I'll fix this later as well.
AMWts8BL9m2P7elY_8WN-yHmUOExABbd1Pdz6ZJQaFo8NrKCnLgQhmk3VbE3dAbDSTiGwmnLEM0yvQjV525SmgIS7S_9Wmh-XB0voOH3OJjl_f7gfGjRPV20AUOUCV2CBRwSOOpP0eA2Pfk-R16YVVZD-X89=w1500-h844-s-no


Top layer getting glued then it will be screwed
AMWts8A_G0rZTJcKC62zinQdyYYiYU0NnpzL4gqtOAtJXBaUUj1KXiL8UVXCKBl1GwqTRK0hL4BuDn8MJ-WKFdLa6RnWvd5XQIg_47g0mEskTg3MO5LPaHmdIbrKjXcSEpejzYAdy94LaCavzRGBT0WeIw7R=w1500-h844-s-no


Top layer glued, screwed and routed.
AMWts8AJVMLrNmgDbkLqw-t3t7zhwMyOPQ9pXoXPRnpFRMixPnxkNtbuCPV2pdEcaRnzcfV2QbGtZg1rolu980Cj_ki4D2mC-zp4tLU8gdnpCiRaUmz6KVI1t9ihHwHByqIMX-3s0VwMrjObNiouvUgJXyhY=w1500-h844-s-no


As RT commented at the top of this page, all the work I was doing was in the blazing hot in the sun. Eventually I wisened up and started using a pop-up shelter to give me some relief from the midday sun.
Only Mad Dogs and Englishmen…..
AMWts8ClQYHbEKwoMIV8xQPP6uMz8MiMVDFfVW0J3MUqFY-wTEMKiQ4cIPRwJIWhxGn7qRmOjw8kY3DbfiB2tnBWTADOV07q0erO2T_n_9A68ZJ0bHXG7tUnSSI1SrZlUXXNl67usSSSkGFYnO-_Ew2UCO2o=w1500-h844-s-no


Before fiberglass, I gave everything a shot of resin to allow it to soak into the wood and reduce its porosity.
AMWts8CSqjWFZqhRgVzLQPLBj-52iiu-4aWdQCrt7pG4wEtYYZyyEaBEmJO9iqxKtRWTKs_ALz8N6DluXBfcoqH8eLL9d6arWfxZUuExEa0DmaFrosqAoayp3DLVWTLmo6JLz6SZgeLTcaoncQ5QeksyagiM=w1500-h844-s-no


A little bit of Bondo here and there to fill in the gaps and smooth it out.
AMWts8CYkdjMv_5ag4TXVqRdumZJ_mvUlZ6DTB1NCps1ynHrbyHizxEW66aup4on_bo4clkMOL1YCs4idcHtQtnMJJITh2EUUafBy73PAmg3PCBF1m-nAzJxlpCYHH_W_lYVyqHraLvdV-XoqJMNv-pSR5j6=w1500-h844-s-no


After everything was sanded, first layer of glass. That's come along way from how it looked when we got the boat.
AMWts8AbfUVrKyKh1C6xjstB-4RLrS5cK49gDztTsPlcni3VUTG-H2DaQ4xQNM9VUFqsLjWaNI9C01plWyk0ooZJASZEB8Bm_Usd07xkowtyIF_3iYH9C9XiaeG_y93NkcYXXyGyRd3HegOhkwIDJ0w7DTKo=w1500-h844-s-no
 
Last edited:
"Impressed" is not nearly a strong enough word!


"Inspirational" is much closer! Keep on documenting. This is really interesting!


Phil Little
 
Is there any air gap between the original layer, and the crowned layer you put on?
 
And I thought I had projects on my boat..

pete
 
Is there any air gap between the original layer, and the crowned layer you put on?

There isn't. Because the deck originally had a step in it. It naturally created a crown. All I did was add filler between the steps. Then the top layer covered both, and was securely glued and screwed.

But now you've got me wondering. Is it advantageous to have an air gap?
 
Thank you so much for preserving your vessel for future generations to enjoy. These are really fine vessels, despite the bad rap they get, and will take you anywhere coastal you want to go. There will never be any more of these, they need to be saved.


Alan & Darina aboard SeaMoose
Resuming our loop adventure on Friday
https://youtube.com/@theadventuresofyorksieandme
 
There isn't. Because the deck originally had a step in it. It naturally created a crown. All I did was add filler between the steps. Then the top layer covered both, and was securely glued and screwed.

But now you've got me wondering. Is it advantageous to have an air gap?

I wouldn’t think so. It could trap moisture and get moldy maybe.


Comodave is exactly right. :thumb: 
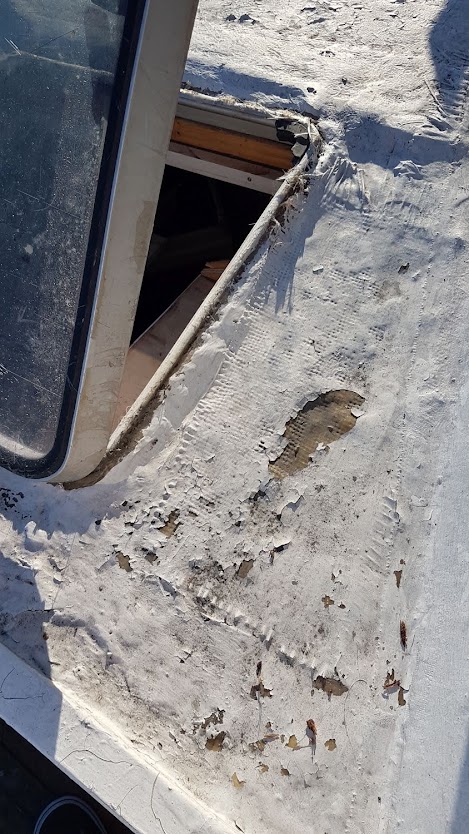
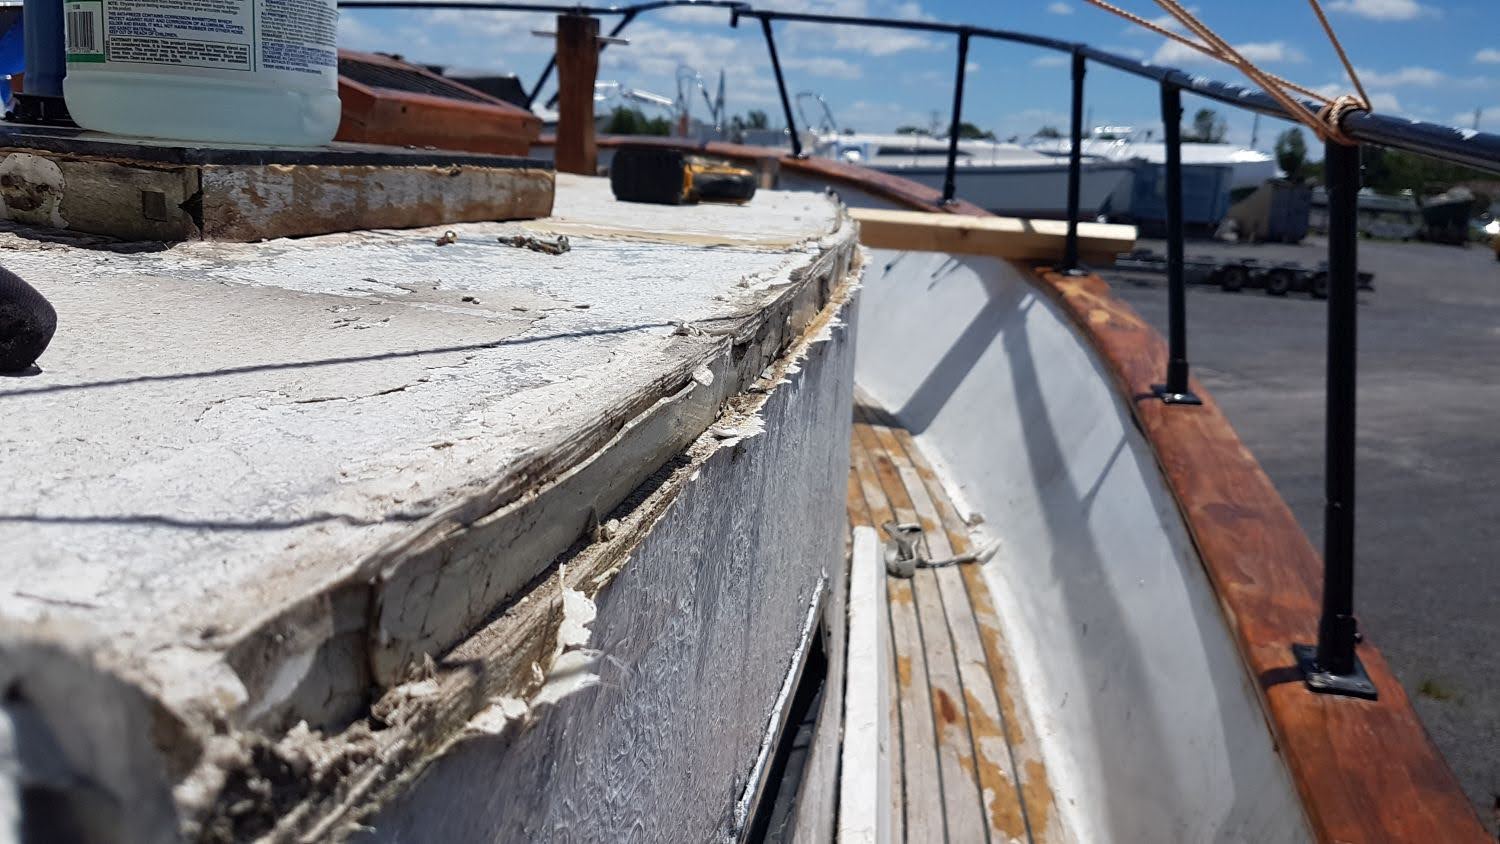
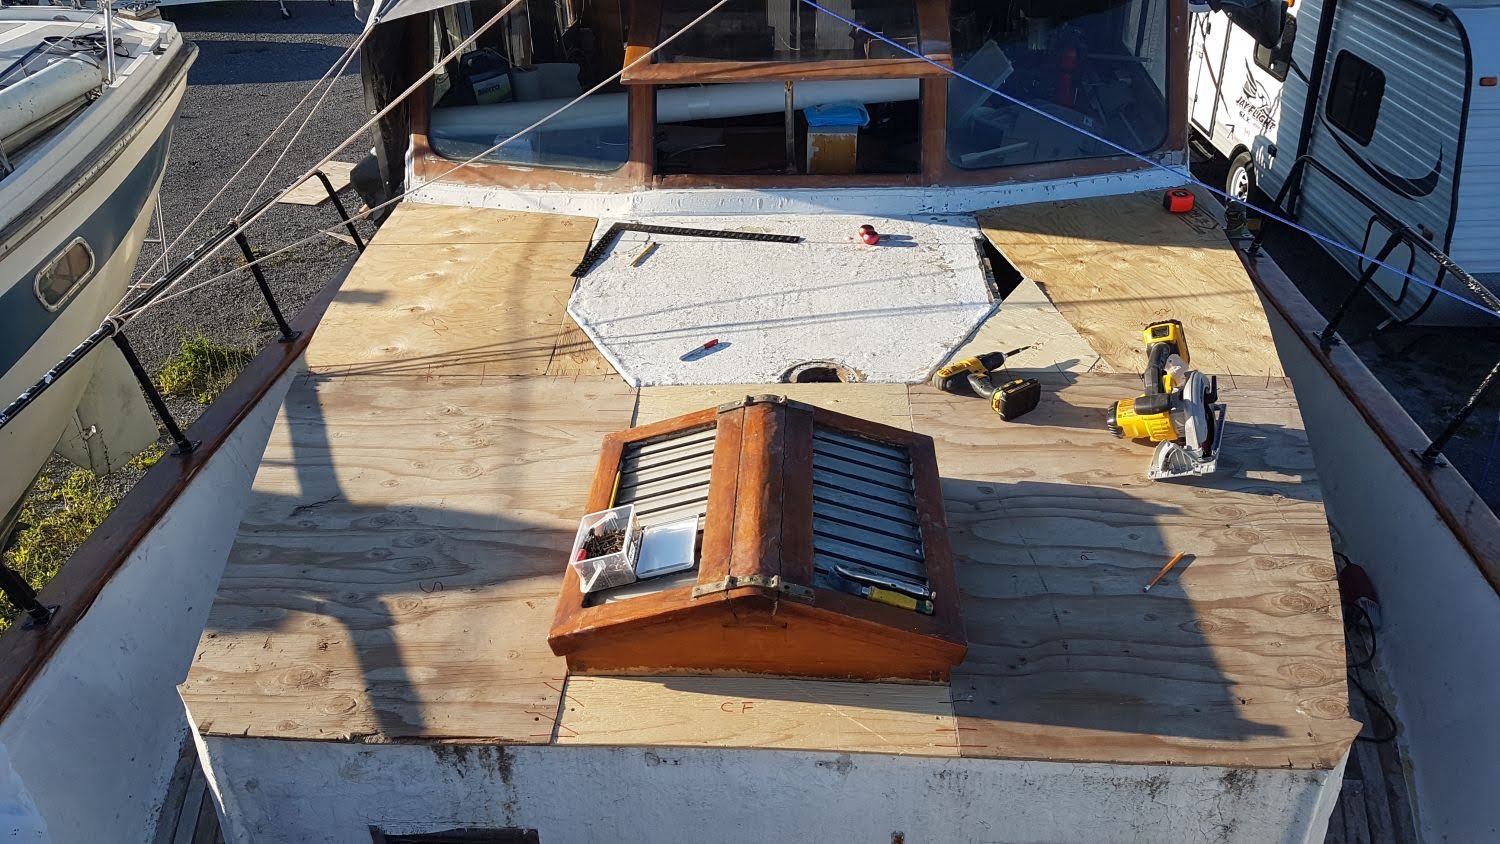
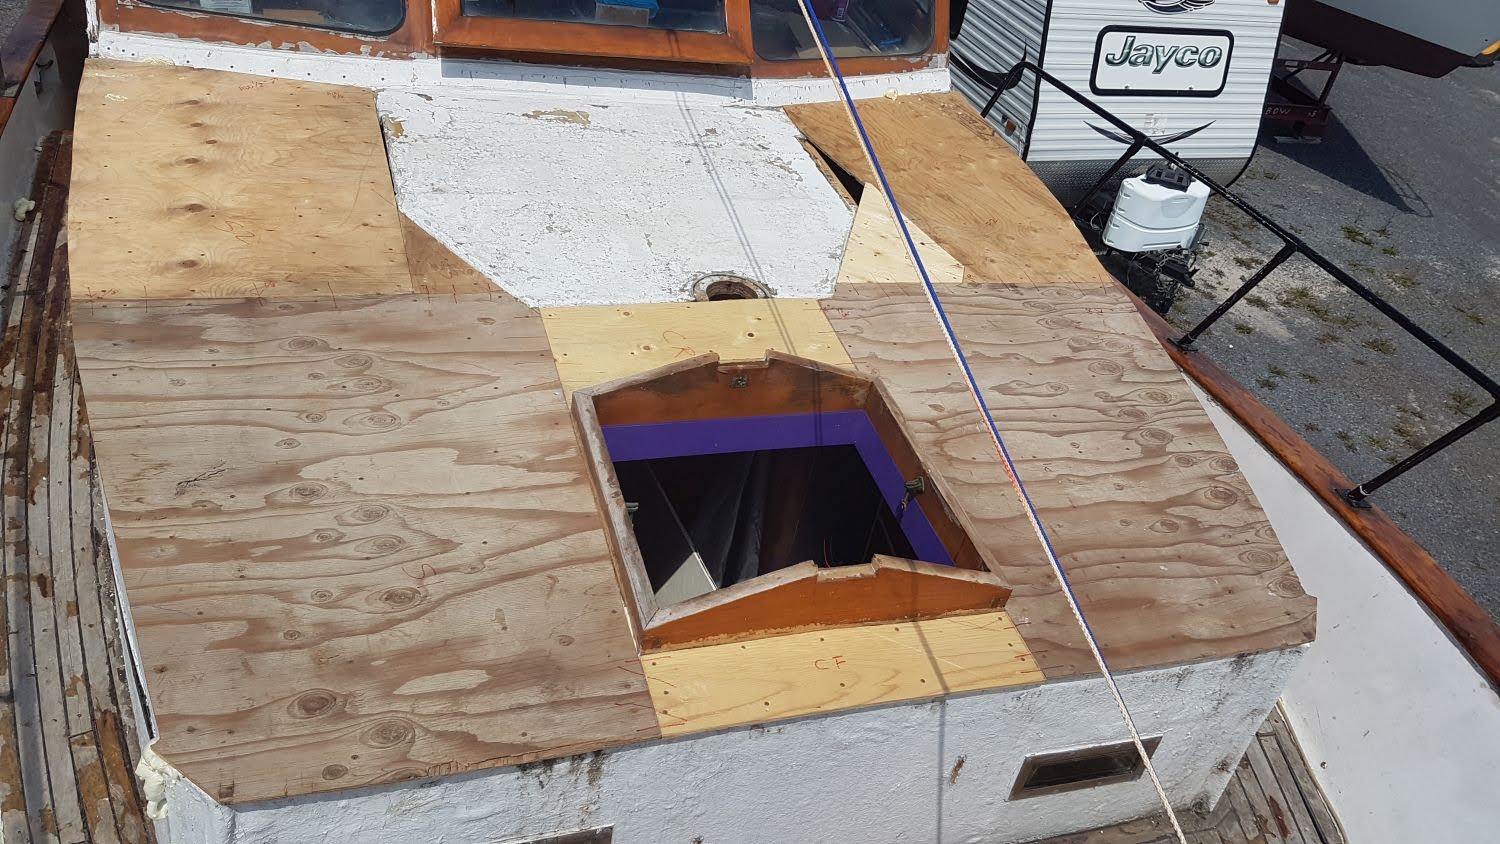
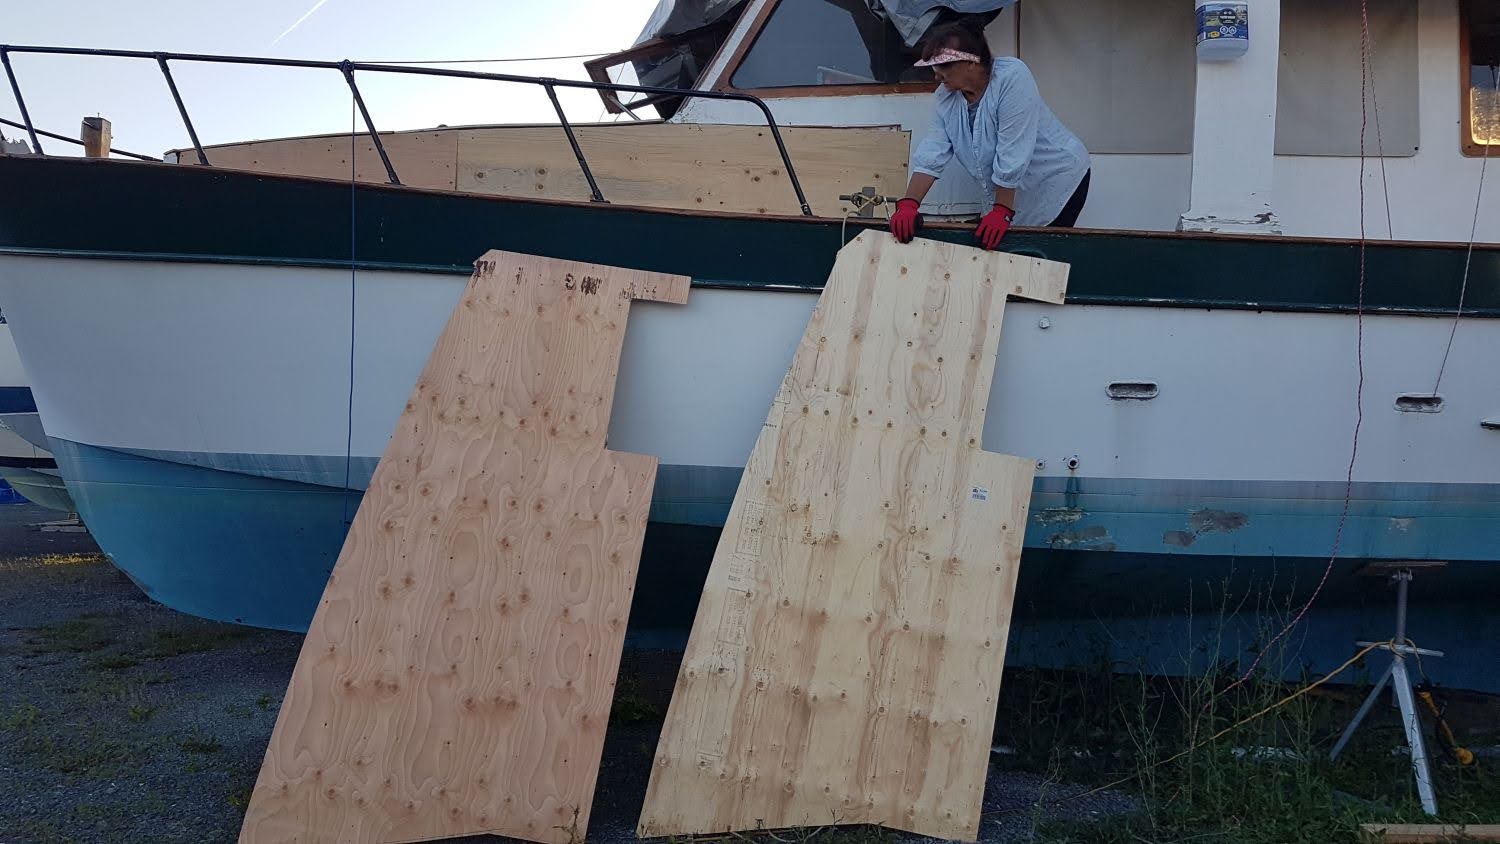
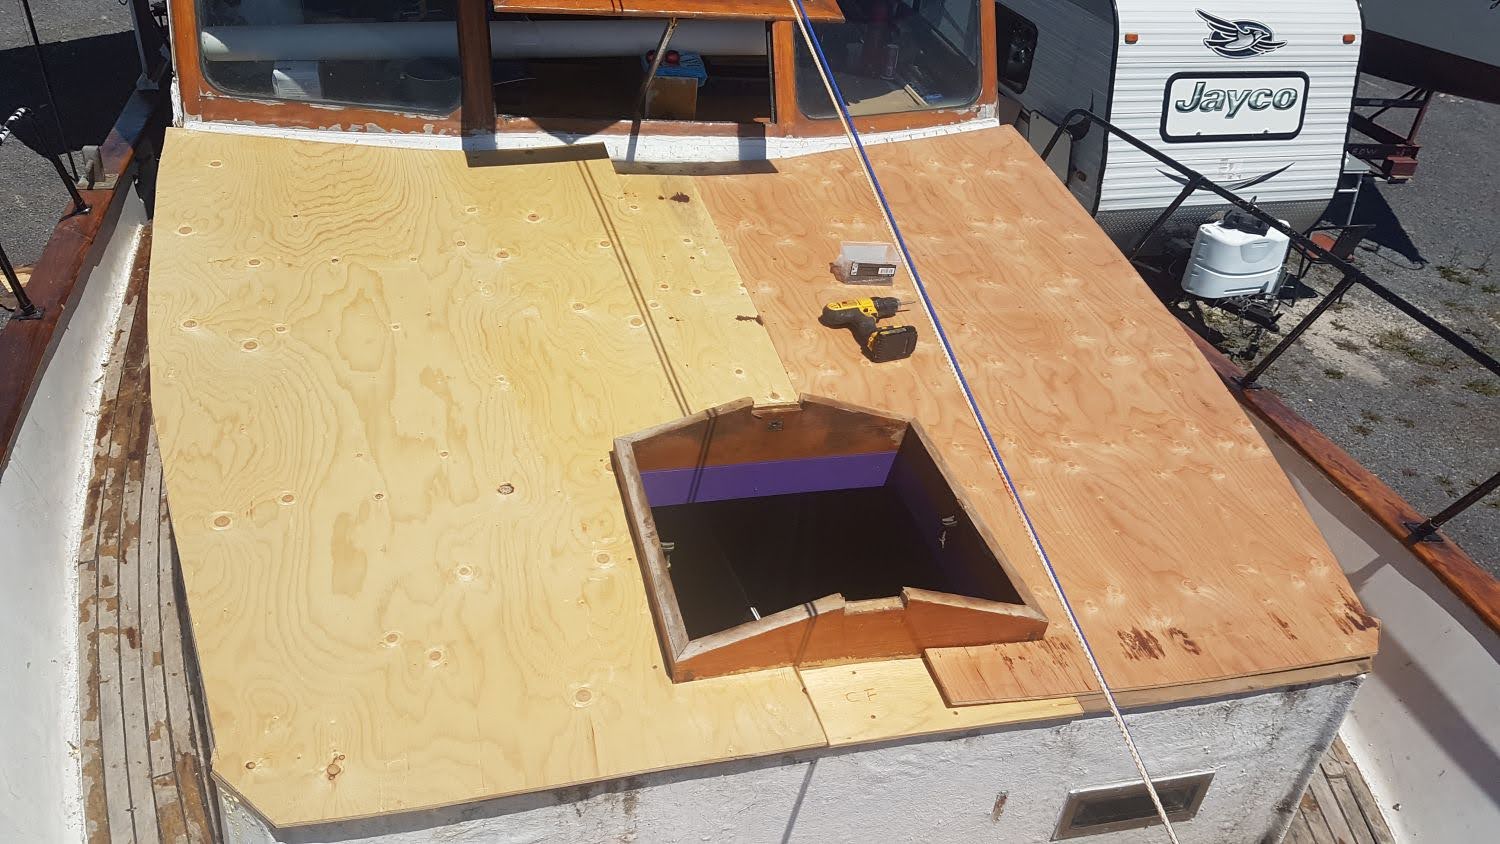
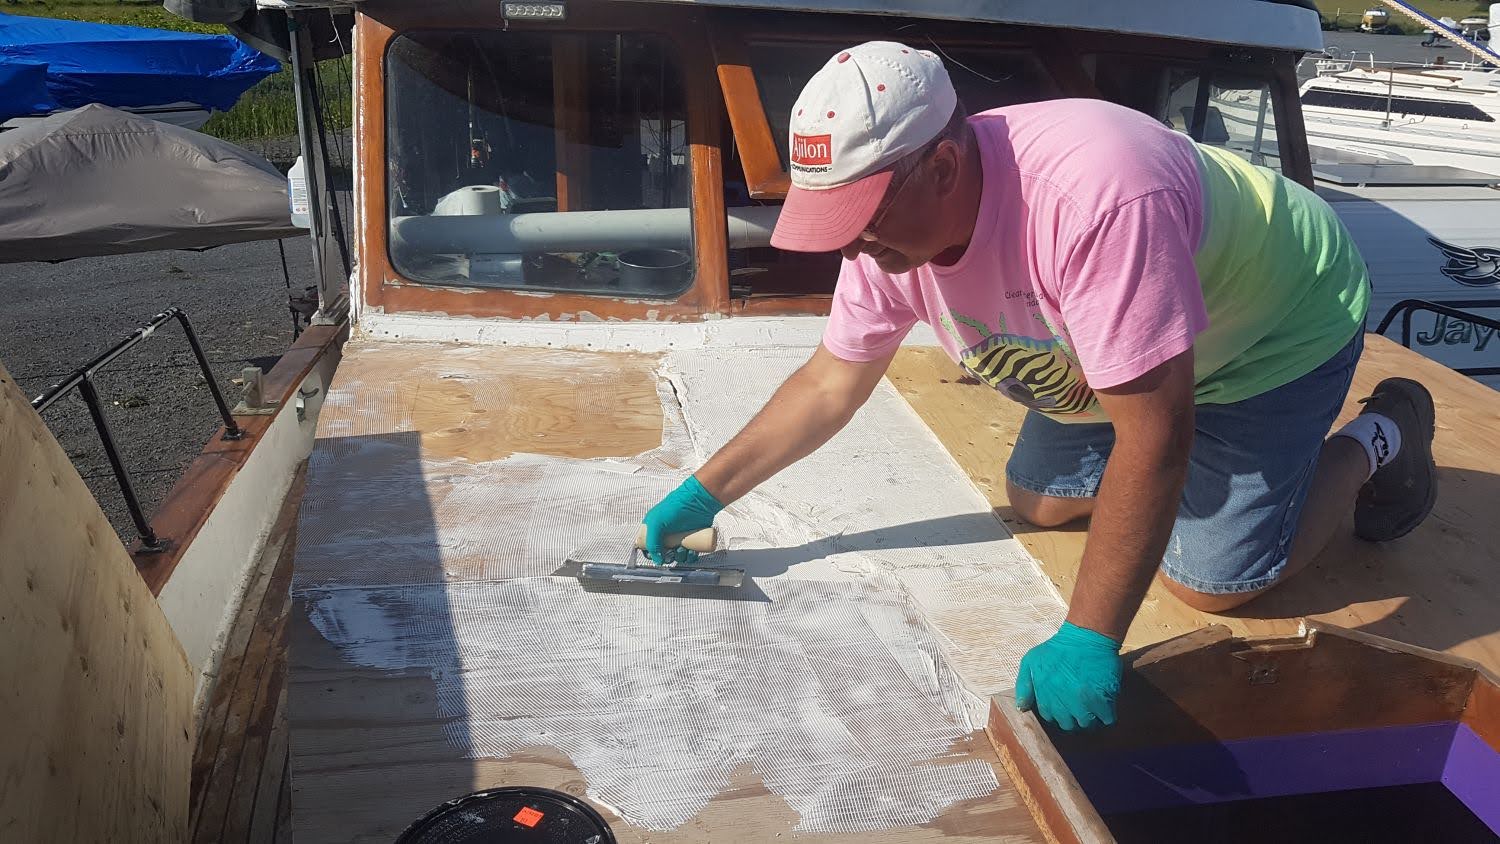
I would want no voids in under the final covering.
 
Thank you so much for preserving your vessel for future generations to enjoy. These are really fine vessels, despite the bad rap they get, and will take you anywhere coastal you want to go. There will never be any more of these, they need to be saved.


Alan & Darina aboard SeaMoose
Resuming our loop adventure on Friday
https://youtube.com/@theadventuresofyorksieandme

Thanks Alan!
We have more work to do in 2023. I'm sure everyone here knows the drill...
Step by step, bit by bit....
 
Don't have any more pictures of the front deck repair. We launched not long after it was repaired, I only took a picture when I installed the stateroom hatch and an overall shot from the flybridge. There is still a head hatch to be installed. We didn't get around to it in 2022. Maybe in 2023?

AMWts8BV8N97FHHLFX9PsAcMG22b-dGgJUmriQlpiOe2OMirvErw90hbRR3z7DPdvlGForhfutModtNChEFMzDt6jYKpckLZrHQTnxxxxavnzAK2graSEzhPhV711FeAPIAv_RTobSWPldvwtV78adBnOnQM=w1500-h844-s-no


AMWts8AsFZfOuuO3NUGGWTRpowcCwuubk95dnI0wiUxJozDrn5ac9S0ue-GrXh2gIaA9G2fblwTXgwLX3XkQoRMi_9q8GeUQI3QLckDOtREn_Gi8W5fzviyEH1PYguKXekyOXrSwHhjWXZFvfw83Qd1O0aRT=w1500-h844-s-no
 

Latest posts

Back
Top Bottom