Uniflite 42 Double Cabin Refit

The friendliest place on the web for anyone who enjoys boating.
If you have answers, please help by responding to the unanswered posts.
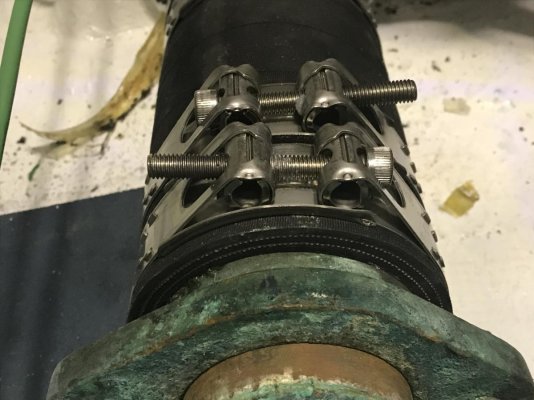
I am doing the same on mine. Got the shaft log hoses off, ordered new Buck Algonquin hoses, and tried to put them on yesterday. I ordered 3" ID, but it looks like I really need 3-1/8" ID. My supplier says the next size up is 3-1/2" and to soap them up and put them on. There is no way I am going to stretch the ID by 1/8". Original is exhaust hose. It looks like exhaust hose is available in 3-1/8". What have you guys used?
 
Mine is also exhaust hose and my local Chandlery advised I do the same due to the size issues. I don't like it but not sure what else to do.
 
Thanks for the reply. Did you use the hose with the embedded wire? It seems that is what is available in the 3-1/8" ID, but I have read that if using exhaust hose for the shaft logs to not use the wire type, and also a minimum of 4 plies.
 
This is sparking a fuzzy memory from two decades ago, but when I was working on my sailboat I ran into something like this. I remember turning down the stuffing box to make it the correct diameter (removed it from boat - already had engine out anyway). It was bronze and had plenty of "meat."

I don't remember doing anything to the stern tube so maybe in my case it was two mismatched sizes and a too-large/more flexible hose had been used to accommodate (?). Too long ago to remember. But I do remember that, like you, I wanted to use the special Buck Algonquin stuffing box hose (it's stiffer - yeah no way are you going to stretch it!). After the modification I was able to use the correct hose and it fit both ends correctly.

May not be a possibility (or help) in your case, but just figured I'd mention it.
 
Original shaft log was Shields Marine exhaust hose 3 1/8 ID.
20171102-142735.jpg

If you see any hairline crack... should be addressed right away!
Yes unforced wire will rust & can cause to leak.
Order 2 Shields Marine series 200 no wire exhaust hose 3 1/8th ID X12", be done with.

Jay Bremerton WA
 
I don’t think that exhaust hose is supposed to be used for a stuffing box. The stuffing box has some twisting on it, maybe, that exhaust hose probably isn’t designed for. Have you put a caliper on the stuffing box to make sure exactly what size it is? Mine took 3.5” ID and 4.25” OD. So the hose wall is 3/8”. I had to cut the wire reinforcement on the old hose to get it off but the new hose went on pretty easily. What size is your prop shaft, mine is 2”.
 
Original shaft log was Shields Marine exhaust hose 3 1/8 ID.
20171102-142735.jpg

If you see any hairline crack... should be addressed right away!
Yes unforced wire will rust & can cause to leak.
Order 2 Shields Marine series 200 no wire exhaust hose 3 1/8th ID X12", be done with.

Jay Bremerton WA

I would use T bolt clamps on the stuffing box. I like the AWAB T bolt clamps because they do not have any welds on them. Instead they have an interlocking mechanism to hold the clamp together. So it will not begin to rust at the welds. I also like to orient the clamps in different directions on each end, one to the left and one to the right so to speak.
 

Attachments

  • B6B3E942-5CAD-4329-81E4-29B2D04F5B32.jpg
    B6B3E942-5CAD-4329-81E4-29B2D04F5B32.jpg
    122 KB · Views: 44
They are 1.75" shaft, swinging 26" X 25" 4 blade.
Uniflite is a such a well built boat, this wonders me also why.
I still have 40 year old original shaft log hoses on my Uniflite & they're in pretty good shape still plus many other Unis that are older.
Heck if they lasted +40 years... they're just gonna be fine.

Your shafts being a bit smaller is probably why you need 3” hose instead of the 3.5” that I have. If the hose is original, it is time to replace it since you are working on it anyway. Have fun.
 
Looks like I opened a can of worms here. The Chandlery sold me a Trident hose when I asked for stern tube hose. I'm not sure which variation but I'll confirm the type and fitment and see if Trident recommends it for the application or not. The hose I have is 3" and honestly I have not yet measured everything in enough detail to know if there is a 1/8" problem, it never occured to me to check for that.
 
I got my stuffing box hose at General Propeller in Bradenton, FL. No affiliation but they gave me great service. I would want hose designated for stuffing boxes.
 
Did some work prepping the new to me rebuilt raw water pump. I found a local marine pump rebuilder that had one ready to go. Had to pay a core charge since mine was not rebuildable.

i-PdhbtR3-L.jpg


Next I had to move over the fittings from the old pump. The tools required:

i-4VC4fVz-L.jpg


Without heating the pump body, the fittings would not move at all. After heating they came loose fairly easily. A 24" adjustable wrench helps too.

I cleaned up the old pulley with one of my favorite tools, the buffer/polisher with a bench grinder's brass wheel installed on it.

i-7mWDHLQ-L.jpg


I hold a lot of the work in do in woodworker's vices. They are great, everyone should have them installed on each of their workbenches, useful for so many things.

Did a fit up of the assembly on the engine, it's ready for paint and then installation. I had to order new grub screws and key, should be here in a couple of days.

i-Vhkk8HG-L.jpg
 
A lot different than mine,
Mine is a gear driven raw water pump with 2" copper plumbing.
 
I started working on getting the cutless bearings out of the struts. I need to do all of this work without removing the shafts from the boat.

First job is to remove the grub screws that hold the bearings in place. Some of them, the bronze of the strut had been mashed over the screw and would not come out.

i-vckCrRk-L.jpg


I stripped out the first one trying to get it out, so then I got a sharp chisel and dug out the bronze from the top of the screws. That along with some heat from a torch I was able to get all but two out.

i-BrXxvK7-L.jpg


One had to be drilled out, but one came out with a screw extractor (ez-out) once I had enough heat on it.

i-H6qFwJh-L.jpg


It took about 6 hours to get them all out.
 
Next was to get the cutless bearing out with the shaft still in place. I ordered a Strut-pro to use for this job. The tool was too big to fit on the forward strut (each shaft has two struts) and I had to modify it, but I ordered a couple of extra parts for it and modified those to make it work.

Here are all the parts in the strut-pro, two of the parts have been modified by me to give more clearance on the bottom of the hull where the short strut is located.

i-D8Vj7SZ-L.jpg


The strut-pro works by clamping the two half shell pieces between it and the strut, and pushing the half shells into the strut therefore pushing the bearing out. The half shells are slightly smaller than the bearing so they push right in and the bearing gets pushed right out.

Here it is all setup and ready to go:

i-3qBWdck-L.jpg


The bearing slides out easily as you tighten up the screws on the tool.

i-BrvnJqG-L.jpg
 
Due to size constraints on the tool, I had to push the bearing forward and it was trapped between the hull and the strut.

i-9v2MhrH-L.jpg


I cut the bearing off and will use the tool to push a new bearing into place another day.

i-zcsnwLm-L.jpg


The strut-pro makes dealing with cutless bearings really easy.
 
Now I have to deal with the starboard stuffing box and stern tube hoses.

Getting all of it apart is no easy task.

I started by trying to remove the gland from the stuffing box. A couple of pitman arm pullers from the autoparts store as well as a shaft collar from McMaster Carr to keep them from slipping off allowed me to get it mostly apart.

i-LwdDXfW-L.jpg
 
Even after getting the gland most of the way out of the stuffing box, the gland is still stuck to the shaft really badly. It won't rotate or slide at all. I took some inspiration from the strut pro and made a puller out of plates of steel to pull the gland forward (or the stuffing box as well)

i-kxZ57QD-L.jpg


Here it is in use. This is a tedious, difficult job. That stupid gland nut is really stuck on the shaft and I as I tighten down the bolts, it resists all movement, but once it's tight enough it 'pops' forward with a loud pop. At first it would only do that if I heated it, but it's getting slightly easier as it gets further forward. I spent 6 hours wrenching on this and moved it forward only an inch and a half.

i-tbMLTBd-L.jpg


Not a fun job.
 
This is the kind of thing that makes boat jobs so hard sometimes. The gland nut should just slide off the shaft, but there must be corrosion on the nut and it's tight against the stainless steel shaft. That make a job that should literally take 1 minute end up being a multiple day, many hours job. In a regular boat yard scenario where you are paying for labor, it would never make sense to do this, at $100+ per hour for labor, it would be far cheaper to cut the shaft off and put a new shaft and a new stuffing box. In this case, I've got the time to do it, but not the money to be buying all new parts every time things get difficult.
 
I thought that mine was difficult to get out, but it doesn’t compare to yours. Good innovative thinking to get it apart. Hope it isn’t corroded beyond saving.
 
I've pretty much reached my limit with this stuck stuffing box. After 8 hours of down in the bilge wrenching on this thing with my custom puller, I've moved it 2". It has more than 12" to go, and it is not getting any easier at all. With it this stuck in there I have serious doubts that the part will be usable once I get it out. I"m about to reach for the angle grinder and try to carefully cut it off without nicking the shaft.

i-GBP5J3b-L.jpg


What do you think? Time to cut, or persevere and hope it gets easier at some point?
 
I think that I would be reaching for the grinder at this point. Sometimes you just have to get done. Good luck.
 
I've pretty much reached my limit with this stuck stuffing box. After 8 hours of down in the bilge wrenching on this thing with my custom puller, I've moved it 2". It has more than 12" to go, and it is not getting any easier at all. With it this stuck in there I have serious doubts that the part will be usable once I get it out. I"m about to reach for the angle grinder and try to carefully cut it off without nicking the shaft.

i-GBP5J3b-L.jpg


What do you think? Time to cut, or persevere and hope it gets easier at some point?

Do you already have the replacement? If not, keep tugging on it.
 
Well if he got 2” in 8 hours then he only has 40 more hours to go. I think that I would cut it before that.
 
I'm going to measure to see if I have space for a dripless. If I have to put a replacement, that's what I'd prefer at this point. Yes I figured about 30-40 more hours to get it off, ridiculous. The shaft is in excellent condition, brushed with a bronze brush it cleans up shiny and no corrosion and measures right on spec.

The stuffing box is probably a lost cause anyways being so corroded that it won't move on the shaft. That particular stuffing box had caused the shaft log hose to tear due to the excessive torque it was putting on the hose. The puller I made does work but it is very slow, you can only turn each bolt about 1/10 of a turn each time you put a wrench on it due to the access, and then you have to move around to each of the four bolts until they all get tight, then heat the stuffing box with a torch to get it to 'pop' and it moves forward some very, very small amount and the bolts get loose. Repeat over and over again.
 
I measured the area available and i have plenty of room to change to a drip less stuffing box, so I'll be waiting for some parts before I cut off the stuck gland nut.

I moved on to the engine through hulls and seacocks. Dismouting the seacock was not particularly easy but with some heat from a torch on the fittings it did come off the hull. They are tapered bronze seacocks that had not been maintained regularly so they are quite stuck in position.

Removed from the boat and disassembled:

i-RnCBCzT-L.jpg


First I wash them in the parts washer to remove old grease and then they get 15 minutes in barnacle buster to remove sea life.

i-RzVvbDC-L.jpg


Some brass wheel work, a few turns with some lapping compound on the taper and the port side is ready to grease up and re-install. Clean up and servicing was a fairly easy job, getting them off the hull was not particularly easy though.

i-LKRcBwK-L.jpg


I did not spend a ton of time making them look pretty, but the inside bore and taper of the valve itself was in very nice shape with just a few scratches. I got nice, even contact with the lapping compound and I'm happy with the result.
 
Amazing

I have the same boat but branded Chris Craft. Hull serial # starts “UNF”. Love the boat and your project. We’ve owned ours for 20 years. Good luck. Seacure Technologies is your best source for parts. They bought out everything from bankruptcy. Sea Cure Technology
 
I continue to be impressed with how quickly you are going, keep it up!
 
I have the same boat but branded Chris Craft. Hull serial # starts “UNF”. Love the boat and your project. We’ve owned ours for 20 years. Good luck. Seacure Technologies is your best source for parts. They bought out everything from bankruptcy. Sea Cure Technology

I ordered some engine room replacement vents from them as well as an electrical diagram. The boat is 90% original wiring which is in impressively good shape so having the diagram will help a lot when messing with systems.

I continue to be impressed with how quickly you are going, keep it up!

It doesn't feel quick! Being unemployed certainly helps. Thankfully I had gathered most of the materials I needed while I was working and too busy to work on the boat, so I have a lot of backlogged projects.

Over the last few days, I've cleaned the bottom of the bilge in the engine room, removed several unused old add-on systems that are not needed, removed the Starboard engine through hull/sea cock which went much faster than the port side now that I've done one

I started cleaning up under the starboard engine. I also removed the starboard sea strainer for cleanup and prep for re-install.

My PSS dripless seals should be here next week along with 3" Buck Algonquin shaft log hose, and some 3" fiberglass Centex shaft log tube so I can replace the old bronze tube that is pretty thin from corrosion. That eliminates any 3 1/8" problems as well.

I also finally solved one oil leak on the rebuilt engine, turns out I cracked the oil filter remote adapter housing by over tightening the hose (it has a 3/4" NPT thread). I had to find a used one for that and it's on the way now.

Haven't taken many pictures the last couple of days.
 
When I had the port engine out I cleaned the bilge and painted it with Bilge Kote. Looks much better now.
 
Back
Top Bottom