DIY rebuilding of diesel engine Yanmar 6LY

The friendliest place on the web for anyone who enjoys boating.
If you have answers, please help by responding to the unanswered posts.
You insert a ring into the cylinder, push it down slightly with a piston to make sure it is square with the bore, and measure the ring gap with a feeler gauge. If it is not the specified gap then you remove it and file a little away and check again. At least that's how we did it on Porsche motors.
 
They wanted to charge me $370 per new nozzle and $40 per injector to assemble.
A new original Yanmar nozzle retail price is $167 from toadmarinesupply.com, which is a large and well-known diesel part supplier: https://shop.toadmarinesupply.com/ships_store/?p=numberresults&pn=119574-53050&storetype=mdd&x=16&y=13

Even if they do not have any special arrangement with suppliers for better than retail pricing, the shop wanted to charge me more than double of the retail price for each nozzle.

To me, this is the classic definition of a rip-off.
if they asked anything close to $167 per nozzle, I would gladly have them do this.


i think the precision of those mechanical injectors is greatly overrated, probably by some shops to justify the high price to screw them together and apply some pressure to see when they start spraying.

This is from the Yanmar's service manual:

attachment.php


Check the cleaning kit: it includes a brass brush to clean the outside and a small wire to clean the holes.
Anything you can clean with a wire can not possibly be on the electron microscopic level of perfection.

All you need this mechanical injector to do is to open at the correct pressure and keep the spray pattern consistent. It's just a small valve with 6 holes. Nothing more.
See the note in the manual "excessive difference in spray and injection angles".

"Excessive" is not 1% or even 10% difference. It means a massive difference in spray pattern which you can see without any high-precision equipment.

I may be wrong, but this is from the manufacturer's manual, not from a shop that has a monetary interest in keeping this more complicated than it really is.

Any competent shop, doesn't have to be a marine shop either, just diesel specialists can both pop test your injectors to shim and balance pressures and flow test them which will reveal any abnormalities. you aren't building an SR71 here, it is a diesel engine and as you have stated, many parts may be perfectly salvageable. Those that wish to throw money out the window always defer to buying new however, this is an easily tested and diagnosed situation. You're doing a fantastic job so far, I commend you on your ingenuity and intestinal fortitude.
 
IMO, a marine diesel engine needs to perform to a higher degree of reliability
and longevity as compared to a road diesel.
Lives can depend on whether an engine runs correctly and efficiently. That said,
I wouldn't even reuse nozzles - which are a wear item - that had been bathed in
water for years(?) in a road diesel engine. The saving of a few hundred dollars
on such critical items will be cold comfort if the engine runs less efficiently or fails
over the next 20+ years as a result. This is the OP's best chance to get it right.
 
Last edited:
measure the ring gap with a feeler gauge. If it is not the specified gap then you remove it and file a little away.

A bit more comprehensive way I found is below:

1) insert the new ring into the cylinder ~3/4" from the top

2) square it off inside the cylinder with the piston and measure the gap to make sure it's more than the minimum and less than the maximum specified by the ring manufacturer

3) Do the same steps (1 and 2) for the middle ring location and the bottom ring location

- if the ring gap is less than the min required in any position - grind off the ends to get it to the specs. there are special ring grinders to make sure the angle is correct.

- if the ring gap of the new ring is more than the maximum specified, the cylinder walls will have to be bored and oversized pistons used.

- another point i found is to never put the ring gaps in front, back or directly above the pin of the cylinder. Gaps must be staggered and at least 1" apart from each other.

- when you put the pistons in, a good way to ensure the oil gets behind the rings is to put each piston for a few minutes into the cut bottle of coca-cola full of oil before inserting it into the cylinder. This will ensure the oil gets everywhere behind the rings for the initial start-up.
 
That's new. So you have some cross-reference table or Toyota engine model which is compatible?
I know your engine is different from my 6LYA but maybe I'll find something similar.

A 6LP Yanmar is a Toyota 1HD block. As you are in Canada there are a bunch of HDJ80/81 JDM LandCruisers imported with 1HDT and 1HDFT engines, particularly here in BC. My son has a 1HDT. I have a 12HT

I believe the big difference is HP. Yanmars are higher because of the cooling availability of water to water cooling. LandCruisers are underpowered for reliability. A few Austrailians actually use Yanmar parts to increase HP in their LandCruisers. Here is a conversion Facebook page: https://www.facebook.com/groups/402595744332088/

My son and I often find parts from megazip.com or Amayama.com with great results.

The forum IH8mud.com (A LandCruiser forum) in the diesel/24volt section might find some rebuild info help too.

I'm enjoying your thread.

Remember as Voltaire wrote: "The best is the enemy of the good."
 
Last edited:
A 6LP Yanmar is a Toyota 1HD block. As you are in Canada there are a bunch of HDJ80/81 JDM LandCruisers imported with 1HDT and 1HDFT engines, particularly here in BC. My son has a 1HDT. I have a 12HT

I believe the big difference is HP. Yanmars are higher because of the cooling availability of water to water cooling. LandCruisers are underpowered for reliability. A few Austrailians actually use Yanmar parts to increase HP in their LandCruisers. Here is a conversion Facebook page: https://www.facebook.com/groups/402595744332088/

My son and I often find parts from megazip.com or Amayama.com with great results.


The forum IH8mud.com (A LandCruiser forum) in the diesel/24volt section might find some rebuild info help too.

I'm enjoying your thread.

Remember as Voltaire wrote: "The best is the enemy of the good."

Great info on Canadian Diesel Land Cruisers.
As for the 6LP hp:
The STE is rated for 300 hp and the 6LPA for 315:
There is no difference, same engine but the 6LP was built in Japan and the 6LPA in the US = A for America.
The additional 15 hp are from using cooler intake air for a higher rating :rolleyes:
There are also some 6LPs with lower hp ratings, like in the 250s for marine use, but rare. (Same as the Land Cruiser engines perhaps?)
These are good engines, but finicky..
They will last a long time with pristine maintenance but are sensitive to abuse.:(
 
I haven't read this whole thread so excuse me. If you mixed the needles and nozzles, you should get new nozzles.
 
- if the ring gap of the new ring is more than the maximum specified, the cylinder walls will have to be bored and oversized pistons used.

WA
Doesn't this issue need to be resolved before you decide on final piston purchase?

I may have missed it, are the cams, crankshaft and lower end bearings ok?
 
WA
Doesn't this issue need to be resolved before you decide on final piston purchase?
I may have missed it, are the cams, crankshaft and lower end bearings ok?

I ordered all new pistons and bearings (except camshaft bearings which look fine and will be a pain to replace).
Old crankshaft and rods bearings do not have any scratches or signs of wear, but a few have discoloration, probably from the water, and are not smooth even after extensive cleaning. maybe they can be polished, but those are not expensive so I'll just change them all.
 
A 6LP Yanmar is a Toyota 1HD block.

thank you. I'll check that group and the sites.
My 6LY is a different engine type from 6LP and, i think they have different cylinders and stroke specs, but maybe they share some parts.
 
With new pistons and new sleeved, I would expect the supplied rings to fit perfectly without adjustment. I think gapping is only needed (or should only be needed) when you are fitting new rings in a worn cylinder. No? Does the service manual say otherwise?
 
With new pistons and new sleeved, I would expect the supplied rings to fit perfectly without adjustment. I think gapping is only needed (or should only be needed) when you are fitting new rings in a worn cylinder. No? Does the service manual say otherwise?

if i remember correctly, the manual just says to check the gap before installation. hopefully, new sleeves, pistons, and rings will fit properly together and the gap will not need an adjustment.
 
To fit rings correctly, you need to measure the bore and using a tool, gap the rings according to the specifications. it isn't rocket science but is a crucial step in a good performing engine.
We always just slid the ring into the bore using the piston, so the rings stayed square to the holes then measured the end gap with feeler gauges.
 
A bit more comprehensive way I found is below:

- when you put the pistons in, a good way to ensure the oil gets behind the rings is to put each piston for a few minutes into the cut bottle of coca-cola full of oil before inserting it into the cylinder. This will ensure the oil gets everywhere behind the rings for the initial start-up.

I would caution on this - squirting with clean oil after the rings are installed and wiping the oil around the piston rings and skirts is sufficient. You really don't need or want the crowns and ring lands flooded with oil. They are never in that condition when running and adding excessive oil to create carbon deposits as it is burned during initial start doesn't help anything.

I know everyone is a keyboard commando/internet mechanic and you have no way to verify my opinions. For what its' worth I worked in the GM Diesel Distribution group (among others) as a tech and field manager for 27+ years and literally have built and installed thousands of power assemblies, and have observed 100's of thousands of hours of running of said components.

got it. no oil bath for the pistons.
thanks for the heads up.
 
I agree with pacopico. We never put the pistons in an oil bath on Porsches.
 
Damper plate replacement

Another little surprise. I disassembled the damper plate, and the aluminum part disintegrated from the galvanic corrosion.
attachment.php


Yanmar schematics do not have this damper plate shown and ZF HSW800A3 gearbox i have, does not show that plate so it's something in between with no part number mentioned anywhere.

If anyone is looking for a replacement, found a matching plate "Vulkan Marine Damper Plate 1KT3110008 Cummins Deere Boat Diesel Engine ZF" and will see if it fits when it arrives.
 

Attachments

  • damper plate.jpg
    damper plate.jpg
    158.4 KB · Views: 366
Injector Testing

Injector Testing

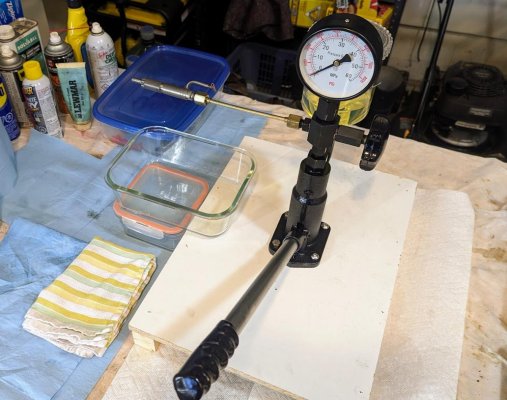
ok, i assembled all 6 injectors and tested them with the injector tester ( VEVOR 400Bar 6000PSI Diesel Fuel Injector Tester Diesel Injector Nozzle Tester with Dual Scale Gauge to Adjust Injector Nozzle Pressure and Testing Diesel Injector Nozzle Pop Pressure Tester | VEVOR US ) to decide how to proceed.

This was a bit tricky, the manual is unreadable and I could not find clear instructions on how that tester works on Youtube. I almost returned it because i thought it was broken.

attachment.php


so here is how it works:

1. Assembling is pretty straightforward but I unscrewed the diesel container and removed a large metal shaving from the thread. Someone on youtube recommended a full disassembly for cleaning but i did not get that far.

2. Put clear diesel in the bowl and pump it thru the unit until it's coming out clear without anything screwed to the end. Took half a cap for me.
* A large knob on the body has to be fully opened.

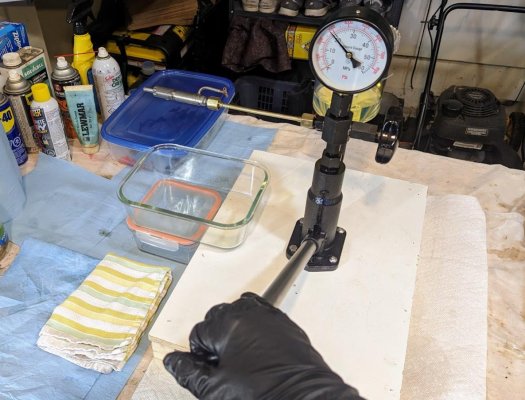
3. Screw your injector to the end of the testing pipe (there are 2 different connector tubes in the box), one worked for my injectors.

4. Tighten the large knob on the vertical body all the way and then take it back a couple of degrees. - this is important, if it's too tight or too loose - you can not build pressure.

attachment.php


5. Now, when you pump the handle, you will be building pressure in the system until the injector pops/injects

attachment.php


Note the maximum pressure at which that happened. For 6LY injectors, it has to be between 290 and 300 kg/cm2 or 4120 - 4267 PSI
If they release too soon, you need to add a thicker shim, if it fires too late, you need to remove a shim.

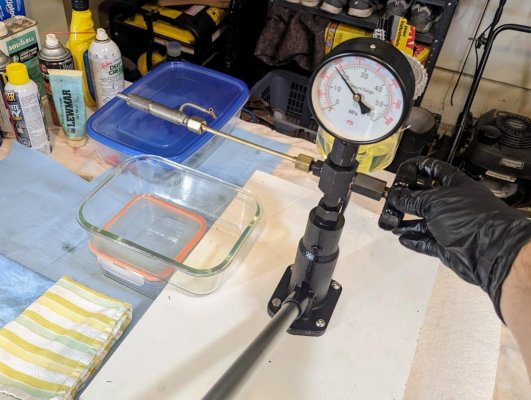
6. Note how it releases. It's hard to explain, but it should not "spray" like a spray bottle but rather "shoot" more like a gun.

7. Check the pattern to ensure all five streams are the same and uniform.

8. Next, pump the pressure to ~300 PSI and tighten the large knob to keep the injector pressurized.
The nozzle should not leak fuel.

attachment.php


A few observations:

  • Needle size was different in at least 2 nozzles because those needles did not fit into the other 4
  • I had different sizes of shims from 0.15 to 0.30 mm in thickness.
  • I found that on some injectors, shims have a chamfer and must be installed with that chamfer facing the nozzle. The manual says it could lead to damage or other problems if installed incorrectly. i could not find any chamfer on my shims but check yours just in case.
  • The nozzle cup has to be tightened to a specific torque (39.2-44.1 Mm, which is 28.9 to 32.5 ft lb)

One more reminder not to mix any internal parts of those injectors when you take them apart for cleaning.

All 6 of my injectors had bad spray patterns, a few leaked and have weak long spray instead of fast fire and 4 of 6 had a wrong release pressure. Maybe that could be fixed by cleaning the nozzles some more with the nozzle cleaning wire and trying to adjust the shims.
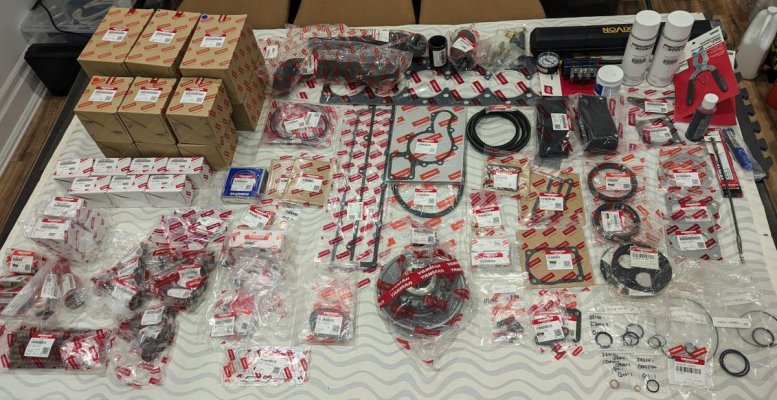
But i was placing an order for the rest of the spare parts so i included all 6 new nozzles (they come with the needles) and 6 set of shims and will have a shop assemble them.
At least i know now for sure this expense is justified :dance:
 

Attachments

  • injector_test-1.jpg
    injector_test-1.jpg
    149 KB · Views: 321
  • injector_test-2.jpg
    injector_test-2.jpg
    145.2 KB · Views: 322
  • injector_test-3.jpg
    injector_test-3.jpg
    148.9 KB · Views: 320
  • injector_test-4.jpg
    injector_test-4.jpg
    143.6 KB · Views: 313
Last edited:
Interesting. With testing equipment you pretty much get what you pay for.
I've paid more than that for a dial caliper.
It would be good to test your newly rebuilt injectors to 'calibrate' the pressure gauge.
 
So, you bought the tester to do a pass/fail test and are going to have the shop do the rebuilding of them? That sounds pretty reasonable for the $$ your putting into the engine.

I agree I'd probably put a rebuilt injector on your tester to do a before and after comparison to your previous results just for fun.
 
Rebuild Kit

Rebuild Kit

Xmas in January! ?

My "Yanmar 6LYA-STP diesel engine rebuild kit" + some extra parts just arrived directly from Japan! All genuine Yanmar parts and at 1/2 the price compared to the best US suppliers and 1/3 compared to greedy Canadian suppliers.
A saved $7000 is a made $7000! ?

attachment.php


New sleeves, pistons, bearings, valves, injector nozzles, gaskets, o-rings, and other misc parts. :D

I've got a quote from multiple suppliers from Asia. The one I used was the only one that gave me two options: genuine or OEM
the rest was trying to push OEM parts on me, and then i asked several times to confirm if those were genuine, the answer always was - "those parts are for Yanmar 6LYA-STP" and they tried to screw me on shipping asking $1500 to ship 3 pretty small boxes to Canada. Sneaky bastards. I paid $380 for shipping of everything.

My supplier has ~50% of the parts offered as OEM versions at 1/2 to 1/3 of the cost of genuine parts.

As an example,
EXHAUST VALVE, 119593-11110: $70 for genuine Yanmar and $20 OEM,
(the same part from toadmarinesupply.com is $113)
and there are 6 of them.

I opted for all genuine, but going with OEM would cut the cost by ~20% (the expensive parts like pistons and injector nozzles do not have OEM options but sleeves, most gaskets, o-rings, and valves do). As a community service, I did order one OEM version of each valve and sleeve to compare to the genuine if somebody wants to save some money. I will post the comparison later if anybody is interested.

I attached "Rebuild kit.txt" with the list of parts - just rename it from .txt to .csv to open in excel as a table.
Before you use that list "as-is", please check the part numbers and qty's against Yanmar part diagrams for your specific engine.
 

Attachments

  • rebuild_kit.jpg
    rebuild_kit.jpg
    177.1 KB · Views: 245
  • Rebuild kit.txt
    3.7 KB · Views: 22
An impressive kit, Waterant. Looking forward to following your project.

Please help me understand why you differentiate "OEM" from "genuine." As I understand it, OEM ("original equipment manufacturer") is in fact genuine to the product as originally manufactured. Anything else would be identified as an aftermarket part, no?
 
As I understand it, OEM ("original equipment manufacturer") is in fact genuine to the product as originally manufactured. Anything else would be identified as an aftermarket part, no?

That's what I thought but a quick look at the sample OEM valve I've got show some difference from genuine one. I'll measure and weight both to compare.

Another example, I was quoted $15 per "OEM" cylinder liner/sleeve 119171-01101 while genuine is $278 from US suppliers and $170 from Asia.
It's just hard to believe it would be the same sleeve for $15 while they do claim it to be OEM.

A sample OEM sleeve I ordered from my supplier is $50. I'll compare to the genuine when I get it (they did not have it in stock). At least for $50 there is chance it will be from the same factory and same material but I wouldn't hold my breath.

I guess they could call it "OEM" but that does not mean it came from the same factory or even from the same material :banghead:
 
I've got a few messages to share the contact of the supplier I used.
I guess saving $ on Yanmar parts hit the sweet spot.

Some general notes on working with Asian suppliers:

- This is a wholesale supplier and does not like selling in retail or small orders. it will be beneficial for everyone if you send a list of multiple parts you need at once. if you just need one or two parts, check https://shop.toadmarinesupply.com/ - they have the best Yanmar parts prices in US I could find, and shipping will be much less expensive, and no worries about custom clearance.

By the way, my custom clearance was an easy process. The shipment was sent by DHL and UPS - their custom department just emailed with the message with the payment button and i paid taxes by credit card before the shipment arrived, so it was delivered to my house as soon as it came to the local warehouse.

- Tell my contact you've got his info from Anton Pachkine so he knows we are part of the same community that will work with him if we are happy with his service. no, i do not get any "referral fees" from him (maybe I should? :socool: ).

- I already told him I'll send referrals because he was quick to reply to any inquiries (considering the time difference), shipping was fast, and he did not try to screw me on shipping or push "OEM" on me like many others i contacted. They have warehouses in China and Japan. I've got 2 boxes from Japan and 1 from China.

- I would recommend dealing with and paying those Asian suppliers thru Alibaba, not directly. There is a small surcharge if you pay via Alibaba, but it is worth it for extra protection. Alibaba has trade assurance, and it will be easier to resolve any issues.

Hope this helps.
Send me PM if you need the contact details.
 
Sounds like a new and creative use of the term OEM, meaning “it fits your engine”. Good job sorting out the difference in their terminology.
 
Back
Top Bottom