It might not be worth it, either american diesel or bomac has a disclamer that their rebuilt lehmans arent guaranteed to not leak (I forget which one).
It might not be worth it, either american diesel or bomac has a disclamer that their rebuilt lehmans arent guaranteed to not leak (I forget which one).
Bomac has the disclaimer. They rebuilt our SP135. In prior discussions, Greg warned us about it. The leak is maybe an oz between oil changes it looks like. The alternative was to get a new crank at $2k plus. We're living with it.
Surprised by suggestion to leave it alone. I had not seen any oil leaking under that motor for the 200 hours since I have owned it. About 2 tablespoons, at most, on bottom lip of bell housing when removed. I would be thrilled to not need to explore further so will check in with Brian on Tuesday.
Eddie
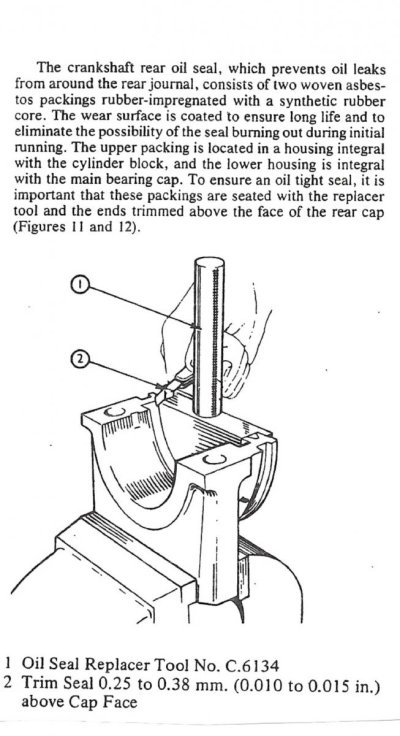
If I remember the Ford rear seal right, it is a split seal that would require dropping the oil pan and likely need lowering crank to access. Maybe more modern versions have a removable seal plate.
If I remember the Ford rear seal right, it is a split seal that would require dropping the oil pan and likely need lowering crank to access. Maybe more modern versions have a removable seal plate.
On one Lehman 120 it was leaking bad out the rear seal. Engine also had a good bit of blowby. The little vent in rocker cover and the whatever valve caused pressure to build in crankcase. Owner was not enthused by the prospect of a rebuild as otherwise, engine ran fine.
I welded on a larger fitting in rocker cover and used a larger diameter vent. No more pressure in crankcase. The oil leak out the rear seal was GONE.
The split rear seal is not really a seal, but a drip reduction device. Just kidding a little there...
Does the install slope angle play a role in rear seal leakage? And yes, IMHO most English design diesels rear main seals are just drip reduction devices as father time comes into play.
Does the install slope angle play a role in rear seal leakage? And yes, IMHO most English design diesels rear main seals are just drip reduction devices as father time comes into play.
It may. But best results come from minimizing crankcase pressure. And that is easier than changing engine angle!!
Also make sure you are not running with too high of an oil level. The pan is pretty deep, so doubt crank is contacting oil level, but that is on the list.
There is a "slinger" ring between last main bearing and seal area, this is supposed to throw oil away from seal. If there is no pressure or even a slight vacuum in crankcase, it won't leak even if there is no seal at all!! Which may be closer to the truth on many engines.
Airsep filters work by applying a slight suction on crankcase. Not sure it would work on one of these as airflow is pretty low.
As others have mentioned, replacing the rear seal is a major job.
I would simply remove the bottom bolt from the bell housing. Any oil getting past the rear seal will then drip out. A few tablespoons is not worth worrying about.
...I would simply remove the bottom bolt from the bell housing. Any oil getting past the rear seal will then drip out. A few tablespoons is not worth worrying about.
Surprised by suggestion to leave it alone. I had not seen any oil leaking under that motor for the 200 hours since I have owned it. About 2 tablespoons, at most, on bottom lip of bell housing when removed. I would be thrilled to not need to explore further so will check in with Brian on Tuesday.
Eddie
If no oil has been dripping from the bellhousing, then even if that oil was from the rear main it's really not an issue. It could just as easily be oil that has collected there over the years from oil filter changes, leaking valve cover gasket, etc. Considering how big a job it is to change AND that there's no guarantee it would ever be totally leakproof, I'd leave it alone unless the amount dripping out became a problem.
When I pulled my trans to have it rebuilt I'm sure I found some oil in the bell housing but it hardly ever has even a single drip on the pad below, so I don't worry about it. I think most of the oil I found came from the previously very nicely leaking valve cover. (fixed with a new gasket)
My other vessel with a British motor is a 1972 Lotus Europa Twincam that I've spent 16 years of driving thrills that included 16 years of battling oil leaks which I've won precious few. As the saying goes "the only time a British car stops leaking oil Is when it's empty." I couldn't be more excited to hear that I probably don't need to pursue that tiny bit of oil. God save the Queen.
Eddie
 The SP135 actually has a drain plug just forward of the lower bell housing bolts. I asked the rebuilder to leave it out. He already had.
 ")