Crack in er hatch beam

The friendliest place on the web for anyone who enjoys boating.
If you have answers, please help by responding to the unanswered posts.

paulga

Guru
Joined
May 28, 2018
Messages
1,025
Location
United States
Vessel Name
DD
Vessel Make
Marine Trader Sundeck 40'
I just spotted the crack in the support beam
Can this be strengthened, or is it better to replace the beam

IMG_20240329_233816.jpg

IMG20240329233241.jpg
 
I would inject as much epoxy as I could into the crack and clamp it together. Then put a couple long bolts from the top to bottom to mechanically clamp it permanently.
 
I would inject as much epoxy as I could into the crack and clamp it together. Then put a couple long bolts from the top to bottom to mechanically clamp it permanently.


Exactly
 
Yup. Then if it still has a problem then consider replacing it.
 
I would inject as much epoxy as I could into the crack and clamp it together. Then put a couple long bolts from the top to bottom to mechanically clamp it permanently.

unthickened or thickened epoxy?

what size of bolts are good for this?
 
As far as whether to try repairing the beam vs replacing it, in my mind that depends on the surrounding structure. If it's easy to replace the beam, I'd probably just do that and be done with it. If it's not so easy to replace, then a repair makes sense.
 
Greetings,
Ms. p. That "beam" appears to be removable. Take it off and drill and countersink for a series of wood screws from the underside (perhaps 4, spaced 2 across the beam and 2 along the beam). Use as long a screw as possible without going all the way through (might need 2 different lengths). IF you DO go right through the beam, simply file off the protruding tip(s).


VERY, VERY gently tap a flat head screwdriver into the crack from the recessed end along the crack to open up the crack SLIGHTLY to allow further penetration of whatever adhesive you choose. It does NOT appear to be load bearing so a good wood glue should suffice. Gob it up well, remove screwdriver, apply several clamps and drive in screws. Allow glue to set, remove clamps and Walla!
 
As far as whether to try repairing the beam vs replacing it, in my mind that depends on the surrounding structure. If it's easy to replace the beam, I'd probably just do that and be done with it. If it's not so easy to replace, then a repair makes sense.

The support beam is not fastened to anything. It is removed the same way as the panels are lifted.

Is there a place to order a new one?
 
Greetings,
Ms. p. That "beam" appears to be removable. Take it off and drill and countersink for a series of wood screws from the underside (perhaps 4, spaced 2 across the beam and 2 along the beam). Use as long a screw as possible without going all the way through (might need 2 different lengths). IF you DO go right through the beam, simply file off the protruding tip(s).


VERY, VERY gently tap a flat head screwdriver into the crack from the recessed end along the crack to open up the crack SLIGHTLY to allow further penetration of whatever adhesive you choose. It does NOT appear to be load bearing so a good wood glue should suffice. Gob it up well, remove screwdriver, apply several clamps and drive in screws. Allow glue to set, remove clamps and Walla!

Would screwing in the pilot holes create new cracks as pilot hole is smaller than the nominal size. The beam is factory original
 
The support beam is not fastened to anything. It is removed the same way as the panels are lifted.

Is there a place to order a new one?

You probably can't order a pre-made replacement, but you should be able to cut a new one to the right size from any appropriately durable wood. Then paint or varnish as necessary and install.
 
You probably can't order a pre-made replacement, but you should be able to cut a new one to the right size from any appropriately durable wood. Then paint or varnish as necessary and install.

That requires a work bench and circular saw but I don't have. Not a fan of fresh paint and clear coat either. Maybe I will first try filling some epoxy.
 
Greetings,
Ms. p. "Would screwing in the pilot holes create new cracks as pilot hole is smaller than the nominal size." Shouldn't if the pilot hole is the proper size. Don't drill too close to the edges. As i said, that beam isn't really load bearing so a repair should be quite sufficient. You've got this one!
 
All due respect, there wouldn’t be a stress concentration in that corner to start a crack if the beam wasn’t bearing any load. It’s doing SOME work, and the crack won’t likely get better on its own.

Should be a pretty easy repair, or easy to make a replacement with some basic hand tools. In the grand scheme of ‘things to break on your old boat’ that’s a good one to start practicing with!
 
Would screwing in the pilot holes create new cracks as pilot hole is smaller than the nominal size. The beam is factory original

As mentioned above, use a flat head bolt with a fender washer and nylock nut on the bottom. I would use a 1/4" bolt and just drill all the way through then countersink for the head. Any good waterproof glue should work.

Here's a bolt example on McMaster Carr: 316 Stainless Steel Hex Drive Flat Head Screws
 
1/4" drill hole is pretty large.
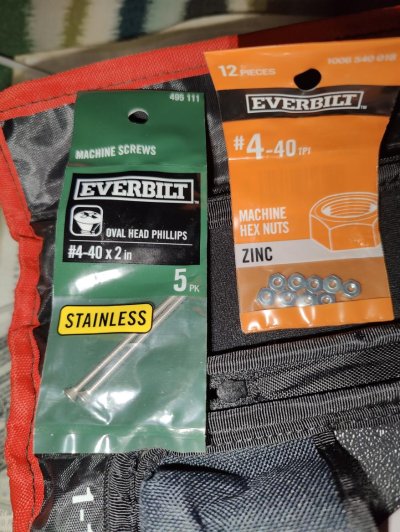
Does #4 screw work?

IMG20240330203758.jpg


As mentioned above, use a flat head bolt with a fender washer and nylock nut on the bottom. I would use a 1/4" bolt and just drill all the way through then countersink for the head. Any good waterproof glue should work.

Here's a bolt example on McMaster Carr: 316 Stainless Steel Hex Drive Flat Head Screws
 
I would not use a #4 screw for anything structural. I would use the 1/4” also.

Agree at least one 1/4" thru bolt, nut and fender washer and good as new.
Of course counter sink bolt head at the top.
If we only had such simple repairs.
 
If the beam is easily removable I would do that even to accomplish the repair with highest probability of success and ease of working.
Flat or oval head bolts recessed on top and I would use a SS T nut on the bottom for looks. What size to use depends on what T nuts I could find nut would not be concerned using a few #10s. The beam provides the structural support and the only thing the bolts are doing is overcoming the weakness of the grain and tendency to split along the grain. I would be comfortable with drilling holes vertically and gluing in a few maple dowels to add strength across the grain. Just make sure the hole & dowel are completely " primed" w glue before inserting.

While it's out you get a better chance to assess the damage and to work epoxy in from the back side. If there is room behind the beam it is easy to sister / laminate a reinforcing piece to the backside AFTER doing the epoxy repair. You should be able to just glue the reinforcing piece to avoid multi fasteners showing. If concerned w the glue joint being strong enough add a few hard wood (maple?) Dowels thru the laminated piece and halfway into the existing beam. Glue & clamp the assy, refinish & reinstall.
 
Last edited:
does a pair of this clamps work?

if waiting for the epoxy to cure before drilling and driving, still necessary to clamp?

Greetings,
Ms. p. That "beam" appears to be removable. Take it off and drill and countersink for a series of wood screws from the underside (perhaps 4, spaced 2 across the beam and 2 along the beam). Use as long a screw as possible without going all the way through (might need 2 different lengths). IF you DO go right through the beam, simply file off the protruding tip(s).


VERY, VERY gently tap a flat head screwdriver into the crack from the recessed end along the crack to open up the crack SLIGHTLY to allow further penetration of whatever adhesive you choose. It does NOT appear to be load bearing so a good wood glue should suffice. Gob it up well, remove screwdriver, apply several clamps and drive in screws. Allow glue to set, remove clamps and Walla!
 
And I'd use SS. Speaking of SS, I discovered Tractor Supply has lots of bolts etc SS and plain- less than HALF the price at Homers and better selection.
 
And I'd use SS. Speaking of SS, I discovered Tractor Supply has lots of bolts etc SS and plain- less than HALF the price at Homers and better selection.

i plan to use this flat head bolt from home depot

the epoxy requires 70F to cure well, so this can wait next month
 
i plan to use this flat head bolt from home depot

the epoxy requires 70F to cure well, so this can wait next month

Epoxy will cure at lower temps unless you're using a really slow hardener. It'll just take longer at lower temps, although you can speed it up with a heat lamp.
 
Epoxy will cure at lower temps unless you're using a really slow hardener. It'll just take longer at lower temps, although you can speed it up with a heat lamp.

this one is not urgent, I'd wait until the outside is at least 60F when it's comfortable to plan it out
it's still ~40F now in this area
 
Epoxy will cure at lower temps unless you're using a really slow hardener. It'll just take longer at lower temps, although you can speed it up with a heat lamp.
Unless you are on a lake, use stainless. And don't overthink this. There's a big dent in the wood above the crack. Something whacked it and split the wood. Either replace it or glue, epoxy/ bolt it together and forget about it. BTW, you're engine and room are crazy clean and shiny!
 
Where the crack ends consider drilling a 3/32" or 1/8" hole at the end of the crack. Many times this will prevent a crack from going further. The challenge is trying to match the angle of the crack such as drilling straight in or at an up or down angle.
 
West epoxy has a slow and fast hardner available. The fast is good down to 40 degrees per West. However I have used it at 20 degrees and it worked fine.
 
Back
Top Bottom