Bedding New Drop-in Bathroom Sink

The friendliest place on the web for anyone who enjoys boating.
If you have answers, please help by responding to the unanswered posts.
Joined
Nov 16, 2011
Messages
3,585
Location
USA
Vessel Name
Catalina Jack
Vessel Make
Defever 44
I am replacing two identical oval sinks that are original to the boat. They are beige while the countertops are white, an unattractive mismatch in my view although that is not what prompted me to make the change. The faucet in the forward head had become highly corroded and unsightly. Unfortunately, though I tried mightily, I was unable to remove the faucet.

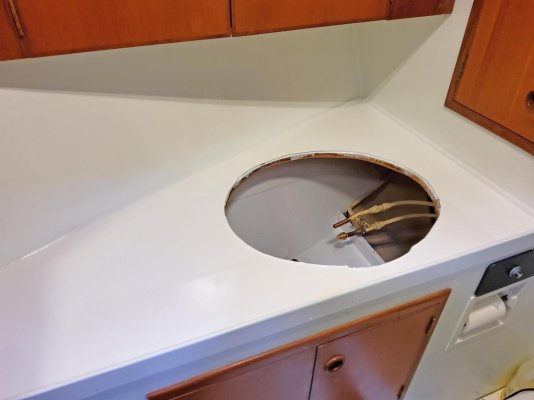
I was forced to remove the entire sink. I began work in the forward head yesterday and was able to remove the sink without a lot of difficulty even though it had been glued in place with some gooey, black caulk of some sort. I was very afraid that I would have had to smash it to pieces (vitreous china).

Now comes the new install. I will need to bed the new sink and need to ensure a good seal all the way around. I cannot have any voids around the rim that would allow any liquid to find its way underneath the rim. The bedding surface is about 3/4" wide. So, I am looking for a consensus on what use to use to fix it place and ensure no voids. I do have a good supply of butyl tape but I am thinking a caulk is the better choice.

Here's the reason for the absolute need for a good seal. The countertops are beat up. I do not want to spend bookoo bucks on granite, quartz, Corian, or anything of the like. So, my plan is to use pourable, self-leveling, two-part epoxy resin to create a new surface after the sinks are bedded. If there are any voids under the rims of the sinks, the resin will find its way through and may leave a depression there. I have used this same resin to repitch the basin in my shower stall and it worked great. The resin will be tinted to an opaque white to match the sink. This resin is commonly used for bartops and table tops.
 
Polyseamseal is water based, sandable and paintable. Used it extensively when I was in the plumbing business for caulking and sealing, also for the very use you're asking about. Use an alcohol or other degreaser on the mating surfaces as prep to remove any contaminants, use rubber gloves during assembly to prevent fingers from transferring contaminants to surfaces. You can remove excess with a damp rag and not screw up the finished appearance. Relatively quick cure.

Under NO circumstances would I recommend silicone, nothing sticks to silicone including silicone, so it would foul your surface for subsequent processes as you're planning.


Oh, and to remove old faucets the best way is a sawzall with a 14 or 18 tooth blade. If you have access, cut from the underside where you can get the blade up against the surface to cut through the retaining nut at least on one side so you can split the nut away from the threads to release the faucet.
 
Last edited:
that polyseamseal has been my preferred caulk for all my DIY house stuff for years...and I concur about silicone caulks...good for nothing in my estimation.

For what's described it seems like it might work great becasue it's also an adhesive.... butyl seems like it might be too flexible...not so worried about the seal in casting, it would be the moving after the resin is cast that would concern me.
 
I would rethink that plan. You are doing the hard work why not do the whole job? I personally would be much happier with a modern countertop material and for a small piece I don't think if would be that expensive.
Get quotes for copying the current top if you bring it to the shop to save travel and installation costs.
 
Polyseamseal is a very good product and will work well. My goto for a project like this is Phenoseal.

Rob
 
Two unsolicited suggestions...

Have you considered, before installing the new sinks, sanding the old counter, sanding or brushing or scraping out any chips,, filling any void with your choice of filler (thickened epoxy, formula 27, even bondo), sanding again to smooth, priming, and painting with 2 coats of Awkgrip or Perfection or similar. I've done this in three different marine bathrooms: forward and aft on a Californian (including showers/bath and lav, and my current boat's lav). In each case, it looked like a million bucks when done and is lasting well. I did my current boat and a pro did my prior boat, both went well.

The other is...if it were me, and I were trying to use a self-leving product, I'd do it before mounting the sink by spanning it with a heavy, waterproof tape cut it out later rather than risk adhesion potentially causing it to ride up around the sink.

Also, what type of epoxy do you have in mind? And, how thick a pour? I'm a little concerned about the product vs adhesion and flexing as it flexes.
 
We did corian countertpos in our galley a couple of years ago. I did the work myself. It is pretty easy to do and it may be less work than the other way. You can use standard woodworking tools. I got my corian from solidsurface.com.
 
The hard work really wasn't all that hard. Yes, I, too, would prefer a modern countertop but I don't have the tools to do a Corian top myself. I do have the skills but we are full-time live aboards. Nor do I want to contract it out.
I would rethink that plan. You are doing the hard work why not do the whole job? I personally would be much happier with a modern countertop material and for a small piece I don't think if would be that expensive.
Get quotes for copying the current top if you bring it to the shop to save travel and installation costs.
 
Thanks all for the help. I did not consider paint but now I am. I already have primer and white two-part epoxy paint on board so this is definitely an option. If I don't like the way it turns out, I can always move on to the self-leveling resin. If I do go to the resin, I will likely pour the resin before installing the sink. The resin will flow over the edges and drip down underneath but that is precisely the way the table tops seen in bars and restaurants are made. Then, it would simply be a matter of sealing the sink in place. As far as the final look, the resin, if done correctly, can look quite nice. Plus, it is a very durable surface.

I will post pictures of the final install, probably in two weeks. Still waiting on the sinks to arrive.
Two unsolicited suggestions...

Have you considered, before installing the new sinks, sanding the old counter, sanding or brushing or scraping out any chips,, filling any void with your choice of filler (thickened epoxy, formula 27, even bondo), sanding again to smooth, priming, and painting with 2 coats of Awkgrip or Perfection or similar. I've done this in three different marine bathrooms: forward and aft on a Californian (including showers/bath and lav, and my current boat's lav). In each case, it looked like a million bucks when done and is lasting well. I did my current boat and a pro did my prior boat, both went well.

The other is...if it were me, and I were trying to use a self-leving product, I'd do it before mounting the sink by spanning it with a heavy, waterproof tape cut it out later rather than risk adhesion potentially causing it to ride up around the sink.

Also, what type of epoxy do you have in mind? And, how thick a pour? I'm a little concerned about the product vs adhesion and flexing as it flexes.
 
I will be using the Polyseamseal. Yes, the seawall. I do have one aboard and have used it to remove an old faucet in the galley sink. In this case, no access.
Polyseamseal is water based, sandable and paintable. Used it extensively when I was in the plumbing business for caulking and sealing, also for the very use you're asking about. Use an alcohol or other degreaser on the mating surfaces as prep to remove any contaminants, use rubber gloves during assembly to prevent fingers from transferring contaminants to surfaces. You can remove excess with a damp rag and not screw up the finished appearance. Relatively quick cure.

Under NO circumstances would I recommend silicone, nothing sticks to silicone including silicone, so it would foul your surface for subsequent processes as you're planning.


Oh, and to remove old faucets the best way is a sawzall with a 14 or 18 tooth blade. If you have access, cut from the underside where you can get the blade up against the surface to cut through the retaining nut at least on one side so you can split the nut away from the threads to release the faucet.
 
Thanks all for the help. I did not consider paint but now I am. I already have primer and white two-part epoxy paint on board so this is definitely an option. If I don't like the way it turns out, I can always move on to the self-leveling resin. If I do go to the resin, I will likely pour the resin before installing the sink. The resin will flow over the edges and drip down underneath but that is precisely the way the table tops seen in bars and restaurants are made. Then, it would simply be a matter of sealing the sink in place. As far as the final look, the resin, if done correctly, can look quite nice. Plus, it is a very durable surface.

I will post pictures of the final install, probably in two weeks. Still waiting on the sinks to arrive.

If you pour the resin before installing the sink (seems like a better approach) you could make dams out of light cardboard and duct tape. As long as the resin only contacts duct tape it won't stick to it (it makes a good release agent for epoxy) and you can peel it off after it cures. I've done tons of plugs covered with duct tape to create odd shapes using glass cloth and west systems epoxy.

Then you can bed your sink with sika flex or any other light duty sealant. I think I'd avoid butyl tape because it would be very hard to keep clean, dirt and grime seems to stick to it.
 
Sban, I did think about doing this way. Knowing that you have used this method successfully, I am going to give it a try. In fact, the new sink as it sits in its hole rocks a bit, no doubt because the underlying surface is uneven. Yes, I could do some more sanding but why bother? Simply pour a new, dead flat surface.

I've used several different resin systems including West Systems, Pro-Set, System Three and other 'quick set' 5 minute type epoxies and none of them have adhered to duct tape. You might mix up a tiny bit of the resin you plan to use and drip it onto some duct tape first to make sure your particular resin does not adhere.
 
I've used several different resin systems including West Systems, Pro-Set, System Three and other 'quick set' 5 minute type epoxies and none of them have adhered to duct tape. You might mix up a tiny bit of the resin you plan to use and drip it onto some duct tape first to make sure your particular resin does not adhere.

I took your advice and taped the edges of the sink cut-out with the exception of using aluminum tape rather than duct tape. I used aluminum tape because the cut-out had ragged edges. I was able to conform the tape to the edges quite readily. However, the tape was somewhat difficult to get off but off it did come. The rim of the new sink would have covered any remnants anyway.

As for using epoxy rather than installing a new countertop (way more money and work), the result was terrific, a dead smooth, hard, impervious surface. It turned out to be a wise choice although not one all would choose. I will be doing both bathrooms. All in, new sinks, faucets, plumbing, and epoxy, about $300.
 

Attachments

  • Countertop.jpg
    Countertop.jpg
    59.6 KB · Views: 12
That looks really nice! Glad the dam method worked for you. What brand/type of epoxy did you use for the pour? I've seen people use west with their pigment for creating surfaces that look nice, but it seems too thick and too fast to pour and self level.

Also, if you wax any non porous material, it makes an OK release for epoxy as well.

It actually came out nicer than the picture shows. I used epoxy from TotalBoat.com with white liquid pigment from them as well. It pours and levels out rather quickly, certainly well before the end of its pot life. It is not at all too thick but follow the directions on the temperature at which to use it. Takes 24 hours to fully cure. The only adjustment I had to make is to sand down the edge that was created by the surface tension of the liquid against the tape dam which was not difficult at all. the really nice aspect of using epoxy this way is that not edge molding is required.
 
Last edited:
Back
Top Bottom