Installing teak slats on fwd cabin hull sides

The friendliest place on the web for anyone who enjoys boating.
If you have answers, please help by responding to the unanswered posts.

Dougcole

Guru
Joined
Jan 21, 2008
Messages
2,167
Location
USA
Vessel Name
Morgan
Vessel Make
'05 Mainship 40T
Hi All,


The recent discussion on furring strips has gotten me thinking of a possible project, and I'd like to solicit input from the board.


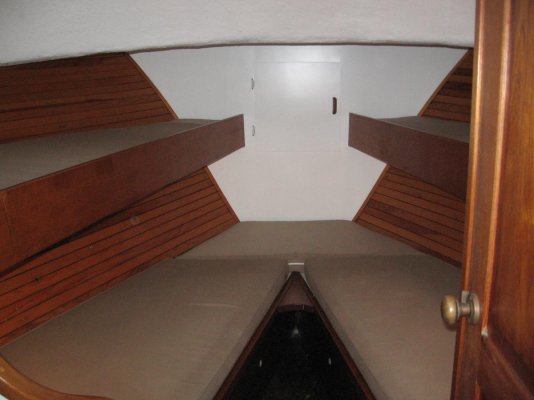
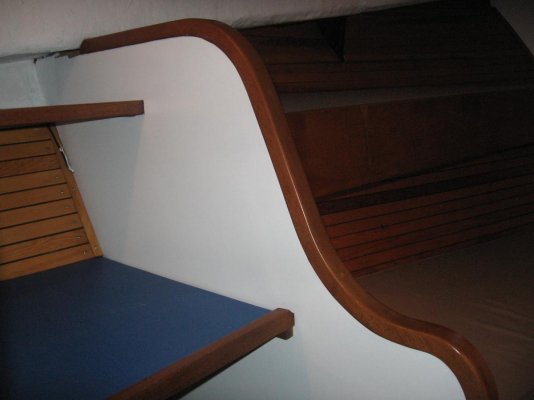
The hull sides in the fwd cabin of our Mainship 400 are covered with a foam backed vinyl that is glued to the hull. The vinyl was installed and then the cabin furniture was installed over the top of it. On our boat the top layer of the vinyl is peeling off, that is to say it is still attached to the hull, but the outer layer (sort of like paint) is flaking off.


I had a vinyl guy give me a quote on replacement, and he said in the $4,000 range as it would be a difficult and messy job to remove it. I've seen a few solutions to this, including one of our TF members who covered it with carpet, which looked nice and was fairly inexpensive, about $1,100.


But here's the rub. I have access to a big warehouse STUFFED with marine hardwoods. The owner has offered me anything I want from it for free. I'm quite certain that I can find enough strips of either teak or cherry to cover the insides of the hull. I could also use a solid panel with a veneer laminated to it.


So here's the questions that come to mind.


1. How to attach the furring strips to the hull sides? The hull is cored in that area, do you think I can screw into it?


2. Can I get away without removing the foam backed vinyl? I'm wondering If I can screw the furring strips right through it into the hull sides. If I went with slats, I think it would look nice in between the slats.


3. See any glaring obstacles I may face? I'm a pretty good carpenter and I have access to really good table saws, router tables, drum sanders et.
 
Greetings,
Mr. D. A few pictures would help but I would be VERY hesitant to screw anything to the inside of the hull particularly since it is foam cored. I could be wrong but that's my gut feeling.

There are a lot of different adhesives available these days.
 
Yes, it is worrisome, though it is coming from the inside of the hull, not the outside, so it shouldn't be exposed to moisture.


The advantage of screwing it on would be that I don't think I'd have to remove the vinyl. It would even serve as an insulator. I suppose it might be possible to glue the strips to the vinyl.
 
I've never seen foam backed vinyl removed from from a V-berth wherein the owner said "That would have been fine left in here." In other words, there is usually a fair amount of "Yuck!" behind it. Especially in a hot/humid climate.

On a fiberglass boat, what I would do is remove the vinyl and foam and clean things up, then epoxy (and possibly glass) vertical furring strips to the hull sides. Then I'd insulate between those with something like extruded polystyrene*. Then put closely spaced wooden ceiling up, screwing it into the furring strips.

*You could leave the insulation out; if so I'd paint the hull sides before putting the ceiling boards on and you could put more space between them. Definitely would NOT insulate on a wooden boat, but on fiberglass I probably would, then space the ceiling closely. The furring strips are "permanent," but the ceiling can be removed if ever desired to get behind it, since it's screwed to the furring strips.

If you are already a woodworker, then you already know this, but whatever finish you are going to put on the ceiling boards, I would do it before installing an apply same to back side (so things don't warp).

On the ceiling, I have seen people start with it level to the berth flat; I prefer it to run with the curve of the sheer, as wooden boat planking would do.
 
Last edited:
I've never seen foam backed vinyl removed from from a V-berth wherein the owner said "That would have been fine left in here." In other words, there is usually a fair amount of "Yuck!" behind it. Especially in a hot/humid climate.

On a fiberglass boat, what I would do is remove the vinyl and foam and clean things up, then epoxy (and possibly glass) vertical furring strips to the hull sides. Then I'd insulate between those with something like extruded polystyrene*. Then put closely spaced wooden ceiling up, screwing it into the furring strips.

*You could leave the insulation out; if so I'd paint the hull sides before putting the ceiling boards on and you could put more space between them. Definitely would NOT insulate on a wooden boat, but on fiberglass I probably would, then space the ceiling closely. The furring strips are "permanent," but the ceiling can be removed if ever desired to get behind it, since it's screwed to the furring strips.

If you are already a woodworker, then you already know this, but whatever finish you are going to put on the ceiling boards, I would do it before installing an apply same to back side (so things don't warp).

On the ceiling, I have seen people start with it level to the berth flat; I prefer it to run with the curve of the sheer, as wooden boat planking would do.

:thumb:

This is a future project for me too. My forepeak has that vinyl on the overhead and outside surfaces, and after 40 yrs, it is tired. No it doesn't want to come off, so I am considering leaving it and applying some new surface covering onto the vinyl. On the inner surfaces of the hull, the teak strips would look good, so maybe just a coat of white paint before gluing the furring strips on. On the overhead, maybe just the white paint.
 
I have a similar project in progress. I removed the carpet on the wall of the forward V berth. Lot of cleanup needed to remove what left from the carpet. Now I want to glue strips to be covered with mahogany boards. My only challenge is to find how to keep the strips in place while the glue sets as the "wall" is slightly curved. I guess I will have to use a kind of clamp that will hold between the two opposite walls.
If anyone has a better solution I am a taker :)

L
 
Greetings,
I've had fairly good results with using a car scissor jack and a piece of lumber for applying pressure at a distance. Works as long as you have a solid "base". The piece of lumber can be cut to any length and is put lengthwise on the smaller end.


iu
 
A simple 2x2 cut in half with a piece of all thread and a couple of washers and nuts in the middle makes a simple and cheap jack. You can epoxy two strip at a time ,one on each hull side with the jack between them, simple and cheap.
 
Our boat was built with the teak ceiling boards in the forward cabin. The furring strips are basically glassed to the inside of the hull. The teak is screwed to the strips, Oval head screws slightly countersunk. Looks good. Don't think it would be too difficult to install.. Wish I had a friend with a warehouse full of marine hardwood free for the asking!!!
 
My only challenge is to find how to keep the strips in place while the glue sets as the "wall" is slightly curved.
If anyone has a better solution I am a taker :)

A useful method is to leave a series of small gaps in the epoxy that you "butter" the vertical strips with. In those gaps put blobs of hot glue (the clear glue sticks that are in an electric "gun"). They will hold until the epoxy cures. You have probably worked with hot glue before, but if not, it hardens very quickly.

(I'm sure there is a limit to that depending on how much tension you need to put on to bend the strips; you could also cut some kerfs in the back to help that if need be.)

You could also use battens across to the opposite side of the boat, but that may have more risk of shifting during the time the epoxy is curing (?)
 
I can vouch for the hot glue and epoxy method mentioned above. I did the same thing to apply ceilings many years ago, I used pine battens from the lumber yard, rounded over one side and prefinished w/ stain and polyurethane. Then used short, countersunk, SS screws to fix the battens. I will try to attach a picture. The result has been durable and quite pleasing to the eye. I painted black behind them b/4 applying
 

Attachments

  • IMG_0625.jpg
    IMG_0625.jpg
    91.4 KB · Views: 23
  • IMG_0631.jpg
    IMG_0631.jpg
    75 KB · Views: 18
Greetings,
I've had fairly good results with using a car scissor jack and a piece of lumber for applying pressure at a distance. Works as long as you have a solid "base". The piece of lumber can be cut to any length and is put lengthwise on the smaller end.


iu
Brillant!

L
 
A useful method is to leave a series of small gaps in the epoxy that you "butter" the vertical strips with. In those gaps put blobs of hot glue (the clear glue sticks that are in an electric "gun"). They will hold until the epoxy cures. You have probably worked with hot glue before, but if not, it hardens very quickly.

(I'm sure there is a limit to that depending on how much tension you need to put on to bend the strips; you could also cut some kerfs in the back to help that if need be.)

You could also use battens across to the opposite side of the boat, but that may have more risk of shifting during the time the epoxy is curing (?)
Thank you for this I forgot about the hot glue!

L
 
I think I would go with furring strips epoxied to the bare hull and then screw the slats to the furring. Not sure but I would probably insulate. Also I would paint the area behind the slats black or dark brown before installing the slats so that when/if the slats shrinh you wont see white between the slats, ask me how I know that.
 
Thanks for the advice everyone.


So how difficult do you think the foam backed vinyl will be to remove? Anyone done it? If yes, what process did you use?
 
So how difficult do you think the foam backed vinyl will be to remove? Anyone done it? If yes, what process did you use?

I've done a few variations on that theme. What I like to do is quickly cycle through a range of options, see which one works best (or which combination), and then concentrate on that one.

PPE is key, as these tools and solvents can be nasty (you probably already know that).

Things that have worked for me (same combo did not work for all jobs, hence the list):

Roloc disc on drill
Wire "fingers" on drill
Scraper blade on Multimaster
3M Scotchbrite pads (gnarly barbecue ones)
5-in-1 tool
Pull scraper
Plastic razor blades
Surform
3M adhesive remover (red/white can)
3M adhesive remover (black spray can, smells orangey)
acetone
denatured alcohol
mineral spirits


Maybe some others I can't think of at the moment, but in each case one or two of the options worked best (but it varied job to job).

Oftentimes a good bit will come off reasonably easily, but then there are always stubborn spots. You just hope the stubborn "spots" aren't 95% of the total area.
 
Last edited:
Hotglue is not a good system in the tropics. It may not melt, but if the wood is under tension, it can get loose on a really hot day.

Fair enough. But in the procedure we're discussing, it's only used as a fixturing agent for a few hours or so. If it was too hot for that, it would probably not be a day you'd be epoxying anyway (especially an "elective" project such as v-berth ceiling).
 
It's not necessary to go to the trouble of using a jack etc to bend strips to the hull if you just use pieces of wood glued to the hull then screw your teak to those. Construction adhesive works but lately I use gorilla glue for everything.
 
It's not necessary to go to the trouble of using a jack etc to bend strips to the hull if you just use pieces of wood glued to the hull then screw your teak to those.

I thought the methods we were discussing were for adhering the "pieces of wood glued to hull," not the actual ceiling strips themselves (which are long and floppy, plus screwed so no issue).

For the vertical cleats aka pieces of wood we spoke of jacks, hot glue to fixture epoxy, kerfs, etc. -- basically ways to conform and hold them to the hull while adhesive cures. I guess in retrospect maybe that wasn't clear.
 

Latest posts

Back
Top Bottom