Helmsman Hacks

The friendliest place on the web for anyone who enjoys boating.
If you have answers, please help by responding to the unanswered posts.
Storing poly line in a bag

As long as you flake the line into the bag without introducing any twists, and as long as you keep the working end of the line out of the bag at the end, there is no danger of anything becoming tangled. I tie the working end to one of the handles of the bag, to make sure it doesn't fall into the bag. This is no different at all from the way the anchor rode piles up in the chain locker. As long as you don't drop the end of the rode into the locker (which won't happen as long as it remains attached to the anchor!), the rode will play out fine, irrespective of how it is piled up in the chain locker. (If you want some tips about how to flake a long line quickly without introducing twist, ask a sailor.)

Check this out:
 
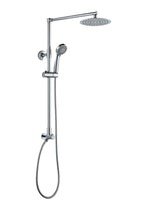
A project planned for the spring is to install a rain style shower. I believe we currently have the common system where by a handheld shower is installed on the wall and shoots water at an angle. Much of the water ends up hitting the opposite wall which is a waist. The built in seat-bench ends up holding puddles of water too. Also I don't like holding a shower in one hand and the soap in the other.
The taps are at knee level, so I will extend with a chrome or SS pipe up the wall and across the ceiling. I did this at home and it was easy and cheap. Got the shower head from IKEA and the pipes from a good hardware/plumbing store. See picture.
Barrie
 

Attachments

  • shower.jpg
    shower.jpg
    3.2 KB · Views: 232
A third head, for the dog

We have a very finicky new dog, part doodle. 13+ hour drive up from California and she refuses to pee or poop. Same for the last time she was on the boat. She has incredible stamina. So I followed other suggestions on this site and got a 3’ square piece of astroturf. At home, when she would pee in the grass, I would sponge up what I could and rub it on the astroturf. I put the now proper smelling fake grass on the port side of the cockpit (we are starboard docked) and voila, she used it immediately and has been doing so for the last three days. Success! Although this went a bit too far last night when she decided it was also a good place to take a dump. Still, when anchored out or on a long haul, this is going to really help. Everything washes down easily with the cockpit shower.
Now if I can just teach her to play Wordle she can make proper use—double duty I suppose—of her new head.
 
The built in seat-bench ends up holding puddles of water too.

What hull number do you have? Our boat is #3 and the seat retains almost an inch of water when full. The seat retains a lot of shower water even when the starboard fuel tank is at half with a full port tank.

I have thought about setting the boat up with a list to starboard and then pouring acrylic in that seat to create a new level that would drain when the boat is anything but way to starboard. My interim fix is a dedicated fast drying camp towel hanging from the grab handle that I use to sponge out the seat after the last shower each night.

Anyone have a good fix for the wet shower seat problem?


P.S. Love your rear bimini. I have a triangle sun shade that stretches between the mast and aluminum pole risers in rod holders at the aft corners of the upper rail, but the coverage is poor and I can't recommend it (yet). How is your solution?

P.P.S. Love the six stages of life! Always gets a laugh.
 
Hey HeadingtoTexas

I understand the shower seat puddling problem is inherent with early models. We are number 4. We are heavy users of a large sponge. When we first got the boat it had a list to starboard. I installed new house batteries on the port side which leveled the boat. Also moved heavy food stuff to port cupboards which gave a slight list to port now. Big improvement.
The aft Bimini is a dream. Could not live without it. Nothing special in the way of install. Looks like a hang-glider from sitting underneath.
Barrie
"Boat speed is in direct proportion to how close the storm is behind you or how far the cocktail bar ahead."
 
Hull 4! Love that blue finish.

We have three big AGM house batteries filling the starboard side of the lazarette. That doesn't help. My plan is to replace those with a LiFePo bank in the engine room, though they will still be on the starboard side. Hoping that will help. It was a big deal at first, but has faded once the seat drying became part of the shower work flow.

Our dinghy stows right at the level of the bridge deck and the stern section of rail is open. Does the bimini fold down to meet the contour of the rail?
 
Hey headingtotexas; Glad you like the blue..........it is actually deep green.
Yes when folded the Bimini meets up nicely with the stern rail. I have a single radar tower. I think you do too. When lowered it rests on the folded bimini frame and the railing. I am not really happy with this set up and am thinking about cutting the upper railing so the radar tower drops lower. The cut out part will then be replaced with some kind of matching fittings. Plug and play. To do this the bimini frame will have to be swung to the side. No big deal.
I am doing this for two reasons. Next year winter storage will be in a new location and need to transport down a road with hydro wires. Also thinking of doing the west Erie canal which has a low bridge.
As far as the shower-seat-puddling. We just live with it.

Barrie
The six stages of life: Toyboat, Sailboat, Motorboat, Motor Home, Nursing Home, Funeral Home.
 
Doh! I looked for a bigger photo, but struck out. I see the green now. Still quite striking.

My research into the western section of the Erie Canal has been less than comprehensive, but I've been figuring that the lowered mast will provide feet of clearance of even the lowest bridges. I wouldn't have though that the extra several inches of folded bimini would raise the mast enough to be a problem. In addition to calibrating my laptop monitor, I need to revisit our folded mast clearance measurements.
 
Definitely do some measuring before trying the Western Erie. Lowest bridge is 15'6" and there are others not much taller. So I'd measure the boat in various states of disassembly so you know what really does and doesn't have to come apart for each height restricted cruising area.
 
Doh! I looked for a bigger photo, but struck out. I see the green now. Still quite striking.

My research into the western section of the Erie Canal has been less than comprehensive, but I've been figuring that the lowered mast will provide feet of clearance of even the lowest bridges. I wouldn't have though that the extra several inches of folded bimini would raise the mast enough to be a problem. In addition to calibrating my laptop monitor, I need to revisit our folded mast clearance measurements.

The lowest bridge clearance on the western Erie Canal is 15’ per the AGLCA web site which is pretty reliable. The follow on trick is to be aware of water levels which will fluctuate some. An alternative is to turn north prior to the western Erie. If you can clear a 17' bridge, you can take Lake Champlain and through the St. Lawrence Seaway into Lake Ontario.
 
The lowest bridge clearance on the western Erie Canal is 15’ per the AGLCA web site which is pretty reliable. The follow on trick is to be aware of water levels which will fluctuate some. An alternative is to turn north prior to the western Erie. If you can clear a 17' bridge, you can take Lake Champlain and through the St. Lawrence Seaway into Lake Ontario.


If AGLCA says 15', they're being conservative. The Canal Corp lists the lowest clearance at normal water levels as 15'6". For the other NY Canal routing options, the Champlain Canal has 17' of clearance. The Eastern part of the Erie Canal as well as the Oswego Canal (route to Lake Ontario) has 21'.

If you take the side trip for the Cayuga-Seneca Canal, lowest clearance there is 17' to Cayuga Lake, 16' going to Seneca Lake. The split is West of the Oswego Canal junction (Three Rivers) though, so if you want to take that side trip and can't clear the 15'6" bridge, you'll have to back-track (lowest clearance on the Erie is listed as 18'9" between the C-S Canal and Three Rivers, so a side trip with a back-track would be possible).

If exploring Onondaga Lake (junction is between Three Rivers and the C-S canal) you need to clear a 17'7" bridge to get onto the lake. If you want to take the channel from the south end of the lake into downtown Syracuse, you'll have to clear a 15'6" bridge there.


Generally the Canal Corp is good about putting out alerts if high water puts bridge clearance in any section below the governing clearance. So for each relevant section, you can expect at least the listed clearance for the lowest bridge (other bridges may have less clearance than published without an alert, but it'll be at least the clearance of the lowest bridge for that section). There's good info on the Canal Corp website for what all of the clearances are in each section, etc.
 
I am as familiar with the air draft limitations as one can be without having been there. The air draft to the bimini on Escape is 15 feet even with the water tank at ¼ and both fuel tanks at ½, but I would have the bimini down when facing that kind of close tolerance. At that tankage, Escape is 12' 3" to the top of the bridge windshield and a few inches taller than that with the mast folded down. Both of those are way under 15' 6", but I agree completely that confirming those air drafts is an essential part of trip prep before attempting anything that close.
 
I am as familiar with the air draft limitations as one can be without having been there. The air draft to the bimini on Escape is 15 feet even with the water tank at ¼ and both fuel tanks at ½, but I would have the bimini down when facing that kind of close tolerance. At that tankage, Escape is 12' 3" to the top of the bridge windshield and a few inches taller than that with the mast folded down. Both of those are way under 15' 6", but I agree completely that confirming those air drafts is an essential part of trip prep before attempting anything that close.


The good news is, that means you can leave the bimini up for a lot of it, provided it's easy to drop. And just make notes of the areas with bridges under 16' or so and drop it in those areas. Personally, in calm water like the NY Canals, I aim for passing under bridges with a minimum 1 foot clearance, although I've seen others cut it significantly closer with a spotter up top to confirm clearance. And I've done that once as well with about 8 inches above the VHF antennas when I didn't want to drop them for a single bridge and had no other traffic to create wakes, etc.
 
This segment of this thread started with a discussion of the increased air draft of a Mariner 37 mast resting on a folded rear bimini rather than on the bridge deck rail. It may or may not be clear that I know that the mast and its connected antennas are the high point of our boat at 18' 2". My observations about air draft to the bimini or bridge windshield are with the mast down, of course.

The mast, VHF antennas, and bimini are all quite easy to lower on Escape, and we are definitely looking forward to the western Erie Canal and everything the Finger Lakes has to offer.
 
If AGLCA says 15', they're being conservative. The Canal Corp lists the lowest clearance at normal water levels as 15'6".

Well, we are mostly older folks. :) Thanks for the detailed info! I will print this off and keep in my navigation notes.
 
Copied from the canal website.

The New York State Canal System is a 524-mile long, commercially viable waterway connecting the Hudson River with the Great Lakes, Finger Lakes, and Lake Champlain. The federally improved route between Waterford and Oswego provides a vertical clearance of at least 21 feet; the Champlain Canal has at least 17 feet; Cayuga-Seneca Canal, 16; and the western Erie Canal, 15.5. The controlling depth on the Erie Canal between Waterford and Oswego is currently 11 feet; the Champlain Canal is 9.5 feet; Cayuga-Seneca Canal, 8; and the western Erie Canal, 9. Efforts are underway to return the Canal System to its published depth of 14 feet from Waterford to Oswego and 12 feet elsewhere.
 
Controlling depth of 9 feet in the western Erie Canal has been somewhat uncontrolled in recent years when the depth has been closer to 4 feet in places.
 
Controlling depth of 9 feet in the western Erie Canal has been somewhat uncontrolled in recent years when the depth has been closer to 4 feet in places.

Definitely worth it to sign up for the "notice to mariners" and get the actual notices of reduced depths, and of course includes lock and bridge closures, dredging operations, pool level, ect.
 
Another hack for the dogs

A few weeks back we were on the boat with the two dogs and an opportunity to enjoy some pretty cold weather and snow. One of our dogs is young and spry. The other, old and full of treachery and guile, at least when it comes to food, but not nearly so nimble. We put out a 10" wide, 3' long plank so the old dog could shuffle from the dock through the skinny cockpit door. Some drama as we coaxed both to "walk the plank"--especially because it had a tendency to slide around--but things seemed OK if a bit tenuous.

Well, it ended badly when I got the dogs out for their morning constitutional and everything was covered in ice and snow. The old dog decided to become a member of the Elliott Bay Polar Bear Club and slid into the water. Fortunately, I was able to fish her out like a 45 lb salmon via her collar and leash. My wife and the dogs all voted that this skinny plank, that shifts too easily, will not do.

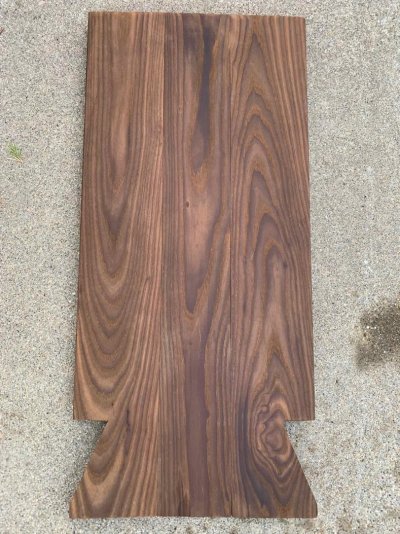
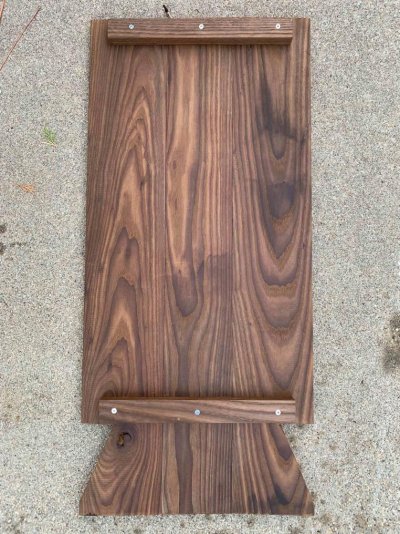
Attached is my hack for the old dog. I had some leftover Thermory decking (European ash cooked to a high temperature..does not rot). Ripped three pieces to make the desired width (15") and doweled and glued them together. Added two cleats to both strengthen it and to keep it from sliding around. And cut it to fit the footprint of the door opening, locking it into place when in use. It gives a bit more room for the old dog to mosey onto the dock and it can withstand a heavy human. It will also store easily in the lazarette. I may add no slip strips to it but will wait to see how the old dog--affectionately known as "the dirt weasel" for her propensity to dig tank traps in the lawn--handles it.

It is all about the dogs, the only source of unconditional love in this life. All other love comes with conditions. Happy holidays to all of you and your dogs. Even your cats.
 

Attachments

  • Topside.jpg
    Topside.jpg
    196.4 KB · Views: 29
  • Underside.jpg
    Underside.jpg
    196.7 KB · Views: 33
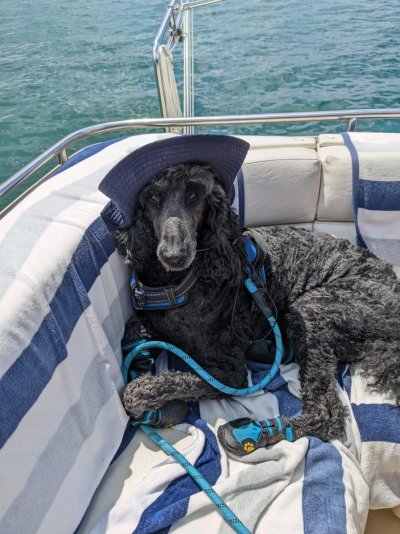
For the dogs, ours wears a harness full time on the boat (and a life vest for swimming and dinghy rides). The harness isn't ideal for lifting him like the life vest handle, but we've confirmed (accidentally) that the harness and leash combo is more than strong enough to lift him in an emergency without hurting him (although it's a bit awkward and lifts him almost vertically).

Ours also wears sneakers on the boat whenever he's out on deck, as he just doesn't have enough grip to move around safely without them. And they make a world of difference for him being able to jump on and off the boat to a dock, even with a couple feet of height difference. You can see him fully dressed (harness and sneakers) below. Ignore the hat, the admiral was trying to keep the sun out of his eyes...
 

Attachments

  • PXL_20220611_181611779.jpg
    PXL_20220611_181611779.jpg
    196.4 KB · Views: 36
a very stylish animal! Mine would have chewed the hat and tennies within minutes and handed them back to me. You have a very compliant pooch.
 
Erie Canal

For what it’s worth, the best part of our Great Loop was the Trent-Severn Waterway, and we took that only because 15’ was too low. Lucky accident. Leave Erie Canal, take Oswego canal, cross Lake Ontario to Trenton.
 
Water pump random cycling

This isn’t so much of a hack, but really a repair where I struggled to find the culprit.

Our water pump would randomly go off, even making strange mewling noises now and then. Originally I found a leak at the pump—which explained water in the forward bilge—and fixed it with a new water screen holder.

But the weird middle of the night noises continued. Poltergeists came to mind. Finally, thanks to Scott and Van, I was able to eliminate everything but the water heater. But I could not catch it in the act. Eventually I took my granddaughter’s beach bucket and stuck it under the high pressure/temperature discharge valve. Bingo, water in the little bucket every now and then and, appropriately, no new water in the bilge.

Replaced the valve with one that meets both temperature AND pressure relief specs and, success!

So, if your water pump appears haunted and there are no obvious leaks, check the pressure/temperature relief valve by putting a little bucket under the discharge tube. The swap is easy.

Sort of a hack…
 
My wife looked for a bath mat that would work well with the shower configuration on the Helmsman. She found this product on Amazon for $59.

The description reads

“SUTERA - Stone Bath Mat, Diatomaceous Earth Shower Mat, Non-Slip Super Absorbent Quick Drying Bathroom Floor Mat, Natural, Easy to Clean”

We placed it in our Helmsman, and it does a great job of absorbing water from you and the door as you leave the shower. It then evaporates away. It has a spacer on the bottom to allow air flow and also eliminates damage to the floor. Pretty happy with it.

Here is a link to the Sutera web site.
https://mat.suterastone.com/?utm_so...erm=&msclkid=149a304d256b1d49b07953873f810ea5
 
Last edited:
A hack for those deep drawers

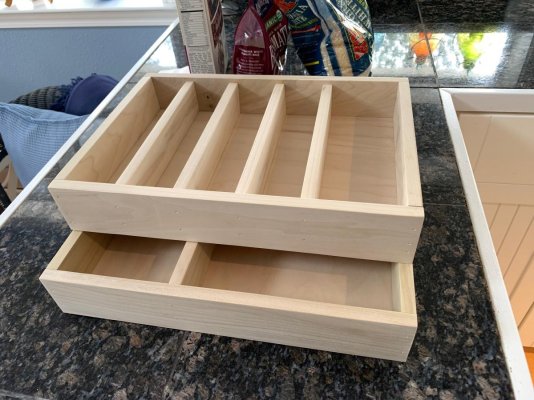
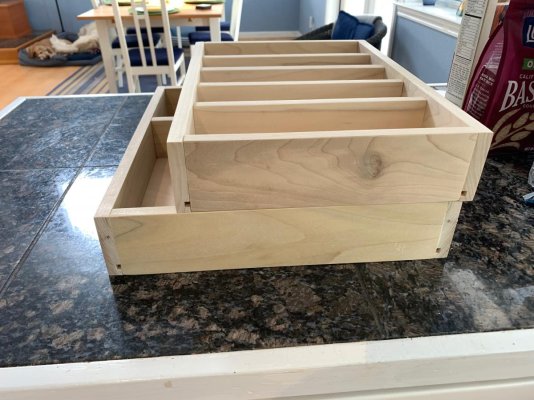
I had some left over 2.5" poplar and 1/4 inch birch plywood in the garage so I took a hack at one of the problems we ran into when we moved our stuff onto our Helmsman 38e.

The drawers in the galley are deep (5 1/4 inches interior height) which is great for pans and bigger stuff, but makes it hard to organize the drawer for kitchen stuff. So I built a prototype and will try it out on the boat in two weeks (we are 800 miles away from the boat so I cannot run out and fiddle with measurements). I built a 2 1/2 inch high tray to fit into the bottom of the drawer in its full dimension. Then a 2 1/2 inch high silverware tray that is 3 inches less in depth. The idea being that it makes it easy to slide it in or tilt it up to gain access to stuff in the lower tray and (hopefully) avoids the lock mechanism. If we like this prototype I will make it out of mahogany and try to do the same in the other drawer that is beneath the microwave. Here are pictures of the unfinished experiment.
 

Attachments

  • IMG_2828.jpg
    IMG_2828.jpg
    152.7 KB · Views: 28
  • IMG_2829.jpg
    IMG_2829.jpg
    146.3 KB · Views: 26
I had some left over 2.5" poplar and 1/4 inch birch plywood in the garage so I took a hack at one of the problems we ran into when we moved our stuff onto our Helmsman 38e.

The drawers in the galley are deep (5 1/4 inches interior height) which is great for pans and bigger stuff, but makes it hard to organize the drawer for kitchen stuff. So I built a prototype and will try it out on the boat in two weeks (we are 800 miles away from the boat so I cannot run out and fiddle with measurements). I built a 2 1/2 inch high tray to fit into the bottom of the drawer in its full dimension. Then a 2 1/2 inch high silverware tray that is 3 inches less in depth. The idea being that it makes it easy to slide it in or tilt it up to gain access to stuff in the lower tray and (hopefully) avoids the lock mechanism. If we like this prototype I will make it out of mahogany and try to do the same in the other drawer that is beneath the microwave. Here are pictures of the unfinished experiment.

That is pretty cool. We bought a similar version of that for the silverware.
 
My wife looked for a bath mat that would work well with the shower configuration on the Helmsman. She found this product on Amazon for $59.

How has this bath mat been working out? Has it been as gentle on the floor as you predicted?

Thanks,
Rick
 

Latest posts

Back
Top Bottom