Battery charger always on?

The friendliest place on the web for anyone who enjoys boating.
If you have answers, please help by responding to the unanswered posts.
The best way is a newer programmable charger. The charger should have 3 phases ending in float when the batts are fully charged. It should be programmable to meet the battery manufacturer's specifications. Here are some articles that will help you get up to speed.

I installed Sterling gear in my previous boat and will give Sterling a mixed review.

The good is that their gear is well made and Ben Sterling promptly answers questions. I'm using heavy duty locally made flooded batteries. The manufacturer recommends charging profiles a bit lower than the built in flooded profile. It was simple to make the change to keep my batts happy.

The not so good is the instructions can be hard to decipher. An example is the Sterling charger I purchased shipped in "California mode" where it would sometimes go to sleep and not wake up again leading to depleted batteries. It has to be programmed into "Power Supply" mode. Easy to do. But the required change was not at all clear in the instructions.
if the boat stays in water all year round, and I only visit her twice a month. what's the best way to use the batt charger?

There is other gear than Sterling but the above reading will give you a good grounding in the basics you need. Note that ProMariner and Sterling seem to be the same. I have been able to find Sterling online for less $$ than ProMariner.
 
I installed Sterling gear in my previous boat and will give Sterling a mixed review.

The good is that their gear is well made and Ben Sterling promptly answers questions. I'm using heavy duty locally made flooded batteries. The manufacturer recommends charging profiles a bit lower than the built in flooded profile. It was simple to make the change to keep my batts happy.

The not so good is the instructions can be hard to decipher. An example is the Sterling charger I purchased shipped in "California mode" where it would sometimes go to sleep and not wake up again leading to depleted batteries. It has to be programmed into "Power Supply" mode. Easy to do. But the required change was not at all clear in the instructions.

I have in the past reviewed both ProMariner and Sterling manuals at the same time... to make sense of some of their instructions.

And also learned that the remote on a ProNautic 1260 is only remote for some actions, not all. Some programming had to be done directly on the charger, not via remote.

Otherwise, our 1260 worked well enough... and did indeed offer good flexibility for voltage selections.

-Chris
 
Scuse my partial hijack here- I need a charger & there is one exactly like this for sale local. Apparently Charles is out of business ?
Should I jump on it for $150 ?
 
Scuse my partial hijack here- I need a charger & there is one exactly like this for sale local. Apparently Charles is out of business ?
Should I jump on it for $150 ?

Were it me, I wouldn't. I'd choose a new ProNautic (or Sterling equivalent) or a new Victron unit.

-Chris
 
charging

The boat has 7 agm house batteries that look like below


View attachment 146597

The boat is connected to the pedestal. I have been leaving the charger always on. The charger gauge always has a positive reading when I checked. Is there risk of overcharging/gassing?

View attachment 146598

====================================
Just asked about your concerns on another thread (Racor)

There are so many excellent responses I didn't add.


Personally, do not like to leave the boat connected to the pedestal if unattended for more than a couple of days, although I have replaced my original charger like yours for a more advanced one.

Have 6 batteries in 3 banks, the charger keeps them on floating charge, each individual bank has its own profile.

If more than a couple of days and nobody can check the boat, I disconnect the power and swing off one of the solar panels up from the railing, will keep the bank supplying power to the bilge pump.

To my level of comfort, the bilge pump is the wild card, should be over run by a sudden water entry and work overtime (did happen) that is an issue keeps my anxiety up.

Easier for me, only 1 block from my boat, go daily.


My set-up

PROMARINER
ProNautic 1240P Onboard Marine Battery Charger, 40 Amp, 12V, 3-Banks
5 out of 5 Customer Rating
4.3
23 Reviews
Model # 14121479 Mfg # 63140
$527.99


Didn't like the old style, as could not adjust charging individual profiles to each bank.

Not sure if there are right/wrong routines, just personal choices.
 
Thanks. this looks like a solid brand.

is it easy to install and set the charging profiles?


====================================
Just asked about your concerns on another thread (Racor)

There are so many excellent responses I didn't add.


Personally, do not like to leave the boat connected to the pedestal if unattended for more than a couple of days, although I have replaced my original charger like yours for a more advanced one.

Have 6 batteries in 3 banks, the charger keeps them on floating charge, each individual bank has its own profile.

If more than a couple of days and nobody can check the boat, I disconnect the power and swing off one of the solar panels up from the railing, will keep the bank supplying power to the bilge pump.

To my level of comfort, the bilge pump is the wild card, should be over run by a sudden water entry and work overtime (did happen) that is an issue keeps my anxiety up.

Easier for me, only 1 block from my boat, go daily.


My set-up

PROMARINER
ProNautic 1240P Onboard Marine Battery Charger, 40 Amp, 12V, 3-Banks
5 out of 5 Customer Rating
4.3
23 Reviews
Model # 14121479 Mfg # 63140
$527.99


Didn't like the old style, as could not adjust charging individual profiles to each bank.

Not sure if there are right/wrong routines, just personal choices.
 
Is it easy? Yes and no. Once you have grasped all you need to understand the work is straight forward.

Please read the link in my post #31 installing a battery charger. Rod Collins discusses in detail the ProMariner charger. I understand he is not easy to read but put in the time to understand what he is saying.

Then look through his articles on making your own cables. Sizing is important. To avoid voltage drop so performance is good. Fusing is important. None of it is rocket surgery but there is a lot to absorb first time around.
Thanks. this looks like a solid brand.
is it easy to install and set the charging profiles?
 
Scuse my partial hijack here- I need a charger & there is one exactly like this for sale local. Apparently Charles is out of business ?
Should I jump on it for $150 ?
Though it looks like an outdated ferro resonant battery fryer the Manual says it`s not and it`s a well known if now closed down brand. A Pro Nautic would be better but the Charles should be fine. Note it doesn`t do Li, just 3 types of LA.
 
Last edited:
Thanks. this looks like a solid brand.

is it easy to install and set the charging profiles?

=========================

not really, instructions easy to follow, just a little patience

Perhaps you could download the owner's manual and go through, should give you an idea if it will work for you.

Normally do that for any new gizmo, if it will be within my “limited capabilities”
 
+1 for "Yes always on, but only if you have an intelligent charger with the common 3-stage feature."

These days the solar controllers have the same feature built in as do many DC-DC chargers for charging between banks of different chemistries (whose voltages at each stage is DIFFERENT! So, the "smart charger" has to be set for the type of chemistry you are charging.)
 
I couldn't sleep for a week after seeing that movie!
Remember to remove metallic rings when working around batteries as well. Metal "dust" not good around fingers.
 
I couldn't sleep for a week after seeing that movie!
Remember to remove metallic rings when working around batteries as well. Metal "dust" not good around fingers.

the movie = Star Wars or WWI?
now i get the idea of dust.
but how can a wrench be zapped to dust by a 12v battery?
 
=========================..Perhaps you could download the owner's manual and go through, should give you an idea if it will work for you.

Normally do that for any new gizmo, if it will be within my “limited capabilities”
Link posted above.
 
@paulga

I have not seen mention if there has been any test performed to verify that the gauge on the charger is accurate?

I have seen gauges that would call out a charge or discharge situation when there was none. Also have seen the reading be off, some by a lot.

Simple check would be to test the resistance on the Engine room lighting circuit with your fluke and then do the math to get what amperage it draws and see if that correlates with the chargers gauge.
Volts/Ohms=Amps

You can potentially test that at the fuse panel, or light switch. I would not use the fluke to do an amperage test (inline) as if it exceeds the internal fuse now you have to fix that too. Fluke 117 is only rated to ~10A DC
 
ProNautic is a great charger. I do like that it displays Amp and Volts. Great customer support too. I have used them.

Now Victron charger has Bluetooth. A great thing to have if your charger is hard to get at. Victrons support, you must go though a dealer.
 
is this test to tap the positive probe to the er lights breaker terminal, and the negative probe to the dc negative buss bar?


@paulga

I have not seen mention if there has been any test performed to verify that the gauge on the charger is accurate?

I have seen gauges that would call out a charge or discharge situation when there was none. Also have seen the reading be off, some by a lot.

Simple check would be to test the resistance on the Engine room lighting circuit with your fluke and then do the math to get what amperage it draws and see if that correlates with the chargers gauge.
Volts/Ohms=Amps

You can potentially test that at the fuse panel, or light switch. I would not use the fluke to do an amperage test (inline) as if it exceeds the internal fuse now you have to fix that too. Fluke 117 is only rated to ~10A DC
 
is this test to tap the positive probe to the er lights breaker terminal, and the negative probe to the dc negative buss bar?

as long as the breaker is off yes that should work.

13.6V and 5Amp should show 2.72 Ohm
 
as long as the breaker is off yes that should work.

13.6V and 5Amp should show 2.72 Ohm

just tried but got no reading. i tapped the red probe to er lights breaker terminal, black probe to the negative buss bar, as shown below, but the reading remains to be OL

lights.png
 
In that configuration is the light switch in the path between + and - probes?
If so it needs to be on

You could also test with a 12v portable light or something similar if you have one. You just need a verifiable load on the battery to check against.

If you know the type of bulbs in the lights you could get close to right by the wattage numbers from them just know that xx Watt bulbs don't always draw exactly what's listed on them they can vary a few watts.

Watt/Volts= Amps

there are 3 Prolume circling lights 22w each, so they draw 5.5A

but the ohm meter should have a reading when the breaker is open if I understood the circuit correctly
 
If you lights are fluorescent the gas mixture inside the tube is not conductive when off.

If you have one, test a circuit with incandescent bulbs only in it.

Be sure your probe leads are in the right ports on the Fluke to measure ohms.
 
just tried but got no reading. i tapped the red probe to er lights breaker terminal, black probe to the negative buss bar, as shown below, but the reading remains to be OL

View attachment 146829

there are 3 Prolume circling lights 22w each, so they draw 5.5A

but the ohm meter should have a reading when the breaker is open if I understood the circuit correctly
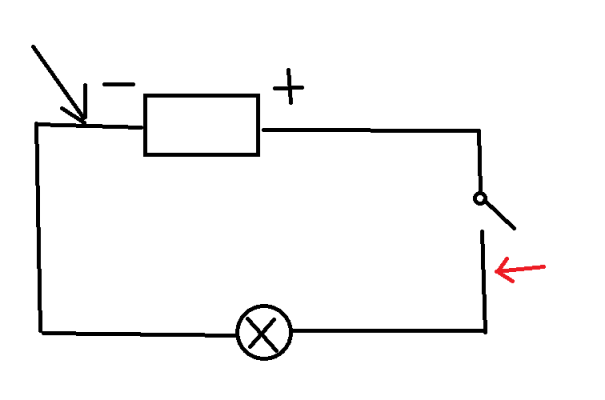
Your drawing shows an open switch, next post you expect ohm meter to read something when the breaker is open.

Maybe you have your words backwards, OPEN = OFF! CLOSED = ON
 
Assuming the circle with the x in it is the light fixtures, the switch must be open as drawn in order to measure the resistance of the rest of the circuit as the meter itself completes the circuit.
Isn’ t that he goal to measure the resistance so you can calculate the current?
 
If you lights are fluorescent the gas mixture inside the tube is not conductive when off.

If you have one, test a circuit with incandescent bulbs only in it.

Be sure your probe leads are in the right ports on the Fluke to measure ohms.

Ok, I overlooked the bulb content is plasma
 
Your drawing shows an open switch, next post you expect ohm meter to read something when the breaker is open.

Maybe you have your words backwards, OPEN = OFF! CLOSED = ON

I know open breaker means disconnected. This is not a confusion to me.
 
If you lights are fluorescent the gas mixture inside the tube is not conductive when off.

If you have one, test a circuit with incandescent bulbs only in it.

Be sure your probe leads are in the right ports on the Fluke to measure ohms.

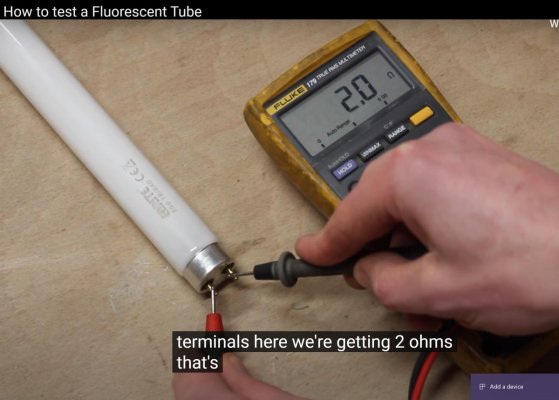
just saw a video where the youtuber was able to get ohm measures of a fluorescent light

light.jpg
 
That is simply because those 2 pins are connected together inside the tube with the equivalent of a filament that is needed to run the bulb. So is the other end.

Without the start circuit getting things going, the gas inside is not a plasma and is therefore non conductive.

Here is how they work in simple terms.

https://home.howstuffworks.com/fluorescent-lamp4.htm

Thanks for the link.

so the fluorescent light need to be turned on before their resistance can be measured? then does the ohm reading indicate the resistance of the light or the battery?
 
You can't, with your Fluke 117 measure resistance with the boat's batteries energizing the circuit. The circuit needs to be dead and importantly, at least one end open.

Find another circuit, (how about the salon lighting or the Nav. lights are they all incandescent?) to use and then measure the resistance of that dead and open circuit, calculate the theoretical load in Amps, and then with a full battery turn the tested circuit back on, lights ablaze and see what the charger meter reads after about an hour.

Hopefully they read the same, but I have my doubts and not solely because of the inaccuracies of the chargers meter. Do it anyway, you may learn a few things.
 
That is simply because those 2 pins are connected together inside the tube with the equivalent of a filament that is needed to run the bulb. So is the other end.

Without the start circuit getting things going, the gas inside is not a plasma and is therefore non conductive.

Here is how they work in simple terms.

How Fluorescent Lamps Work
I didn't quite get it here.
my Prolume circling daylight (model fc8t9dl) should work in the same way (also have a filament inside) as this fluorescent light shown in that video. why is that fluorescent conductive when the switch is off?
 

Latest posts

Back
Top Bottom