Should I consider doing my 3208 after coolers my 3208's myself??

The friendliest place on the web for anyone who enjoys boating.
If you have answers, please help by responding to the unanswered posts.
Another note on the air side of an aftercooler and egt.

As the air side gets dirty. You loose boost pressure and you exhaust gas temperatures will rise. So having egt guages on the boat is a good thing. Get a base line for your egt for the boat. It can tell you a lot about the boat. From a dinged prop to a dirty aftercooler.

Example
Egt increases with load. One weekend after running the boat all was fine. Follwoing weekend all of a sudden the egt was higher on one engine. Then I noticed the load was higher and fuel was also more on the port engine. Once I got where i was going, i went for a swim thinking i picked up a rope or something. Woah, the prop was damaged. I think I hit something in the marina the week before but did not notice. The rise in egt on one engine alerted me to something wrong with that engine.

If you know your base line of your egt's you can get a feel for when things need to be done.
As load increases at a given rpm the egt will rise. If it is an even rise for both engines it indicates a change to the boat. Dirty props, dirty bottom, clogged aftercooler on the air side. A rise on one engine indicates a problem on that engine. Its important to understand that changes in egt will not necessarily show up on engine temperature gauge. Your engine will be running at its popper temperature. The egt is your early warning system .

My EGT gauges don't work currently. I replaced the sensors, replaced the gauges, still nothing. Next I'm going to clean up the wiring harnesses and hopefully that give me a better signal. If not I'll have to run new wires. Ughhh.
 
You should look into a barnacle buster flush it will remove the built up calcium and save a lot of labor

I'm with Greg and Firehoser. Best to remove the entire unit so air side and fluid side can be properly cleaned. Re-assemble with right parts and then pressure check. Aftercoolers are made with several different and largely unknown metals and welding rod so avoiding harsher chemicals is recommended.

And to repeat, re-assemble with lots of proper lube so next time is an easier DIY.
 
Ok, I got this started. Sorry, I was on my own and too much trouble to video. The bolts were quite easy except for a couple things. 9/16 socket and ratchet got all the bolts. Where the turbo air comes over some bolts they are actually nuts. Got one with the socket the other two nuts with open end wrench while laying on top of the engine. When I got to the forward port corner my socket was dragging on the frame and I broke the bolt off. I think it must have be stressed by previous work as it did not require much effort. So I'll have to get and drill and Easy Out. Then I cut the water return hose off and undid the 1/2" nuts, slid off the cover plate and cylindrical seal and wiggled the pipe out. After loosening the clamps on the air hose from turbo to aftercooler I was able to remove the top. I was a bit surprised to see how oily everything was. I know I vent crank case gasses into the turbo but still it was quite wet with oil. I quit the job for a bit. Next I'll cut the hose on the supply end down at the water pump and remove that pipe which will allow me to remove the core. There is some sealant used that may make removal hard. Not sure why it would be in the on port and starboard edges of the core. I was planning on doing that on monday then running the core down to the radiator shop and purchase the gasket and seal parts. I'll be ordering 1 foot of silicone hose in 1-3/4" Oops, DrMLK day. Damn. more to follow. Oh also I was surprised to realize that the cooling salt water comes directly from my water pump up to the lower inlet, then returns that somewhat heated water to cool the coolant bundle. I guess it doesn't add much heat to the water since it is just cooling air.
 
This picture shows the aftercooler after I removed a couple bolts. More images later.
 

Attachments

  • After cooler 1.jpg
    After cooler 1.jpg
    82.1 KB · Views: 14
I was a bit surprised to see how oily everything was. I know I vent crank case gasses into the turbo but still it was quite wet with oil.


These engines only have two piston rings, so there's quite a bit of blow by compared to the more typical three piston ring engines. Consider adding Walker Airseps to keep the oil out of the intake and after cooler. I added them to my 375HP TAs and they work great. Walker Airseps were a factory option, at least on the 375HP versions of the 3208, so I suspect CAT understood that they are a good idea.
 
So earlier I neglected to mention that there is heavy brass sleeve that fits over an "O" ring on the core and slides out of the core on the pipe if it is still installed. It was hard to wiggle out on top but I got it and was able to take the top off of the Aftercooler box. But then I had to take the lower supply pipe off at the water pump. Ok, got that. But, now I can't get the brass sleeve off. I have worked it and worked it with a couple of screwdrivers an I can wiggle it but not get it off. I sprayed with WD40 and PB Blaster, left overnight and still nothing. My neighbor said he used CLR to break up corrosion and got his off. I'm try that. I also texted my Cat mechanic to ask if there were any tricks. He just said many times the core connector gets damaged in the process and needs to be replaced. My dealer says new core= $5,500 before taxes. Sooooo I'm slowing down the process and hoping the CLR will do some work.
 
So earlier I neglected to mention that there is heavy brass sleeve that fits over an "O" ring on the core and slides out of the core on the pipe if it is still installed. It was hard to wiggle out on top but I got it and was able to take the top off of the Aftercooler box. But then I had to take the lower supply pipe off at the water pump. Ok, got that. But, now I can't get the brass sleeve off. I have worked it and worked it with a couple of screwdrivers an I can wiggle it but not get it off. I sprayed with WD40 and PB Blaster, left overnight and still nothing. My neighbor said he used CLR to break up corrosion and got his off. I'm try that. I also texted my Cat mechanic to ask if there were any tricks. He just said many times the core connector gets damaged in the process and needs to be replaced. My dealer says new core= $5,500 before taxes. Sooooo I'm slowing down the process and hoping the CLR will do some work.


I can't picture the problem, but when metal parts are stuck together and are supposed to come apart, I have had tremendous success using lots of heat (acetylene or MAP gas) on the outer stuck part to expand it, then air duster in a can, held upside down (so that it comes out as a liquid), to super-chill the inner stuck part. The shock of the temperature changes combined with the expansion of the outer part and contraction of the inner part, work remarkably well to free stuck parts. Vibration (like from an air hammer or impact gun) combined with this technique really helps a lot too. I have no idea if these ideas will work for your situation, but I hope they do.
 
This comment is not meant to be directed at you. You have decided to service your engine properly . Good decision! This is for the forum

This is the exact reason why several of us have have been harping on doing the cooler service. The corrosion that sets in an damages seals and very expensive parts that are otherwise in servable condition. Damages to the seals that lead to the seawater getting into the air side of the engine. A killer of many engines.

As far as the corrosion. I have great success with Kroill oil. I seeps in and frees stuff up . Great in conjunction with heat. Also you can try the radiator shop. I would recommend ( since you don't have records of service) have the cooler ultrasonically boiled out, air side cleaned and pressure tested by the shop. They can probably break the parts apart for you. After all, they see this a lot.

Post pics of the gooey mess on the air side too, so others can see the reason you need to clean the air side also.

I just did mine last year and I did all my coolers 2 trans, 2 fuel, 2 heat exchangers and 2 aftercoolers. coolers were 350 each small and 450 each large.
 
I'm going to post a couple more pictures. Not what was requested but I'm not currently on the boat.[/ATTACH][/ATTACH]
 

Attachments

  • After cooler in the box.jpg
    After cooler in the box.jpg
    134.4 KB · Views: 29
  • Brass sleeve for AC.jpg
    Brass sleeve for AC.jpg
    114.6 KB · Views: 14
Well I just finished rebuilding my second aftercooler. I had been trying to get it to hold pressure but it kept leaking down. It was my test fittings leaking. I tried 3 different ways and the third one worked, it has held 20 psi for over 24 hours now. Going to reinstall it on Thursday.
 
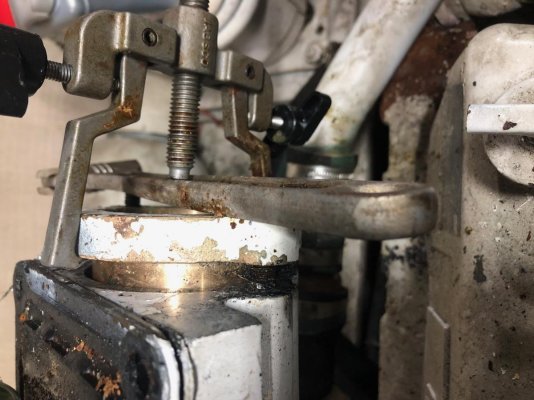
Ok the first image is me trying to get the supply side sleeve off. They call it a coupling. the last picture is the sleeve I got off the top. The middle is the cover off of the AC box. You can see the fitting with the "O" ring. The sleeve fits over this "O"ring and the "O" ring on the pipe fits inside that core fitting and does not seal with the sleeve. So now I put a puller grabbing the sleeve with a bar across the studs coming out of the box, and the screw pressing on the bar. I was able to pull it out 1/4". I have been spraying with CLR inside and out. Looking into the sleeve I can see the core fitting is a bit welded to the sides of the sleeve. When I get back to the boat I'll take some more pictures outside and inside. I'm going to get into the sleeve and tap the exposed edges of the core fitting to try to break it free a bit. Carefully of course. The heating and cooling ideas are in my pocket for now as it is awkward. I'm taking my time, just keeping working hopefully without breaking the core fitting.
 
Looking at the aftercooler air side. Plugged. Engine is suffocating. This is one of the many reasons for doing this service. You will find less smoke, better power, lower egt.

Great for the engine!!
 
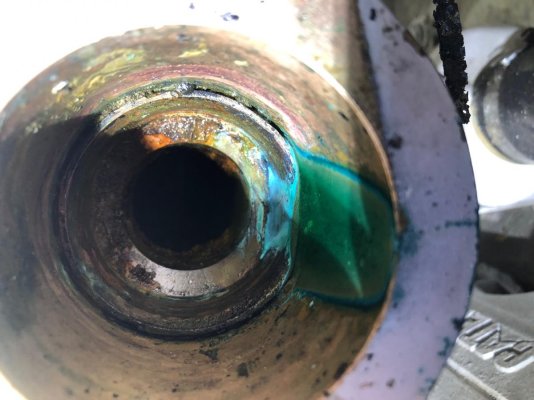
Here is where I am at. I still can't get the brass sleeve off of the projection coming out of the core. Here is a picture of what it currently looks like. I seem to making a little headway. I put a puller on it and it stretched out about 1/4" It is not sliding it is stretching so I'm being careful not to break it off. I Used a screwdriver and tapped around the edge that you can see on the inside. I'm getting the CLR fluid you see to slosh around the edges a bit. It is no longer welded completely around but it is not sliding yet. I'm going to keep working it.

IMG_3237.jpg

IMG_3240.jpg[/ATTACH][/ATTACH]
 
Sometimes I find it helps to move the part back in the direction from which it started. Seems counterintuitive, but it can free up the part and allow lube to penetrate, then might move more freely in the right direction.

Just throwing that out there, its hard to know without a better look. Best of luck.

I did that right after the pictures. I took off the puller, cleaned out the CLR turning green, Hammered the sleeve back in which didn't go far, tapped around again with the big screwdriver, wiggled the sleeve around, put the puller on, not much change but it is going to take time to get the CLR up between the sleeve and the tube coming out of the core. You can see it beginning to open up in the photo. Time and movement might get it done. I still have yet to use heat and cold.
 
Sorry to hear about your challenges in doing this work, but for others, there are a lot of lessons here. I agree with Greg about the air side. Aftercoolers have air and oil vapour pass over and condense on the cooling tubes and fins (full of saltwater, freshwater, or coolant), leaving an oily mess over time greatly reducing air flow to the engine. No amount of Barnacle buster (or other flushes) will even touch this. The aftercooler must be taken apart and cleaned. Also, if this type of service is put off (enough), instead of a fairly simple job, it will become difficult at best, and may require a whole new (expensive) assembly. Saltwater and dissimilar metals in close contact with each other, if ignored, cause most of the issues. If your core fails and leaks and allows saltwater into the air intake (servicing with pressure testing is needed to avoid (as best as possible) this issue) it can lead to needing a complete overhaul or engine replacement.
Aftercoolers require regular, full, off engine servicing. Just like the old Fram oil filter commercials, "you can pay me now or pay me later"!!
Good luck RickyD and keep us posted.
 
I might be misinterpreting the picture, but it looks like the puller is largely pushing down on the thing you're trying to pull up. Consider getting a deep socket or piece of pipe that will fit down inside the flange/coupler and push against the thing holding onto it. That'll give you all the power that puller can manifest.
 
I might be misinterpreting the picture, but it looks like the puller is largely pushing down on the thing you're trying to pull up. Consider getting a deep socket or piece of pipe that will fit down inside the flange/coupler and push against the thing holding onto it. That'll give you all the power that puller can manifest.

There are two studs coming out the air cooler box so I put a crescent wrench across the studs because it was flat. So there is only so far I can pull but I don't want to pull to hard anyway. If I needed a little more I would thread a couple nut on the studs for a little more space. But so far, even pulling 1/4 inch, it is not sliding out, it is stretching out. So now I have it relaxed and trying to keep soaking and manipulating.
 
There are two studs coming out the air cooler box so I put a crescent wrench across the studs because it was flat. So there is only so far I can pull but I don't want to pull to hard anyway. If I needed a little more I would thread a couple nut on the studs for a little more space. But so far, even pulling 1/4 inch, it is not sliding out, it is stretching out. So now I have it relaxed and trying to keep soaking and manipulating.


Take the studs out and replace them with longer studs that are fully threaded, but when you install them, put a nut under each side of the flange (in the gap between the parts you are trying to separate) and thread the studs through the nuts. After the studs are seated, you can back the nuts up the stud to help push the flange off. It might not be enough to complete the task alone, but when combined with the puller, the chemicals, some heat, some cold and a little rocking action...


A real gear puller (not the impeller puller you are using) combined with an impact gun would likely help a lot too.
 
Oh also I was surprised to realize that the cooling salt water comes directly from my water pump up to the lower inlet, then returns that somewhat heated water to cool the coolant bundle. I guess it doesn't add much heat to the water since it is just cooling air.

The path of the raw water-cooling system is strategically planned to maximize heat transfer. In order for an aftercooler to function well, you want the coolest water possible to be absorbing the heat load, this load depends on the amount of work the turbo is doing on the air (compression causes heat). After the aftercooler, the raw water usually flows to the oil and transmission coolers, then the engine coolant heat exchanger, and if the manifold(s) are raw water cooled, raw water flows to them next and then the riser. Pretty much, it cools the items which need to be the coolest first, the engine oil and transmission coolers are a bit of an exception to this rule but cooling the engine oil effectively reduces the engine temp as well as raising oil pressure so this is a priority in order over the coolant exchanger. It would make no sense to cool the engine exhaust manifold first, which produces a lot of heat and then try to use that hot, raw water to absorb heat from the engine coolant.

For this reason, you will see that lower output versions of some engines may use engine coolant for the aftercooler and the higher output versions use raw water. Raw water is at least 100 degrees Fahrenheit cooler than engine coolant on an engine at operating temperature, so the aftercooler cooling capacity of the lower output version is much reduced compared to the high output, raw water cooled versions. Cummins does this in some engine families and I believe volvo does too. Land based diesels don't have the option of sea water coolant and this is why diesels in marine applications frequently have higher output ratings than their land-based versions.

Sorry for stating the obvious to most of you.
 
Last edited:
Take the studs out and replace them with longer studs that are fully threaded, but when you install them, put a nut under each side of the flange (in the gap between the parts you are trying to separate) and thread the studs through the nuts. After the studs are seated, you can back the nuts up the stud to help push the flange off. It might not be enough to complete the task alone, but when combined with the puller, the chemicals, some heat, some cold and a little rocking action...


A real gear puller (not the impeller puller you are using) combined with an impact gun would likely help a lot too.

Right now I don't think pulling harder or longer is the answer. I'll just crack off the fitting that is inside the sleeve and then need major core surgery or replacement. The part costs $5,500. I think I'm making headway at the cost of time. Time I have at least for now. gunk keeps working its way out as I tap and flex the fitting inside the sleeve. Work and rinse, work and rinse and someday it will release. Right now my pulling is not getting the fitting to even start to slide or more accurately the sleeve to slide off of the fitting. The 1/4 seen in my photo is only from moving and stretching the core. I may add some heat and cold today.
 
Slow and Steady wins this race.
 
Oh, the challenges of working with raw water cooler aftercoolers are legion and in my mind are not really worth having as how many times do you think you have actually needed to use the addition horsepower they create?

Perhaps this kind of delay in service induced corrosion is one reason why the quoted prices to service them are so high.

As you have now come to the realization that the present puller set up is only stretching the aftercooler core and not moving the sleeve itself, I would change things by having the pulley impart the forces on the end of the core's nipple (ideally to what appears to be a thick part inboard of where the oring seals) by way of a correctly sized brass round bar, or as heysteve suggested upthread a deep socket, provided you have one that fits well. This should stop the further stretching of the core but may damage the core's nipple itself.

You are wise to proceed with caution, let soaking time do its job and push/pull only on the right places.
Heat may help but it appears difficult to get the heat quickly to where it would do the most good. A slow application of heat (heat gun or small propane torch) seldom works well.

Understanding that on this engine you have already experienced both a coolant and oil heat exchanger core failures and replacements, this 1/4" +/- of stretching to the aftercooler core does not instill much confidence in its condition. Even if it tests OK, failure could be imminent and you may also need to repair it's oring sealing surfaces.

Yes $6k is a bitter pill but pales in comparison to a complete engine rebuild.

Good luck.

Today as I manipulated the sleeve, I could see the core fitting flexing and shifting. I'm getting there, just not yet. Back at this weekend.
 
From my vantage point some 1300 miles North of Long Beach the flexing and shifting of the aftercooler core's fitting (or nipple) is the last thing you want. Continuing to flex this nipple can only lead to metal fatigue and failure. You may be there already.

I would try the brass round bar or socket and puller set up which should not deflect the nipple if the load is applied evenly.

Understanding that this entire assembly is still in the aftercooler housing that remains bolted on the top of the engine, I don't see how one could "boil it" effectively, while not allowing any water to find its way into the intake plenum.

Let's hope that whatever magic elixir you are using loosens this coupler and along with some gentle force from the puller, tomorrow, it just slides off.
 
[/ATTACH]Hurray, success. Just this morning I lamented that this thing may never come off. I worked on it and worked on it but I could not pry the pieces apart. Then my boat neighbor started throwing out suggestions till one put on a light. It is akin to someone else's suggestion but his was to take one of my tapered wooden hose plugs and use that to push while using the puller and separate them. I didn't want to jam something in there that would not want to come out but I found one that fit well with the large diameter on the inside. I then hammered on it hard to shake things up, then brought the puller back into play. At first I just screwed into the wood pushing the plug against the fitting coming out of the cooler in opposition to the sleeve being pulled. That was no good, then I put the crescent wrench across and started screwing so I could put more pressure on it. It argued just for a moment and finally slid apart. I have a couple more pictures here showing the fitting coming out of the cooler with an "O" ring and a return pipe with and "O" ring that fits inside the AC fitting. The brass sleeve (coupling) fits over all. The pipe goes inside the sleeve and then seals inside the fitting. The fitting seals inside the sleeve.
 

Attachments

  • Sleeve for after cooler.jpg
    Sleeve for after cooler.jpg
    91.2 KB · Views: 17
Last edited:
The cooler nipple, unless you cleaned it up for the pictures looks like it's free of corrosion and in great shape.

One has to wonder what was the glue that kept it together, Just the o ring?

Good job in creating the right tool.

Onward and upward.
 
The cooler nipple, unless you cleaned it up for the pictures looks like it's free of corrosion and in great shape.

One has to wonder what was the glue that kept it together, Just the o ring?

Good job in creating the right tool.

Onward and upward.

These pictures are showing how the parts go together to some degree but they were from the top water return line that I did not have a big problem removing. It was the bottom supply system that was the problem. As was shown in earlier pictures there was lots of green coming from the the CLR I sprayed but some of that was easily coming from the brass coupling or sleeve as i like to call it. Early yesterday morning, after letting it all soak for two days, the green water had turned white. I think that may have been from calcium deposits. Later after getting it all apart the left over deposits were black, I suppose from the oil evident on the heat exchanger. I quit after taking it all apart and sat with a friend for a couple shots of 18 year old scotch. I'm home now waiting for our huge rain storm to pass before going back and cleaning all of the parts, lubbing and re-assembly. Need to hit the Cat parts supplier for new "O" rings. Then, on to the starboard engine which should be much easier as it is more accessible and now I know what to do. Sorry I did not do a video. Maybe I'll at least take more pictures. I also know why it is recommended to do this every three or four years. Do it before it becomes a BITCH.
 
I contacted the boats original owner and he said he had never done the after cooler service. The owner before me did no service. A search through invoices showed only the stbd engine being done when an overheat situation required a rebuild. That means I just experienced what can happen when you wait 33 years to do a service suggested for a 3-4 year interval.
 
Back
Top Bottom