Wood water damage

The friendliest place on the web for anyone who enjoys boating.
If you have answers, please help by responding to the unanswered posts.

arthurn

Veteran Member
Joined
Apr 21, 2020
Messages
30
Location
United States
Vessel Name
Brown Eyed Girl
Vessel Make
38ft Helmsman Trawler
I am going to show my ignorance so please forgive me.
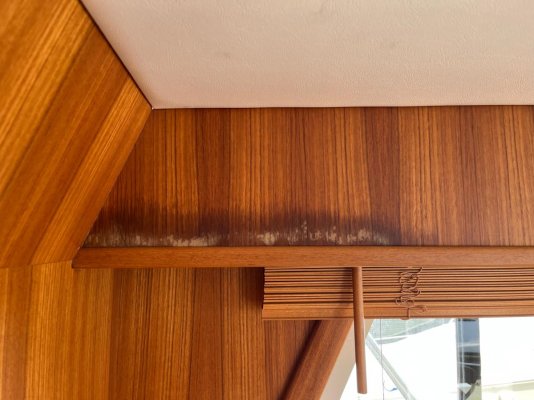
I have a 2017 Helmsman 38 ft helmsman trawler when I noticed this damage to the wood in the pilot house. I looks like water damage but it is at the bottom of this piece of wood and not the top. The only break in the cabin top near this area is a horn. I assume water leaked thru where the wires penetrated the fiberglass top and drip over the cabin liner on to the wood. I am still confuse about why it is on the bottom and not the top. Be that as it may does anyone have any ideas how I can repair this? Can I sand it and restain it?

I am not sure what type of wood it is.

Any help would be appreciated.

Arthur
 

Attachments

  • IMG_4095.jpg
    IMG_4095.jpg
    127.6 KB · Views: 63
Looks like a teak veneer over plywood sheeting. Make sure the leak is stopped first, of course, but I’ve seen some ok results from just sanding in the direction of the grain, 120 to 240, and just a teak oil.
You could buy some golden teak stain and dilute with denatured alcohol until you achieve the desired colour, then a couple of brushed on clear coats with the appropriate level of gloss/satin/matt.
This will depend on what is going on with the state of the plywood, it will need drying out first, maybe some clear penetrating epoxy first to stabilise the substrate?
 
Is there any varnish like finish on the paneling? If there is anything you do will probably not get to the stain unless you remove the finish first. Then treat the stain and refinish.
 
Is there any varnish like finish on the paneling? If there is anything you do will probably not get to the stain unless you remove the finish first. Then treat the stain and refinish.

+1
You can try oxalic acid after removing the finish to lighten the stains. Finish must be removed first both for the acid and the stain. Make sure the veneer is not “rippled” or lifting. It can be reglueded but might be easier to cover with 1/8” teak veneer if that is the case.

As Comodave said, be sure the leak is fixed before repairing.

Rob
 
Being on a 4o yr old Trawler I have learned that water can and will wick anywhere without logic. Find the leak and then repair. ZAR makes awesome oil base wood stains. As others have said, sand in the direction of the grain, apply your stain to match the color and then apply varnish to match the rest of the finish.
The benefit of ZAR and other oil base finishes is the longer they sit and penetrate the darker they get, so you ca match pretty good when you learn what product or mixes work. Same thing with the varnish. My surface finish is a diluted Interlux mat finish rubbed on and not brushed. Experiment and write down what works.
 
All great, thanks very much. Yes the leak has been fixed. I pulled the ceiling panel and will water test it this weekend.
 
Was the horn installed at the factory? It's a little disconcerting if a factory installed option caused this much damage on a 6 year old boat.
 
I had some similar water spots around a pilot house window. There is a woman in Seattle who cleans that up and actually paints the grain back onto the wood...she is an artist. It looked great.


I don't know if she was "one of a kind" or it there are more like her.


I was put in contact with her they AAA Yachtfinders in Anacortes.
 
I had some similar water spots around a pilot house window. There is a woman in Seattle who cleans that up and actually paints the grain back onto the wood...she is an artist. It looked great..

Did not think of that, great idea. Check at your local paint store for recommendations of a “faux” painter. They can imitate almost anything from stone to wood.

In June at the end of a delivery I saw a painter doing just that on the cap rails of an Italian boat. Looked fantastic.

This from a guy who has been in the refinishing business since age 5.

Rob
 
To answer one unanswered question; The reason that the discoloration is at the bottom is that the water leaked down the vertical face(s) of wood and then pooled on the interior flat surface where it slowly worked its way into and damaged the bottom of the vertical face, working its way up the grain by capilliary action. By contrast the rest of the vertical face did not suffer standing water and therefore shows no damage. I have similar damage which, having treated the source, we treated by faux painting (my wife is an artist so that helped!) as others have recommended.
~A
 
Was the horn installed at the factory? It's a little disconcerting if a factory installed option caused this much damage on a 6 year old boat.

The original horn died so when I purchased the boat the owner had a new one installed.
 
The unfortunate part is I don't think the owner did the repair.
 
If you have access to a moisture meter, you might want to check the surrounding area. A rotten pilothouse roof would not be good.
 
That's a good thought. I was able to take the ceiling liner down. The area around the horn is solid.
 
Where the horn is mounted is it cored? If so I would check the coring for rot. Also maybe take the horn off and mount properly if you haven’t done so already. Marinehowto.com has a great article on bedding things.
 
I repaired similar damage with oxalic acid and a green scrubber. I then restored the color with a green scrubber and Olde English scratch coat, dark. Hand rub with soft cloth and let dry for a week. Then refinish.
 
Comodave, yes I removed the horn. The cabin top did not look cored. I did rebed the horn. Water tested it, no leaks.

Darlin, thanks for your input, will look into it. I found out it is a teak veneer over plywood.
 
I see the possibility of that being condensation.
 
Our last boat had some stains under very poorly designed side windows. I took the windows out and glassed the openings up. The windows were not much help since they were only about 5” tall but they were 48” long and straight. The cabin side there was curved. No way to effectively seal them up. I made a mold that matched the curve of the cabin side and laid up some glass and then filled the openings. No more leaks but the teak veneer plywood was stained. The finish was a satin varnish so the stains were under the varnish. I didn’t get around to fixing the stains before we sold the boat but the varnish would have had to come off before I could have done anything with the stains.
 
Sanding with the grain up close to the trim at bottom can be problematic...
Best to remove the trim while refinishing. If not possible/EZ you may need to use a cabinet scraper instead of sanding. Here is a link to a card scraper.
https://www.amazon.com/s?k=cabinet+...3457722&tag=googhydr-20&ref=pd_sl_rz642ib6e_e
There are some videos on how to use and "sharpen" the scraper if you are not familiar / experienced in their use. It may require some practice to get the feel before tackling the intended area.
 
It's going to be very difficult to repair that such that you can't see a mark. What about asking Helmsman for a pre-finished panel large enough to either splice it in cleanly with a vertical molding just to the right, or replace the piece completely. Since it's such a new boat I would think they could do that and it would match pretty closely.
 
It's going to be very difficult to repair that such that you can't see a mark. What about asking Helmsman for a pre-finished panel large enough to either splice it in cleanly with a vertical molding just to the right, or replace the piece completely. Since it's such a new boat I would think they could do that and it would match pretty closely.

That's what I was thinking... good idea :)
 
I have also had very good luck with Peel and Stick Teak Veneer. Its real teak veneer that comes in a roll. The back is very stick. Cut to size, place, then just varnish. I did the dash of my pilothouse of an old boat I had and it looked great.
 
Back
Top Bottom