DIY Canvas Tips, Tricks, Recommendations

The friendliest place on the web for anyone who enjoys boating.
If you have answers, please help by responding to the unanswered posts.
Dougc...
I agree w previous replies.

Machine - not familiar w yours but I started w an old Singer portable my grandmother had. It was heavy and would punch through the material fine but didn't feed very even but I was able to do small projects and repairs. I learned enough to figure I could do more and kept an eye out for a used WF machine on Craigslist and eBay and ran across the Sailrite. There are other similar machines available for less than Sailrite. Haven't touched one but they appear to be identical in pics.

Stamoid - I've done a few projects w it but don't consciously do anything different
than Sunbrella. It does tend to leak a little more / longer than Sunbrella so the suggestion of smaller needle could help. Rubbing parafin over the stitching helps seal the holes and stop the leak. I recommend it if folks have leaks but do recomment working from the inside just in case it changes the appearance at all.

Good luck w the projects... many others here on TF doing some nice DIY work and willing to share knowledge.
 
Below is my post #225 - Update - I submitted the DIY Boat Canvas info to the TF Library - Misc - to give folks another way to access it (may take mods a little while to approve it?) - it is still available via my "Bacchus" website as well
Hope it helps

Fellow TF Stitch Meisters...

Water is hard up here in the NE and that leaves some spare time to fill

I had some interest in DIY Boat Canvas from members of my local Power Squadron members so I put together a short seminar on what it takes to get started.
Some of this is stuff I already posted in this thread but there are some new info & video links

Topics include: (Links & Videos included)
• Sewing Machines – features & options
• Work Area Set-up
• Useful Attachments & Tools
• Zipper Basics & options
• Sources – machines, fabrics, accessories
• Resources – Learning aids

If interested you can access the seminar with pictures, informative links and videos from my Bacchus website - Projects - DIY Boat Canvas
 
Kinda sorta on subject.... we bought a Sailrite, just delivered last week. One of the first things I need to do is restitch some covers. Sunbrella is in good shape but the stitching is worn. Do you remove the old stitiching before redoing or leave in place and just go over it with new?
 
Last edited:
I recommend just resew. Think about it, if you remove the old stitching the pieces are going to fall apart.
 
Yep, that's what I was thinking but wasn't sure. Take out the thread and elevate it to a whole new level of project. Thanks for the response.
 
+1 on just resewing it. I would not try to remove the old stitching. Have resewn several boats for friends this way.
 
My canvas guy asked me to clean the canvas to be resewn(it needed cleaning) with a power washer,saying it would remove most of the old stitching, and it did, but not 100%. I don`t know if he had trouble resewing, and I don`t remember the hemmed edges becoming fully flat and extended during cleaning.
 
I have a power washer and have used it to wash my Ford Econoline van. Darn near removed some of the paint
 
I have a power washer and have used it to wash my Ford Econoline van. Darn near removed some of the paint
I used mine on a car once,after following a truckload of incontinent cattle:eek:. The paint stayed on but it needed waxing.
I`ve cleaned more than one piece of boat canvas,successfully. I take care doing it,your machine might be more powerful than my Karcher.
On the bimini I was removing something like lichen, and bird stuff, you`d be hand scrubbing hard a long while to remove that. Final clean is done in the front loader washing machine.


Maybe. Mine is a Mi-T-M rated at 4000PSI @ 3.4 gal/minute. No way would I consider using my machine to clean canvas
 
Last edited:
4000PSI is a lot of PSI. I believe the norm for household use is 2600-3000 if I remember right. Of course it depends on which nozzle is used and how close you put it to the item.
 
Maybe. Mine is a Mi-T-M rated at 4000PSI @ 3.4 gal/minute. No way would I consider using my machine to clean canvas
Good grief! No no no. Mine is less than 1/2 that. But, it just did some good work in the ER.
Now back to canvas.:)
 
I wouldn't use my P W to clean any canvas.
Recommendations for care and cleaning of Sunbrella are in the TF Library section and online.

I have done repair / patch jobs for a local cleaning service that power washed a store awning canopy. I doubt they will do that again but I'm happy to do their repair$ when they do!
 
Yes, we are in agreement, don’t use this machine to clean canvas. My first pressure washer was one purchased from Harbor Freight. It really didn’t suit my needs including taking too much time to get things done so I gave it away and started to look for a better pressure washer.

I came across the Mi-T-M in a pawn shop of all places that advertised it on Craig’s List. So I went to look at it, made an offer of $250 and took it home in my van. I got a good deal and when I need a good pressure washer, I have it in my garage.
 
I wouldn't use my P W to clean any canvas.
Recommendations for care and cleaning of Sunbrella are in the TF Library section and online.

I have done repair / patch jobs for a local cleaning service that power washed a store awning canopy. I doubt they will do that again but I'm happy to do their repair$ when they do!


Don—

Nice to see that you keep your machine busy! Wifey explained just yesterday that now that the boat’s canvas work is done I should get rid of my Juki. So I suggested that she should get rid of much of her exercise equipment. So as it now looks, nothing is going to go. I even pushed to move the Juki out of my office and into her exercise room.....I lost that battle.
There was a time when I looked for canvas jobs... not so much now but don't think about getting rid of the machine.
With 2 boats and a motorhome Always a personal project on the To Do list

Protect your tools... you won't regret it.
My DW keeps telling me to get rid of one boat but hasn't mentioned the sewing machine.... yet???
 
I love new tools. My wife doesn’t even ask anymore, just shakes her head and walks away. I do occasionally make the point that it is cheaper to buy a tool than having to hire the work done. She does tease me about my sewing machine...
 
Iv done a little work using old singer and I have a boat load to do right now. Thinking about the ls1. I have a basic question regarding seams. What is the correct way to make them leak proof? For say a large Bimini I don’t want drips through the seam in the middle.

Thanks this is a great thread!
CC
 
Seam/ basting (double sided sticky) tape helps.
I lay material w finish (exposed) sides together.
Stirch about 1/2" from edge.
Open it up so finish down for both.
Place seam tape under the flap and stick the flap down
I like to then stitch from top / finish side fairly close to the joint line to secure the flap.

If you get any leakage you can rub a wax candle along the bottom side of the stitching and that will stop leaks.

I would not use silicone waterproofing treatments. They leave an oil film and collect dirt.
 
Is the axle on the shuttle (gib) hook that holds the bobbin supposed to be loose on a Sailrite LSZ-1?
 
Last edited:
Mine is not. My machine was purchased in 2016. So unless something has changed in the design since then I’d say no.
 
Just ran across this thread.

Bought a Sailrite LS1 with Monster Wheel in the early 90's. It was $300. Added foot's and other accessories over the years.

Unless I'm making something large, the sewing machine, tools and materials live on the boat. I do small projects and repairs while cruising during the summer. Dinghy covers, winch, windless and instrument covers are made on the salon table.

I have a large table at home with outfeed for big jobs. I've made window covers and cockpit enclosures for Sandpiper.

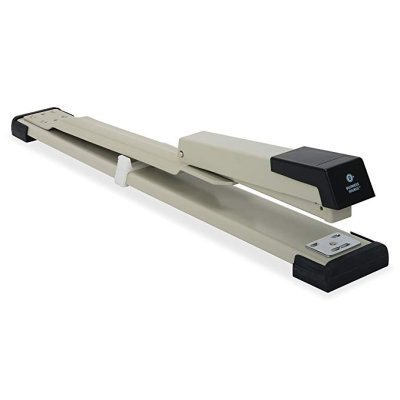
I also use an office stapler to hold things together while sewing. For stapling into the middle of a wide fabric, I use a stapler that has a 12" throat
 

Attachments

  • 71D0DZUThiL._SX679_.jpg
    71D0DZUThiL._SX679_.jpg
    20.4 KB · Views: 86
Is the axle on the shuttle (gib) hook that holds the bobbin supposed to be loose on a Sailrite LSZ-1?
Mine is not. My machine was purchased in 2016. So unless something has changed in the design since then I’d say no.
Thanks for the quick reply. Maybe time for a new one.
Bought one for a lookalike Reliance for $5 at a sewing machine shop in Victoria. Worked great for a straight stitch. Not sure if I'll use it for zig zag. It looks like Sailrite customizes theirs a bit by grinding/machining/stoning off some material.
 
Bought one for a lookalike Reliance for $5 at a sewing machine shop in Victoria. Worked great for a straight stitch. Not sure if I'll use it for zig zag. It looks like Sailrite customizes theirs a bit by grinding/machining/stoning off some material.

I've seen several Sailrite look alikes. I'm sure it was an inexpensive semi industrial sewing machine made in China to be used in their factories.

Sailrite probably asked for some changes and ordered a quantity of them.
 
Alternate Vinyl Window Replacement Process

I have viewed the Sailrite video showing replacement of vinyl windows and have sent them the attached file for review and comment. They agreed with this approach and even made a suggested improvement. I'll attach the complete file if anyone is interested.
 

Attachments

  • Vinyl Window Replacement Process.pdf
    51.6 KB · Views: 44
Last edited:
I would be very interested.

Thank you!
 
Back
Top Bottom