Tuttouomo
Senior Member
Good choice to replace with new. I had followed Angus's lead and replaced all my sea chest thru hulls and sea cocks with the Groco IBV system. That was about 5 years ago, and still really like them.
Bill
Bill
The mismatch is only an issue when threading a plain ball valve onto a thru hull without the adapter. If you use a proper flanged seacock, they've got straight threads to match the thru hull. The adapters do give you the ability to replace the valve itself more easily, however.
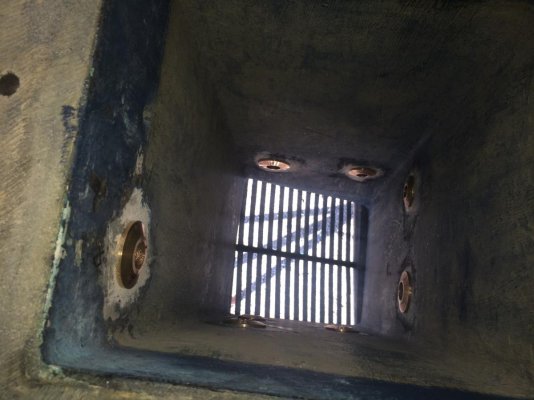
I know you will do it on the hard, but question for you : your sea chest is pretty deep. Could you physically reach the mushroom fitting even if doing in the water? Just curiousOkay, guys, there is a 100% consensus that I need to install new valves. I will be doing so, soon. I have plenty of real estateon the seachest wall above those two decrepit valves. I have learned here that the installation is really not that much of a big deal especially with the great access I have. Thanks so much, everyone, for taking the time to provide your insights.
One last question: what are your thoughts on installing them while in the water. I can glue the backing plate in place, get the flange ready to bolt to the plate with the ball valve mounted, drill the center hole for the water intake, and quickly, very quickly bolt the assembly to the backing plate. Crazy idea?
I know you will do it on the hard, but question for you : your sea chest is pretty deep. Could you physically reach the mushroom fitting even if doing in the water? Just curious
When an SV series seacock is left in the closed position, the rubber expands into the opening and eventually a bump forms. This bump prevents it from easily turning. Some people would sand down the bump to make it easier to turn. You can try that but your seacocks are so old I really recommend replacing them. The rubber is probably really hard and brittle by now.
Hi, Parks. Still living large off my investment in your company (Post 21)?
Seriously, hope all’s good.
When an SV series seacock is left in the closed position, the rubber expands into the opening and eventually a bump forms. This bump prevents it from easily turning. Some people would sand down the bump to make it easier to turn. You can try that but your seacocks are so old I really recommend replacing them. The rubber is probably really hard and brittle by now.
I have both 1&1/2" and 3/4" Groco seacocks with no through-hulls. Yes, no freaking through-hulls to cause problems.
For a dissenting opinion...
... The only downside to them is that it is a two step process to change positions of the lever because you need to loosen the lock screw first, move the lever and then tighten the lock screw.
Sounds like you’ve already figured it out but for those who haven’t., don’t over tighten the lock screw. It makes the bumps bigger faster.
There are three more for discharge above the water line for bilge water discharge. These stay open. In fact, I do not understand why a valve is even needed for bilge water given that, at least on my boat, the three ports for air conditioning sea water are not valved.
Is the bilge pump through hull below the dynamic water line? If so that may be why.
I don't know what is a "dynamic" water line
It's what you could call the heeled waterline. In other words parts of the boat that may be below the waterline underway vs. at rest. I believe 7º is considered the standard heeled amount for powerboats (obviously it's greater for sailboats).
Frosty, yes, your observation was good food for thought. No siphon breaks though on above water line holes. A side benefit of these old valves is the one used for the overboard black water discharge. In no discharge zones, we all know of the Coast Guard requirement that the discharge is locked out in some manner. These valves are locked with the t-handle, open or closed. We have been boarded by the CG just once. I was asked how we comply with this requirement. I demonstrated the t-handle. A-OKAY.Fair enough. You had mused about why the bilge pump outlet had a valve, and I thought that might be the reason. Since "technically" the dynamic waterline is mentioned as a dividing point. I didn't mean to imply you should set your boat up that way though. (I imagine it already has a siphon break if appropriate.)
I am planning on paying Groco a visit soon, in person. They are located on Kent Island (MD) where the boat will be soon relocated.
What? You're moving? Where?
-Chris