Building New Pilothouse Doors for a Bluewater Trawler

The friendliest place on the web for anyone who enjoys boating.
If you have answers, please help by responding to the unanswered posts.
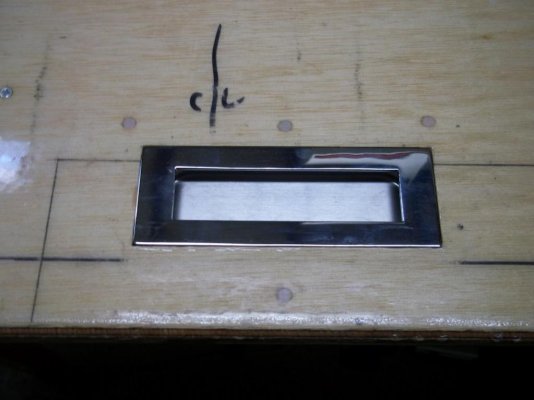
After a 5 month break, back to working on the pilothouse doors. Replacing boathouse floatation and floors took up most of the fall. Some maintenance on Sandpiper and projects around the house took up the rest of the time.

My wife reminded me at the beginning of the year that I needed to finish the doors so we can go boating this summer.

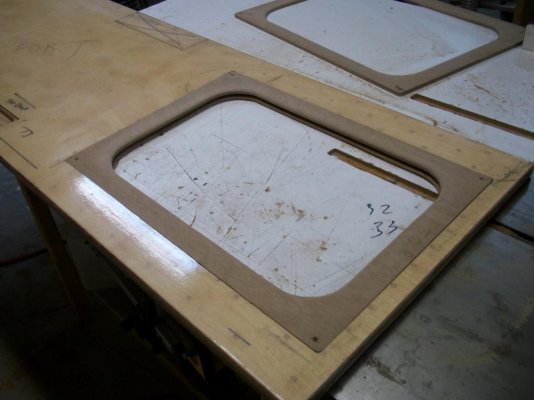
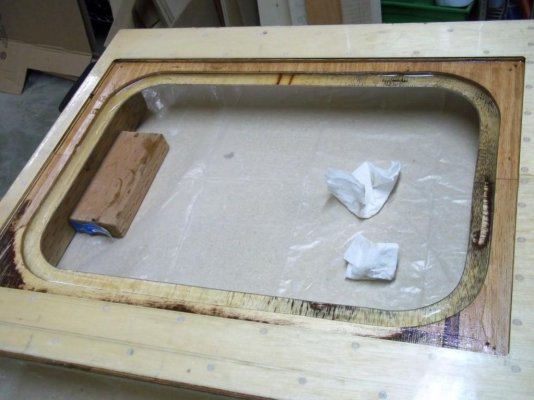
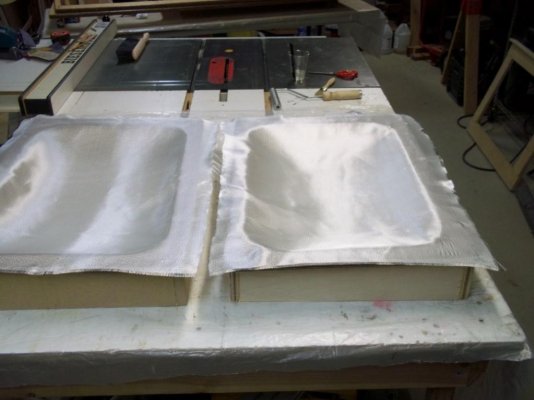
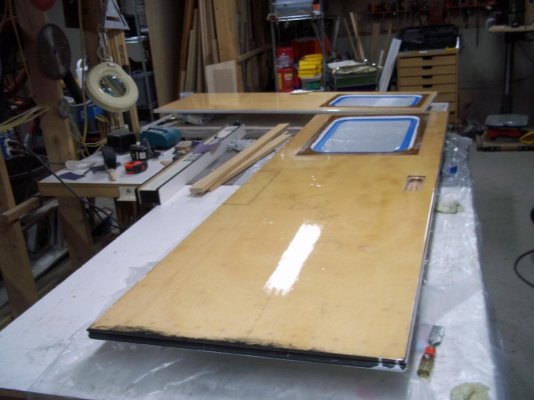
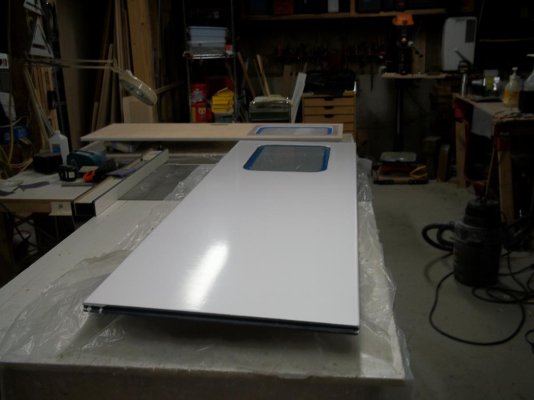
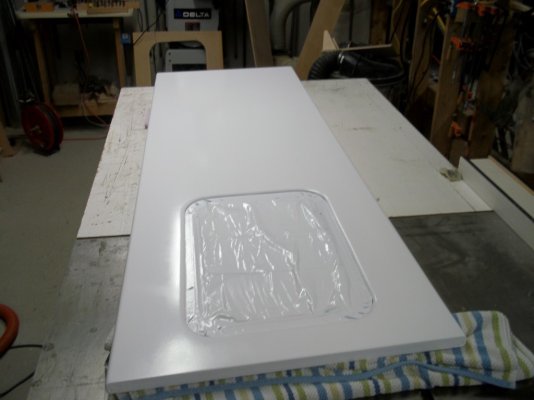
In September, I completed the glass fabric application to the doors and filled the weave with epoxy before I quit working on it.

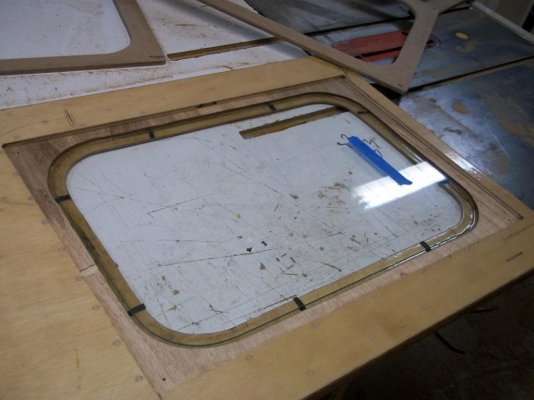
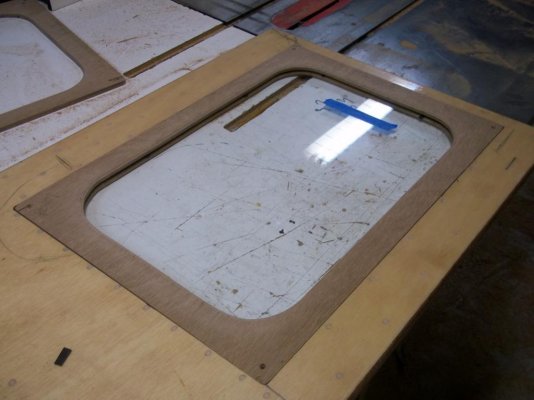
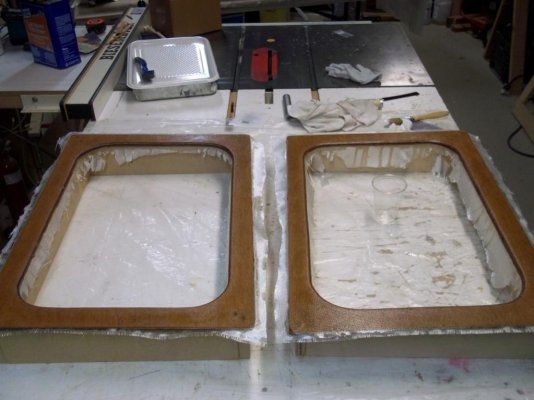
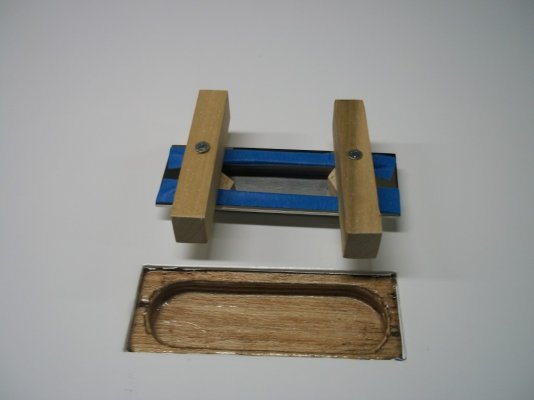
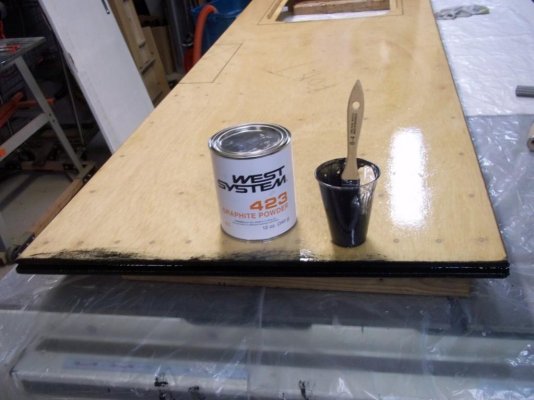
I routed an oversize groove at the bottom of each door which will ride on the bottom track of the door opening. The groove is being coated in these pictures with a mixture of System Three Epoxy and West System 423 Graphite Powder. The graphite powder will create a low-friction surface for the doors to slide on the tracks. The 423 also increases scuff resistance and durability. I use the epoxy/graphite mixture often as a low-load, low-speed bearing surface.

After several coats of the epoxy/graphite cures, it will be polished smooth.
 

Attachments

  • 100_3832 (Medium).jpg
    100_3832 (Medium).jpg
    73.4 KB · Views: 22
  • 100_3831 (Medium).JPG
    100_3831 (Medium).JPG
    178.3 KB · Views: 22
  • 100_3830 (Medium).jpg
    100_3830 (Medium).jpg
    63.9 KB · Views: 22
Last edited:
Yours just slide on a track? Mine are on rollers.

Mine rides on a teak track. No rollers.

The rollers on yours sound interesting. Pictures?

What year is the Bluewater?
 
Last edited:
The new Flush Pulls for the doors finally arrived today.
 

Attachments

  • 100_3834 (Medium).jpg
    100_3834 (Medium).jpg
    72.2 KB · Views: 17
  • 100_3835 (Medium).jpg
    100_3835 (Medium).jpg
    71.5 KB · Views: 17
Making patterns to route the recesses in the doors.

Measure and transfer to 3/4" plywood.

Drill the holes and cut between the holes with a zig saw.

Clean up the pattern with a spindle sander.
 

Attachments

  • 100_3838 (Medium).jpg
    100_3838 (Medium).jpg
    74 KB · Views: 16
  • 100_3839 (Medium).JPG
    100_3839 (Medium).JPG
    176.5 KB · Views: 18
  • 100_3840 (Medium).jpg
    100_3840 (Medium).jpg
    72.5 KB · Views: 17
  • 100_3841 (Medium).jpg
    100_3841 (Medium).jpg
    63.2 KB · Views: 15
  • 100_3843 (Medium).jpg
    100_3843 (Medium).jpg
    76.3 KB · Views: 16
Last edited:
Thanks RT!
 
Routed the door handle recesses using the patterns created in Post # 36.

Applied epoxy to raw wood to prevent moisture intrusion.

Test fit - perfect!
 

Attachments

  • 100_3851 (Medium).jpg
    100_3851 (Medium).jpg
    81 KB · Views: 22
  • 100_3852 (Medium).jpg
    100_3852 (Medium).jpg
    64.8 KB · Views: 23
Using a MDF pattern, routed the landing for the 3/8" plywood that will be mounted to the inside of the window opening to hold the glass in place. You can see the 3/8" plywood inner panels in the background of the pictures. Those were routed to shape with the patterns created earlier.

The finished routed recess - Pic 2

Trial fitting the 3/8" plywood on the inside of the window - Pic 3

Test fit new glass - Pic 4. The black rubber spacers represent the future thickness of the sealant/adhesive. They will insure that the sealant/adhesive will be uniform thickness.

The tempered window glass was ordered from a glass shop, who used
the pattern I supplied - Post #3

With the inner 3/8" plywood test fitted - pic 5

The difference in color of the plywood is because 3/8" was only available in Aquatek Plywood. The lighter color plywood on the rest of the door is Sande/Virola Plywood. Both are marine plywoods.
 

Attachments

  • 100_3853 (Medium).jpg
    100_3853 (Medium).jpg
    78.1 KB · Views: 24
  • 100_3854 (Medium).jpg
    100_3854 (Medium).jpg
    77.4 KB · Views: 24
  • 100_3855 (Medium).jpg
    100_3855 (Medium).jpg
    70.1 KB · Views: 23
  • 100_3856 (Medium).jpg
    100_3856 (Medium).jpg
    81.5 KB · Views: 26
  • 100_3857 (Medium).jpg
    100_3857 (Medium).jpg
    72.8 KB · Views: 24
Last edited:
Very nice work! I appreciate your attention to detail.
 
Applied a coat of epoxy on the routed wood to prevent moisture intrusion. Pic 1

And a precoat of epoxy to the inner panel before glassing. Trial fitting to make sure epoxy did not alter fit. Pic 2

Built risers out of scraps for the inner panels to raise them off the table during glassing. Pic 3

Inner panels on risers with 5 oz glass cloth draped ready for epoxy. Pic 4

Applying epoxy to the cloth with a brush. Pic 5

The epoxy is spread with a spreader and rolled with a laminate roller to bring excess epoxy to the surface to be squeegeed away. Pic 6

The goal is to not have excess epoxy under the cloth. The purpose of the fiberglass cloth is not strength but as a way to insure uniform epoxy thickness, puncture resistance and a smooth hard surface for paint. Any excess epoxy under the cloth lifts the cloth and creates an uneven surtace requiring fairing and more sanding than necessary. Plus the possibility of sanding through the glass cloth at the high spots.

After the epoxy hardens, the cloth will be trimmed and the weave filled with epoxy.
 

Attachments

  • 100_3858 (Medium).jpg
    100_3858 (Medium).jpg
    84.9 KB · Views: 15
  • 100_3860 (Medium).jpg
    100_3860 (Medium).jpg
    72.6 KB · Views: 14
  • 100_3861 (Medium).jpg
    100_3861 (Medium).jpg
    84.4 KB · Views: 14
  • 100_3863 (Medium).jpg
    100_3863 (Medium).jpg
    68.4 KB · Views: 14
  • 100_3865 (Medium).jpg
    100_3865 (Medium).jpg
    75.9 KB · Views: 15
  • 100_3866 (Medium).jpg
    100_3866 (Medium).jpg
    83.8 KB · Views: 15
Last edited:
Painted the exterior side of the doors prior to the installation of the window glass.

Decided to try spray painting the doors with the System Three WR LPU water based polyurethane paint for the first time. I usually roll and tip WR LPU but I wanted a sprayed on look on the doors. Purchased a Graco Airless Paint Sprayer and erected a temporary paint booth under a deck.

The airless sprayer did an excellent job producing a smooth finish without any orange peel. Experimented with various sprayer settings and thinning of the paint with water.

The sprayer produced very little overspray and no odor so did not have to wear a respirator.
 

Attachments

  • thumbnail_Resized_20210420_131612.jpg
    thumbnail_Resized_20210420_131612.jpg
    140.1 KB · Views: 17
Last edited:
Painted the inner panel around the glass opening prior to installing it to make masking and painting the inside of the door easier.

Installed window glass using 3M Auto Glass Urethane Windshield Adhesive. The adhesive was applied to the glass and the glass set in the routed recess. The glass sits on small rubber pads (Post 42 pic #4) to maintain an even sealant thickness and to center the glass in the recess.

For the inner panel, 3M Urethane Adhesive was applied around the perimeter of the glass and the inner panel glued to the door with epoxy around it's perimeter.

Temporary screws were used to hold the panel in place until the epoxy cured and the screws were removed.

The urethane skins over quickly so did not have time to take pictures of that process.

The glue line was faired and sanded.
 

Attachments

  • 100_3885.jpg
    100_3885.jpg
    84 KB · Views: 14
Last edited:
The inner side is coated with additional epoxy before painting.

View of the painted exterior side of doors after glass installation.

Paint the inner side and I'm done!
 

Attachments

  • 100_3892.jpg
    100_3892.jpg
    105.7 KB · Views: 14
  • 100_3889.jpg
    100_3889.jpg
    92.6 KB · Views: 15
  • 100_3887.jpg
    100_3887.jpg
    72 KB · Views: 16
  • 100_3888.jpg
    100_3888.jpg
    77.1 KB · Views: 16
Last edited:
Doors painted.

Getting prepared to install the recessed handles.

Attached cleats to handles so as to orient them at the correct depth. The recess for the handles were routed slightly deeper than necessary so the handles could be adjusted for depth.

Applied packing tape to the back of the handles so handles would not adhere, put four small mounds of fairing putty into the recess and pushed the handles in until the cleats contacted the surface.

Pulled the handles out after the putty cured.

Removed packing tape, filled the recesses with Gel Magic epoxy adhesive and pushed the handles in until they bottomed on the putty mounds created earlier.

Allowed the adhesive to cure overnight and done!
 

Attachments

  • 100_3893 (Medium).JPG
    100_3893 (Medium).JPG
    174.2 KB · Views: 12
  • 100_3896 (Medium).JPG
    100_3896 (Medium).JPG
    137.9 KB · Views: 11
  • 100_3900 (Medium).JPG
    100_3900 (Medium).JPG
    129.2 KB · Views: 12
  • 100_3905 (Medium).JPG
    100_3905 (Medium).JPG
    183.3 KB · Views: 12
  • 100_3907 (Medium).JPG
    100_3907 (Medium).JPG
    114.3 KB · Views: 11
This is some very nice work. Great job!
 
Looks great. The WR-LPU is being replaced by something called "Pennant." Not sure if it's actually a reformulation or just branding. Have you used the water based epoxy primer?


Which Graco gun are you using? There's a couple different levels of guns with more or less control over pressure.
 
Looks great. The WR-LPU is being replaced by something called "Pennant." Not sure if it's actually a reformulation or just branding. Have you used the water based epoxy primer?


Which Graco gun are you using? There's a couple different levels of guns with more or less control over pressure.


S3 said it was a new formulation and not to mix the two together.

I used WR LPU on the first couple coats on one side, let it dry, sanded it and sprayed the last coat with the new Pennant paint. The colors are identical.

I bought the True Coat 360 DS - dual speed. I only use the high speed setting since the lower setting caused uneven application.
 
How well does the we-lpu hold up?

The WR LPU holds up well. It is harder and shinier than one part oil based paint such as Brightside and Easypoxy.

It does not fade like the one part enamels.

The WR LPU and Pennant is slightly more difficult to apply than enamels because it dries very fast. Rolling and tipping has to be done fast to avoid brushstrokes.

It is easier to use than the solvent based polyurethanes like Perfection.

Spraying is the best way to apply it and clean up is easy with water.
 
Rebuilding Pilot House doors

My project is similar to Simons. Bluewater 40, pilothouse doors need replaced. My doors are not on slides, but are hinged. I was planning to use two sheets 1/2 marine ply and glue or epoxy together. However, since the door hinges go into the edge of the ply, I was thinking that I need to band it with a hardwood, probably 3/4' thick so the hinges had something beefier than the edge of the plywood. Thoughts on that? And if that sounds like a good idea, what type of wood is recommended? I'm building these in my So. Nevada workshop and transporting them to the boat (Oregon coast) so I also need the ability to slightly adjust fit and my thoughts are I could use a hand plane on the hardwood edge(s) if necessary but doesn't work so great if they are just plywood.

Open to suggestions.

I considered adding wood around the edges too but a lot more work. I didn't have any need for fastners in the edges but if I did, I would route a mortise into the edge and fill it with wood or epoxy filler.

I used Sande/Virola marine plywood. It is a well made imported mahagony plywood with many plies that cost less than fir marine plywood. The plies are slice cut instead of rotary cut so hardly any warping of the plywood. Slice cut mahagony plywood has very fine grain running in one direction so the surface come out very smooth when painted. The Bluewaters superstructure is constructed with a mahogany plywood but of unknown quality

Fir marine plywood is rotary sliced and tend to warp. Its rotary cut surface has an uneven surface which require a lot of sanding between coats to have a smooth painted surface. I cover plywood with fiberglass and epoxy so surface grain is not an issue.

You may be limited in marine plywood availability where you are. I did have to take the doors to the boat several times during construction for trial fitting.

A sharp plane will plane plywood edges if held at an angle. I sometimes use a Stanley 21-296 Surform Plane for plywood edges.

A router with a straightedge guide and pattern bit would be my method to trim plywood edges.
 
Back
Top Bottom