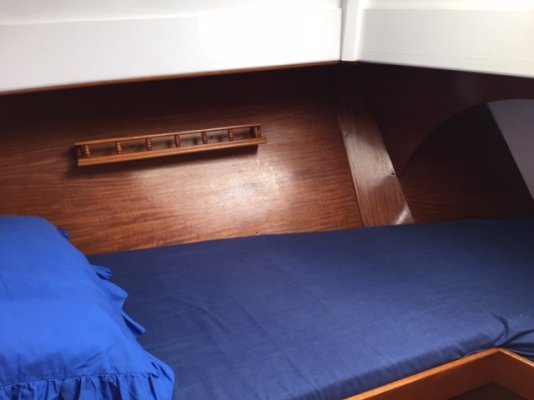
Reattach these?

The friendliest place on the web for anyone who enjoys boating.
If you have answers, please help by responding to the unanswered posts.

Unclematt

Senior Member
Joined
Apr 9, 2020
Messages
318
Location
United States
Vessel Name
Seaview
Vessel Make
Sundowner 32
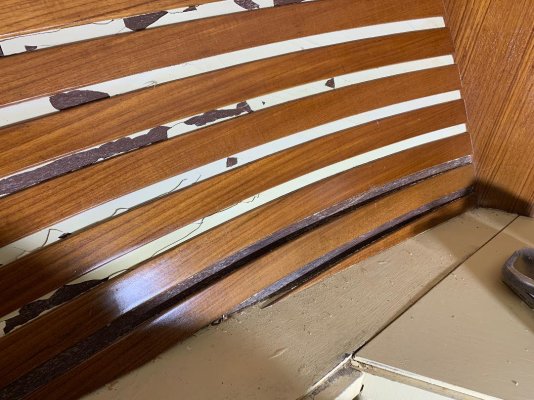
My vee berth walls have laminated pieces of teak spaced about 1" apart. In between there are white stripes, I am stripping the white due to severe cracking. Problem is a lot of the teak is pulled away and a few pieces came off. My question is how can I hold the teak pieces in place while the epoxy dries? s vee berth.jpg

p vee berth.jpg
 
I use hot glue for those instances - leave gaps in the lineal application of thickened epoxy, then use hot glue "dots" in those voids for a quick set/hold until the epoxy cures.
 
Last edited:
How are they attached now? You have looked closely for screws / bungs? Most of the time there will be screws. That is actually called the ceiling on a boat by the way. I would just add a screw or two.
 
Last edited:
The hull there might be too thin for mechanical fastening.

Might have to get scrap lumber and make a frame for a set of pressure points.
 
Have you thought about just removing all the teak and just putting a nice headliner on the hull. It might be easier to keep clean without all the spaces between the teak strips. Certainly easier to do than try glueing all the teak on.
 
The repairs I am doing are on the sides not the ceiling and I like the original look so want them on. I don't want to look at screws on a nice refinished surface so that's out. I thought of making the frame but not using hot glue that sounds promising.
 
Greetings,
Mr. M. Ceiling IS the correct nautical term.


From Wiki:

ceilingPlanking attached to the inside of the frames or floors of a wooden hull, usually to separate the cargo from the hull planking itself. The ceiling has different names in different places: limber boards, spirketting, quickwork. The lower part of the ceiling is, confusingly to a landsman, what you are standing on at the bottom of the hold of a wooden ship.


From Nautical Dictionary (Young, Arthur)

CEILING- (Fr. Vaigre). The inside planking of a vessel. It has also received the name of footwaling, but this term seems more applicable to the thicker planks, viz. those inside the bilge, which are termed bilge-planks, and the limber-strake or futtock-plank. (Plate II. fig. 6.)


Nautical Dictionary: https://archive.org/details/ldpd_7518586_000/mode/2up
 
There are current construction glues at the big box store that feature " instant" grab .

Might be strong enough to glue the ceiling easily and rapidly?
 
VHB tape might work too.
 
Yeah, why not just use simple painters tape. Won't peel anything and should hold well enough for the epoxy to set...
 
Some of them have been unglued for long enough to have lost some of there shape. Tape just wont hold it tight enough. I think I will try the hot glue idea first. I am using Total Boat Thickso as the epoxy I find it to be easy to use, it stays in place and holds very well.
 
If the teak strips have lost their curve I doubt that hot glue will hole them in place. You will probably have to make a fixture of some sort to clamp them in place until the epoxy sets.
 
I have used Jorgensen clamps with the jaws reversed to clamp things similar to this. You would need to make some braces for the clamps to push against and use the clamp to hold the teak to the side until the epoxy dries.
 
Greetings,
Mr. M. Ceiling IS the correct nautical term.


From Wiki:

ceilingPlanking attached to the inside of the frames or floors of a wooden hull, usually to separate the cargo from the hull planking itself. The ceiling has different names in different places: limber boards, spirketting, quickwork. The lower part of the ceiling is, confusingly to a landsman, what you are standing on at the bottom of the hold of a wooden ship.


From Nautical Dictionary (Young, Arthur)

CEILING- (Fr. Vaigre). The inside planking of a vessel. It has also received the name of footwaling, but this term seems more applicable to the thicker planks, viz. those inside the bilge, which are termed bilge-planks, and the limber-strake or futtock-plank. (Plate II. fig. 6.)


Nautical Dictionary: https://archive.org/details/ldpd_7518586_000/mode/2up
Well this explains the recent term 'roof' used by a French origin person to describe the ceiling.
It seems ceiling was already allocated.
 
What is the reddish material under the white cracked one?
Looking at how it looks it may be some plywood on which the teak plank are glued.

L
 
My vee berth walls have laminated pieces of teak spaced about 1" apart. In between there are white stripes, I am stripping the white due to severe cracking. Problem is a lot of the teak is pulled away and a few pieces came off. My question is how can I hold the teak pieces in place while the epoxy dries? View attachment 114733

View attachment 114734
Frankly, I think the striped effect looks a bit odd. I mean the white areas between the nice teak doesn't do it for me.

Have you considered taking off all those teak strips and moving them together so as to form a planked sheet effect with no gaps in between, and just adding in more teak strips of same thickness to cover the whole area above bunk level..? What it looks like below bunk level is almost irrelevant as not seen. Any imperfections at the ends where the strips butt the teak covered walls can be finished off easily with teak stained quarter round.

I lined the whole front cabin with teak veneer because the original had been stripped out as a result of water ingress staining and damage, and the end result was great, and I'm no great shakes at DIY either. Just a thought..?
 

Attachments

  • 71733035-2B8F-492D-ACC8-C90950AE9A85_1_105_c.jpeg
    71733035-2B8F-492D-ACC8-C90950AE9A85_1_105_c.jpeg
    65 KB · Views: 16
Last edited:
The backing is a teak veneer and it looks like it was gel coated white and the teak strips were held on using the gel coat. I do like the striped look so for now I am keeping it. I am also trying to keep it simple, the mission creep on everything I touch never ceases to amaze me. This started as a strip and paint and has turned into a repair some water damage, re glue teak, prime, paint and just for good measure fresh varnish. Next up is redoing the Head then start on the outside.
 
The traditional ceiling on the hull was to gain the additional venting from bilge to deck to have the hull last longer.


With a plastic boat this is not required , but it might help the boat see deck leaks and help the boat stay fresher smelling.


Was filling the gaps std or some improvement from a past owner?
 
The boat came that way and needs redoing. Im have decided to remove all the teak, coat the veneer with penetrating epoxy, fix some delamination, prime, paint then reinstall the ceilings using epoxy and screws. Once done I will post pic's should take a couple weeks if all goes well.
 
Frankly, I think the striped effect looks a bit odd. I mean the white areas between the nice teak doesn't do it for me.

Have you considered taking off all those teak strips and moving them together so as to form a planked sheet effect with no gaps in between, and just adding in more teak strips of same thickness to cover the whole area above bunk level..? What it looks like below bunk level is almost irrelevant as not seen. Any imperfections at the ends where the strips butt the teak covered walls can be finished off easily with teak stained quarter round.

I lined the whole front cabin with teak veneer because the original had been stripped out as a result of water ingress staining and damage, and the end result was great, and I'm no great shakes at DIY either. Just a thought..?
Pete, Where did you purchase the vener and how did you attach it? Dorsey
 
if its a wood substrate you might try a "pin nailer" kinda like a "brad nailer" only the pins are literally a little finer than sewing pins and it doesn't have a head so no putty, you can get them from 1/4" to an 1&3/8" I think. Cabinet guys use them to hold skins in place while gluing and all kinds of stuff, I got one last year to tighten up some miters on some
finished crown mold, worked great
 
You've answered a curiosity I had; thank you! I had looked (online) at a Sundowner 32. I was wondering what the wide white sections between the ceiling boards were. Now I know (I thought it looked pretty busy with those wide, high contrast "stripes").

I did not know that. Learned something new today.

And just to add, the inside above you is the "overhead" (as opposed to the ceiling).
 
The stripes are 3/4 wide and are white gel coat. When you see it in person it is a nice look. Now that I am cleaning the old gel coat off the ceiling boards I see they have lots of rotted off pins that use to hold them. The reattach plan is apply Thickso and use (3) #8 oval head screws with finish washers on each board. I am at least a week away from reinstalling the ceilings.
 
The reattach plan is apply Thickso and use (3) #8 oval head screws with finish washers on each board. I am at least a week away from reinstalling the ceilings.

On the examples I've seen, there are vertical boards (sort of imitating the frames of a wooden boat) adhered to the hull, and then the ceiling is screwed into those. So there is either an air gap (traditional) or insulation board behind the ceiling. Do you have those vertical pieces? I'd be nervous to screw directly into the hull, but maybe it's thick enough? (Also screws into fiberglass never seem that effective to me but perhaps fine until the epoxy kicks.)

If it were me I think I'd like adhered vertical pieces behind. For either air or insulation space. But if I were going to attach directly to the hull I would consider the hot glue dots to hold while the epoxy cures.
 
Pete, Where did you purchase the vener and how did you attach it? Dorsey

Dorsey, any good lumber shop will have various grades and sheet sizes of teak veneer. I fixed it to the ribs exposed on the inside of the hull with dark brown coloured monel screws, and actually took advantage of the fact that there was a space behind it between the teak and the hull, by installing acoustic batts for insulation and to deaden the bow slap - worked well on both counts. Never got condensation in there.

If it had to go onto a flat surface I would, and did, use 'Liquid Nails' or similar quick setting wood adhesive. I did that where I lined the underneath of the side deck and bulkhead. It did require some imaginative bracing holding it in place until the adhesive set. But the end result was well worth it.

Any imperfections, ( only I know where they were), were beautifully camouflaged by judicious use of dark-stained quarter round trim, (eg corners, where two surfaces met at angles), and the varnishing over it all was the really fun part, it came up so well.
 
Last edited:
The ceilings are attached to a teak plywood backing. I am painting the backing white before I reinstall the ceilings.
 

Latest posts

Back
Top Bottom