Access to aft wall of forward head in Helmsman 38

The friendliest place on the web for anyone who enjoys boating.
If you have answers, please help by responding to the unanswered posts.
Joined
Jul 3, 2016
Messages
1,439
Location
USA
Vessel Name
Escape
Vessel Make
Mariner 37
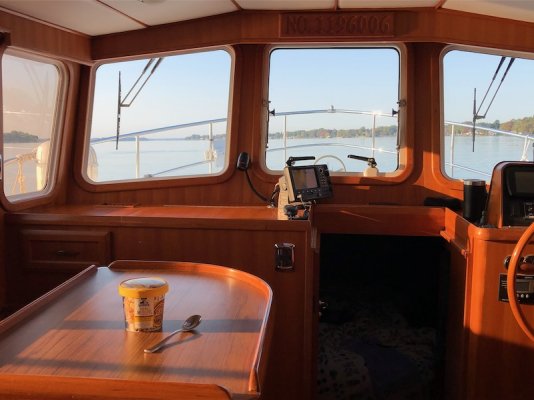
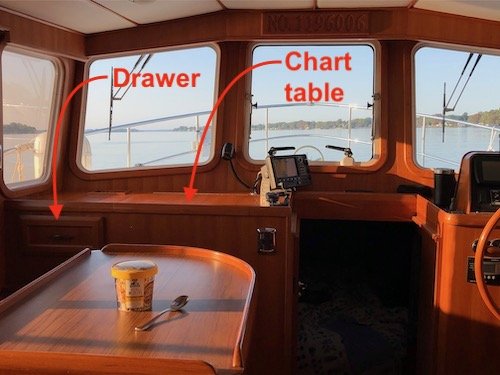
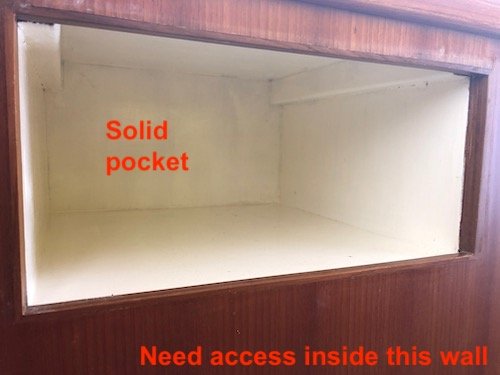
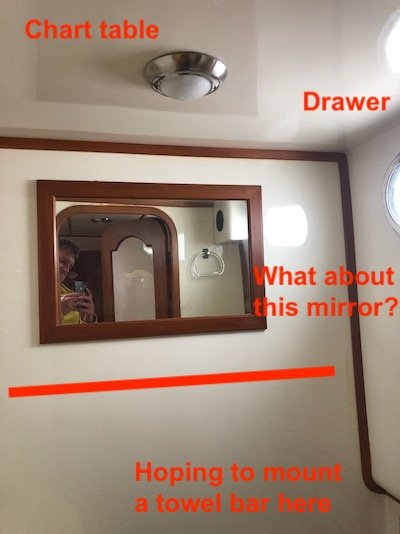
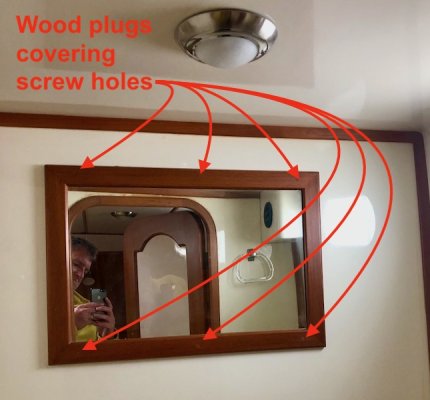
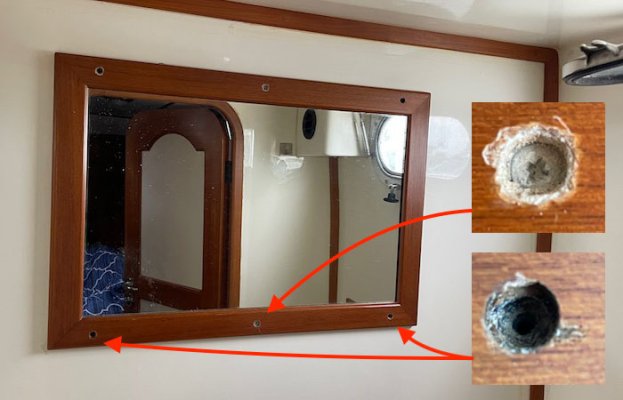
Is there a trick to accessing the back side of the aft wall of the forward head on the Helmsman 38/Mariner 37? I am planning to install a grab rail towel bar and need access to the back side to tighten the nuts.

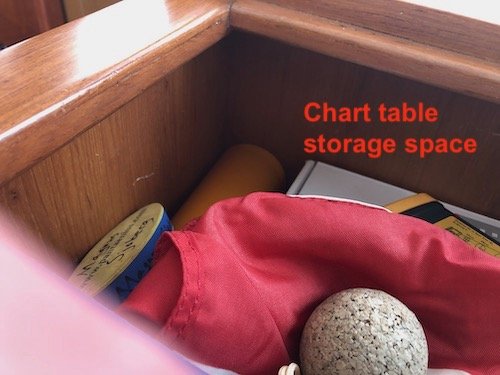
There may be space between the aft wall of the head and the forward knee area in the pilothouse, or there may be access beneath the "floor" of the chart "drawer" on the port side of the pilothouse. Sure would love to know before getting too aggressive with that beautiful wood.
 
Post photos when your done. I might like to do the same.
 
Will do. There is a factory bar on the aft wall of the shower, but I believe that back side is accessible from beneath the pilothouse helm instrument riser. Hoping there is similar access on the port side.
 
When I installed a couple extra grab rails, I put nice stainless backing plates and through bolted the rails.
 
That's my approach too, but I am hoping to learn how to get to the back side to fit those backing plates without tearing into wood first.
 
That's my approach too, but I am hoping to learn how to get to the back side to fit those backing plates without tearing into wood first.

I have 4 polished stainless backing plates, 2 per grab bar, in my head because I wanted 2 sturdy grab rails in the pilot house.
 
Ahh, you mean your pilothouse and head share a common wall so that the backing plate is in the head and the grab rail is in the pilothouse? That makes sense.

My boat must have some space between those walls as they are different material. The pilothouse is wood and the head is fiberglass. The shower is the same way and the backing plate on that grab rail is in the space between the walls. Hoping the head has the same amount of space. I am trying to figure out where and how to access that space.

I had to use 'not too long' machine screws. I drilled for grab rails in the pilot house, through the empty space and through the head wall mounted the stainless backing plate and used a fancy cap nut on each of the machine screw.
 
Still hoping to find access to that space. The currently leading idea is through the opening created by removing the port side drawer in the forward pilothouse bulkhead. Fingers are crossed.
 

Attachments

  • IMG_6206.jpeg
    IMG_6206.jpeg
    143.4 KB · Views: 16
Keep us informed of your progress.
You could dill a very small pilot hole, leave the bit in then go down and look for the protruding bit.
Of course, the drill bit my be a bit short so you will have to go up to a larger and longer bit.
Good luck on your 'improvement'. SMILE
 
If there is a common wall between the head and the cabin your options are endless. Anything from a carriage bolt or finishing washer to a S.S. plate or something to hide the bolt head like a picture or a nautical theme thing "The captain is always right" etc.

If it is a hollow wall you may have to cut a hole into the wall to see what you are dealing with.

pete

Pete, I made no attempt to hide the backing plates, I just explain them. I have 4 polisher SS backing plates in the head area. Yes, I had dead space between the walls. I just used longer machine screws.
 
So I finally got up to the boat to examine a few possibilities, and struck out with all of them. I had hoped that there was access to the space between the head and pilothouse walls through the port side drawer in the pilothouse "chart table," but the entire drawer pocket is finished with solid wood with no removable sections. Same with the fold up top of the "chart table." The storage space beneath that fold up top is solid throughout with no removable panels.

The head has two mirrors, one on the aft wall in question and another on the starboard wall above the sink. Both mirrors are very securely mounted to the fiberglass wall. Any idea if there is a hole behind them or how to remove them gracefully?
 

Attachments

  • IMG_6206 (1).jpeg
    IMG_6206 (1).jpeg
    89 KB · Views: 20
  • IMG_7218.jpeg
    IMG_7218.jpeg
    39.3 KB · Views: 20
  • IMG_7219.jpeg
    IMG_7219.jpeg
    83.6 KB · Views: 17
  • IMG_7234.jpeg
    IMG_7234.jpeg
    46.7 KB · Views: 19
Greetings,
Mr. HtT. The most apparent thing that jumps out at me is make a hole inside of the drawer "pocket". If you use a multi-tool you can make plunge cuts and re-use the piece you remove. Still, unless you have VERY long and multiple jointed arms I can't see how you would access the towel bar location from the drawer area...
Edit: I would try Mr. OD's suggestion of probing with a small drill bit first.
 
Last edited:
Not knowing any better, I am probably going way too far to rule out the "easy access." If the mirror does not come off the wall, probing through that drawer pocket is definitely the least destructive way in.
 
Check the wood frame for counter sunk and refilled screw holes
 
Good call, Dan. There are six neat wood plugs covering what I hope are screws holding that mirror frame to the wall. Also hoping they weren't just holding it in place until the 5200 cured! How do Taiwanese craftsmen usually attach wood framed mirror to gel coat wall? What is the best way to take those plugs out without destroying the nicely finished wood frame?
 

Attachments

  • Wood plugs in mirror frame IMG_7234.jpeg
    Wood plugs in mirror frame IMG_7234.jpeg
    111.8 KB · Views: 8
It depends on how they glued the plugs in. Sometimes they use varnish as a glue and they will come out pretty easily. They may have used epoxy and they will come out and rip up the surrounding area. I take a drill and drill a small hole in the middle and then use a screw driven into the plug. The screw will hit the covered screw and start to back the plug out. Go easy and see how it is progressing. I then use a S/S decorative washer to trim the screws when you put the mirror back on. That way you can get it off again without having to remove plugs.
 
Thanks Dave. That advice makes perfect sense and sounds really familiar. Forgive me if it has taken me hearing or reading it twice to finally jump into action. I've added it to my to do list for our next time aboard. Fingers are crossed.
 
My mirror challenge bubbled back up to the top of the priorities list and I made some headway this weekend. Unfortunately, still no access to the space behind the forward head wall.

The mirror appears to be held to the wall by six screws. I (somewhat crudely) removed the plugs, cleared out all the glue that held the plugs in place, and removed the four corner screws. The two "middle" screws must be stripped as they spin effortlessly without coming out.

Alas, the mirror remains tightly mounted to the wall. I can get a blade between the wood frame and the gelcoat and the sides are loose, but I don't want to break the mirror or the wood frame. Is the center (or more?) of the frame held by an adhesive? Or clips somehow? What is the best approach for removing adhesive if that is the mechanism?
 

Attachments

  • Mariner 37 mirror IMG_9827.jpg
    Mariner 37 mirror IMG_9827.jpg
    67 KB · Views: 10
Please continue this discussion! Id also like to know what is behind the mirror/wall. THANKS!
 
My next move is to work a putty knife in from the corner toward those stubborn middle screws to put some pressure on them in hopes that it is a backing board that is spinning rather than a hole that is stripped. If the screw was simply stripped out, then it should pull free. If the backing piece is spinning, then it would no pull free until the screw comes out.

What I hope to find behind that mirror is a rectangular access opening into that space. My plan is to drill a pair of holes nearby into which the studs of a grab bar (or towel bar in my case) will go. I need access to the back side of that fiberglass wall in the head to secure washers and nuts on those studs.

If there is no access opening, my multi-tool will create one.
 
Greetings,
Mr. HTT. IF you experience spinning screws, your multi-tool is another alternative. I never realized how versatile they were until I got one.
 
Maybe use some wood shims to give some constant pressure on the mirror.
 
Greetings,
Mr. HTT. IF you experience spinning screws, your multi-tool is another alternative. I never realized how versatile they were until I got one.

Hmmm, hadn't thought of that. Slip the multi-tool blade between the wall and the frame and saw the screw off! Very nice. Thanks RT.
 
Greetings,
Mr. HTT. I had to remove a section of wall (dirt house) and used the "MT" to cut all the toe-nailed studs. Nary a splinter or damaged end. Re-used all the studs. Indeed a MULTI-tool.
 
I used to think that multi tools were a gimmick, but once I had one my opinion changed. Now I have 5 or 6 of them. I really like the cordless ones.
 
If you end up replacing the mirror like I did on my trawler due to age damage around the edgeas of the glass, you might want to take the time to spray paint the back of the mirror to seal it from moisture attack. That's what I did, and the mirror was still fine many years later.
 
This mirror / towel bar project slipped down the priorities list for two and a half months, but I made some minor progress today. I slipped a shim between the fiberglass wall and the mirror frame to put resistance on whatever the middle two screws are in, but it made no difference in how freely the screws spin.

Before I put the multi tool blade in there and risk marring the surfaces, I think it’s worth trying to figure out if there is some adhesive holding the mirror to the wall. There is very, very little give in the wood mirror frame (barely enough to get a sharp edge shim in) and it seems like pretty common practice to use screws to hold something in place while the adhesive sets. Does that seem likely in this case? Is that what Helmsman does in other applications?
 

Attachments

  • 5CB05FA7-4571-498B-81CC-A945F42E257C.jpg
    5CB05FA7-4571-498B-81CC-A945F42E257C.jpg
    66.7 KB · Views: 16
Back
Top Bottom