GB32 Woodie Under Contract: Lots of Questions :)

The friendliest place on the web for anyone who enjoys boating.
If you have answers, please help by responding to the unanswered posts.
Is there a coolant recovery bottle attached to that engine, or is that the original big ol' 4 PSI single-acting radiator cap?

Yea, its got a 2015 reman Lehman with the coolant expansion tank mounted on the bulkhead.

@art - yea, that was the throttle cable. They are stranded wires so any moisture gets in there and they rust and expand. Question is where that moisture came from. The only thing around it was some water hoses, so possibly some old hoses were leaking on it.

@mako - yea Im thinking about a teflon strip if I cant fix the rollers. I pushed that project to march as its a nice to have and I have some more urgent "must-dos" right now.

Re the damper plate, is this on the flywheel? We arent uncoupling the whole transmission, just the shaft and rear seal.
 
Re the damper plate, is this on the flywheel? We arent uncoupling the whole transmission, just the shaft and rear seal.
Bell housing had to come off mine to get the damper replaced. But once you unbolt the tranny you will see if the damper springs are good or not. The judgment call for the extra labor and $150
 
Bell housing had to come off mine to get the damper replaced. But once you unbolt the tranny you will see if the damper springs are good or not. The judgment call for the extra labor and $150

Ahh, thx! Seems similar to a pressure plate in a car clutch that has a spring-back test?
 
Chances are you’ll find no records of the DP ever being replaced. If you’re planning on keeping the boat fir a long time and thousands of nautical miles then it really good preventive maintenance. What would it cost... $200 or so?
 
Chances are you’ll find no records of the DP ever being replaced. If you’re planning on keeping the boat fir a long time and thousands of nautical miles then it really good preventive maintenance. What would it cost... $200 or so?

:thumb:

I saw some old threads about reducing vibration at idle in Lehmans. Some said it was "normal", some said to just run at a slightly higher rpm, some said injectors needed servicing, etc.

Any conclusions on this? Mine was considerably smoother after replacing that broken support. It was reverberating through the whole boat during warmup. It still pulses at low rpm, but smooths out if you push the throttle up a bit.
 
700 RPM is the ideal on my GB32. I start the engine at 1000 for a minute or so and then drop it to idle. In general all Lehman engines do vibrate at idle but once in gear it should run very smoothly. From the flybridge you won't even hear the engine. Good job on that boat. Great undertaking though.
 
Here is a photo of the back side of the door, the wheel is held in place by a slotted screw, this is on my GB 32 1967.


Our door was so badly rotted that we built a new one and replaced the wheels with a thin strip of HDPE plastic as a slider. I put it the full width but in hindsight I should have just maybe used three short pieces, the full length is probably too much resistance. The previous door used to open and close by itself in rough seas when using the wheels on the bottom, so now we have gone too far the other way!
 

Attachments

  • IMG_3727.jpg
    IMG_3727.jpg
    123.3 KB · Views: 12
A lot of honest answers were given here. You probably can do most of the work however, you will be on the hard for a long time that will drain you financially.
Save your money!
 
A lot of honest answers were given here. You probably can do most of the work however, you will be on the hard for a long time that will drain you financially.
Save your money!

You missed the party on this one. We've already ripped big holes in the boat. No give backs now :)

And for reference, if we take the cost of the boat + cost of major refit items to date, we still have the cheapest GB32 on the market. So there is value if you are willing to do some hard work and hire out efficiently. We've been lucky as we had a solid hull, 2015 reman engine, and fantastic team of 3-5 guys (reasonably priced) for the stripping, sanding, paint and varnish. They are able to do in a day what would take a month if you were trying to do on weekends by yourself.

The amount of sanding required to prep the paint has been my biggest miscalculation (so far). Stripping the old varnish took 2 days. Stripping the superstructure paint took 1 day. But it was probably 3 days of prep before the first coat of primer, then 1 day of sanding between each coat of primer and paint - and thats with 3-5 guys per day.

But luckily we're still on budget, we've just accelerated the spend as things are moving faster than planned in some areas.

Final coat of paint will go on the superstructure today. Then will rebuild the flybridge seats on Sunday and start on repainting the hull next week. And the major engine work listed in the survey will be finished on Monday.

So that still leaves a ton of projects, but the less intensive and longer term ones: interior repaint will start next week, interior varnish will be a winter project, electrical and electronics will be a winter project, and decks will be a spring project.

The other miscalculation has been on cushions. I was sure I was going to be able to find a hack get the prices more reasonable. But thats been elusive. I even went to the automotive upholstery shops and they were also quoting $120 an hour. I can hire a software engineer with a PhD for that...come on.

Its also been funny to see everyones attitudes change on the dock over the past 6 weeks. Our slip is right next to the gate so everyone needs to walk by the boat. The progression of comments has gone something like this...
- For the 1st week we got the condescending, "are you the new owner....good luck ;)".
- The 2nd week was "oh wow, you guys are going for it." "A lot of work to do." "you know on boats the work never ends".
- The 3rd week when the windows came out and it looked like floating pile of scrap wood we got "I respect your commitment, but question your sanity". "you know its the rainy season right" "this is a wood boat right. thats too bad"
- The 4th week after the first coat of primer and interior was stripped we got the first 2 unsolicited offers to buy it. the comments were "what an exciting project" "its a perfect blank slate" "I love watching your progress but its making me feel guilty". "what a labor of love"
- The 5th week after the 2nd coat of primer, windows were back in and interior was stripped we got the "this is an amazing restoration. you guys should be proud" "what a fantastic project" "this is so exciting" "what a special boat"
- The 6th week and first coat of paint has gone on, we get the longer stop bys with everyone wanting to chat "this is turning out amazing" "what great memories you will have with your family on this boat"

Its all in the eye of the beholder.
 
Last edited:
I even went to the automotive upholstery shops and they were also quoting $120 an hour. I can hire a software engineer with a PhD for that...come on.

And, some do next to nothin lawyers charge $400 + per hr. Go figure!! :facepalm: :dance:
 
"I even went to the automotive upholstery shops and they were also quoting $120 an hour. I can hire a software engineer with a PhD for that...come on."
Yes but the overpaid software engineer cannot sew. :lol:
I went through the similar dock talk as you, It is very satisfying to see the final result. I know it never ends. Enjoy.
 
I would like to know more about replacing the window sliders. I had the cracked windows replaced in the aft cabin and after I drydocked the boat, they cracked again!
 
I would like to know more about replacing the window sliders. I had the cracked windows replaced in the aft cabin and after I drydocked the boat, they cracked again!


I would like that also need to replace all mine.
 
It is a great project for sure and a bit of an experiment going fast like you are. Appreciate keeping us informed along the way. Have you been surprised in regards to rot? And how are your transom corner.s? That’s where water collects.
 
There is a nice thread on this forum that discusses classic GB replacement windows. The GB window structure can be disassembled and replaced on DIY basis or I’ve seen quotes of 1000 a window. Need someone who’s done it before and will do it right. I’ve heard it’s a one day job for one person.
 
thebruce:

Door slider; if you go to sliders consider polypropylene or similar. Teflon is kinda soft and could snag/embed on stuff that gets in the track (like sand). You may have to move the position of the handle down a bit to get it to slide easy, as the sliders will have a bit more drag, but that can keep the door in part-open position too.

You are soo right on the prep time to paint, that's most of the work, the painting goes fast.

I've had several unsolicited positive comments on my boat's look after finishing up the exterior, but no offers to buy! Good on 'ya.
 
"I even went to the automotive upholstery shops and they were also quoting $120 an hour. I can hire a software engineer with a PhD for that...come on."

Yes but the overpaid software engineer cannot sew. :lol:

Well said :)
 
I would like to know more about replacing the window sliders. I had the cracked windows replaced in the aft cabin and after I drydocked the boat, they cracked again!

I've been meaning to do a writeup on these. They arent fun :) And I would recommend just doing one at a time. I tried to do all of them at once and it sucked. However, I was trying to get them done before painting started.

For the sliders the basics are as follows:

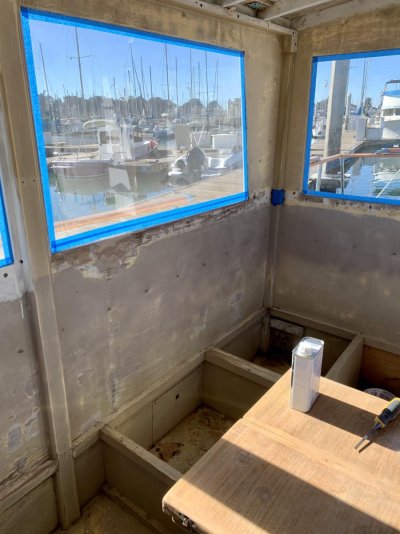
- you need to remove the interior wood trim above and below the windows to get access to the interior fasteners. that will take you 2-3hrs to remove all the bungs.
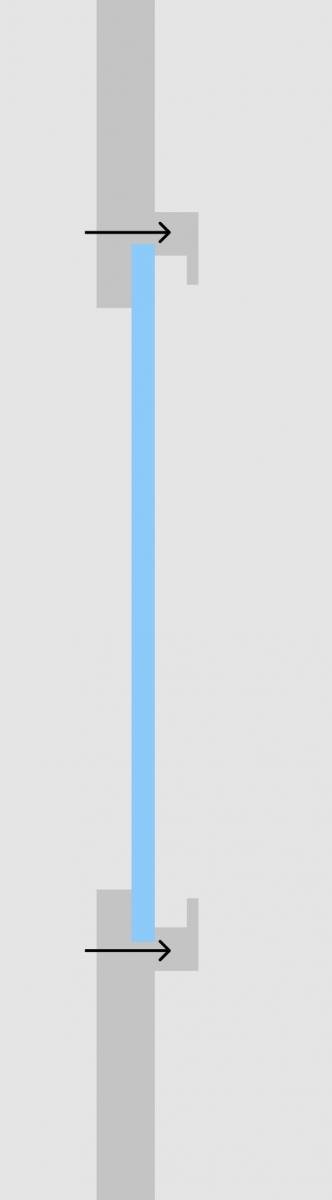
- the interior fasteners go horizontal, above and below the windows. the exterior fasteners go vertical.
- to access the exterior fasteners you need to scrape the window frames to find the bungs. there are probably around 12 on the outside.
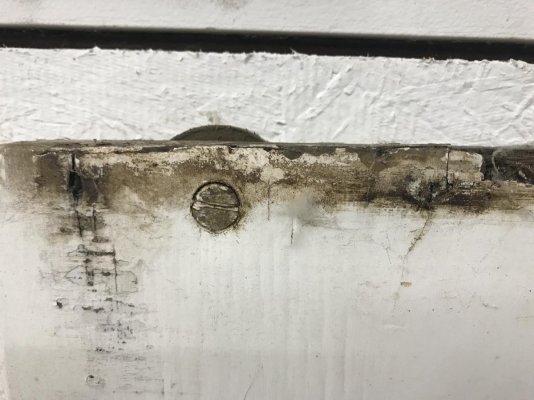
- the interior fasteners are semi-hidden with some fairing compound, but you can typically see the outlines of them. I chipped out the compound. there are about 18 of these per window.
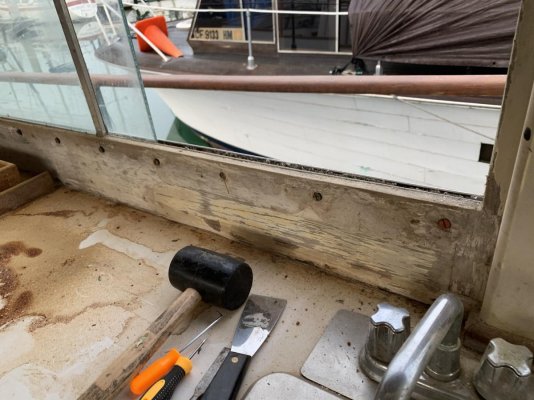
- you then need to break the sealant around the exterior frames. I used the edge of a wood chisel for this and just ran it around the edges.
- then remove all the fasteners. they are bronze, so do it by hand so you dont strip them. they cost about $2 a piece to replace.
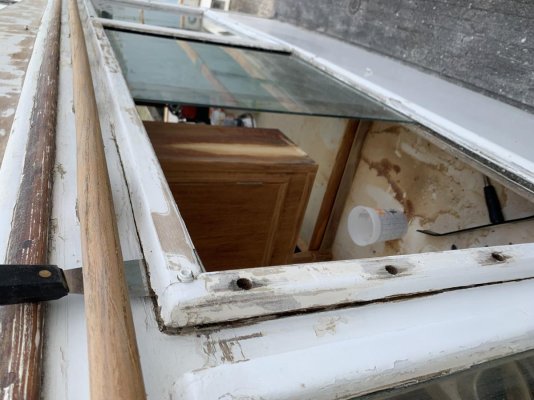
- use a putty knife to pry under the exterior frame and slowly remove it. be careful and have two sets of hands here. the frame, window tracks and slider window all come out as one piece (if you are lucky).
- the fixed frame then can just be pulled straight out. be careful with that as it can fall out when you remove the frame.
- the wood frame is a bit flexible when you take it out, so if you pull the horizontal frames (gently) you can pull the window out of the track.
- then carefully remove the metal tracks. my screws were all corroded so I used a multitool and just cut them. DONT DESTROY these during removal. you need them to as templates to cut the new ones.
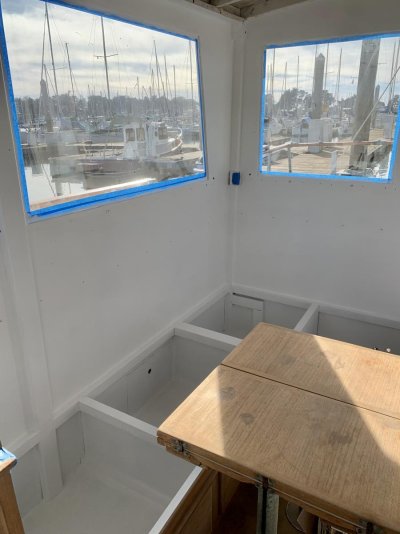
- then sand and prep the frames for new tracks. the most time will be spent here.
- I sanded down to bare wood and then had a lot of repair to do with systemthree fairing epoxy. I wouldn't recommend that, unless you have just some small areas to fix. I would just get new frames milled. it will save you a ton of time and you will get better results.
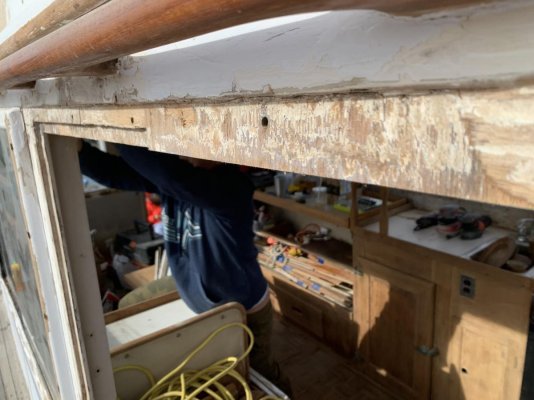
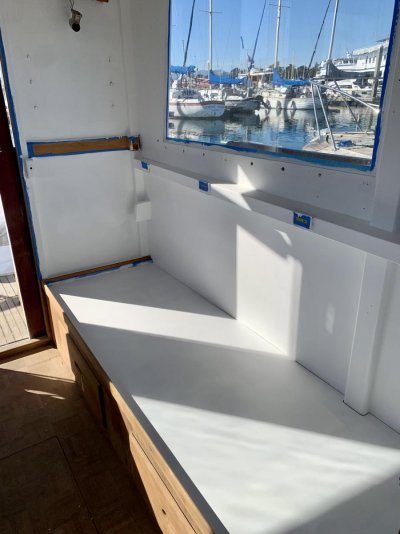
- then prep the frame on the superstructure. it looks like its all rotten when you first take the frames off. but thats just the old dolphinite. scrape and sand all that off then use penetrating epoxy, build any areas up with fairing epoxy, then prime.
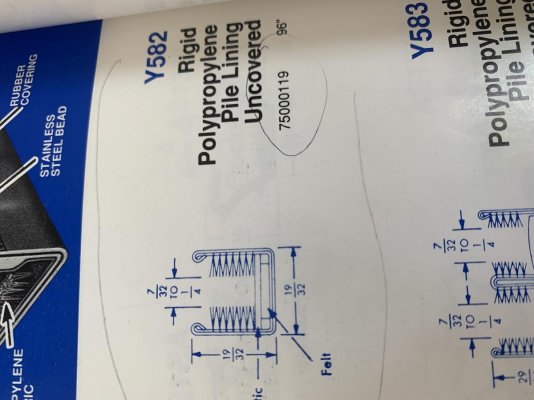
- then you need to get 6 X 8" stanpro window tracks. that will give you enough for all 4 sliders in the boat. you also need 1x 8" single track for the vertical felt between the sliders and fixed frames.
- if you need to replace the windows they are just laminated safety glass. I replaced 7 and it was only $500. but - MAKE SURE to have the shop sand the edges of the windows down, or do it yourself with 120. if you dont, the rough edges will gouge into the window tracks.
- cut the window tracks using your old ones as the template. use an angle grinder to cut the tracks to the basic size, then use a flap disk sanding wheel to trim to down perfectly. it makes quick work of it. we would test fit the tracks and mark any overlap with a pen, then grind down to that line.
- then install 900 tiny screws to hold the vertical and top track in place. you need to pre-drill these with a metal drill bit. I didnt use screws on the bottom track, as recommended by others. I bedded all of them with sikaflex.
- then drill the drain holes in the bottom track.
- I used butyl to hold the fixed frames in place but found it too thick for the main frames. I used sika for that.
- you need 2-3 people to install the window. dont try to be the solo hero. I did and shattering one of the windows on install when the frame imploded. it was the low point of the project.

I have pictures of most every step I can share. Ping me with any questions.
 
Last edited:
6 X 8" stanpro & 1x 8" single track, explain, or do you mean 6 pieces-8 foot doubletrack and 1 piece-8 foot single?

when you had it all apart did you see any reason this could not all be done from the inside?
 
Yes, 6 pieces of the U track (Stanpro Y582) and 1 8" piece of the edge trim (slides over the edge of the fixed windows). I dont have a part number for that, but its also stanpro.

I didnt follow what you meant by "all done from the inside"? All windows are removed from the outside, even the fixed windows. The cabin plywood walls have a notch that runs around the window opening that the glass sits in, making it impossible to remove from the inside (and making the plywood window frames very thin in this area and prone to dry rot, so be careful.) I attached a quick sectional of how they are sandwiched together.
 

Attachments

  • Screen Shot 2021-01-30 at 11.10.31 PM.jpg
    Screen Shot 2021-01-30 at 11.10.31 PM.jpg
    11.4 KB · Views: 10
  • IMG_8710.jpg
    IMG_8710.jpg
    94.5 KB · Views: 13
  • IMG_9018.jpg
    IMG_9018.jpg
    124 KB · Views: 17
  • IMG_9011.jpg
    IMG_9011.jpg
    141.5 KB · Views: 14
  • IMG_9132.jpg
    IMG_9132.jpg
    111.1 KB · Views: 16
Thanks Bruce. I see what you mean on how it was built, I was wondering if it had to be from the outside is all. Having to take the inside apart anyway is a surprise, first time I have read that. Not only is it a problem area, it is also a finicky construction, as you said better to have 1-2 helpers for the install.
 
Hi all - quick update on the project:

- First coat of paint on the hull. Looking terrific.

- The boat is becoming a popular attraction at the dock. Everyone stopping by to chat.

- Overall the exterior paint is looking great but after a few days I have found all the little imperfections. Unfortunately my OCD will be compelled to fix them. The window frames need the most work. I am kicking myself for not replacing them.

- Over the weekend I got the first coats of primer on the cabin. Wow, what a transformation. It previously had a Jack Sparrow meets Shawshank type thing going on.

- The flybridge seats are rebuilt. Will start priming the flybridge tmrw. Still lots of work to do up there. I also found a 2" area of rot on the top corner of the console. Not sure how im going to fix that. Its right on the edge where the water drains.


- The transmission seal and new transmission oil hoses were installed last week. The nut in the coupler was loose so the mechanic felt this might have been the real reason for the leak.

Questions for the pros:

- I have the original Stewart Warner gauges at the helm. The tachometer and voltmeter dont work, but they work on the flybridge. Any tips on how to debug them? I believe they both run off the alternator so that seems like it might be the culprit.

- Anybody install an EMU1 analog to digital converter for engine gauges?
 

Attachments

  • IMG_9632.jpg
    IMG_9632.jpg
    126.7 KB · Views: 26
  • IMG_9634.jpg
    IMG_9634.jpg
    109.5 KB · Views: 31
  • IMG_9633.jpg
    IMG_9633.jpg
    111.2 KB · Views: 30
  • IMG_9601.jpg
    IMG_9601.jpg
    130.4 KB · Views: 25
  • IMG_9649.jpg
    IMG_9649.jpg
    99.9 KB · Views: 24
  • IMG_9616.jpg
    IMG_9616.jpg
    97.5 KB · Views: 29
  • IMG_9652.jpg
    IMG_9652.jpg
    99.3 KB · Views: 25
Last edited:
Nice paint job on hull. High Gloss? Gotta ask what paint brand are you using, then next question is those OCD imperfections, show me before and after . Reason I ask is if you are doing spot touch ups how is the paint working out so the touch up is not more visible than the imperfection.
 
Re: volt meter. If fly bridge works but main is not a problem then it’s probably at bad connection or ground. Look at the wiring junction panel, where upper helm and lower ones connect. This is at main helm and is accessed by removing instrument panel. It is on the right side affixed to the aft panel of the helm enclosure. Upper and lower wires are connected here so bridge can be disconnected and removed. Check screws for tightness. Some of mine were loose. Check voltages here. Check ground on lower volt meter.
 
Nice paint job on hull. High Gloss? Gotta ask what paint brand are you using, then next question is those OCD imperfections, show me before and after . Reason I ask is if you are doing spot touch ups how is the paint working out so the touch up is not more visible than the imperfection.

Thanks! We used 2 coats of Interlux Pre-kote primer and 2 coats of Brightsides topcoat. The recommendation I got was to stick with polyurethanes as the wood flexes too much for epoxy-based.

Compared to what it looked like before, its an amazing transformation. But...its so good it raised the OCD meter. The paint itself was fine. No issues in how it laid down. Key areas I need to work on:

- The window frames had been worn down from years of sanding and weather. I tried to fix them with system three woody putty which got me 80% there, but it could have been 100% and far less effort if I just had them remilled. I "think" I can get them up to 90% if I fair them again. I'm also envisioning a Dremel router jig contraption which could get the edges perfectly straight.

- There is one spot on the cabin side that we didnt fair well enough. That can be fixed pretty easily.
 
Re: volt meter. If fly bridge works but main is not a problem then it’s probably at bad connection or ground. Look at the wiring junction panel, where upper helm and lower ones connect. This is at main helm and is accessed by removing instrument panel. It is on the right side affixed to the aft panel of the helm enclosure. Upper and lower wires are connected here so bridge can be disconnected and removed. Check screws for tightness. Some of mine were loose. Check voltages here. Check ground on lower volt meter.

Awesome. Thanks so much!
 
Hi all - quick update on the project:

- First coat of paint on the hull. Looking terrific.

- The boat is becoming a popular attraction at the dock. Everyone stopping by to chat.

- Overall the exterior paint is looking great but after a few days I have found all the little imperfections. Unfortunately my OCD will be compelled to fix them. The window frames need the most work. I am kicking myself for not replacing them.

- Over the weekend I got the first coats of primer on the cabin. Wow, what a transformation. It previously had a Jack Sparrow meets Shawshank type thing going on.

- The flybridge seats are rebuilt. Will start priming the flybridge tmrw. Still lots of work to do up there. I also found a 2" area of rot on the top corner of the console. Not sure how im going to fix that. Its right on the edge where the water drains.


- The transmission seal and new transmission oil hoses were installed last week. The nut in the coupler was loose so the mechanic felt this might have been the real reason for the leak.

Questions for the pros:

- I have the original Stewart Warner gauges at the helm. The tachometer and voltmeter dont work, but they work on the flybridge. Any tips on how to debug them? I believe they both run off the alternator so that seems like it might be the culprit.

- Anybody install an EMU1 analog to digital converter for engine gauges?


Here is the wire diagram should be similar.IMG_2150.jpg
 
Back
Top Bottom