You are using an out of date browser. It may not display this or other websites correctly.
You should upgrade or use an alternative browser.
You should upgrade or use an alternative browser.
GB 36 Classic Seacocks
- Thread starter Khays
- Start date
The friendliest place on the web for anyone who enjoys boating.
If you have answers, please help by responding to the unanswered posts.
If you have answers, please help by responding to the unanswered posts.
mbdana
Veteran Member
- Joined
- Oct 20, 2020
- Messages
- 75
- Location
- US
- Vessel Name
- Third Reef
- Vessel Make
- 36' Grand Banks Heritage Classic
Third Reef 1988 36' Classic
I will check ours for a size tomorrow but wondering if you have issues with the aft head SW supply. Mine is nearly impossible to cycle open and close, therefore I tend to leave open which I'm not crazy about. It feels like the rubber drum is swollen. I have lubricated but still no joy. Very hard to operate particularly in its location below the steps.
We are thinking of swapping out the aft head for a composting toilet which would enable us to eliminate both the supply and discharge but still up in air about this.
Is your discharge malfunctioning? I will go aboard our boat tomorrow and let you know the size.
Best regards,
Mike Dana
Third Reef
36' GB Heritage Classic
Potts Harbor Maine
207-833-5080
Attachments
Comodave
Moderator Emeritus
- Joined
- Jul 2, 2015
- Messages
- 21,297
- Location
- Au Gres, MI
- Vessel Name
- Black Dog
- Vessel Make
- Formula 41PC
If you can’t work the seacock, then you should replace them asap or remove them asap.
OP
OP
Khays
Member
- Joined
- Feb 16, 2020
- Messages
- 19
- Location
- USA
- Vessel Name
- RambleOn
- Vessel Make
- Grand Banks 36 Classic
Aft Head Seacocks
The aft head seacocks, supply and discharge are original Groco tapered rubber drum type; the supply is capped off and in closed position. The toilets are Sealand electric fresh water flushed types still connected to the original discharge seacock. That is the one I want to replace when hauled out next month but wanted to order the new seacock before haul. I was sure the original boat information said what size each of the seacock thru-hulls are but can't find the info. The one I'm interested is hard to reach too under the aft head lav. Don't know where to look on the valve to see if there is a model number. If you can figure it out please let me know.
Thanks.
Comodave
Moderator Emeritus
- Joined
- Jul 2, 2015
- Messages
- 21,297
- Location
- Au Gres, MI
- Vessel Name
- Black Dog
- Vessel Make
- Formula 41PC
I don’t think that they sell the rubber plug type anymore. All you really need to know to get a new through hull and seacock is the hose size. Then you can order it and have it on hand in time for the haul out.
OP
OP
Khays
Member
- Joined
- Feb 16, 2020
- Messages
- 19
- Location
- USA
- Vessel Name
- RambleOn
- Vessel Make
- Grand Banks 36 Classic
No the rubber drum types are obsolete; I was hoping to replace the seacock only, not the thru hull which appears to be fine. Are you suggesting both should be replaced as a matter of course?
Thanks for the reply!
Thanks for the reply!
Comodave
Moderator Emeritus
- Joined
- Jul 2, 2015
- Messages
- 21,297
- Location
- Au Gres, MI
- Vessel Name
- Black Dog
- Vessel Make
- Formula 41PC
I would replace both since it isn’t that much more work. The old through hull is probably ready for replacement also. Besides it may give way when you are replacing the seacock anyway. This way you are prepared for that possibility. I took out a seacock last year. No way would it unscrew so I just took a grinder and ground the head off and pulled the rest into the boat. Very quick and easy, maybe about 5 minutes of grinding and it was out. I could have spent hours trying to get it apart.
Cigatoo
Guru
I have the manual for our 1984 GB 36 in my hands. It gives the locations for all thru hulls but not the size. I believe the original seacocks were the Groco SV series. I have one left. I have attached the instructions on servicing from Groco. I would give that a try.
Attachments
Last edited:
mbdana
Veteran Member
- Joined
- Oct 20, 2020
- Messages
- 75
- Location
- US
- Vessel Name
- Third Reef
- Vessel Make
- 36' Grand Banks Heritage Classic
Third Reef 1988 36' Classic
Hi K
I checked the size of the aft overbd under the vanity. The hose size is 1-3/4", couldn't see any size markings on valve.body and have to agree after looking at mine, if mine were not working I would replace the whole valve/ thru hull fitting as mine is looking pretty crumpy too.I
As I mentioned, we are leaning towards a composting toilet aft at first so will be able to eliminate 2 thru hulls....less the better.
The plate you referenced doesn't look familiar, do you know where on the boat it comes from? Or from the spare parts drawer? I h haven't seen anything like that on our 88. What year is your GB?
STay safe.
Mike Dana
Third Reef
36' GB Heritage Classic
Potts Harbor Maine
207-833-5080
mbdana
Veteran Member
- Joined
- Oct 20, 2020
- Messages
- 75
- Location
- US
- Vessel Name
- Third Reef
- Vessel Make
- 36' Grand Banks Heritage Classic
Thanks Charlie for the tech manual for the Groco seacock. This will be very helpful in the spring when I service all on our boat.
Thanks again
Mike Dana
Third Reef
36' GB Heritage Classic
Potts Harbor Maine
207-833-5080
Thanks again
Mike Dana
Third Reef
36' GB Heritage Classic
Potts Harbor Maine
207-833-5080
Comodave
Moderator Emeritus
- Joined
- Jul 2, 2015
- Messages
- 21,297
- Location
- Au Gres, MI
- Vessel Name
- Black Dog
- Vessel Make
- Formula 41PC
Hi K
I checked the size of the aft overbd under the vanity. The hose size is 1-3/4", couldn't see any size markings on valve.body and have to agree after looking at mine, if mine were not working I would replace the whole valve/ thru hull fitting as mine is looking pretty crumpy too.I
As I mentioned, we are leaning towards a composting toilet aft at first so will be able to eliminate 2 thru hulls....less the better.
The plate you referenced doesn't look familiar, do you know where on the boat it comes from? Or from the spare parts drawer? I h haven't seen anything like that on our 88. What year is your GB?
STay safe.
Mike Dana
Third Reef
36' GB Heritage Classic
Potts Harbor Maine
207-833-5080
1 3/4” is pretty huge for a head intake.
OP
OP
Khays
Member
- Joined
- Feb 16, 2020
- Messages
- 19
- Location
- USA
- Vessel Name
- RambleOn
- Vessel Make
- Grand Banks 36 Classic
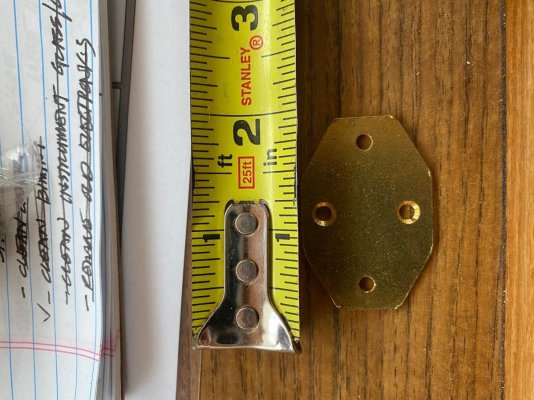
The little solid brass plate is one of 8 wrapped in a small plastic bag with #6-1/2" FH SS WD Screws, enough for all holes. I found the package in an engine room bin with spare parts. At first I thought they must be cabinetry related but yesterday searching for ground junction posts I saw some slightly larger rectangular gold plated electrical connector plates, not sure what they are to be used for but on considering the plates I have (don't have one with me now but will inspect on boat tonight) the color/tone of the metal is more gold-like than yellow brass when seen in person. IDK, it's a mystery. I can not fathom how they would be used in cabinetry or electrical.
HopCar
Guru
- Joined
- Aug 20, 2011
- Messages
- 5,309
- Vessel Name
- Possum
- Vessel Make
- Ellis 28
At this age I would replace those Groco rubber plug seacocks with Groco Ball Valve Seacocks.
The reason rubber plugs become difficult to turn is that when you snug up the T-handle it causes the rubber to swell into the openings. Eventually the rubber hardens and the bump remains in the openings making it hard to turn the plug.
If you need to keep using it for a while you can extend the life by removing the rubber and sanding down the bumps.
HopCar
Guru
- Joined
- Aug 20, 2011
- Messages
- 5,309
- Vessel Name
- Possum
- Vessel Make
- Ellis 28
The 1-3/4" line is on the head discharge.
Best
Mike Dana
Third Reef
36' GB Heritage Classic
Potts Harbor Maine
207-833-5080
That’s a really odd size for a toilet discharge. The pretty much standard sizes for marine toilet discharge is either 1-1/2 inch or 1” inside diameter. You might want to check again. What make and model is the toilet?
EVERFOR
Veteran Member
Sea valves
I bought GB 36 #736 (1986) last year. She had the old rubber valves. Don’t waste time trying to refurbish them. I replaced all 9 (4 with integral strainers) with the new Groco ball valves. Worth every cent. Easy to turn even with arthritic hands. The new handles are great as you can use a 3/8’s ratchet to turn them if they are hard to reach. Let me know if you have not had your question already answered and I will dig out the yard invoice for you.
I bought GB 36 #736 (1986) last year. She had the old rubber valves. Don’t waste time trying to refurbish them. I replaced all 9 (4 with integral strainers) with the new Groco ball valves. Worth every cent. Easy to turn even with arthritic hands. The new handles are great as you can use a 3/8’s ratchet to turn them if they are hard to reach. Let me know if you have not had your question already answered and I will dig out the yard invoice for you.
OP
OP
Khays
Member
- Joined
- Feb 16, 2020
- Messages
- 19
- Location
- USA
- Vessel Name
- RambleOn
- Vessel Make
- Grand Banks 36 Classic
Hi Everfor,
The original post I asked is anyone new the size of the seacock and through-hull for the original aft head overboard. Never actually got a for sure answer (some one suggested 1-3/4"). I intend to replace it but had also asked about the through-hulls; assume that requires replacement too?
If the 7 seacocks you replaced were the original ones I would still be interested in what size the aft head overboard seacock is and whether you had to or did also the through hull.
Thanks,
RambleOn
I know you didn't ask me, so I hope this is not an unwelcome contribution (but if so, I'm sorry).
First of all, I feel your pain. We had a cruising sailboat built in the 70's that had those Groco rubber plug seacocks. Even in the early 2000's when we were getting it ready for a longer cruise, we could only get the rubber part in certain sizes (off dusty chandlery shelves).
Anyway, except for some emergency type situation, I would be suspicious of any yard that would want to replace the seacocks without doing the through hulls. Especially if using (what I consider to be) proper seacocks with a backing flange that gets fastened (in the old days through the hull with fasteners; nowadays often to a fiberglass/ed backing block).
Here is why I say that.
1) Well just because I'd want to get a good look at 40-year-old bronze, so it'd be out anyway.
2) I'd want to get a look at or renew 40-year old sealant.
3) The big one for me is how you install these. Now I know every boat isn't this way, but oftentimes (my preference) you use a seacock with a flange that has holes in it around the perimeter. These holes allow you to fasten the seacock to the boat. In the old days, oftentimes right through the hull with big machine screws. Nowadays often with a fiberglass backing block that is permanently affixed to the hull, then tapped (or some other way) the seacock is fastened to that.
So if you visualize the installation (and I'm skipping some steps for hopefully clarity), you fasten the seacock to the boat and then from the outside you screw in the through hull with its sealant. All good.
But if you picture leaving the through hull in there (presuming the bronze and the sealant are still great after 40 years), now you are "unscrewing" the original Groco seacock, and then "screwing" the new seacock down onto the through hull (maintaining that old sealant on the through hull all the while so don't let it move at all), and then either trying to "hit" the holes you already tapped in the backing block, or tapping new ones once the seacock is in place. Okay, maybe that's no big deal, but I see possible problems with that. Even if re-using the existing through hulls, I would want to reinstall them into the already affixed new seacocks.
Caveat though: There is usually more than one right way to do things, and perhaps my worries aren't valid. But if nothing else they are one perspective.
(I can expand on the steps I take if it's of any interest; but I figured this was long enough already since I don't know your level of interest in my thoughts.)
OP
OP
Khays
Member
- Joined
- Feb 16, 2020
- Messages
- 19
- Location
- USA
- Vessel Name
- RambleOn
- Vessel Make
- Grand Banks 36 Classic
GB 36 Seacocks
Frosty,
Thanks for the detailed response. I have to apologize for my poor typing: "...is anyone new..." was supposed to read "...if anyone knew...". Anyway what you said about the through-hulls is what I was wondering; the bronze on the GB, an exceptionally well bonded boat and mine has had the bonding redone, everywhere looks good. I'd heard the trouble with thinking you're not going to replace the through hull is sometimes the old bronze seacocks don't come off the through hull, you have to grind the whole assembly free. I'm doing the work myself and am trying to plan the time and materials to get the work done and all the feedback has been helpful.
Thank you,
RambleOn
If you are going to do it youself, I will feel free to ramble on ")
I've done mine myself for two reasons. One, save money; and two, no-one cares more than me about my boat. Not that there is anything wrong with a good, professional installation at all.
So obviously you will be on the hard. In my case, I first considered the number and location of my through hulls. I ended up closing off two and moving another. But we'll ignore that for now and concentrate on replacing like for like.
I did a bunch of research into the various options for seaocks. Material, style, ball material, handle material, where made, etc. etc. For myself I chose the Groco BV series.
Next, removal of existing. Should be pretty straightforward, although if you can't get the through hull loose from the seacock, you can grind a few slits into the "head" of the mushroom on the outside and pull the whole works into the boat.
Now you have a bare hole.
The way I installed was to make backing blocks out of pre-made fiberglass board from McMaster Carr (avoiding the red fire-retardant material as that can inhibit bonding). I made round ones, I forget exactly but around 5" in diameter and I think 3/4" thick. Next I cleaned up the inside of the hull to prepare for bonding the backing block.
Next, choose an option for mounting the seacock to the backing block. I chose to tap the backing block for bronze machine screws (my seacocks and through hulls were also bronze). Before mounting the block (while it's on your workbench), you can drill and tap the holes into the backing block (these only go into the backing block, not the hull with the method I used). (So one center hole for through hull, and usually three tapped holes for bolts - I find that for tapping fiberglass I can use a slightly smaller drill bit than for metal - you can experiment on scrap of the same material.)
Another thing you can do in this stage is check the length of the threaded through hulls. If too short, oops, order a different one. If too long, trim to size (cut).
Next decide how you want the seacock handle oriented and somehow take note so that the backing block gets adhered in the right position (since you have already tapped the holes in it).
In order to make sure the surface of the block was "perpendicular" to the hull, I used the through hull (dry fit), with the mushroom inside IIRC, to do that. In other words the thickened epoxy "took up" any hull curvature and in the end the backing block was "square" to the hull. I have seen people fiberglass (cloth) the blocks to the hull but I just used thickened epoxy with a fillet around the perimeter. I put fasteners in the tapped holes to keep them from getting filled with epoxy (mine went all the way through even though the fasteners will stop just shy of that).
I can't remember which of these I did, but you can either tape over the through hull threads or wax an old through hull to keep it from getting epoxied in this stage (I've found it a pain to de-wax new though hulls so hence only use old ones with wax or new ones with tape).
So once the backing block is cured and all is spiffy there, then you can mount the seacock with appropriate sealant, using the tapped holes and fasteners to mount it to the backing block. Then go around to the outside of the hull and screw in the mushroom (through hull), also with sealant.
Attach hoses (if you use two hose clamps be sure the second isn't doing more harm than good by being too close to the end of the barbed area).
I believe that Groco now has pre-made backing blocks (?) I have not installed any through hulls since these were developed so have not analyzed them. Groco also now makes what they call "flanged adapters" -- that separate the inside flange from the inside valve, but they just don't appeal to me. I don't want that join of two threaded bits on the seawater side of the valve. That may just be me though. (And it's not like I change seacocks every six months and need a "quick way")
I hope this was not too wordy and did help.
EVERFOR
Veteran Member
Sea valves and thru hulls
All the old rubber sea valves were difficult to turn and one of the tail pipes broke off easily while repositioning. This prompted me to replace all sea valves and all below water thru hulls. This proved to be wise, for in the course of replacing them it became apparent that bedding was marginal after 35 years.
The aft head out flow is 1 1/2” for both the valve and the thru hull. Hope this is helpful.
Steve1.0
Senior Member
"I ended up closing off two and moving another."
Frosty,
Did you seal the unused holes yourself? If so please describe your process. Pictures too please if you have any!
I took the fore and aft head OB discharge valves out of service, sending both heads to the tank only. Thence to pump out at the dock or overboard.
Thanks
Steve
Frosty,
Did you seal the unused holes yourself? If so please describe your process. Pictures too please if you have any!
I took the fore and aft head OB discharge valves out of service, sending both heads to the tank only. Thence to pump out at the dock or overboard.
Thanks
Steve
Last edited:
Did you seal the unused holes yourself? If so please describe your process. Pictures too please if you have any!
Yes, I did. That was a few years ago, but let me dredge up the steps from my memory bank
I should mention also that I consulted the free WEST Systems' (at that time) booklet (which one can now download for free). It applies to pretty much any marine epoxy (except for mix ratios) and is a great "cookbook" for a wide variety of fiberglass/epoxy projects.So for starters, as they explain in the booklet, you asses the hole. Like the difference between a huge, ragged hole in thin material (worst), and a small machined hole in a thick material (best). Of course, disused through hull holes are machined holes, and generally in thick fiberglass. OTOH, if the repair fails you sink, so there is that. In my copy, "repairing machined holes" is in Appendix D.
First step obviously is to remove the old hardware until you just have a hole in the boat, and then clean off any sealant or etc.
Once I had that done, I taped off the outside of the hole (could do either side but this way gravity was helping not hindering) and then simply filled the hole to flush with thickened epoxy. Just so the hole was now "flat" on both sides.
Next I used a grinder with a flap disk (the flat style, not the "water wheel" style) to grind out a taper on the outside of the boat. WEST explain how to calculate the diameter of this. I ended up with around 8" diameter tapers, IIRC. I drew a Sharpie circle to keep track of the edges. Because of the epoxy plug in the hole, this dust is not going inside the boat (for once).
Cleaned up the dust, then used clear plastic and laid it over the tapered area, then drew a Sharpie outline of it. This was my pattern for patch cloth. I then drew a number of concentric lines inside of that one. After I'd mark a patch (sharpie right on the fiberglass reinforcement), I'd cut the pattern to the next smaller size then mark that, etc. So I ended up with a pile of patches the right shape and gradually diminishing in size. I used some biax 1708 (stiched so it's fine with epoxy). You just want to get it back flush so it's about the same amount of material. So if you use thinner cloth you need more layers.
I make a work table out of cardboard covered in waxed paper. A dishpan can be handy if it's windy (you can re-use it for other fiberglass projects as the hardened material can be "cracked" right out of it).
So once all is clean, organized and ready (important), I wet out the area to be patched with un-thickened epoxy. If it's an upside down type surface, you can let that tack up and it will help hold the patches up. Or you can use blue tape after you have patched to hold them in place if need be.
Somewhat counterintuitively, WEST recommend starting with the largest patch and then going smaller as you work. But their explanation makes sense to me. First, the biggest patch has total contact with the boat. Second, if you end up sanding off some of the patch material when you fair the repair, you are sanding off parts of the small layers, not the nice, big contiguous one.
You can lay up all the patches right on the waxed paper (like a stack of pancakes) if you want, then move the whole thing over onto the boat patch area. It's good to have a ribbed metal roller to roll over the patches and get the air out. I have used just a squeegee but once I got the roller I could see it did a better job. You want all the cloth totally saturated (so it's translucent, not white and fibery); but once you have achieved that, any extra resin is basically not advantageous. I start with the squeegee and then move to the roller getting it all nice and snugged up to the surface.
You can mix a little bit of something like colloidal silica and put that on the boat before your first patch layer, but to me that seems more useful on irregular surfaces, whereas a through hull area I have just prepped is pretty smooth, so I have just used plain resin (unthickened).
After you get the strength part on, you have a few choices. If I were doing something "finer," I'd probably lay on a layer of thinner/smoother cloth, or maybe some Peel-ply (windbreaker type material). But with a through hull patch I know I'm just going to sand it smooth outdoors and bottom paint so I don't do that. You could though.
So another factor when epoxying is that you have a window for a chemical bond, and after that window you have to clean off blush (just water and a 3M scrubby), sand, de-dust, and then you can get a mechanical bond.
If the patch is clearly going to need a lot of "finishing" work, I'd probably let it cure completely, de-blush, sand, de-dust, and then do whatever needed (more glass or etc.). But if it's close to being fair, then I'll just let it tack up to the point where I'm not going to disturb it, and then lay on some fairing compound during the chemical bond stage (aka "green stage" when you can dent with fingernail). This stage doesn't have a defined time length; due to temperature differences and different hardener speeds, you have to just test. If I've been able to fair in the green stage like that, then once it cures I may be able to just sand and go. Or at worst clean/sand/clean and add a bit more fairing. Once it's all faired and smooth, I like to coat with one layer of plain epoxy (as in, paint it on) to seal the fairing compound for sure. Then clean/dust/clean and ready for paint.
Now the inside. Technically, you'd do the same on the inside for the "worst" type of hole. In my case these were small diameter holes, not far below the waterline, so on the inside I added one layer of heavy biax material. Because it was not on a place that showed or that I interact with, I just laid it on the prepped surface without tapering (it was flat due to that initial thickened epoxy plug). I did smooth it so that if one reaches a hand in that compartment there is nothing "snaggy." Appendix D in the WEST booklet (or if they have changed the Appendices, it's the one for evaluating machined holes), gives a decision matrix for this.
This skipped over some of the epoxy details and etc. but I'm sure it's already plenty long! I don't have any photos set up to add right now, but I will see if I can dig some up. Also, that free WEST booklet has really good illustrations. They are probably better than photos in some ways (they always make it look so tidy and achievable, too
)I have since sold that boat, but I see it occasionally and she's still floating on her lines, 15 years after I eliminated those through hulls (I patched two, and reinstalled one but moved it slightly). But that's not really much of a brag, because fiberglass work is really easy if you just follow the instructions, prep well, and keep things clean. It may sound weird but I think starting on a bottom patch like his is actually an easy intro. Your work area is outside in free air (for the most part), it's straightforward (machined hole, no need to evaluate why it happened or how to fix any underlying structural issue), and you will be painting over it (no gelcoat matching, etc.).
Steve1.0
Senior Member
Thanks Frosty, I'm very familiar with working with epoxy, vinyl-ester etc.. never thought of the West manual. I'll give it a look see.
I was more interested in how far back you took the edge, how deep, that kinda stuff.
Thanks again!
I was more interested in how far back you took the edge, how deep, that kinda stuff.
Thanks again!
Thanks Frosty, I'm very familiar with working with epoxy,
Now you tell me!
I was more interested in how far back you took the edge, how deep, that kinda stuff.
For the overall diameter, I followed the WEST Systems suggestion, which is a multiple of how thick the laminate is (not of the diameter of the original hole). Once you have the size of the overall circle, then just taper from thin (at edge of hole) to full thickness (at outer edge of circle). I tapered at a constant rate, if that terminology makes sense.
Then how many layers of reinforcement has something to do with what material you are using. Somewhere I have seen an estimate of how thick X number of layers X material builds. IIRC what I did was cut more circles than I would probably need (graduated size), so I'd have them ready if I needed them. I think used Biax 1708, which builds reasonably quickly. Once I'd done the first one the rest were easier (did some more on a subsequent boat).
Last edited: