Building New Pilothouse Doors for a Bluewater Trawler

The friendliest place on the web for anyone who enjoys boating.
If you have answers, please help by responding to the unanswered posts.

syjos

Guru
Commercial Member
Joined
Nov 8, 2012
Messages
2,315
Location
USA
Vessel Name
Sandpiper
Vessel Make
Bluewater 40 Pilothouse Trawler
Time to build new doors for the Pilothouse. This is a continuation of my "Bluewater 40 Pilothouse Replacement" thread. I felt a new thread would be easier to follow.

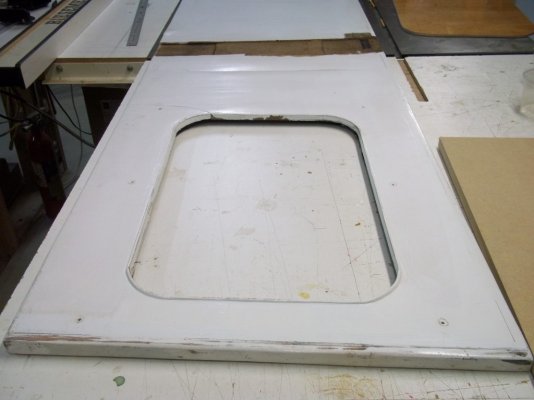
Picture 1 shows the crack on the port door. The door is constructed out of 3/4" plywood of questionable Chinese origin, sheathed in fiberglass cloth with polyester resin. Water leaked past the window seals and saturated the plywood core.

The leaking window and the wet core were pointed out by Matt Harris during a pre purchase survey in 2000. Sales price was reduced to cover replacement.
There were other issues with higher priority that needed attention first so I did a temporary repair after drying the core. The repair lasted 20 years! The plywood eventually delaminated and swelled creating cracks in the door skin.

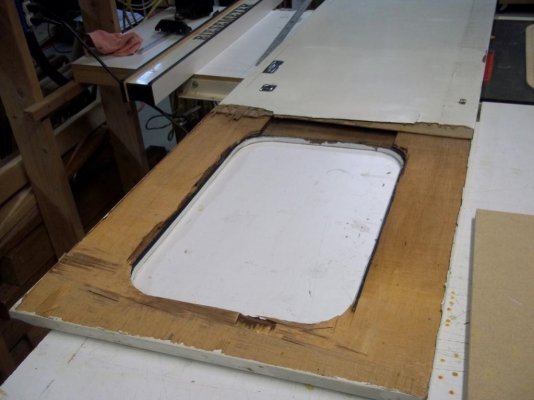
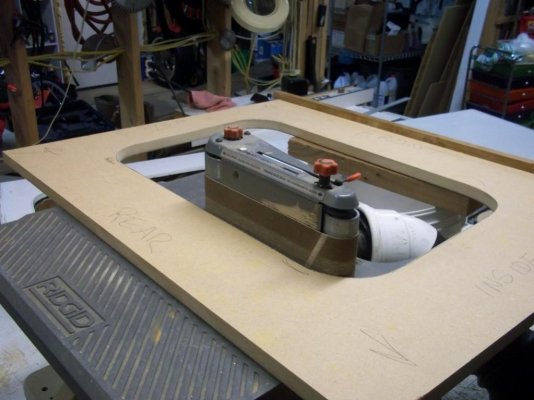
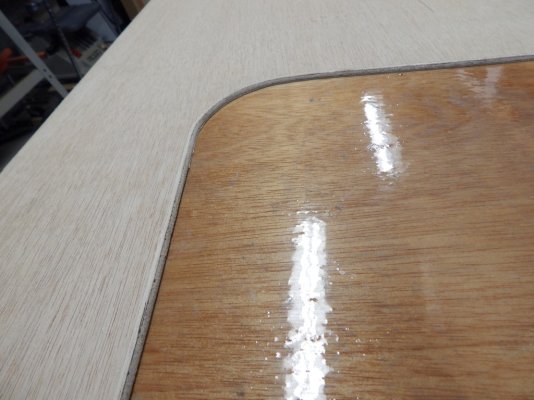
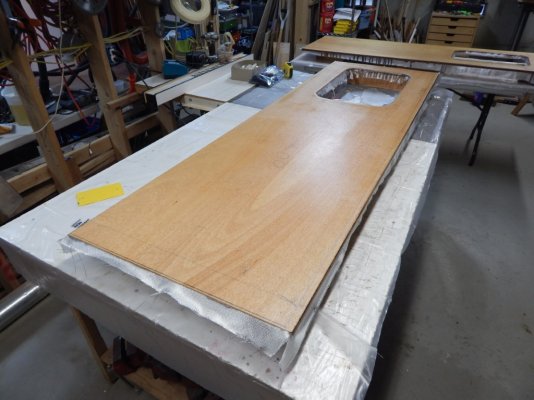
Picture 2 and 3 shows the dry delaminated core.

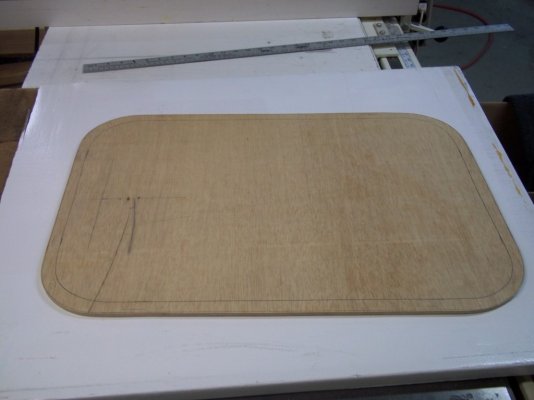
Picture 4 and 5 shows the interior side of the door after the window was removed. I will be replacing the windows with new glass.

I will be building a new starboard door also. The starboard door is not delaminating but starting to warp.
 

Attachments

  • 100_3766 (Medium).jpg
    100_3766 (Medium).jpg
    68.5 KB · Views: 83
  • 100_3778 (Medium).JPG
    100_3778 (Medium).JPG
    174.4 KB · Views: 75
  • 100_3780 (Medium).JPG
    100_3780 (Medium).JPG
    187.1 KB · Views: 75
  • 100_3790 (Medium).jpg
    100_3790 (Medium).jpg
    68.6 KB · Views: 73
  • 100_3791 (Medium).jpg
    100_3791 (Medium).jpg
    66.1 KB · Views: 76
I made a sliding door for a previous boat out of 1” starboard. Zero maintenance.
 
Picture 1. Traced the old window opening to MDO, cleaned up the straight lines and curves. Cut out center with jig saw and sanded the MDO to the line to create an accurate, smooth pattern for routing openings in new doors.

Picture 2 shows the pattern being checked for accuracy. There is a cleat on the right side to index the pattern to the door edge.

Picture 3 shows the pattern for window glass being sawn. Using the pattern created above, traced a line 5/8" larger than the opening.

Picture 4. Will ship the pattern out to have tempered glass made.

Will be buying two sheets of 3/4" mahogany marine plywood next week to build the doors. Will compare Aquatek and Sande/Virola plywood and select the one which is flattest.

Will build doors in similar fashion to the old doors with a few improvements. The window openings and glass landing will be epoxied prior to window installation to mitigate water incursion. The bottom of the door where it rides on the track will be improved with HDPE.

The plywood doors will be sheathed with glass cloth and epoxy.

I looked at several other door building methods:

A foam cored door. Wood framing with 1/8" Okoume plywood on either side, polyurethane foam coring, encapsulated in glass and epoxy. Too much work.

A door made out of Starboard. Difficult to glue, the white doesn't match boat paint, paint will not stick, hard to repair or hide mistakes, too much expansion with hot weather. I don't enjoy working with plastic as much as I enjoy working with wood.
 

Attachments

  • 100_3785 (Medium).jpg
    100_3785 (Medium).jpg
    81.5 KB · Views: 68
  • 100_3779 (Medium).JPG
    100_3779 (Medium).JPG
    185.4 KB · Views: 67
  • 100_3788 (Medium).jpg
    100_3788 (Medium).jpg
    65.3 KB · Views: 60
  • 100_3781 (Medium).JPG
    100_3781 (Medium).JPG
    173.8 KB · Views: 46
Last edited:
I made a sliding door for a previous boat out of 1” starboard. Zero maintenance.

I seriously considered making the doors out of Starboard after reading a previous post of yours last year or so. It seems like the ideal material.

I looked at a boat that had 3/4" Starboard sliding doors last summer. The owner complained that when it got hot, the door would warp slightly and make opening and closing difficult. 1" like you suggested would be more stiff but the tracks on Sandpiper is made for a 3/4" thick door. I even looked at shaving 1/4" off the top and bottom to make the door fit but other reasons had me look at other methods.

Fiberglass encapsulated doors will be 0 maintenance too.

I listed the reasons for not using it on the next thread.
 
Purchased two sheets of 3/4" Marine Sande plywood which is mahogany.

Plywood ripped to correct width in picture 1.

Sawing bottom and top of doors at proper angle with a saw guide. Pic 2

Cleaning up the cut with a router using a straightedge for a guide. Pic 3
 

Attachments

  • 100_3792 (Medium).jpg
    100_3792 (Medium).jpg
    69.2 KB · Views: 43
  • DSCN0062 (Medium).JPG
    DSCN0062 (Medium).JPG
    180 KB · Views: 38
  • DSCN0063 (Medium).JPG
    DSCN0063 (Medium).JPG
    184.4 KB · Views: 38
The opening for windows traced with pattern, rough sawn with Jig saw.

Picture 1 shows opening being trimmed using a router with pattern.

Edge rounded with trim router. Pic 2

Finished exterior of window opening with radiused edge. Pic 3
 

Attachments

  • DSCN0052 (Medium).JPG
    DSCN0052 (Medium).JPG
    189.7 KB · Views: 38
  • DSCN0053 (Medium).JPG
    DSCN0053 (Medium).JPG
    152 KB · Views: 41
  • DSCN0054 (Medium).JPG
    DSCN0054 (Medium).JPG
    138.4 KB · Views: 41
Using the window opening pattern to create another pattern 7/8" larger all around for the glass landing. Pic 1

Routing the glass landing on the back side of door using the pattern created above. Pic 2

Finished glass landing recess. Pic 3

Trial fit of glass landing using the glass template. Pic 4

View from the outside. Pic 5
 

Attachments

  • DSCN0056 (Medium).JPG
    DSCN0056 (Medium).JPG
    170 KB · Views: 45
  • DSCN0055 (Medium).JPG
    DSCN0055 (Medium).JPG
    181.4 KB · Views: 44
  • DSCN0059 (Medium).JPG
    DSCN0059 (Medium).JPG
    149.9 KB · Views: 44
  • DSCN0060 (Medium).JPG
    DSCN0060 (Medium).JPG
    175 KB · Views: 43
  • DSCN0061 (Medium).JPG
    DSCN0061 (Medium).JPG
    190.5 KB · Views: 43
Both sides of the door precoated with epoxy and allowed to dry. Nicks and low spots filled with System Three Quickfair and sanded lightly after drying.

Applied 5.6 oz fiberglass cloth to exterior of doors with System Three Silvertip Epoxy.

The cloth was draped over the doors, epoxy poured on and spread with a squeegee. Excess epoxy squeegeed off and the fabric pressed down with an aluminum finned bubble roller and squeegeed again to remove excess epoxy.

The fiberglass is for sheathing only, not adding strength. The 5.6 oz glass fabric will insure uniform epoxy thickness and provide impact and puncture resistance. The glass/epoxy surface provides a hard smooth surface for paint.

The interior side will be glassed tomorrow..
 

Attachments

  • DSCN0065 (Medium).JPG
    DSCN0065 (Medium).JPG
    173.7 KB · Views: 40
  • DSCN0066 (Medium).JPG
    DSCN0066 (Medium).JPG
    181.2 KB · Views: 39
Did you ever finish these?

I took a break after getting both sides glassed. Had other projects in the fall at home and boat.

Started work on the doors two weeks ago. Will be posting soon with pictures.
 
Great! I like You’re posts because you’re a true craftsman and you have the same boat that I have.
 
Great! I like You’re posts because you’re a true craftsman and you have the same boat that I have.


Thanks for the compliment.

Where do you moor the BW?

You work at my favorite Marine Supply store!
 
She’s currently near Portland, OR but the plan is to move her up to the Sound this summer. Probably Shilshole.
 
She’s currently near Portland, OR but the plan is to move her up to the Sound this summer. Probably Shilshole.

Did you buy it recently?
 
I bought her about a year ago. She needs a bit of work to get her up to snuff though.
 
I bought her about a year ago. She needs a bit of work to get her up to snuff though.

Which BW in Oregon did you purchase?

Can you post some pictures in the BW section? Especially with the work you will be doing.

We have a small BW owners group here on Puget Sound. We have a rendezvous in the spring.
 
The Lady J. I’ve never been one to take pics and post the work I’m doing, but I’ll consider it for some of the work I’ll be doing. The next big thing will be replacing some decking. Basically everything on the foredeck level including the area behind the Portuguese bridge. Lots of soft stuff up there and a leak that drips onto the v berth cushion. Then hull work. Blisters.
 
She’s currently near Portland, OR but the plan is to move her up to the Sound this summer. Probably Shilshole.

Now I know why you asked about seaworthiness and following seas earlier.

The trip from Portland to Puget Sound will be sometheng to look forward to and fun, maybe?
 
Hopefully. It’ll be my first time on the open ocean. The closest I’ve been is the Strait of Juan de Fuca in my sailboat, and that was just a trip to the San Juans so I can barely make that claim. It’ll also be my first time crossing the bar, but as long as I time it right I don’t expect problems there.
 
The Lady J. I’ve never been one to take pics and post the work I’m doing, but I’ll consider it for some of the work I’ll be doing. The next big thing will be replacing some decking. Basically everything on the foredeck level including the area behind the Portuguese bridge. Lots of soft stuff up there and a leak that drips onto the v berth cushion. Then hull work. Blisters.

Yikes! Will you have covered moorage to do the outside work?

Is your hull cored or solid?
 
Hopefully. It’ll be my first time on the open ocean. The closest I’ve been is the Strait of Juan de Fuca in my sailboat, and that was just a trip to the San Juans so I can barely make that claim. It’ll also be my first time crossing the bar, but as long as I time it right I don’t expect problems there.

The bar can be flat as glass sometimes.

When I was doing deliveries, being able to time the crossing was essential.

A lot of clients were in a hurry, limited budget or other reasons and tried to limit my timing.
 
Yeah I’m in covered moorage here in Scappoose. The hull is solid.
 
Yeah I’m in covered moorage here in Scappoose. The hull is solid.

Covered moorage in Seattle?

I'm surprised that you have blisters.
 
No covered moorage in Seattle. Lots of blisters. I might peel it.
 
No covered moorage in Seattle. Lots of blisters. I might peel it.

Ouch! That can get expensive and/or lots of labor.

I've never had blisters on our boats but I oversaw a couple blister jobs and they were not simple procedures. Drying the hull to a recommended percentage was criticle.

Are you doing the peel and barrier coat or hiring out?
 
I’d be doing it. Yeah lots of work. I reckon it’ll take 1-2 months. Probably two. It’ll take a solid month just to dry it out.
 
I’d be doing it. Yeah lots of work. I reckon it’ll take 1-2 months. Probably two. It’ll take a solid month just to dry it out.

Are you retired?
 
Temporarily. My lady is supporting us financially while I work to get the boat ready. Then I’ll go back to work. I got the boat for about 40k less than what it would be worth if it needed nothing so there’s work to be done.
 
Last edited:
Temporarily. My lady is supporting us financially while I work to get the boat ready. Then I’ll go back to work.

Lucky you.

If you need anything, let me know.

PM me your email address so we can communicate without going through TF.
 
Last edited:
Back
Top Bottom