Cover plate ideas for removed electrical systems?

The friendliest place on the web for anyone who enjoys boating.
If you have answers, please help by responding to the unanswered posts.

socalrider

Guru
Joined
Feb 14, 2020
Messages
1,011
Location
usa
Vessel Name
SEA WOLF
Vessel Make
1979 CHB 41 Trawler
Wonder if the TF gurus out there have any thoughts on this: I've been working my way through our '79 CHB 41 trawler removing lots and lots of old systems.

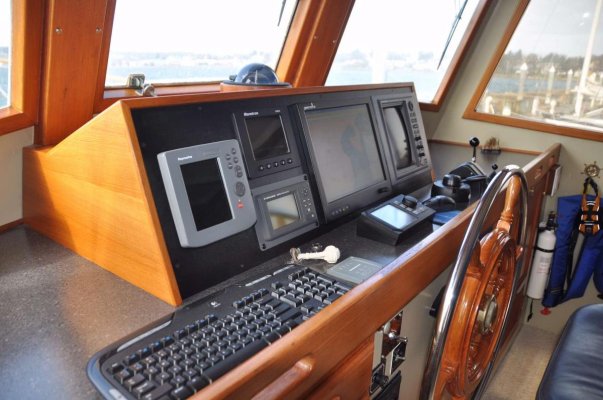
As a result I'm starting to accumulate holes throughout the boat: old displays at both helm stations, holes in thin fiberglass, in thick plywood, on my electrical panel (removed battery selector switch). Mostly, I want to just cover them with blanking plates, but occasionally I'd like to cut out a new switch (e.g. my Blue Sea battery shutoff switch).

I'm not likely to find this stuff pre-made, so wondering if anyone's had good experience with particular materials/tools fabbing up plates that look decent. I don't have access to a machine shop.
 
I put shiny screws in unused screw holes. They look like they are supposed to be there.

A small picture can cover a hole in a cabin wall.

Lots of plastic pieces in different colors are available in a plastic shop.

To mount a new item in an old larger hole mount a plastic square over the old hole and cut a new smaller hole for the item. It will look like it was always that way.
 
I have struggled with this same problem for the 22+ years of owning my 1970 Willard 36. I never found great solutions but I could make it better (or less bad). For the most part, repair was some form of sheet plastic trimmed and glued in place. In out-of-the-way places like for speakers, I left the patch. If in a more obvious place, I tried to find a replacement gizmo. For example, maybe a small meter or some sort of readout or power outlet. But even a decent patch looked better than a 4-inch round knot-meter that no longer worked. I used matte-finish white, usually very fine pebble finish.

Down below was a little easier as I could often cut and finish a decent piece of teak or mahogany. For two round gauges mounted overhead the helm, I replaced with a clock and a barometer. For your displaced battery selector, perhaps you can put some sort of multi-gauge meter (Blue Sea Systems State-of-Charge or something). In some cases, combining multiple small/medium holes (car stereo and a small gauge), looked better to make the hole bigger and form a single cover plate out of black or charcoal matte plastic held in place with a teak/mahogany trim bezel. Because my boat is so old, the original holes were pretty big. VHF radios were much bigger than now; the old Benmar A/P display was huge. So really, best I could do was make it less-ugly, but not great.

But in the end, as part of my refit, I had everything hole professional repaired. Fiberglass holes were repaired and painted as if they were never there. Holes in woodwork were filled and veneered over. I also replaced the electrical panel so cleaned-up that area too.

It's a problem on older boats. Its the main reason I love "survivors," boats that have had little to no electronics installed. DIY butcher installs don't exist.

Peter
 
Wonder if the TF gurus out there have any thoughts on this: I've been working my way through our '79 CHB 41 trawler removing lots and lots of old systems.

As a result I'm starting to accumulate holes throughout the boat: old displays at both helm stations, holes in thin fiberglass, in thick plywood, on my electrical panel (removed battery selector switch). Mostly, I want to just cover them with blanking plates, but occasionally I'd like to cut out a new switch (e.g. my Blue Sea battery shutoff switch).

I'm not likely to find this stuff pre-made, so wondering if anyone's had good experience with particular materials/tools fabbing up plates that look decent. I don't have access to a machine shop.

For many plywood-backed console panels it's not uncommon to create a 'dutchman' to fill the hole from previous hardware and then re-skin the area with a fresh layer of formica or veneer. Had that done to rearrange some gauges on our lower helm station. The old holes were round, so it was relatively easy to just cut a fresh pieces of plywood to fit into it.

To handle a change on the upper fiberglass helm from a Clarion round remote to a rectangular Fusion remote we used a thin piece of black Starboard. That covered the old hole, which was slightly larger than the height of the Fusion.

For larger areas it'd depend a lot on the rigidity of the material. Starboard mills like regular wood, so you could use a thicker piece of it to cover the whole panel. Then use a router to create a suitable round-over to the edge. But the through-holes needed for your new items would have to be planned to not reduce the underlying strength too much. That or you'd have likely need to have some supports arranged behind it to help carry the new load.
 
If the holes are large in the dash then I fill them with the same thickness plywood then make a new front for the dash out of 1/4” Starboard. Keep in mind the Starboard will not be structural. But as previously said it works with standard woodworking tools. I make a template out of luan plywood and make it exactly what you want as to size and clean edges. I cut the luan slightly oversize and then use a sander to bring it to the exact size and shape I need. Then clamp it to the 1/4” Starboard and use a templating bit in a router to route the Starboard to shape. The pattern you make will be copied exactly to the Starboard. Then mount the dash and replace the gauges, etc. you can make all new holes to suit your needs. I use black so that it doesn’t reflect in your face. Have fun!
 
If the holes are large in the dash then I fill them with the same thickness plywood then make a new front for the dash out of 1/4” Starboard.

This sounds like a great idea, particularly for the flybridge station - below, the holes are scattered across several surfaces so I'll probably have to make several different covers.
 
If the holes are large in the dash then I fill them with the same thickness plywood then make a new front for the dash out of 1/4” Starboard. Keep in mind the Starboard will not be structural. But as previously said it works with standard woodworking tools. I make a template out of luan plywood and make it exactly what you want as to size and clean edges. I cut the luan slightly oversize and then use a sander to bring it to the exact size and shape I need. Then clamp it to the 1/4” Starboard and use a templating bit in a router to route the Starboard to shape. The pattern you make will be copied exactly to the Starboard. Then mount the dash and replace the gauges, etc. you can make all new holes to suit your needs. I use black so that it doesn’t reflect in your face. Have fun!

One tricky thing to remember about actual Starboard (and not just other generic sorts of PVC lumber) is that it requires it's own special adhesive to get it to stick properly. So if you use it be prepared to either deal with their spendy two-part glue or arrange the design such that you can use mechanical fasteners to hold things in place.

I concur on using black for the helm background, at least for a lower station that's not going to be in direct sunlight.
 
There is a guy in Carpenteria who does custom face plate engraving. They can also just be blank plates with nicely spaced drill holes for mounting screws. I have a VHF hole that I needed to cover and he made me a plate with the boat's hull number and call sign engraved on it so it wasn't just a big blank plate, but rather looked like it was actually supposed to be there.


Something like this might work in some places for you.


Mark Craven, cravenengraven@gmail.com
 
You don’t need to glue Starboard for a dash installation since it will be flat. I just screw it to the substrate. I do use pan head screws and oversize the holes in the Starboard to allow for expansion and contraction.
 
You don’t need to glue Starboard for a dash installation since it will be flat. I just screw it to the substrate. I do use pan head screws and oversize the holes in the Starboard to allow for expansion and contraction.

Right, just making the point so a design doesn't get started, thinking it'll be something that can be easily affixed using adhesives without knowing the requirements.

+1 on the expansion allowances. Not something you typically need to do when using plywood/formica as they're more dimensionally stable.
 
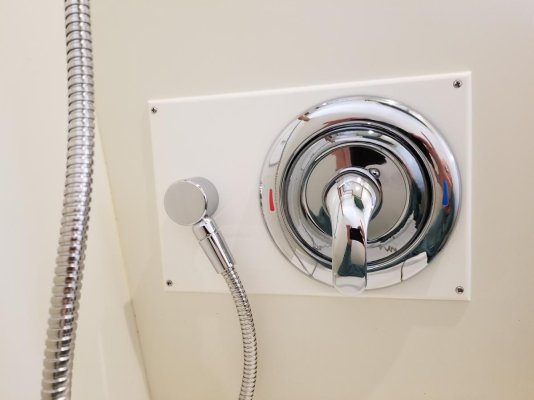
Probably half my displays and radios have Starboard plates to adapt them to oversize holes. Also have used it to cover a few holes where stuff has been removed. Its very easy to cut on a table saw and quarter round the edges with a router. It's available in 1/4" thickness in a number of colors. Here's the latest job in the shower room.

20201013_142955.jpg

Ted
 
Probably half my displays and radios have Starboard plates to adapt them to oversize holes. Also have used it to cover a few holes where stuff has been removed. Its very easy to cut on a table saw and quarter round the edges with a router. It's available in 1/4" thickness in a number of colors. Here's the latest job in the shower room.

Very slick. I like the idea of making up black covers for the interior (it's a teak forest). Might do white for the flybridge. Probably a pretty satisfying project to bang them all out once I've got the template dimensions noted.

Thanks guys!
 
Probably half my displays and radios have Starboard plates to adapt them to oversize holes. Also have used it to cover a few holes where stuff has been removed. Its very easy to cut on a table saw and quarter round the edges with a router. It's available in 1/4" thickness in a number of colors. Here's the latest job in the shower room.

View attachment 110806

Ted

I did exactly that last year when I replaced the shower faucet. Simple to do.
 
I keep a selection of white and black HDPE (AKA Starboard) on board for that kind of thing. At this point I have 1/8,1/4, 1/2” thicknesses.

It is inexpensive to keep around, easy to work, and looks nice.

I also keep a brady labler on board to print professional looking little plackards to properly identify things.
 
I opened two access holes in my head (my boat head, my head has enough holes already) to be able to access some nicely places plumbing fittings.
I built two plates using simple 1/8 plywood, epoxied and fiberglazed then paint with white bilge kote (and a coat of pre kote before).
I guess it was overkill to fiberglass them and just epoxy before paint would have been enough to make these rock solid.

L

I can do that in Starboard in 10 minutes and it will last forever and never need repainting.
 
Not having to do it again, I have enough to do on the boat without having to do it twice.
 
My helm panel is 1/2” or 5/8”, Black starboard. The PO used the textured side facing outwards. I think it looks quite slick.

Helm Consol.jpg

Jim
 
I had a big gauge hole where the new replacement gauge was much smaller. I bought a set of round teak coasters from Ebay. The coaster made for a circular molded teak frame around the smaller gauge and looks like somebody took some extra care (instead of covering up a big old hole).
 
Aluminum plate. .125 or 1/8 makes a nice thin panel. Instruments or gauges.
Or .250 / 1/4" for something heavier.
You can work it with wood working tools. Belt sander for corners. Drills easy. Paint whatever color you want.
Find a metal shop, metal supplier, or recycler. Ask to look in the scrap bins. Sometimes you can get it at the 'by the lb.' price. $
 
The really nice thing about Starboard is that it won’t crack when you are working it. Plexi and the like can crack without warning. Then you start over.
 
Beer coasters work for me. Collect the whole set!
 
Acrylic comes in the most colors and has a glass like appearance. It is brittle compared to HDPE (starboard) or ABS.

ABS is moldable, can be glued, it’s slightly less structural than HDPE and lacks UV protection.

HDPE is the strongest, has UV properties, can’t be molded or glued.

It really depends on the project as to which product makes the most sense.
 
Thanks guys - this was a really helpful thread. I got a few small sheets of 1/8" ABS that I'll use to make a cover for a battery positive bus bar and anything else I need to mold, a few sheets of 1/8" and 1/4" black Starboard for flat covers, and to supplement the 1/4" white Starboard I have lying around. Also got some more router bits for rounding this thinner stock.

I can't deal with putting any more teak on this boat. Enough is enough!
 
Some local sources:

For sheet plastics of various types, located in the Kearny Mesa area:
eplastics/ridout plastics:

https://www.eplastics.com/

They used to have a scrap bin (pre-covid), I don't know if they do anymore but you could often find partial, odd sized sheets of ABS/PVC/Acrylic/polycarbonate priced by the pound. Great when you need a couple of small pieces or want some pieces to have ready on the boat. If you want full sheets cut to size per your design, they can do that too.

For metal, try Industrial Metal Supply in the Convoy area. They have many pre-cut small pieces in their showroom as well as some scrap bin stuff ranging from sheets of metal to bars, rounds, tubes, diamond plate, etc... in a variety of materials. They can get or have in stock just about any raw metal material you might want. I recently purchased a 20' length of 316 stainless 1" OD tube to cut new stanchions from.

https://www.industrialmetalsupply.com/Locations/San-Diego-Metal#1

I'm not affiliated with these places, but they are some of my go-to local suppliers.

If you want marine grade ply, try Frost Hardwood Lumber in Miramar area. I recently purchased a full sheet of marine grade mahogany plywood there.

Since I'm listing favorite local suppliers, I'll throw this one in there.... For odd hardware or to 'browse' and try to match up an unusual screw, fitting or other oddity try Marshalls Industrial Hardware, also in Miramar area. My favorite hardware store ever. Prices are a bit high, but their selection is tremendous with thousands of bins of hardware in all sorts of materials and very helpful staff to help find what you need. They sell by the unit so you can go in and buy just one or two of the special screw you need. They do not have bronze hardware though. :( Plenty of 316 SS, aluminum, metrics, etc...
 
Back
Top Bottom