Stern tube leak

The friendliest place on the web for anyone who enjoys boating.
If you have answers, please help by responding to the unanswered posts.

mike66

Guru
Joined
Oct 7, 2014
Messages
525
Location
USA
Vessel Name
Susan Helena
Vessel Make
Albin40
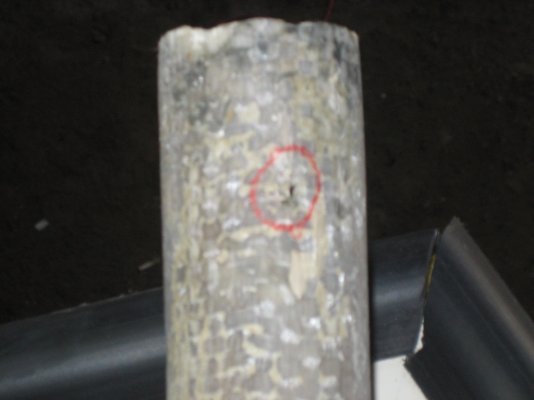
I've started to dive into a leak that developed in the area of the shaft log. It doesn't seem to come from the shaft seal, but from behind the log/bearing. The area aft in the keel where the stern tube runs is wet, and when we were in the water a leak was coming up through the false floor.
So I'm thinking of removing the shaft and both bearing carriers, and pressure testing the shaft tube. There is room to sleeve the tube. By removing both ends, I can make sure the sleeve seals well, rather than push it blindly as far as I can.
I'll also carefully inspect the hull and keel to make sure they are tight.
So first up, anybody know how to remove the shaft from this? 20201110_095754.jpeg20201110_095730.jpeg
 
It’s pretty obviously bolted together, so a good start point would be to remove the bolts.
What is the shaft log made of? I’ve seen some corrosion related failures in stainless steel stern tubes.
 
Seems to be stainless. The tube def has corrosion on it. You're right, just have to start unbolting and see what's there. Hoping the shaft end is accessible, and that I can force it out. There is a PSS system installed, so the shaft came off before.20201109_093017.jpeg20201109_093812.jpeg
 
We need a little more information, particularly about the make and year of the boat.

If it is a 30 year old T.T. it probably has a S.S. tube. T.T.s used a very poor grade of stainless, it was subject to rust and deteriorating in the tube, tanks and fittings.

It is a pretty big job to replace the shaft tube in a trawler, an even bugger job to dig out and replace all the accompanying rotten wood and glass around the tube, but you need to get it done. Right now the leak is probably just annoying, next year it will probably be worse and in a few years it will become downright dangerous.

Good Luck. I am a real D.I.Y. guy but had mine done at the yard. It is pretty involved and requires more fiberglass knowledge than I have.

pete
 
I had it done.
But it was much more complicated.
The stern tube was covered in concrete ballast.
Had to jackhammer the concrete out w two sizes of jackhammer.
Lots of dust and noise ... hours and hours of work.
Out w the concrete and in w the locally made stern tube.

I covered it all w lead of various shapes and sizes ending w bird shot on top.

I discovered the stern tube was leaking because the bulkhead just behind the shaft seal was bowed fwd. The expansion in the corroding steel punch outs was pushing on the bulkhead.

We surmised that the tube cracked when the boat was on the hard in freezing weather. That could be a heads up for at least a few here .. sorry.

But .. as they say .. things could be worse.
 
Mine looks pretty open under the false fiberglass floor. I'll have to open up under the aft bed, which will involve moving the water tanks out of the way. Looks doable. What a PIA.
 
Shaft log forward view. Think that bottom stud might be tough. 20201008_094449.jpeg20201008_093155.jpeg
 
If the small hose goes to the shaft log that isn’t what I would want below the waterline. And why all the clamps and spliced hose anyway? I am sure you will get that cr*p out of there. Looks like fun...
 
Comodave,
Shaft logs frequently are pressure fed from seawater taken from somewhere in the seawater system.

This is more common in FD boats and perhaps fishing boats to insure plenty of water is present in the rubber stern bearing for lubrication. My Willard is such a boat. I have a small ball valve that isolates the “stern bearing tube” from the rest of the system. When I leave the boat overnight or overweek ect I turn off the seawater intake at the Kingston valve and also the small ball valve feeding the stern bearing through the stern tube.
 
Last edited:
I know that shaft logs are sometimes fed by cooling water, mine are. I couldn’t tell from the photo if the small hose was going to the stuffing box or just going past it to somewhere else.
 
To the stuffing box. This is definitely a case of out of sight, out of mind. That photo is with my arm in a hatch. Yup I'll replace all that with a nice new hose.
 
Gotta love POs and their Macgiver work. I replaced one of the hoses to the shaft log last year when I rebuilt that log. I am going to order new hose for the starboard side tomorrow since I have the starboard engine out and am reworking the starboard side of the engine room this winter. I am replacing the house batteries with LiFePO4 batteries, painted the bilge and replacing hoses all over.
 
Pete, 86 Albin 40. Been fixing leaks for close to 10 years. But, can't beat the comfort for cruising. (Except those long crossings with beam seas).
 
Mike 66, Mine is a little older and a little smaller, a 78 36 foot. I' sure yours has the same problem. Love that rusted hose clamp. Looks like they couldn't get a nut on the bolt for whatever reason and used a hose clamp instead. LOL

pete
 
Mike 66, Mine is a little older and a little smaller, a 78 36 foot. I' sure yours has the same problem. Love that rusted hose clamp. Looks like they couldn't get a nut on the bolt for whatever reason and used a hose clamp instead. LOL

pete

Good eye, Pete. I didn’t see that.
 
Hi Mike,

I had the same problem on a former boat, a 37' trawler built in Korea. The shaft tube was a home built fiberglass pipe. First photo shows the tube ready to come out after removing the false floor and disgusting foam under it. Shaft was removed before interior work started. I cut the mid fiberglass bracing and the stuffing box mount with a sawsall. Once the mounts were cut the tube just pulled out. Must have been leaking there as well. Photo 2 shows the hole in the tube. Photo 3 old tube out ready for the new one. Photo 4 stuffing box mount was in rough shape.

I bought a fiberglass tube from Nor Easter Yachts in Milford, CT https://noreasteryachts.com

While I took everything apart I had the yard glass the tube to be sure alignment was right on. Everything went together well, leak stopped. Unfortunately, I can not find the photo of the completed project.
 

Attachments

  • IMG_0220.jpg
    IMG_0220.jpg
    88.7 KB · Views: 32
  • UNADJUSTEDNONRAW_thumb_75.jpg
    UNADJUSTEDNONRAW_thumb_75.jpg
    120.6 KB · Views: 34
  • UNADJUSTEDNONRAW_thumb_6d.jpg
    UNADJUSTEDNONRAW_thumb_6d.jpg
    172.1 KB · Views: 32
  • UNADJUSTEDNONRAW_thumb_71.jpg
    UNADJUSTEDNONRAW_thumb_71.jpg
    94.4 KB · Views: 29
Last edited:
We see these stainless and bronze shaft tubes a lot on Canadian fishing boats (our shop is in Maine). As others have mentioned, the preferred remedy is to replace it with a custom fiberglass shaft tube fitted with cutless bearings (water bearings). We'll then "barb" the forward end of the shaft tube to ensure a good seal around the hose that connects the self aligning stuffing box.

Untitled-design-58.png


If you need help give "mike" a call at 207-422-6532.
 
Hi Mike66 - I recently purchased a 1976 CHB34 with a very similar problem. At this time I don't know if the leak is through the wall of the stern tube (which I am guessing is stainless) or water seeping in around the outside of the stern tube.

Please let the forum know what you find as this may be of great help to me and others.

I like your idea of pressure testing the stern tube but I have an idea to do a similar diagnostic check with the boat still in the water. To do this check I intend to inject air into the forward end of the stern tube and push down the level of seawater in the tube. With your setup you could do this much more easily than I can by just injecting air into that small hose on the dripless packing. I intend to do this while at the dock and the idea is that, if the stern tube contains air rather than water, the leak into the bilge will become air and seawater will cease to accumulate in the bilge. This would confirm a leak through the wall of the stern tube. As regards how to inject air, I am thinking of an aquarium pump or something similar as I think the injection would have to be continuous for a day or two to give a reliable indication.
Beyond that, with the boat on the hard and the shaft pulled I am thinking of an internal borescope inspection.

I wonder if the Captain Tolley's leak fixer fluid would be able to fix these king of seepage leaks.

On the subject of how to remove your shaft from the coupling it may be held by a taper bushing which you loosen using jacking screws. Here is a link showing one.

Nick
 
My boat had copper stern tube extensions from the factory. I wanted to replace them and found that pre-made fiberglass stern tubes are available from Centek (they make a wide variety of fiberglass exhaust components as well). I purchased mine at fisheries supply. You can get the heavy duty fiberglass stern tubes in a variety of sizes, so if you find you need to replace portions or all of the stern tube, you might find the Centek product to be a good fit.

https://www.fisheriessupply.com/centek-shaft-log-rudder-post-housing
 
Wow, two great replies.Thanks, we'll keep each other informed. Good luck.
 
Mike - have you progressed any or are you shovelling snow?

I am slowly getting ready to test my stern tube (see earlier post). I have 3D printed a pair of clamshell pieces to fix across the shaft and stuffing box with some sealant and a couple of hose clamps. This is my 1st attempt to attach photos, so hopefully you can see something in this post. I will drill the stubs and attach a hose to inject the air.

I must say, 3D printing is great! Nice, too, to have draftsmen colleagues and to get some time on the company printer.

I have also found that you can buy really thin wall FG tube from - get this - DIY rocket suppliers. It looks like an interesting option but the seal at the aft end where it meets the cutlass housing at the back of the keel could be a bit tricky.

Nick
 

Attachments

  • IMG_3820.jpg
    IMG_3820.jpg
    59.5 KB · Views: 19
  • IMG_3821.jpg
    IMG_3821.jpg
    55.9 KB · Views: 20
Not shoveling, just escaping altogether in FL. Won't be attacking until May. That looks like just the way to go! Same fitting fore and aft? I've been thinking about how to clean out the inside of the tube prior to inserting a new one. Maybe a metal tube of some sort with a just fit OD to run in and out a few times. Don't want to damage a thin glass tube.
Keep up the good work!
 
And I am in Brazil for the winter!

Several possibilities come to mind for cleaning the inside of the old tube:
- rotary wire brush on a drill with a long extension?
- one of those "glaze breaker" things with lots of little balls on springs as used for engine cylinders?
- a flap wheel on a long extension?
 
Not shoveling, just escaping altogether in FL. Won't be attacking until May. That looks like just the way to go! Same fitting fore and aft? I've been thinking about how to clean out the inside of the tube prior to inserting a new one. Maybe a metal tube of some sort with a just fit OD to run in and out a few times. Don't want to damage a thin glass tube.
Keep up the good work!

I would be worried that the metal tube might damage the stern tube. What about getting a metal bottle brush, or similar, and pulling it through the stern tube several times.
 
Could do that. I was thinking of leaving in the propshaft. Maybe an underside pipe with sandpaper glued around at one end.
 
Oops, undersized. Been thinking, there was a weep of water coming from the area of the rear cutlass when the boat was hauled. Since that aft hull was full of water right up to the top, it should have run out of a stern tube hole until the water reached the level of the hole.
Must be a very small leak, although under pressure it could be enough to kick off my bilge pump 2-3 times a day. Maybe this year I'll put a pump in the aft hull and just see how it goes or if I can determine where the leak is.
 
I can't imagine replacing a leaking metal stern tube with anything other than a thick-wall fiberglass version. Somebody needs to invent a method of tunnel boring around old metal tubes leaving a hole in which to insert the new tube.
 
Back
Top Bottom