Cummins 6BTA 5.9 M3 Service Maintenance Schedule

The friendliest place on the web for anyone who enjoys boating.
If you have answers, please help by responding to the unanswered posts.
Joined
Sep 9, 2020
Messages
19
Location
US
Vessel Name
Galene
Vessel Make
2003 Mainship Pilot 30 II (hull#112) since Nov.2020
I am in the process of purchasing a Legacy 34 with a 370HP Cummins 6BTA5.9M3 turbocharged engine with 2400 hrs. Survey set up in 2 weeks. I’ve found information on SB Marine but could not locate a operation and maintenance manual or a schedule of recommended maintenance service schedule that I can download. I’ve searched on TF and while I find threads on specific components service could not find any references to where to download an O&M manual.

I expect that a 2000 hour service would possibly recommend some major component service such as after cooler, injectors, etc. and I want to ask the owner for records of what service was performed and by whom.

Hope someone can guide me in the right direction.
Thanks,
Rob
 
This is for a 330. I expect it is close: Screenshot_20201103-131400_Firefox.jpeg
 
One of the big issues is the aftercooler. It requires regular service using the SB Marine protocol!!! I have a Cummins 330 6BTA and utilize Tony Athens website for info. Good engine with a few items to "look after". A friend has over 10,000 hours on his engine (same as mine). PM me, if you want to discuss in more detail giving an email address if you wish.
 
You should be able to find help at

https://www.cummins.com/customer-assistance


You'll need the engine number for any interaction with Cummins. The engine number will be on the gear case, probably near the seawater pump. Take a picture or record it and keep it on your phone, etc. for easy access.


I'll 2nd the SBMAR recommendation, they are excellent with any thing marine Cummins. I once called them from the Bahamas for tech advice, they were very helpful. I had purchased some products from them previously, so they had my info on file, I'm sure the fact that I was a customer did help, so don't hesitate to purchase from them, great source.


Keep up with the service, and keep accurate & complete records.
 
At 2400hrs I'd expect the aftercooler, gear cooler and coolant heat exchanger to have serviced at least a couple of times. If records don't show this being done, do it first thing.

If the aftercooler has not been serviced, there is a fair chance that core will be stuck and whole unit may need replacement.

My personal boat has a 450C which has a very similar aftercooler. I service it about every five years and it is in good shape when taken apart. I don't see the need to do it ever 2-3yrs.

Set valve lash too. New belt. While coolers are off for cleaning, go back with new hoses and replace any clamps with rust.

First thing is see what maintenance was done over the years. Go from there.
 
You should be able to find help at

https://www.cummins.com/customer-assistance


You'll need the engine number for any interaction with Cummins. The engine number will be on the gear case, probably near the seawater pump. Take a picture or record it and keep it on your phone, etc. for easy access.


I'll 2nd the SBMAR recommendation, they are excellent with any thing marine Cummins. I once called them from the Bahamas for tech advice, they were very helpful. I had purchased some products from them previously, so they had my info on file, I'm sure the fact that I was a customer did help, so don't hesitate to purchase from them, great source.


Keep up with the service, and keep accurate & complete records.

Thanks Steve for the 2nd on Tom’s recommendation. I’ve joined SBMAR and found the many detailed tips and service instructions posted there already. Will purchase the engine O&M Manual download. I am anal about keeping service and maintenance records, receipts etc. and will be diligent with this boat as it is the mechanically and electronically capable of any that I’ve owned. I’m really pumped though and especially glad to have this forum to learn from.
Cheers,
Rob
 
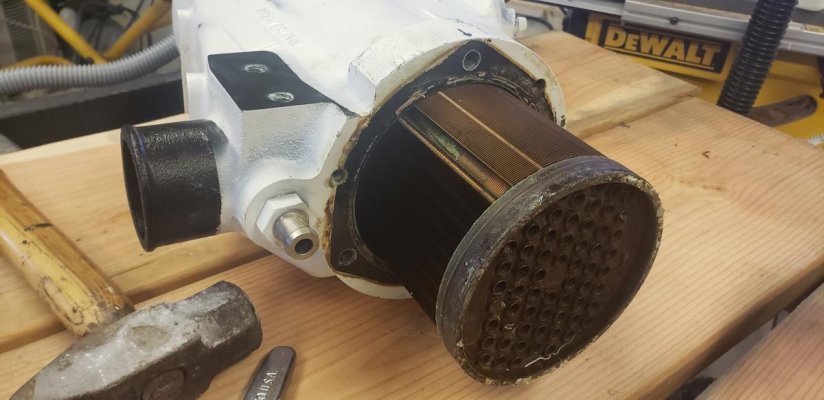
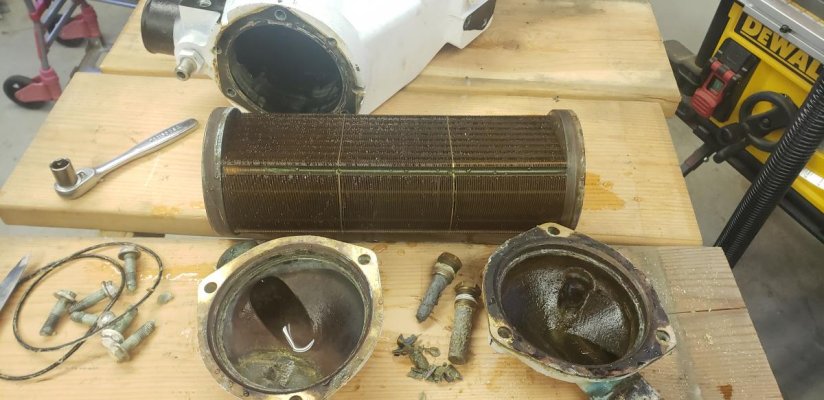
The aftercooler is not difficult
Take off the end caps
Press out the core
Clean , Alco grease, o rings
Assemble
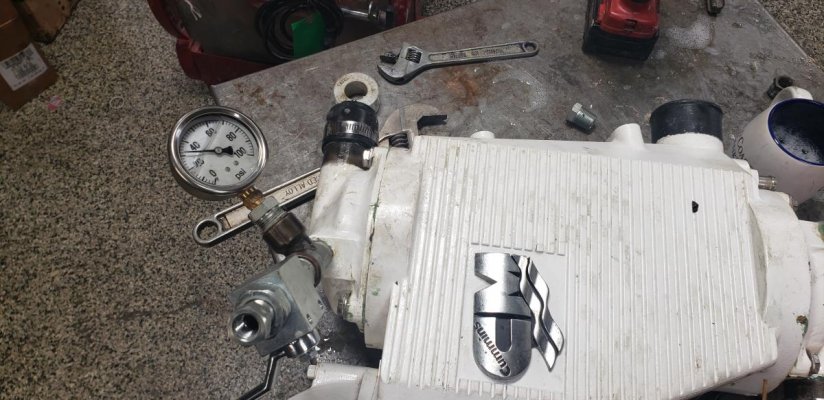
And definitely pressure test. To 30 psi
A723C78C-C79B-4A83-868F-6CC8EE215240.jpg

BB81BB30-7E0D-4BEB-B36C-034FE54FCD63.jpg

B2284B56-C30E-48B5-AAD6-8715AF856647.jpg
 
Arc, do you have a parts list for the fittings you put together for the pressure test? Thank you for the pics and info.
 
People make elaborate stands with rods and plates to test the core. Then they put the unit together and never test the assembly.
I put the complete unit together the cap off the water in/out fittings. You can actually do it by running a hose from top to bottom but it is better to cap the ends.
Then just take 1/2” npt fitting with T and a ball valve . It goes right into the zinc plug. Now just pressure is it to 30psi and close the valve. 30min. Test is fine.

The first time you are removing the core don’t be surprised if you need to put it on a press. Some hammer them out with a block of wood. I would probably miss and damage the cooler so I always press it out. If you do everything right it will slide right out next time
 
I block off the water inlet and outlet with a short section of rubber radiator hose and plug it with some sort of PVC fitting clamped in. Then a garden hose attachment to the 1/2" NPT zinc port. My shop water pressure is about 40psi so I use that directly. Just leave the water on for an hour or so, and if no water shows up on the air side, it has passed the test.

The orings seal on three surfaces: Bottom of Al housing, OD of core, and bevel in bronze end caps. Those surfaces need to be clean clean clean. Bottom of Al housing tends to get rough with corrosion, that can easily be fly cut smooth on a vertical mill. Can take off like 0.020" with no effect on fit-up.

Once the PVC plug clamp was a bit loose and it popped out with some force (air trapped in AC) and put a dent in my car door.
 
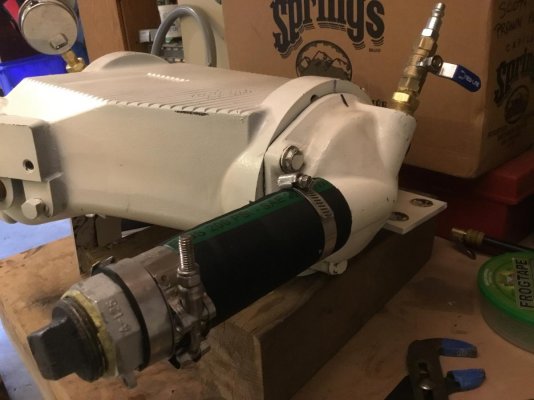
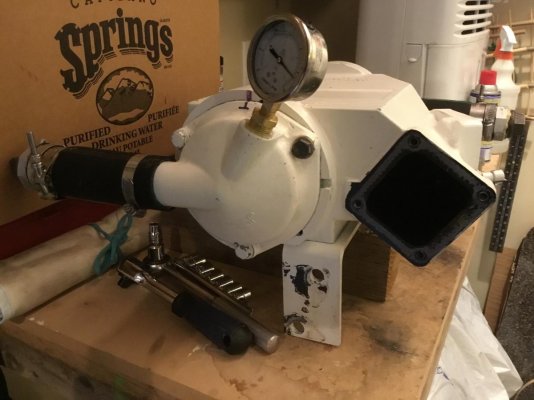
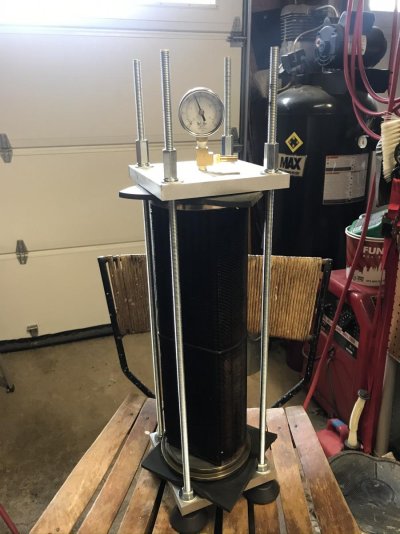
Like Ski, I test my aftercooler in a similar but different manner. I block off the water inlets, and use a pressure gauge in one anode port, and an air connection with shutoff in the other. Pressurize with air to about 25 pounds and leave it sit for a few hours. Same issue, one time the end plug cap came off (flying). If the aftercooler passes this test, the core is good as well. If it does not hold pressure, then you have to find the leak, which could be the core. When first devising my test setup, I ended up using a garbage can full of water to find the leak. It was in my test setup, which is now resolved (at least for now).
I have included a couple of photos of my test setup that I picked up parts for from the local hose supply company. Also, I included a photo of a "core test" setup that may be needed if you suspect a core leak. Tony Athens suggests conducting a core test first, then a fully assembled test, I guess to save having to completely disassemble the unit should it fail the fully assembled test. I totally agree that the most important test is the fully assembled one, as that is what will assure that you are not allowing a leakage of saltwater into the engine air intake.
If you grease up the assembly following Tony Athen's (and Ski's) instructions available with photos and video on his website (sbmar.com), the next time you take it apart for cleaning, the core should just slide out. If your unit was not greased, be careful not to damage the core trying to remove it.
 

Attachments

  • Aftercooler test kit.jpg
    Aftercooler test kit.jpg
    92 KB · Views: 12
  • Aftercooler test kit 2.jpg
    Aftercooler test kit 2.jpg
    102.3 KB · Views: 13
  • AC-Core-Pressure-Tester-1.jpg
    AC-Core-Pressure-Tester-1.jpg
    130.4 KB · Views: 15
Don't forget to check or change the coolant including the filter and verify the proper SCA level.
 

Latest posts

Back
Top Bottom