Replacing the holding tank

The friendliest place on the web for anyone who enjoys boating.
If you have answers, please help by responding to the unanswered posts.

oak_box

Veteran Member
Joined
Feb 4, 2017
Messages
91
Location
USA
Peggie - I'll be curious to hear what you have to say about this!
If you want - skip to the end. Executive summary of the question: Can I fabricate my own holding tank from plywood covered in fiberglass and epoxy?

I posted a previous thread "Are two (marine) heads better than one?"

In the process of investigating my 1980 Chris Craft Commander 410, I discovered that my holding tank was hidden under the plywood floor of the engine room, under the main salon.

In terms of location - this is VERY good - pretty much dead center of the lowest part of the bilge.

The original tank is metal, and I have discovered has holes rusted completely through it. The boat hasn't been actively used in years - so it appears all is dry - as there is no stinky smell in the boat!!

The tank needs to be replaced. It will be a pain in the tail to get the old tank out, but can be done.

Now I need to figure out what to replace it with.

I can only see the aft end of the tank, and the fittings are in the forward end, so below are reasonable guesses:

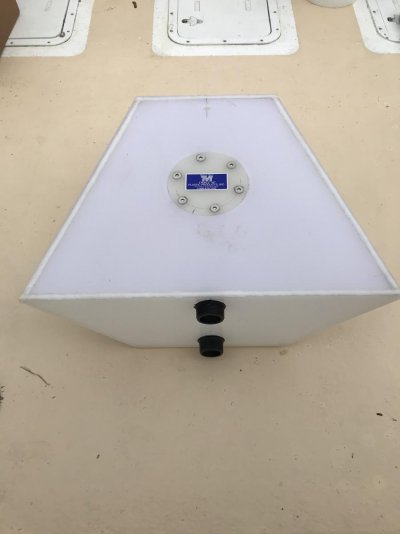
The tank is rated to be 75 Gallons. It appears to be 50-55" long. The end of the tank looks like an "upside down house" - basically a rectangle 25" wide
and 11" tall. From the bottom edge, the tank extends down in an isosceles triangle another 4 inches. The triangle portion sits on the bottom angled surface of the bilge. The main vertical sides of the tank snuggle between two fiberglassed ribs(?) that run longitudinally down the bilge.

I looked at Ronco Plastics. The closest tank they had that would immediately fit would only fit the square area of the original tank site, and would only hold about 40 gallons.

So... two other options:

1) Can I get a custom plastic tank fabricated for a reasonable price (under $1000?)? Given the time it would take - I'd be VERY surprised - though someone like Ronco may have molds that are "adjustable" and allow custom configurations?

2) I've built small boats before. Can I make my own tank??? The geometry isn't that hard. I could assemble the shape in plywood, and then coat it in fiberglass and epoxy, and add epoxy tape no the edges for re-enforcing. The shape of the bottom of the boat, and the two bulkhead / stringers on the side should take most of the stress.

I'm assuming a good layer of fiberglass and plenty of epoxy should do the trick, right???

Will epoxy work ok for a holding tank? Am I missing anything?

Thank!
John
 
I would not do it. Do you really want to experiment with a holding tank? How much fiberglass work have you done? The plywood would be a weak spot in the tank if it gets wet and starts to rot. If it starts leaking you will wish that you had not done it. I would put in the largest tank that will fit from Ronco. If necessary then have a tank for each head and you will probably have shorter runs to the tanks. It will require 2 deck fittings and 2 pump outs each time but that would be better than a leaking tank.
 
I wouldn't even consider making a poop tank out of plywood. If I were going to build one it would be with coosa board (doesn't rot and is closed cell). I would price the custom Ronco tank and be willing to go well above $1K. Buying the materials would not be cheap to build one and while your labor may be free, you're probably working for less than minimum wage with all costs factored in.

Ted
 
Pics? If you have acceptable access, and your bilge under the tank is accessible, might you be able to convert the entire space into an integral tank? by that I mean, if there are limber holes in the bulkheads front and back to allow for a "free flow" of bilge water from front to back, consider installing a pvc pipe from front to rear limber holes, and fiber glassing in place. Then fabricate a "lid" using either coosa board or fiberglass sheet complete with fittings. Personally I would avoid plywood. Then, with fiberglass, tab it into the surrounding hull. You will end up with a fully enclosed fiberglass holding tank, using the existing bottom of the boat for part of the tank. I would also lay a thin matt of roving on the inside of all the other "interior" parts of the new tank to ensure you don't have any permeable service on the inside of the new tank. Will be somewhat larger in capacity than the original tank, and if done properly should last as long as the boat does. JMHO
 
Last edited:
Thanks guys for the sounding board.

OK, you have an excellent point - Plywood as the "form" for a poop tank may not be the best idea. I'm not familiar with "coosa", but will peek into it a little better. The point of the plywood was to have something that was cheap and easy to work with that could provide the "form" of the tank. The fiberglass and epoxy would be doing the real work. One option would be to build up enough layers of fiberglass to be able to remove the plywood once the fiberglass had sufficient strength. But that would probably not be cost effective. Coosa or some other synthetic board might be a more reasonable approach. But still much more expensive than a pre-made tank.

Building the tank "in place" as part of the hull is an interesting idea - but I'd be very reluctant to do that for a poop tank. I feel like I'd really want a way to get the darn thing out of there if I wanted / needed too in the future. While entirely practical, and while I think I've heard of (not necessarily holding) tanks fiberglassed into the hull before, there's just something about having raw sewage in contact with the hull of the boat that doesn't feel good.

Of course, this will all have to wait till I get the engines running well enough that I can stop working on them and pull the plywood floor out of the engine room so that I can get to the holding tank.

I love the position of the current tank. I *hate* that it is so shallow. For purposes of monitoring, I'd really like the bulk of the tank to be more than a foot tall.

I may still have an option of going with a tank mounted on the floor of the engine room. It could be boxier, and easier to get to. But the heads are both at about that level - so the heads would have to pump the waste UP hill and then dump it into the tank. The fear of back-flow into the tank makes me really nervous about doing that. Just how well do backflow preventer valves work, and is there a REALLY good one that would work for toilet waste???
 
Seems to me once you get the old tank out the hard part is done. Order a custom tank with the same dimensions and fitting locations and have no worries afterward.
 
I just installed a new holding tank at a cost of well under $1000. Although it wasn't custom made, I managed to find one of the several hundred standard designs a local tank company offered suited my needs perfectly.

Have a look around before building from scratch.
 
I wouldn't use the hull or structural members to build a custom tank either. Any flex and it could crack.

How about making fiberglass panels up and then epoxy and glass them together ? Maybe you can buy panels already made, cut to the size needed, and epoxy together.

Or use wood for a form with the inside the size you need. Line it with plastic sheeting in side so the epoxy will release. Build the bottom and sides up and make a top seperate. Pop it out of the form for final assembly.

Still I would go with a plastic tank.
 
Boy, after reading this thread, I have to say I'm glad our boat has the configuration it does, at least as to this discussion. I've complained a lot about engine access on our model, especially between the hull and the outboard sides of the engines, but the holding tank is the most easily accessible of all. Open the big floor hatch and the large, plastic, simple rectangular holding tank lifts straight up and out -- access couldn't be any easier, when that day comes.
 
If the toilet were located above the tank , fairly close, you might consider an RV head.

They use gravity to drop the waste and frequently will use 1/10 1/20 the water a marine head would.

You would have to modify the tank to accept a 2 1/2 or 3 inch flush hose.

With a gravity flush there are no pumps to power or fix , every few years the rebuild ball is $20 or $30 .

Plastic or China Hi or Low all are OTS., and not marine priced.
 
Or go with compost toilets that don't use tanks at all. No hoses, through hulls or pumps outs, waste gets tossed with the regular trash every two or three weeks. Getting more common now on sailboats, and most that have them say they'd never go back. Haven't converted my trawler yet, but it's on the list for this winter.
 
"Dead center in the lowest part of the bilge" may not be the best location for a holding tank. It depends on the distance from both toilets, how convoluted--or not--the plumbing runs have to be, and can make venting to keep it aerobic difficult if not impossible without aeration. So depending on the locations of the toilets, there may be a better location. Even if there isn't, there's no reason why the fittings have to be in the same locations that they are on the existing tank.

Why does it have to be 75 gallons? A full tank weighs 625 lbs plus the weight of the tank. That can have a major impact on fuel consumption/cost. I'd give strong consideration to reducing the size to 50 gallons, 200 lb reduction in weight.

As for removing the existing tank...a Sawzall will make that job a lot easier! But keep in mind that getting a new tank INTO that location will be just as much of a PITA--if not more of one--than getting the old one out in one piece. Another reason to consider a smaller tank: easier to install. It can still be the same shape, just shorter.

However, to answer your question...Get a quote from Triple M Plastics Triple M Plastic Products Inc They make TOP quality welded tanks, using PP instead of PE because it's a better choice for custom welded shapes. As for fittings locations, you'll specify those.

--Peggie
 
Triple M Plastics

I just took delivery of a custom holding tank from Triple M Plastics. The materials and workmanship are unparalleled. Larry, the owner, pioneered a process to weld PP and knows how to do it perfectly.
 

Attachments

  • E360A32E-05CF-4AEE-B9E0-BC11D1A46135.jpg
    E360A32E-05CF-4AEE-B9E0-BC11D1A46135.jpg
    50.1 KB · Views: 41
  • EDC75D51-12A2-40BD-95BF-58C7F9067D1E.jpg
    EDC75D51-12A2-40BD-95BF-58C7F9067D1E.jpg
    39.1 KB · Views: 37
  • 71E05C7D-986F-457B-B0BB-E4EF42C0D12B.jpg
    71E05C7D-986F-457B-B0BB-E4EF42C0D12B.jpg
    60.4 KB · Views: 37
"Dead center in the lowest part of the bilge" may not be the best location for a holding tank. It depends on the distance from both toilets, how convoluted--or not--the plumbing runs have to be, and can make venting to keep it aerobic difficult if not impossible without aeration. So depending on the locations of the toilets, there may be a better location. Even if there isn't, there's no reason why the fittings have to be in the same locations that they are on the existing tank.

Why does it have to be 75 gallons? A full tank weighs 625 lbs plus the weight of the tank. That can have a major impact on fuel consumption/cost. I'd give strong consideration to reducing the size to 50 gallons, 200 lb reduction in weight.

As for removing the existing tank...a Sawzall will make that job a lot easier! But keep in mind that getting a new tank INTO that location will be just as much of a PITA--if not more of one--than getting the old one out in one piece. Another reason to consider a smaller tank: easier to install. It can still be the same shape, just shorter.

However, to answer your question...Get a quote from Triple M Plastics Triple M Plastic Products Inc They make TOP quality welded tanks, using PP instead of PE because it's a better choice for custom welded shapes. As for fittings locations, you'll specify those.

--Peggie

Peggie I don't mean to hijack the post but I am looking for a good stick on sender for my plastic aft holding tank. My old tank was removed by the last owner and the empty/full display has been disconnected. I'm looking to have more information about tank contents. Can you make a recommendation?
 
Two responses...

1) On my Regal, I've been using the Garnet SeeLevel II tank monitor ( https://www.amazon.com/LEVEL-709P31...ords=garnet+seelevel+ii&qid=1613970873&sr=8-7 ), about $280.
The tank monitor comes with 3 self-adhesive strips that you apply to the side of a plastic tank. In my case, I have one strip on the water tank, one on the holding tank, and a 3rd spare. I've been using it for over a year, and it's working great! It is designed for RV's, so it looks a little funny having a "grey water tank" button when there is no grey tank on my boat - but it works well enough, and is a LOT cheaper than many of the other monitors I saw.

2) PEGGY >> Thank you for your response! On the Chris Craft that I'm restoring - dead center of the bilge is the best place in this case because it's about the only place to put a tank that would be lower than the toilets. I could put a tank on the starboard side (both toilets are on the starboard side) - but then might have a balance issue. More importantly - I'd have to pump waste uphill - which just doesn't seem like a good thing to do! I think I've asked about the Marine Elegance head - and that it supposedly will pump up hill - but this sounds like an opportunity for a HUGE mess, if I can avoid it.

About size... I *think* the tank on my 40' Regal may be about 70 gallons - and it seems to fill up much faster than I would like it to. I could fit an off the shelf tank easier, but that might limit me to 40 gallons - which would seem like it might fill up very quickly based on past usage with a vacuflush head.

Not sure what the Marine Elegance would do in terms of number of flushes per gallon.
 
Glad you're happy with the Garnet SeaLevel. Amazon doesn't seem to carry SCAD, but Defender does:SCAD TM2 Tank Monitor for Two Tanks

Pumping waste uphill isn't a problem, nor is an "opportunity for a huge mess." Every boat with a below-waterline toilet that discharges directly overboard has to pump bowl contents up and over a vented loop in the discharge line, and it isn't uncommon to have a loop--not necessarily vented, just a loop--immediately after the toilet that's slightly above the top of the tank to eliminate a long uphill run to tank that has an inlet fitting that's higher than the toilet discharge or one that's to far from the toilet to get there without some help from gravity.

Distance from the toilet to the tank is also an important factor. The high end all china toilets--Marine Elegance, Tecma, HeadHunter--have pumps powerful enough to push bowl contents at least 30' without any help from gravity, so a single tank to serve two toilets can work well without any help from gravity. But manual and the more basic electric macerating toilet pumps can only move bowl contents about 6' in the amount of time anyone wants to spend pumping or leave their finger on the typical flush button, making a single tank that's further than 6' from one of the toilets (which is common in OEM installations) all but unworkable because flushes from the furthest toilet are inevitably left sitting in the discharge line.

As for "what the Marine Elegance would do in terms of number of flushes per gallon"...that can easily be controlled by the user if the toilet has a flush "button" that provides multiple options--either the 3 option Momentary Control or the 4 option Smart Flush Panel.

All of the above notwithstanding, my main concern about a tank buried dead center in the bottom of the bilge are hose runs...the pumpout line to the side deck and the difficulty in venting it to maintain it aerobically (essential to odor prevention) without mechanical intervention..i.e. aeration. The vent fitting on the tank needs to be at least 1" (even 1.5" wouldn't be cosmetically offensive) and on the top of the tank (as should all the other fittings be too).

We can discuss all of this in more detail than is practical in a discussion forum if you'd like to do that.

--Peggie
 
I'm going to add this even though the track is otherwise.

I'm not sure I would do it again. It was not cheap either. I did not track the cost but I think $1,000 20 yrs ago doing my own work. Maybe 40-50 hrs overall.

AND if you do your own get a good respirator for chemicals. Dust masks WILL NOT CUT IT or you very likely will make your self sick. Excellent ventilation is also needed.

I would not use wood at all except as I did, for the form , which then got the boot.

If you do build your own then think really hard about HOW. I spent a lot of time doing that and had all the parts and pieces decided upon and the basics of how to deal with the form. Of course there were a few very minor changes as I went.

Before deciding which tank you want figure out what you want before even worrying about the details such as material. Shape, inlets and outlets.
Don't forget about access to the various parts, fitting, hoses.
Once done then start asking for prices.

There are many good suggestions here and if you can find a good local fabricator or adapt a ready made tank that may be a better way to go.
 

Attachments

  • I built my own holding tank.doc
    29 KB · Views: 12
Last edited:

Latest posts

Back
Top Bottom