Frameless rear wooden hatch repair - lexan?

The friendliest place on the web for anyone who enjoys boating.
If you have answers, please help by responding to the unanswered posts.

socalrider

Guru
Joined
Feb 14, 2020
Messages
1,008
Location
usa
Vessel Name
SEA WOLF
Vessel Make
1979 CHB 41 Trawler
All,

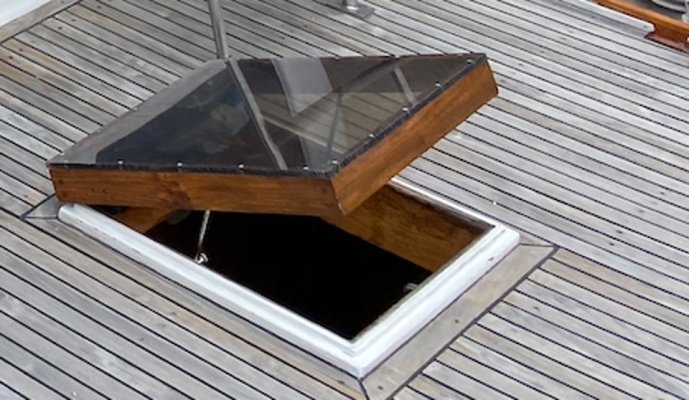
The previous owners of my '79 CHB seem to have replaced the Lexan or Plexiglas covering on my rear wood-frame hatch - from the pic below (taken at survey) you can probably make out that it is secured with countersunk screws - a big no-no from what I understand.

Sure enough, in the past few months, the hatch has started cracking badly from the screw holes, so I'm planning on replacing properly before it starts raining here. You can see there's no frame holding the material to the hatch, just the screws. It's probably 5/8" thick and tinted.

Advice appreciated! One idea is to overbore the screw holes in the Lexan (or other material), fashion a frame from wood, countersink screws into the frame to better distribute the pressure. I have butyl tape to make the seal.
 

Attachments

  • Picture1.jpg
    Picture1.jpg
    154 KB · Views: 49
It's not really the screw holes that are the problem it's the countersink to accept the flathead that stresses the plastic. Really it's the goo that seals and attaches the lid not the fasteners, the fasteners shouldn't be tight. Easiest would be to drill and flatbottom counterbore so that you could use a round head fastener and they'd still be flush with the top.
 
It's not really the screw holes that are the problem it's the countersink to accept the flathead that stresses the plastic. Really it's the goo that seals and attaches the lid not the fasteners, the fasteners shouldn't be tight. Easiest would be to drill and flatbottom counterbore so that you could use a round head fastener and they'd still be flush with the top.

Thanks! Would it be better to not counterbore at all and just use a roundhead fastener to avoid the water pool? Obviously it wouldn’t be flush but I think that’s ok.
 
Maybe use pan head screws and drill the holes in the Lexan a bit oversize so there is room for the plastic to expand and contract. The wood and plastic won’t expand and contract at the same rate so having a bit of room for movement may help keep the plastic from cracking. The butyl will easily move with the expansion and contraction and still seal.
 
If you use a more aggressive glue that is still flexible, like teak deck sealer, you would only need a couple of screws to locate it while it dries. That's what I did with my hatch but because its an aluminum frame, I used no fasteners.
 
Best practice with butyl is to counter sink the hole in the frame for better seal..
I wonder if it wouldn't be a good idea to also counter sink the plastic and then use pan head screws. My thought is use butyl around the screw just under the head. It will then be forced into the counter sink and around the screw shank for a better seal of the screw. The other way to accomplish the same thing might be to counter sink the bottom side of the plastic as well as the frame so the butyl is forced up and down around the screw.
The breakage problem with plastic is the force of using a tapered flat head screw.
 
Thanks all! Any advice on the type of plastic I should use?
 
Best practice with butyl is to counter sink the hole in the frame for better seal..
I wonder if it wouldn't be a good idea to also counter sink the plastic and then use pan head screws. My thought is use butyl around the screw just under the head. It will then be forced into the counter sink and around the screw shank for a better seal of the screw. The other way to accomplish the same thing might be to counter sink the bottom side of the plastic as well as the frame so the butyl is forced up and down around the screw.
The breakage problem with plastic is the force of using a tapered flat head screw.

I countersink any hole that gets a sealer on it so it makes an O ring of the sealer, good idea here.
 
Some good suggestions here. I'd use clear instead of tinted. As this material cracks easily, go thicker, it's more money but stronger. I think the idea of countersinking the wood frame under the lean, to hold more adhesive is a great suggestion. Each corner and a couple in between each corner. The butyl should hold well without any screws as long as the wooden frame is sturdy and doesn't flex. Block the corners if need be. Just weight it down for 24 hours or as directed on tube.
 
When I use butyl, I tighten it up over 3 days. First day bring it snug with a bit of tension. Then the next 2 days tighten it a bit more. It takes time for the butyl to squeeze out. If it is cold then it will take even more time. You don’t want to squeeze it all out anyway. If you try to tighten it all at once you can either strip out the threads or crack the plastic.
 
Socal, take a look at the "rounded head screw" tab in McMaster-Carr. There are a couple washer head screws there that would distribute the load on the plastic better than button heads.
 
This is great. I just put in an order for the 1/2” polycarbonate, which will be ready tomorrow.

The idea of using no screws At all is certainly attractive. I might give that a shot first as I can always add screws later if the deal breaks. I’ll also check the frame for stiffness.
 
This is great. I just put in an order for the 1/2” polycarbonate, which will be ready tomorrow.

The idea of using no screws At all is certainly attractive. I might give that a shot first as I can always add screws later if the deal breaks. I’ll also check the frame for stiffness.
You can add screws later but miss the chance to bevel hole in frame and bottom of plastic to enhance seal.
Butyl doesn't work all that well where you can't apply some force to squeeze it.
If going w/o s rews I'd look towards an adhesive vs a sealant.
 
You can add screws later but miss the chance to bevel hole in frame and bottom of plastic to enhance seal.
Butyl doesn't work all that well where you can't apply some force to squeeze it.
If going w/o s rews I'd look towards an adhesive vs a sealant.

It's easy to remove butyl tape, so I can always re-engineer later. I can apply force by opening the hatch and clamping (carefully, probably with some thicker wood to spread the force on the polycarb) to the underside of the wood frame. It does feel weird doing it that way without a proper adhesive though. Will have a think on it and take a good look once I have the new piece on hand and can remove the old to examine the sealing surface.
 
I am not sure if you are talking about using butyl without any screws, but if that is what you are thinking, I would not do that. Butyl can creep in hotter weather and would need screws to hold the plexi in place.
 
Some good suggestions here. I'd use clear instead of tinted. As this material cracks easily, go thicker, it's more money but stronger. I think the idea of countersinking the wood frame under the lean, to hold more adhesive is a great suggestion. Each corner and a couple in between each corner. The butyl should hold well without any screws as long as the wooden frame is sturdy and doesn't flex. Block the corners if need be. Just weight it down for 24 hours or as directed on tube.

The 1/2" is ample and sturdy. Some wood clamps or similar around the hatch edges will work better than weighting down the the Lexan. I believe that you can find some inexpensive ones to do the job as you won't need tremendous pressure to get a good seal. I imagine there are some combination adhesive/sealants that would give you the proper combination of both properties. Or use a sealant on the outside edges after the adhesive has cured. It depends on how detailed you like to be.
 
Last edited:
I just did mine and used 3/8 Plexi non tinted. I over sized the holes, counter sunk the heads and used 1/2 round. I have screws every 4" with the corners pulled back 2 inch from the edge of corner (this is where it cracked before with the 1/4 inch plexi). I then used butyl tape that was 1/4 thick. The screws are just snug, not tight. No leaks so far and its raining cats and dogs right now.
 
My slightly tinted 1/2" had surface crazing, but none of it looked structural. I took it home and sand blasted both sides. Now I can't see the crazing and years of scratches and it lets in just as much light diffused without creating a "hot spot" when the sun is overhead.

I also had a little weeping somewhere from rain or deck spray. I used Dr. Tolley's Creeping Crack Cure and that fixed it. The stuff is hard to apply directly from the bottle, so I bought some craft syringes to use as applicators.

I only needed one syringe, as you can rinse it out and use it again. Applying directly from the bottle always was too much. Even with the syringe it was difficult to get the tiny amount needed to fill where it seeped under the plastic or through the joinery in the wood. Put something down inside to catch any drips!!. One area took an application-a-day for several days. Still easier than pulling the plastic off an resetting. Even more so pulling the coaming off and rebuilding.
 
My slightly tinted 1/2" had surface crazing, but none of it looked structural. I took it home and sand blasted both sides. Now I can't see the crazing and years of scratches and it lets in just as much diffused light without creating a "hot spot" when the sun is overhead.

I also had a little weeping somewhere from rain or deck spray. I used Dr. Tolley's Creeping Crack Cure and that fixed it. The stuff is hard to apply directly from the bottle, so I bought some craft syringes to use as applicators.

I only needed one syringe, as you can rinse it out and use it again. Applying directly from the bottle always was too much. Even with the syringe it was difficult to get the tiny amount needed to fill where it seeped under the plastic or through the joinery in the wood. Put something down inside to catch any drips!!. One area took an application-a-day for several days. Still easier than pulling the plastic off and resetting. Even more so pulling the coaming off and rebuilding.
 
I am not sure if you are talking about using butyl without any screws, but if that is what you are thinking, I would not do that. Butyl can creep in hotter weather and would need screws to hold the plexi in place.

Thanks - that makes total sense.

I have the new plastic in hand and cleaned off the old silicon sealant from the varnished frame with isopropyl. I'm going to look for some appropriate fasteners today; thinking of minimizing the number of holes - maybe just two per side since the purpose is just to keep the plastic located and maybe help clamp down on the butyl initially.
 
I've used very large ss flat washers or Hillman finish washers in many cases where the load needs to be spread out and gentle. Take an hour to gently snug the screws as the adhesive spreads out from the pressure. I agree with your goal of 2 screws per side.
 
Last edited:
I've used very large ss flat washers or Hillman finish washers in many cases where the load needs to be spread out and gentle. Take an hour to gently snug the screws as the adhesive spreads out from the pressure. I agree with your goal of 2 screws per side.

Thanks for the Hillman washer idea - that’s what I ended up using with the existing screws and no counterbore. Looks good! Snugged it up for now, will slowly clamp it down tomorrow and add a butyl “gasket” under each screw. Looks good!
 

Attachments

  • 53D014F8-0A66-4C03-822B-613922E65CBD.jpg
    53D014F8-0A66-4C03-822B-613922E65CBD.jpg
    182.6 KB · Views: 24
The Hillmans create a finished look as well as structural advantage. Very happy to see you got this done so promptly. Looks good!
 

Latest posts

Back
Top Bottom