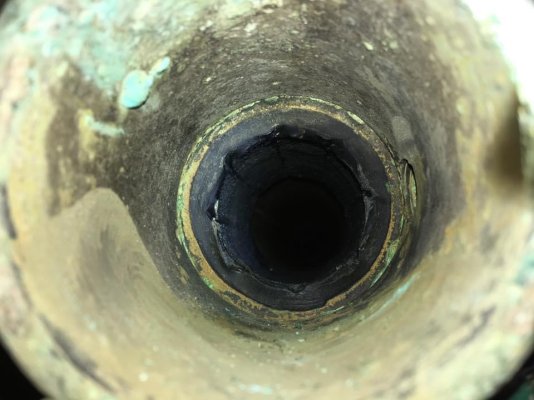
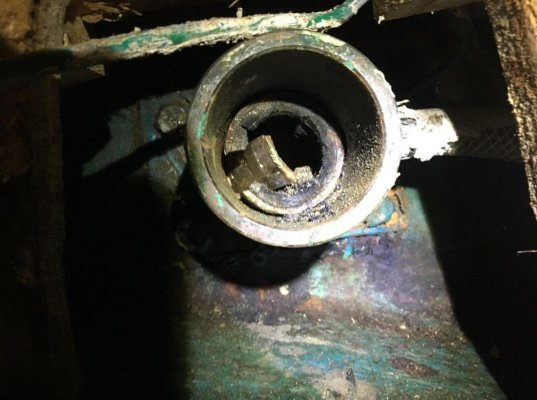
Present 42 (Chung Hwa yard) stern tube cutlass bearing.

The friendliest place on the web for anyone who enjoys boating.
If you have answers, please help by responding to the unanswered posts.

Forkliftt

Guru
Joined
Oct 6, 2007
Messages
2,450
Location
USA
Vessel Name
KnotDoneYet
Vessel Make
1983 42' Present Sundeck
Greetings all. Ive pulled my prop shafts and am having replacements made. I’ve removed the cutlass bearings on the four outer struts.
But if you look through the stern tube you can see the grooves in a cutlass bearing Has anyone replaced one of these? Look an the picture of the hull where the prop shaft exits. It’s as thought the cavity there is covered, so no access. IMG_7778.jpgAdjustments.jpg
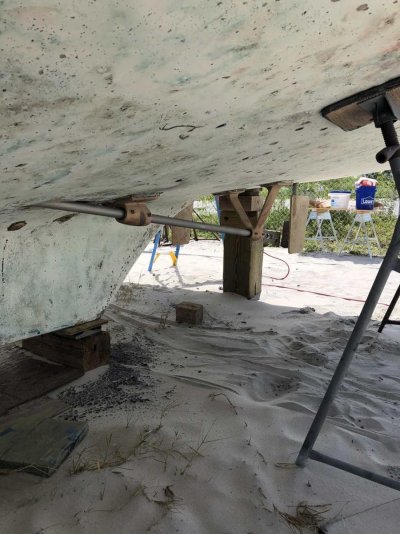
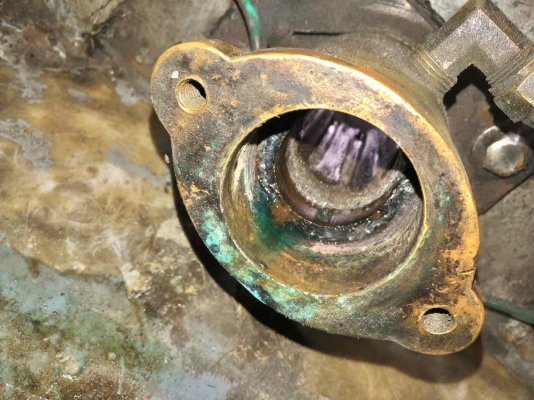
 
Last new one I installed had grooves. It allows the water to lubricate the rubber.

Was there lots of play between the bearing and shaft?

(Mind you, im a firm believer of “while you’re there, you might as well...”
 
Also, it went in, and is bolted in place. The tube should be able to be removed.

(At least judging by the pictures).

You can then have the old one pressed out and new one pressed in. Reinstall with lots of 5200.

Others might have better information.
 
Yes, I’ve done this on our ‘79 Albin. Three cutlass bearings: aft strut, mid-shaft support, and stern tube. After working up my courage and a plan, I used a sawzall to cut out a longitudinal section of the bearing, and then I pulled it out. Scary operation, frankly, but got the old one out and the new one in. I pulled the transmission to make enough room to get in there and maintain control of the saw. IMG_1688.JPGIMG_1689.jpg
 
It pays to look at an image on the laptop where I can zoom in.

Your stern tube and stuffing box arrangement is clearly different than mine. I'm going to guess that you may need to remove the lag bolts that secure the stuffing box to the stringer/floor structure and then unscrew it from the actual stern tube that runs through the hull. With the stuffing box housing/collar out of the way, I suspect you'll see something that looks more like my picture - i.e., you'll see the brass sleeve surrounding the rubber bearing material. Removing those lag bolts and attempting to remove the stuffing box assembly from the stern tube could open up an ugly can of worms, however, so proceed with caution.

I'd get in there with a bright flashlight and determine how things are assembled down there. In the meantime, hopefully someone with a similar setup will chime in and give you better information.

Good luck!
 
Serious question. How worn does it look and is it worth the hassle? These trawler shafts don't spin that fast. With the other new bearings you're probably fine for a long time.
 
Thanks guys for all the input.
Been lots of boat repairs under way on the hard and THEN I ended up sticking the old port shaft in and the repaired prop and got launched to limp back it the local hurricane hole and tie up for the possible double hurricane, 15’ tidal surge storm the boat yard probably wouldn’t have survived in. Course we totally dodged the bullet twice so I just got to get her back out when the winds lay down.

Further/ closer observation (my head down to eye level and a flashlight) and I could see that looking at the stern tube cutlass bearings, both sides looked great. I could also confirm that the inside diameter of the cast tube had a shoulder. And the old bearing would have to come out aft, requiring removal of the whole piece. I geared up with my Fein, a 36” Dewalt crowbar and a large hammer. I removed the lag screws with my 20V impact, and then failed miserably in getting either to housing to budge. This was followed by my “closer observation” and an informed decision now made to leave the sonsofbitches in!
So far:
•Props were reworked in Mobile by southeast props
•2 new 1.75” aqua17 shafts machined locally at Brimmer and Turan. These guys are great. Known for prop shafts.
•Cutlass (Cutless) bearings replaced aft and center.
•Couplings aligned with shafts
•I pulled the Velvet Drive CR2 flanges off, had faces trued up, new output seals, one flange installed and torqued per spec
 
Back
Top Bottom