Fuel lift pump replacement help

The friendliest place on the web for anyone who enjoys boating.
If you have answers, please help by responding to the unanswered posts.

albinalaska

Veteran Member
Joined
Jun 6, 2020
Messages
94
Location
USA
Vessel Name
Sea Gypsy
Vessel Make
1979 Albin Trawler 36'
Good evening/morning/day!

I've just finished a 12-day voyage transiting Alaska's Inside Passage and en-route had the unfortunate issue of my stbd fuel lift pump failing causing us to leak fuel for 4 days making our way from Seattle to Alaska.

The issue is this: I live on a small island and don't have the fortune of a qualified Ford Lehman mechanic to deal with this repair and fix this for me. So I fear I'm quite left to deal with this myself.

I've seen a youtube video of someone replacing the pump which is great but other than (whats the pitfall of most youtube boating channels) showing that the issue merely occurred it provided incredibly little useful or specific information on how to actually do this repair.

So what I'm wondering is this: If anyone has steps or assistance they can provide on what I need to do to replace a Ford Lehman fuel lift pump unit or what I might to do to even reprime the fuel etc. afterwards and if they wouldn't mind sharing that with me that would be amazing.

Repairing this alone in the Alaskan woods,

Kyle
 
Last edited:
Replacing the fuel pump on a Ford Lehman engine is very simple. Bleeding the injection pump is slightly more difficult but that's something anyone that owns a diesel boat should know how to do.

Turn off fuel valve to engine.

Place a container under the pump to catch spilled fuel.

Disconnect the fuel hoses to pump.

Unscrew the two fuel pump mounting bolts. I alternate back and forth between the two bolts to insure pump is coming out straight. (The pump has a spring loaded arm extending in to the block that could cause the pump to become crooked and possibly get stuck as it comes out. Depends on the orientation of the cam that actuate the pump. Some will turn the engine for the pump arm to be on the cams low spot before removing but it's a hassle to locate that exact spot. )

Clean the mating surface on the block.

Install the new pump with a new gasket. Screw in the two bolts alternating back and forth to insure it goes in straight. (You could stick a dowel into the hole where the pumps arm goes in, turn the engine until the dowel goes all the way in, which is the low spot on the cam. Do that before putting the pump in and you will not be working against the pump arm spring so alternating bolts would be unnecessary.)

Tighten bolts to 12 to 15 ft/lbs

Reconnect fuel lines. (Do not use Teflon tape. Use a liquid pipe sealer)

Open fuel valve.

Bleed engine filter and injection pump.

Start engine.

Bleed injectors.

Check for leaks.
 
Last edited:
New pump sells online for 70-100. You could probably find rebuild kits in UK but it probably cost the same. Biggest problem is the lack of room to work on the outboard side of the engine. The actual replacement is simple, 2 hoses and 2 bolts. Prior to putting a wrench to a bolt or hose, clean, clean, and clean again. Use acetone, isopropyl alcohol, or your favorite carb cleaner.

Once you are done with installation, fill the secondary filters. Then bleed them per the manual by pumping the little lever a million times. If the cam lever is in the wrong position nothing will happen but your thumb will get sore. . Bump the engine with the starter or bar it over an inch or so. Once the secondary's are bled, the engine should start. (Be very gentle tightening the bleed screws. The filter housing is Al and the threads strip easily)

Unless you have air locked the injection pump.

In that case, you might get lucky by cracking an injector and trying to start it. If not, then you'll have to bleed the pump. Keep top of pump operating room clean.
Start at the filters. Crack a line open, push the starter. Be patient.

Note: Every time you hit the starter, raw water pump will push water into your muffler. Without exhaust gas to push water out, your muffler will eventually fill up. It will then flow through your exhaust valves into the cylinders and hydrolock your engine. This will not be good.

If you shut the water intake off, and the engine actually starts, your dry impeller will fly into a million pieces. Replacing the outboard impeller is not my idea of fun. Simpler to take off the raw water hose leading to the exhaust elbow and dump the raw water into the bilge. Cram a wood bung into the exhaust elbow or the ER will fill with diesel fumes.

Again, you may get lucky and the engine will start after bleeding the secondaries.
(I do not use any sealant on any fuel lines. They are designed to self seal. Any contamination ending up in the injection pump will be a costly repair. If you are determined to use a sealant, at least keep it off the first several threads.)
 
Last edited:
As syjos said, replacing the pump is fairly easy but bleeding the system is not, primarily because using that bleed lever on the pump is a long and tedious affair. And, of course, one must make certain that the pump arm is positioned correctly on the cam lobe. Otherwise, one can pump all day and get no flow.

But, why bother replacing the mechanical pump? Simply install an electric pump such as a Walbro. A Walbro pump is rated for 18,000 hours. Wire it to an ignition switch source, plumb it, turn on the ignition switch, bleed the system effortedly in just a few minutes, and never again have to struggle with that ridiculous bleeding lever again.

Some folks here may disagree but, hey, just look at the what syjos and sowhat advised as to how to do the job. They were both absolutely correct on the process but what a pain! I eliminated the mechanical pump years ago.

But, I have a question for you. You mentioned that your pump leaked for four cruising days. From where was the pump leaking? I am no expert on mechanical pumps but my understanding is that, when they fail, the diaphragm fractures. When that happens, fuel is pumped into the oil sump. If you think that any fuel has been added to your lube oil, you MUST change your oil. Check your dipstick. If the oil level is above its normal point it is very likely that diesel fuel is in your lube oil. If so, continuing to run that engine will cause damage. I will let others explain better what that damage might be.

By the way, whether you choose a new mechanical pump or go with the electric pump as I would do, I would replace the pump on the other engine as well. Can its failure be not far in the future?
 
Which Lehman do you have? The 135 has nuts holding it on which are difficult to access. Don't drop them! Also I found it easier to disconnect the fuel line up at the filters rather than at the pump body. Same with installation. Getting the top hose threaded straight can be a challenge with the heat exchanger and oil cooler in the way.
 
Which Lehman do you have? The 135 has nuts holding it on which are difficult to access. Don't drop them! Also I found it easier to disconnect the fuel line up at the filters rather than at the pump body. Same with installation. Getting the top hose threaded straight can be a challenge with the heat exchanger and oil cooler in the way.

I have a pair of Lehamn 120's. 2715E's to be exact.
 
As syjos said, replacing the pump is fairly easy but bleeding the system is not, primarily because using that bleed lever on the pump is a long and tedious affair. And, of course, one must make certain that the pump arm is positioned correctly on the cam lobe. Otherwise, one can pump all day and get no flow.

But, why bother replacing the mechanical pump? Simply install an electric pump such as a Walbro. A Walbro pump is rated for 18,000 hours. Wire it to an ignition switch source, plumb it, turn on the ignition switch, bleed the system effortedly in just a few minutes, and never again have to struggle with that ridiculous bleeding lever again.

Some folks here may disagree but, hey, just look at the what syjos and sowhat advised as to how to do the job. They were both absolutely correct on the process but what a pain! I eliminated the mechanical pump years ago.

But, I have a question for you. You mentioned that your pump leaked for four cruising days. From where was the pump leaking? I am no expert on mechanical pumps but my understanding is that, when they fail, the diaphragm fractures. When that happens, fuel is pumped into the oil sump. If you think that any fuel has been added to your lube oil, you MUST change your oil. Check your dipstick. If the oil level is above its normal point it is very likely that diesel fuel is in your lube oil. If so, continuing to run that engine will cause damage. I will let others explain better what that damage might be.

By the way, whether you choose a new mechanical pump or go with the electric pump as I would do, I would replace the pump on the other engine as well. Can its failure be not far in the future?

I sure appreciate the advice- getting a couple of spares for sure. Regarding the leak: The pump was observed to be leaking from the bottom of the lift pump housing (presumably from a failing gasket) and dripping (at times at a rate of 6 drips per second) down the intake hose onto a saturated absorption pad and worked its way along the stringers and finally into the bilge.

The bilge is black as well which was concerning/confusing but it's yet another mystery of this boat and hard to trace its source exactly because there is an oil separator in the bilge pump line that we deduced must have been backflowing into the bilge when we were in bigger seas as the bilge thru-hull is right at the waterline. (Looking to eliminate the oil separator and put in a check valve asap) I'll have to investiage that more and I appreciate the heads up as I hadn't considered that.

During engine checks, the oil level actually appeared to decrease slightly over several days and we observed a small sheen coming from the stbd exhaust pipe while idling at the dock on several occasions. Over the 12 day voyage I think I added a third of a gallon to the stbd side. I don't have enough information to qualify that issue yet but it's certainly being monitored.
 
I had a new Universal 25 installed on a boat I owned and within 25 hours the lift pump didn't work. Universal sent me a new pump which also didn't work. I thought about it for a while. Humm, I burn about 1/2 gph and the engine only works while my fuel level is above the engine (My tank was about 1/2 above and 1/2 below the level of the engine fuel intake) So the fuel was flowing freely until the level was less than 1/2 tank, the unused fuel being sent back to the tank. And the engine speed was determined by the throttle, not the excessive fuel flow. So what's the difference between this and a constant flow pump @ 1gph? So I installed a cheap automotive 1 gph fuel pump from Autozone. It worked like a champ, never had another fuel problem.

While figuring this out I installed a fuel bulb (like on an outboard) because I would take the boat out on a trial and the engine would die from fuel starvation. Normally this would require a bleeding of the fuel lines to get it running again. But with the bulb installed all I had to do is pump it a little and the system was ready to go. You should have seen me trying to get back to the dock. Jump down behind the engine and pump till the motor runs, sail till it dies, jump down and pump again. Etc., Etc., Etc.
 
Last edited:
If that is a mechanical engine mounted pump check the lube oil in the engine to make sure the pump didn't leak into it.
 
If that is a mechanical engine mounted pump check the lube oil in the engine to make sure the pump didn't leak into it.

How would this present itself?
 
The fuel is likely leaking past the gaskets but the source of the fuel is a fractured diaphragm. That means diesel fuel is in your lube oil the extent to which can only be determined with an oil analysis which will cost $25 - $30. Just change the oil, change the pump and move on.
I sure appreciate the advice- getting a couple of spares for sure. Regarding the leak: The pump was observed to be leaking from the bottom of the lift pump housing (presumably from a failing gasket) and dripping (at times at a rate of 6 drips per second) down the intake hose onto a saturated absorption pad and worked its way along the stringers and finally into the bilge.

The bilge is black as well which was concerning/confusing but it's yet another mystery of this boat and hard to trace its source exactly because there is an oil separator in the bilge pump line that we deduced must have been backflowing into the bilge when we were in bigger seas as the bilge thru-hull is right at the waterline. (Looking to eliminate the oil separator and put in a check valve asap) I'll have to investiage that more and I appreciate the heads up as I hadn't considered that.

During engine checks, the oil level actually appeared to decrease slightly over several days and we observed a small sheen coming from the stbd exhaust pipe while idling at the dock on several occasions. Over the 12 day voyage I think I added a third of a gallon to the stbd side. I don't have enough information to qualify that issue yet but it's certainly being monitored.
 
A couple of things - have you ever measured the proper amount of oil to be added with an oil change and then checked the dipsticks? The Ford engines were designed to be installed horizontally as for a combine or a generator. When they were marinized and turned into Lehmans they were tilted back as is normal in a boat but the dipsticks were not re-marked. If you fill the crankcase to the "full" mark on one of these dipsticks, you have over-filled the crankcase and the rear crank journals will splash the oil about resulting in more oil being ejected from the breather. This results in the engine seeking its own oil level; topping the oil to the full mark results in the oil you just put in being ejected and wasted.

If you monitor the oil level drop, you will see that it stops declining after a while and will not drop further.

A sheen in the water is fuel, most Lehmans mark their territory. You can reduce this somewhat by servicing your injectors but don't be surprised if the engine still does it.

Buy a lift pump from a farm supply store, its a cheap Ford part. DON'T buy from a marine store. Actually, buy 2 and keep the one that still works as a spare.

Don't forget to change your injector pump oil at every 50 hours unless you have a really good one, which you can then stretch to up to 100 hours. Measure that oil too, don't take out the level plug.

As for fuel in the oil, put a few drops of oil on a shop towel and observe. If there is fuel in the oil it will leave a larger ring around the oil stain.
 
Last edited:
Rereading your post, make sure the fuel is not leaking out of a fitting and not the pump itself.

Also, when you install the new pump you may have to bump the engine a bit so that the cam is not pushing on the pump while you seat and torque it.

90 percent of the oil leaks on a Lehman are from the lift pump gaskets; with the vibration it gets everywhere and is very hard to find. Its probably the pump. Also, check that the gaskets that seal the injector pipes on the outside of the block are tight. If you find fuel in the oil, pop off the valve cover and ensure that the return line from the injectors are tight and not leaking and if you're really on a roll, check and set the valves WYIT.
 
"Actually, buy 2 and keep the one that still works as a spare."

Great advice for ANY part you need to replace .

A known operating part solves many trouble shooting questions.
 
Lots of good advice above. A couple of things that may help, it sounds like you have identified the leak as being the diaphragm, but if you’re lucky it just may be that the the centre bolt holding the screen cover or that the tube nut attaching the fuel line require nipping up especially if things are a tad grubby and access isn’t too flash. (I’m never that lucky). Before you remove the pump try actuating the lever on the side of the pump, then bump the motor over on the starter motor and actuate the pump lever again. If you do this a few times it will become obvious when the pump is free of the cam. (The pump lever will stroke further) This is the best place to remove the pump and bleed the system after replacement. As others have noted, the risk of diluted engine oil is probably your biggest risk, oh and you already know this but ensure you are satisfied with this engine before delving into the other one.
 
A fuel leak that big could be captured in a small container then dumped back in to the fuel tank.
 
If you have not done this repair yet, I forgot to mention that if you need to bar over your engine to get the cam in the correct position, Do It Slowly! With a jerk-injected engine you could initiate an attempted start which could injure you.

The high compression ratios of a diesel are sufficient to ignite the fuel even without spinning the motor.

The way to tell if you have fuel in your oil is to put a drop of the oil on a clean paper towel and wait a bit. If there is any fuel it separates into a ring around the oil drop.
 
Xsbank, to be certain, at least on a Lehman 120, one can position the fuel solenoid such that no fuel can be supplied. And, I would still bar the engine over slowly. I did not do the solenoid thing when I adjusted the valves on my 120s. It gave me pause when I think it was you that pointed out that doing is a good idea.
If you have not done this repair yet, I forgot to mention that if you need to bar over your engine to get the cam in the correct position, Do It Slowly! With a jerk-injected engine you could initiate an attempted start which could injure you.

The high compression ratios of a diesel are sufficient to ignite the fuel even without spinning the motor.

The way to tell if you have fuel in your oil is to put a drop of the oil on a clean paper towel and wait a bit. If there is any fuel it separates into a ring around the oil drop.
 
UPDATE:

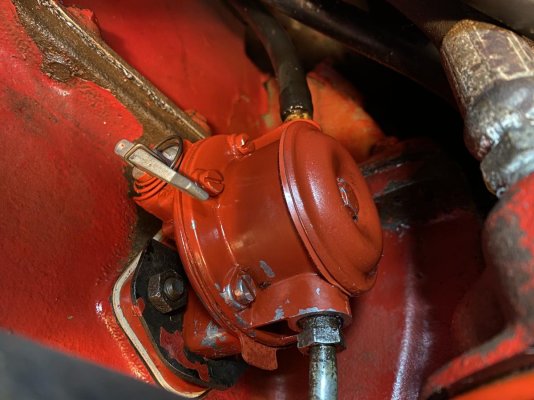
After weeks of delays from life getting back to normal after our Inside Passage cruise from Seattle to Alaska, starting back at winter work and just general business pulling me away from the boat I’m happy to report that the fuel lift pump replacement is now complete and was a big success!

There was some trickery involved that took some creativity but it all worked out, very much to surprise actually.

I lack mini ball valves in the fuel lines (future project) so I had to turn off the fuel at the tank and use hose clamps which was concerning. It was time I change the primary fuel filter anyways so I made the racor my stop to verify the fuel line was no longer charged.

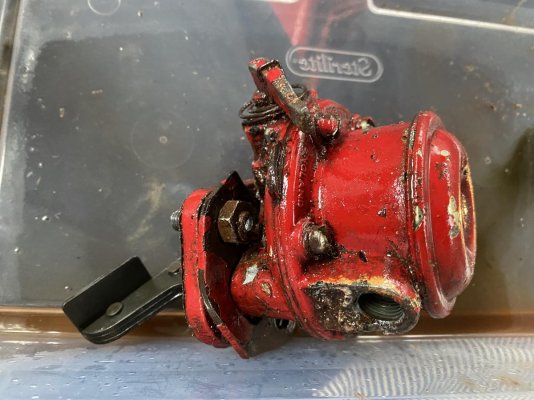
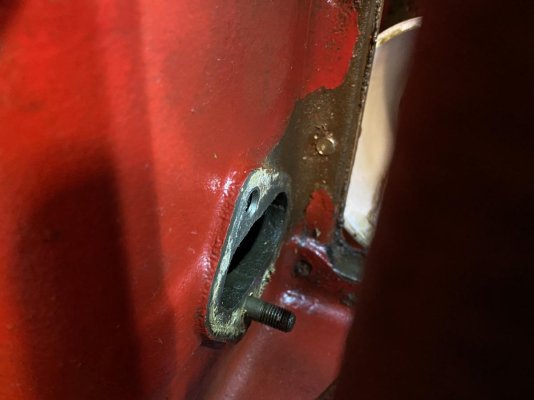
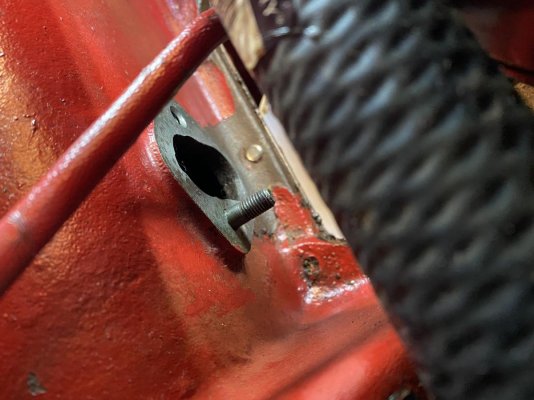
With the line not charged I was able to move on to remove the failed pump. Using the steps outline above it really was quite simple. The main issue, of course, was access to the aft mounting bolt. It was on the outboard side of the starboard engine and required some crazy engine room yoga to get in there. Once there it HOURS of turns with a 1/2” wrench. I was convinced at times that I just lived down there now. I’m having a wrench fabricated for future need but if you a short (3-5”) cleft foot wrench it may make your life easier.

The fuel line on top of the pump was easy to wrench off but you’d do yourself a favor waiting until the pump is off of the block to remove the bottom fuel line. Rotating the pump around the hose is much easier than the other way around.

The bolts on the block are removable and in my case one actually unscrewed from the block which was concerning but after examination of the threads it still seemed useable so I moved on.

The gasket on the block was crusty and old but actually NOT where the leak was. In my original post I outlined the issue as a fuel leak from the pump where it meets the block. It was found to be on a gasket in the pump itself.

I removed the old gasket with a blade and acetoned the area many times to get rid of all old gasket residue. I also cleaned the hoses and all affiliated parts really well so there was no contamination.

Once cleaned I connected the new pump to the intake hose first. (Rotating the pump around the hose since it’s mounted and essentially doesn’t rotate on its own).

The arm on the back of the pump magically went into the block with no resistance or issues. Could hardly believe it.

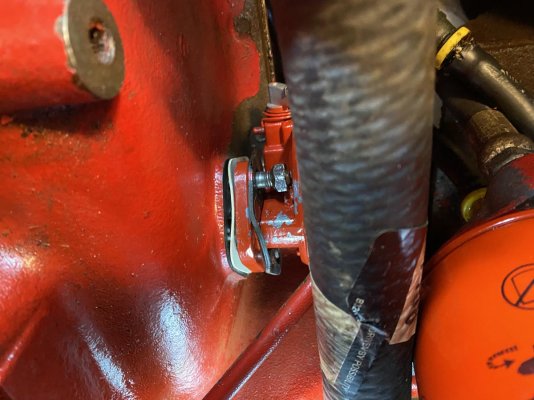
I then mounted the pump to the block making sure that the gasket was installed as well. The bolts were very difficult to get back on and took several hours.

I actually had to take a small screw driver with the aft mounting bolt around it and put the screw driver tip down on the aft bolt and then take my small wrench and tease it off of the screw driver and onto the bolt to get it to finally thread. After maybe 2 hours of chasing it around the engine oil pan it finally took!

With the pump tightened down on the block I decided to attach the top line fitting. That was a real b**** because of the angle. In should have threaded it on before I mounted the pump to the block. But it eventually took.

I used loctite on all connections after activating it with surface prep and let the hoses sit for 24 hours before I charged the fuel line.

Reprising the engine was no issue at all. I pumped the new pump a couple times (twice) really just to verify it was working. Upon opening the aft secondary filter I had air come out for a split second but then fuel just oozed- indicating you me no presence of air. I cracked the forward filter and just had fuel ooze as well. So reckless that.

I left the seacock on the intake open just to see how the engine would start but was prepared to close it if needed.

The engine started and just kept running. Ran engine for about 15-20 minutes and monitored for leaks. No leaks observed!

Appreciate all your input and help! Sucks not having engine help up here in this remote area but a relief I was able to save a couple grand in labor hours by doing it correctly myself :)
 

Attachments

  • 0CB3C236-9E10-4BD3-95FE-8FF9DCBCE1B5.jpg
    0CB3C236-9E10-4BD3-95FE-8FF9DCBCE1B5.jpg
    134.9 KB · Views: 20
  • ED0175E8-7081-4B98-BB30-ED464D31A77E.jpg
    ED0175E8-7081-4B98-BB30-ED464D31A77E.jpg
    71.1 KB · Views: 18
  • 70539631-F652-40EE-8B62-795C3EC6ADFE.jpg
    70539631-F652-40EE-8B62-795C3EC6ADFE.jpg
    111.8 KB · Views: 18
  • 6AC993EE-41AE-49F8-99C4-FF1EC5521E4B.jpg
    6AC993EE-41AE-49F8-99C4-FF1EC5521E4B.jpg
    122.4 KB · Views: 19
  • F8FD2EDA-290E-4DB0-B6B0-2520DAC1F9F7.jpg
    F8FD2EDA-290E-4DB0-B6B0-2520DAC1F9F7.jpg
    126.5 KB · Views: 18
Yes that angle with the upper hose is tough! Best to do it with the pump off. Next time! [emoji846]
Love your description of engine room yoga. I was in the bend at the waist love your engine pose for 2 hours on mine. One dropped nut later, short wrench and 1/8 turns it went together.
 
Last edited:
Back
Top Bottom