Drivesaver install and torque

The friendliest place on the web for anyone who enjoys boating.
If you have answers, please help by responding to the unanswered posts.

SailorGoneBad

Veteran Member
Joined
Nov 4, 2018
Messages
58
Location
US
Vessel Name
Sea Turtle
Vessel Make
Grand Banks 32
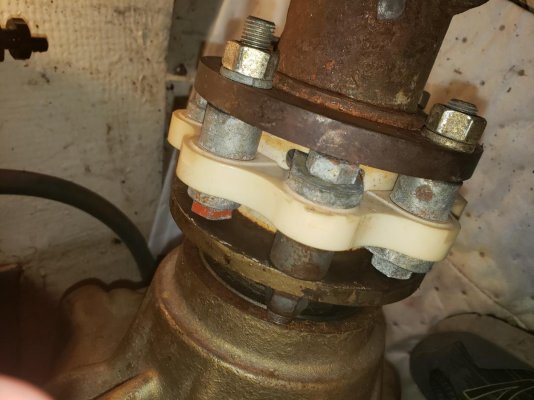
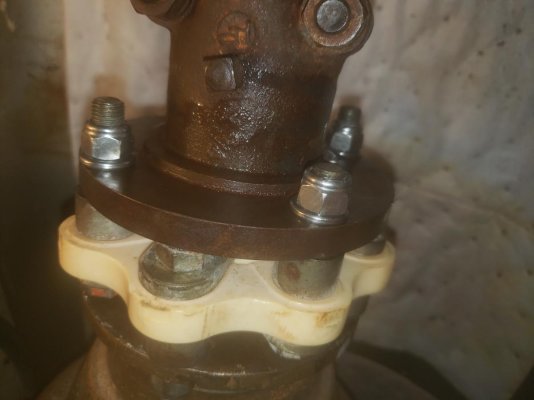
I was in my engine room on an unrelated task and I noticed one of the nuts holding the drivesaver onto the driveshaft was sitting on the floor of the boat under the driveshaft. So I stuck it back on and tightened it. I noticed that one of the other nuts was finger loose. I have no idea what the make and model of the drivesaver is (was on the boat when I bought it).

This is a 1.5 inch shaft on a Velvet Transmission on a Ford Lehman 120. I figure these should be re-torqued but don't know how much torque should be used.

Any insights appreciated.

Thanks.
 

Attachments

  • drivesaver.jpg
    drivesaver.jpg
    114.9 KB · Views: 51
What exactly does a drive saver do? Are they worth installing?

pete
 
I have/had drivesavers on my engines. I got rid of one this past winter and will get rid of the other one next winter when I pull that engine. Problem is you can’t do a proper engine alignment with them in. You have to have a spacer made , install the spacer, do the alignment and then remove the spacer and install the drivesaver. A real pain. I had a spacer made and installed it permanently
 
Torque on Drive Saver

It is 60 to 70 Ft Pounds, but call the factory to be sure and get the rust off the threads first. If they were properly tightened at installation you should probably use new bolts as they are now stretched.
 
I did the same, that is, removed the flexible coupling and replaced with a solid, machined spacer. If you keep yours, I highly recommend that you replace all of the bolts and lock washers. Two years ago in the eight stair-step locks in downtown Ottawa, my DriveSaver (DriveSaver is a brand) fractured parting the prop shaft from the output flange on the transmission. Not fun having to figure out I had no propulsion on one side as the boat was moving forward and very close to the lock door. Anyway, I found two of the four flange bolts in the bilge. I had had a yard replace the damper plates on both engines. When they replaced the transmission and reattached the shafts, they used the old, tired bolts and washers. Don't trust those old bolts and lock washers.
I have/had drivesavers on my engines. I got rid of one this past winter and will get rid of the other one next winter when I pull that engine. Problem is you can’t do a proper engine alignment with them in. You have to have a spacer made , install the spacer, do the alignment and then remove the spacer and install the drivesaver. A real pain. I had a spacer made and installed it permanently
 
I did the same, that is, removed the flexible coupling and replaced with a solid, machined spacer. If you keep yours, I highly recommend that you replace all of the bolts and lock washers. Two years ago in the eight stair-step locks in downtown Ottawa, my DriveSaver (DriveSaver is a brand) fractured parting the prop shaft from the output flange on the transmission. Not fun having to figure out I had no propulsion on one side as the boat was moving forward and very close to the lock door. Anyway, I found two of the four flange bolts in the bilge. I had had a yard replace the damper plates on both engines. When they replaced the transmission and reattached the shafts, they used the old, tired bolts and washers. Don't trust those old bolts and lock washers.

Another reason to get rid of them.
 
There is no reason to remove them. They allow for some misalignment and might just save your transmission. If the bolts are solid blocks of rust indicating little to no maintenance, replace them.

I can't see how a 9/16 bolt only torqued to 60 ft lbs will ever stretch. 240 ft lbs, yes.
I coat the threads with anti seize to make future removal easier.
 
Last edited:
I just align my engines and there is not need for misalignment.
 
I just align my engines and there is not need for misalignment.

If there is any rubber in your mounts they will eventually deteriorate and throw your alignment off. You could align every year. or install drivesavers. Nothing wrong with either approach.
 
I am not a big fan of drive savers. They are often installed to solve a problem that could be more easily solved at its source: a bent prop or a bent prop shaft.

They are often installed with no consideration that the drive saver extends the prop another inch or two out and may be causing a vibration due to the prop being extended too far beyond the cutlass bearing.

The putative justification for drive savers is that they protect the transmission in case of a severe prop strike. Is any one aware of a boat where this has happened?

David
 
The putative justification for drive savers is that they protect the transmission in case of a severe prop strike. Is any one aware of a boat where this has happened?

I'll never know. I had to replace a drivesaver. Transmission was intact.
Velvet drives are hefty enough to tear the struts out. Something has to give.
 
DriveSavers actually saving a transmission is a big maybe. What is not a big maybe is their failure as a matter of course. I had one fracture simply by putting an engine in reverse and applying thrust to back off a sand bar. Nope, you can keep your DriveSavers. And, contrary to some beliefs, they are not meant to accommodate (mask) some engine misalignment. There is no substitute for a good alignment which requires good cutless bearings and straight shafts. Getting a good alignment with DriveSavers in place is hit or miss. One can never be certain of the result.
There is no reason to remove them. They allow for some misalignment and might just save your transmission. If the bolts are solid blocks of rust indicating little to no maintenance, replace them.

I can't see how a 9/16 bolt only torqued to 60 ft lbs will ever stretch. 240 ft lbs, yes.
I coat the threads with anti seize to make future removal easier.
 
I am removing them based on Steve Dantonios recommendation. I agree with CatalinaJacks comments.
 
If you have older Drivesavers, check the bolts frequently and also examine the polymer coupling very carefully annually. They develop fatigue fractures which show up as small cracks adjacent to the bolt holes and are prone to sudden failure at inopportune times.
 
Ours supposedly had a limp home mode but I don’t think they would work very well.
 
I'm afraid I have to disagree with you guys who wish to take them out.
Firstly they can accept some misalignment and smooth the transmission, thats their function.
Second, the nuts shown on the bolts in SailorGoneBad's photo are wrong which is why they came loose in the first place. They should be NYLOC nuts, nothing else will do.
Thirdly, the correct way to align your engine to the shaft is as follows.

You see the nut with the head painted red , OK that will be the nut I refer to in the following.
Turn your shaft by hand until that nut is at 12 o clock, measure the distance between the head of the nut and the flange with a feeler gauge.
Turn the shaft again until that nut is at the 6 o clock position, measure it.
If there is a difference then you need to adjust either both the front engine mountings or the back ones until both the 12 o'clock and 6 o'clock measurements are the same to within maximum of 2 thou.
Now turn the shaft to 3 o'clock, check the measurement, same at 9 o'clock, if necessary the engine needs to be moved either left or right until both measurements are the same..
Make sure all engine beds nuts/bolts are tight, then run the engine in gear for a few minutes.
Now repeat the process to check until everything is exact. Yes it's time consuming but its well worth the effort as you now you have perfectly aligned shaft with reduced vibration and wear on your transmission.

Time to crack a beer for a job well done ! :thumb:
 
Last edited:
Thirdly, the correct way to align your engine to the shaft is as follows.

The recommended way to align drivesavers is too align the shafts without drivesaver installed, and then align a second time after installation. BOth up and down and side to side variance must be within 2 or 3.

In my case the couplings align well but I put a DI on the shaft that trashed the drivesaver and it's slightly banana shaped. No vibration but when I find the right size props new shafts might be appropriate.
 
Thanks all

Great input guys. I think there may be a benefit to these things and, in keeping with the "if it ain't broke don't fix it" approach I am going to keep it for now. I replaced all of the nuts and lock washers with new lock washers and nyloc nuts. I cleaned and lubricated the bolts (which did not show any signs of ware) with blue thread lubricant and torqued everything to 60lb spec for 7/16 bolts.
 

Attachments

  • 20200727_103926.jpg
    20200727_103926.jpg
    71.7 KB · Views: 18
Alignment - a Catch 22

Alignment begins with the shaft log since it can't be corrected. The shaft then needs to be perfectly straight and the shaft coupling face trued to the shaft and taperered to matche the prop. The transmission half of the coupling needs to be tested with a dial indicator and refaced if it is not in alignment with the shaft. A traditional weakness of GB boats is not having a tapered end on the shaft at the engine coupling and threaded for a nut inside the coupling to keep the power train all together. The prop should be mounted and Locked on without the shaft key and the shaft marked at the forward edge of the prop. The prop is then removed and the key installed to see if it aligns with the shaft mark to make sure the prop is not riding on the key. The prop nut should not not be torqued using a board against the outside edge of the prop which can distort the prop blade. Torque with a socket wrench, not an adjustable wrench and block the prop at the hub. Before the boat goes back in the water and the shaft put in place a laser should be set up and guided thru the strut bearing and to a target plate on the engine coupling for an initial alignment of the shaft coupling and strut. Final alignment normalllly requires the boat to be in the water for several days. This may not apply to boats under 60 feet and a moulded hull. Once the shaft is back in the boat there is little or no room for laser measurements so you go back to measuring coupling gaps which takes a lot of patience.
 

Latest posts

Back
Top Bottom