Teak removal Aft Deck

The friendliest place on the web for anyone who enjoys boating.
If you have answers, please help by responding to the unanswered posts.

TrawlerTribe

Veteran Member
Joined
Sep 2, 2019
Messages
36
Location
USA
Vessel Name
Gratitude
Vessel Make
1982- 44ft Island Gypsy Trawler
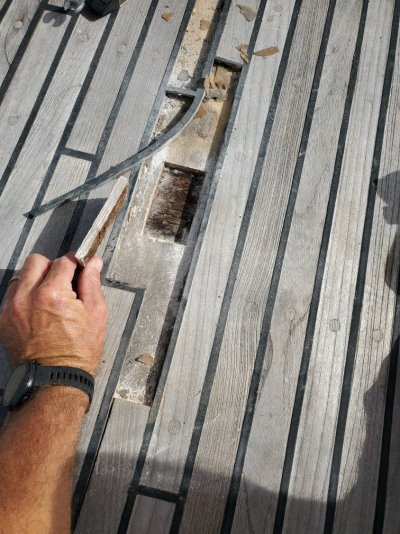
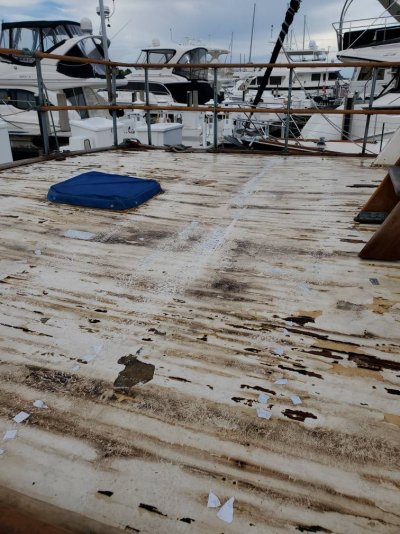
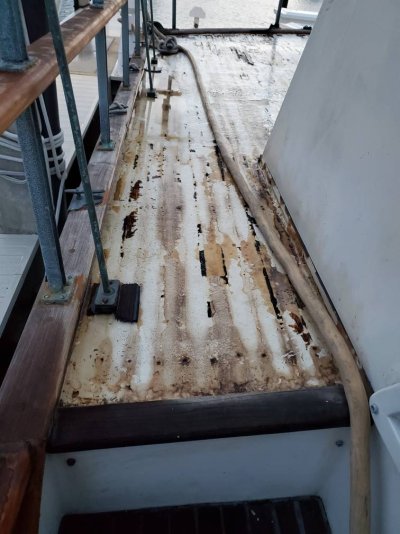
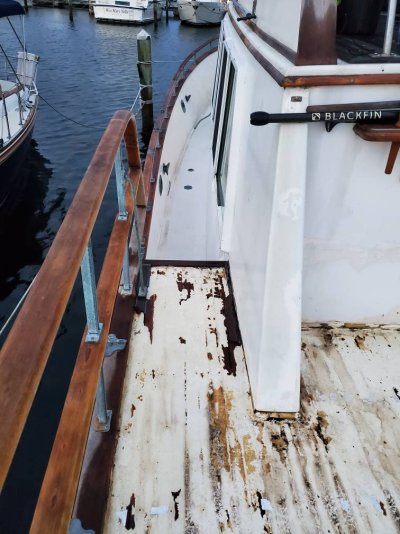
We finally got to pulling up our rear teak. Our aft Stateroom has has leaks in specific areas since purchasing the boat and now I see why.
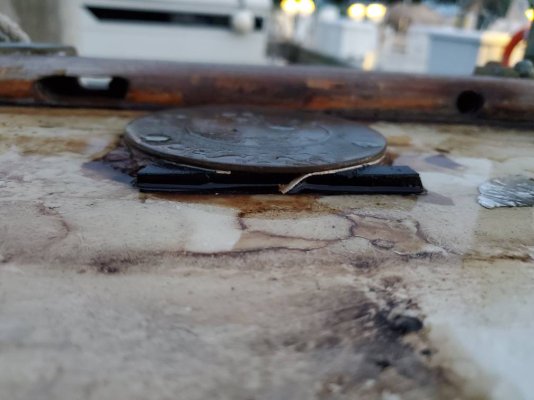
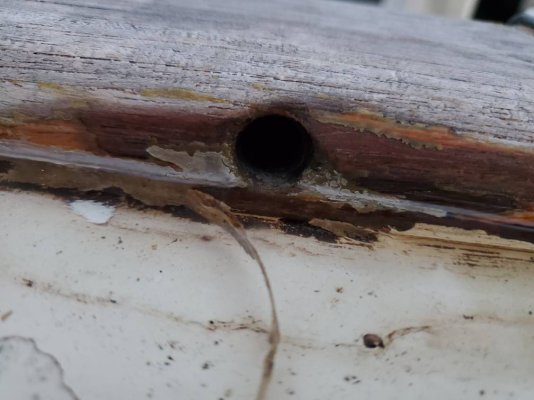
A previous owner pulled up the old teak years ago had teak glued back down with no screws. The adhesive they used was starting to fail so I decided to pull it up. I got it up in a day and found a lot of the old screw holes were either never filled or whatever they filled with came out. I cut a small section of the glass back to the core to check it. Its Marine Ply that was moist but hard as a rock. I expected to find Balsa from an 1982 Taiwanese boat so I'm wondering if the core was replaced w Marine ply when the teak was removed and glued back?
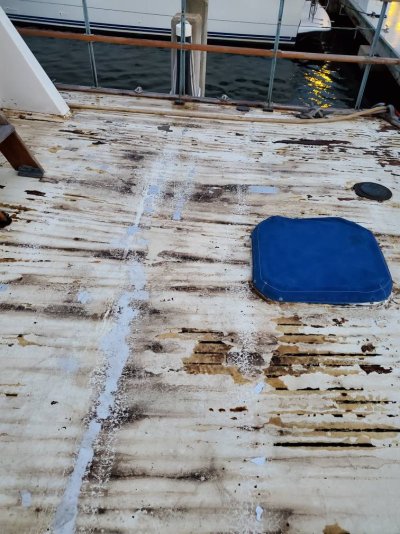
I was planning on installing a new layer of Polyester Resin/Chopped strand to reinforce what is there and waterproof the deck, paint w non skid for now. Maybe install synthetic teak later. We just want to stop the leaks and clean up for now. There is a strange layer of white chopped strand under the teak. I've never seen white fiberglass. You can see the translucent looking glass under this layer. I'm wondering if this is Epoxy that was put down when teak was removed but it does have screw holes in it which doesn't make sense with the previous teak glued down. Now I'm wondering if I should use Polyester w chopped strand or Epoxy and a different laminate fabric. I've read the Chopped strand is not the best to use with Epoxy and Polyester does not adhere well with Epoxy.
Planned on cleaning it up more this weekend and doing more prep.
Any thoughts?View attachment 105292 20200721_180558.jpeg20200627_094414.jpeg20200627_094411.jpeg
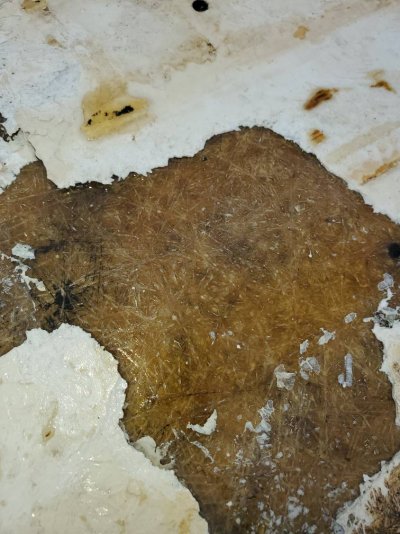
 
A couple of thoughts. Taiwanese boats typically used plywood in the decks made from local wood - usually some kind of mahogany. The good part about that is it is way more rot resistant than balsa. That looks like what you found.

Polyester definitely does not adhere as well as epoxy especially in challenging situations. Also, I stay away from mat. It has no strength and you can’t get it in the thicker layers. Cloth is so much easier to deal with.

Ken
 
Thanks Ken,
Good to know about the Taiwanese using Ply. I assumed Balsa. I was hoping it would dry out after pulling up the teak and before glassing over. It has not rained here for 3 weeks and since pulling up the teak last weekend,, it has rained everyday..[emoji849]
I don't have much experience with fiberglass in general. Only a couple small projects. I've never seen white fiberglass. I read that using Epoxy resin on chopped strand can be white but this is really white. Almost looks like Epoxy filler but it goes all the way through the thin layer of the fiberglass chopped strand.
I was hoping to use Polyester resin because that is what I've used before, its what the boat is made of in general, and its less expensive. I'm not that familiar with the other fabrics for laminating. Will need to do some research.

A
 
An overall pic....20200721_180446.jpeg
 
There’s no reason you can’t use polyester especially if you’re not trying to Bond to old glass But be sure any wood is good and dry. Polyester has a very hard time bonding to damp wood. I just prefer epoxy. The white glass could have been that way due to a small amount of thickening agent added to the polyester or epoxy that was used.

Ken
 
Epoxy is not compatible with chemicals used to bind chopped mat. It doesn't soak through properly, doesn't wet correctly, and adhesion is questionable. Having said that, I went ahead and used West epoxy. Only had a couple of areas that failed to bond. Ground them out and redid them. 2 years and no additional failures.
 
I would use 1708. It has 2 layers of glass on angle to each other and 1 layer of mat. But the mat is bound with stitching rather a binder so epoxy works very well. That way you have the epoxy for strength and the 1708 will also make the deck much stronger. Then look at Kiwigrip for a nonskid paint. Water based and wears like iron. Simple to paint on as long as you pull the painters tape as you go along. You don’t want the Kiwigrip to dry with the tape still on.
 
Thanks for the tip on the 1708. I called an online vendor this afternoon to inquire..
Anyone know the thickness of 1708? Vendor was not sure. They recommended using Total Boat high performance epoxy with 1708 because of the viscosity helps w the wet out. Good?
Seems like 1708 w Epoxy is definitely more expensive than Polyester w chopped strand but if it works long term without delamination it's worth it.
I have approximately 225sqft ft to do (15x15ft). Need to research how much Epoxy Resin I will need for 1 layer of 1708.

A
 
Sounds like you are working with Jamestown Distributers. They have been great whenever I worked with them. I have always used West epoxy but recently bought some Total Boat epoxy. So far it seems fine. Yes 1708 will be a bit thicker than mat but I wouldn’t go to all the work and have it fail due to resin or the type of glass used. Minimum would be one layer of 1708, maybe two depending on the structure below the glass. 1708 is about as thick as a heavy upholstery fabric. Get all the loose crap off first and give it a sand with at least 80 grit, maybe 60 to give the substrate some tooth.
 
It will be more expensive than poly resin but do it right one time...
 
It looks like 1708 comes as 17 ounce cloth. This is fairly thick but it’s good stuff. Being a biaxial cloth it is extra strong so really is overkill for just coating a deck. If you want to save some money you can buy more standard 10 ounce cloth and use one or 2 layers of that. You will probably need a couple of gallons of epoxy. The best way to do it, is prep your glass first, then roll out a coat of epoxy on the deck, then roll the glass Into it. Smooth the glass down, then roll morE epoxy into the glass until it’s saturated (you can tell because it will go almost clear). Let this harden a bit (you can but you don’t have to wait for it to fully harden) then you will need at least one more coat of epoxy on top to fill in the weave. If you do recoats before 72 hrs you get best adhesion between the layers.

15 x 15 is a LOT to do at once especially if you haven’t done it before. I would work in sections of maybe 5 feet. Whatever you do, do not get fast hardening epoxy to use in this weather. For “standard” cure epoxy you’ll have about 30-40 minutes at 68 degrees and that time drops by half for every 18 degrees over the 68. If you need to work in warmer temps, get slow cure. You will be very glad you did. Nothing stops the epoxy clock but you can slow it down.

For say a 3 x 5 section, you’ll need about 8 ounces of epoxy to coat a relatively smooth surface, then almost double that maybe 12 ounces to wet out the glass. I like to use a roller with a 1/4 nap. They sell all kinds of special rollers but they’re not needed. The best rollers I have found for this are called Purdy White Dove brand lint free - you can get those at the hardware store. You can use the full size or what I usually do is cut them to either 3” or 4” size for use on a smaller roller frame. You can pour out some epoxy then use the roller to spread it.

Some people like to roll out the glass dry and then epoxy from the top. This works but it’s harder to ensure you have full penetration into the substrate.

Make sure you clean excess epoxy from your work and tools before it hardens because nothing but sandpaper takes it off once it’s hardened. For cleaning unhardened epoxy all you need is denatured alcohol, don’t bother with acetone or lacquer thinner like so many people seem to use. The alcohol works best and it’s not nearly as nasty a chemical for you.

Hope this helps feel free to ask if you have other questions.

Ken
 
Last edited:
I think using one layer of 1708 is easier than doing several layers of thin cloth. I mostly use 1708 because it is so strong and why not go strong, it won’t hurt having it stronger, but I would rather err on the stronger side than have to redo it a second time.
 
Thanks for the thorough walk through on laying the glass.
It was Jamestown I spoke with.
I'm in SW FL w temps in the 90s so I'm guessing slow cure is the way to go?
With Polyester you can adjust how much hardener to adjust the cure time. From what I'm reading this sounds like it is not the case with epoxy resin?
I see people using bare metal rollers. Is this ok? I've used thin rollers from the hardware store for Polyester but they still seem to waste a lot of resin that soaks in and are only good for one use.
The glass comes 50 inch wide so i will be working in sections but not sure if i can get down a 15ft length of 50 in wide section before the epoxy starts setting up. I might need to reduce the length and error on smaller sections until I can figure out what I can handle.
Can I just lay it section by section and butt them together or do I need to wait until the joining section is cured before adding another section?

The existing deck itself is pretty stiff and sturdy. I wouldn't mind adding extra thickness though because the existing drainage from the deck was designed based on the Thickness of the Teak deck that i removed. The water was supposed to flow off the Teak toward each side of the boat and out little scuppers/holes drilled through the toe rail. The Aft deck is crowned higher in the back and front. Its lower in the middle to get sheet flow towards each side where the holes are located . The Teak was around 1/8 to 1/4 thick so with it gone the rain water collects along the toe rail because the holes are too high up. I still need to figure out the drainage obviously.

A
 
I use the finned metal rollers sometimes. They work well to roll out excess resin and to push the fabric down firmly to the substrate. Just put them in acetone so the epoxy doesn’t set up on them. I also use plastic spreaders to push the epoxy around and force it into the fabric.

A photo of the area that you want to drain would help.
 
Thanks Ken,
Good to know about the Taiwanese using Ply. I assumed Balsa. I was hoping it would dry out after pulling up the teak and before glassing over. It has not rained here for 3 weeks and since pulling up the teak last weekend,, it has rained everyday..[emoji849]
I don't have much experience with fiberglass in general. Only a couple small projects. I've never seen white fiberglass. I read that using Epoxy resin on chopped strand can be white but this is really white. Almost looks like Epoxy filler but it goes all the way through the thin layer of the fiberglass chopped strand.
I was hoping to use Polyester resin because that is what I've used before, its what the boat is made of in general, and its less expensive. I'm not that familiar with the other fabrics for laminating. Will need to do some research.

A

Our boat is a 1980 made in Taiwan. I don't know about the decks as I haven't been that far into them... but during repair of our built in holding tank (formed between the hull bottom and stringers, with the ends and a top added) I found that same white resin/fiberglass mat. They had made the end of the tank of a fiberglass/ply/fiberglass sandwich construction, and the inner wall of the tank was of this white fiberglass/mat. It was a bit of a quandry trying to figure out the material but the tests I did all pointed to polyester resin and chopped strand. Because it was forming the inside of the tank, I left assuming it was gelcoat or or tinted resin specifically to create the inner lining of the tank...maybe that same material/practice was used in other areas of the boats?

+1 on local ply used in construction of some of our boats. Most of the plywood I have had the opportunity to get at in my boat (the aforementioned sandwich constructed tank) and my stbd shaft/packing gland hatch located in the aft head appeared to be plywood made from layers of a really pretty hardwood - unfortunately subject to water damage over time like any other plywood.

Like you, for my repair I switched to modern materials (epoxy and 1708 cloth) for my repairs.

Good luck with the deck repair, and keep posting pics of it. I've found so many online documentation of repairs that have helped me, anything you can do to pass on what you learn will likely help someone else down the road!

My own boat appears to have had a DIY aft cabin top deck repair done at some point in the past. It appears the non-skid they put down is gel coat with crushed nut shells in it, and will have to be redone as its wearing poorly. I'm also worried about whether a compromised core was actually fixed or not, so may be in for a bit of a gut/rehab job rather than just skin over.

Also - food for thought - it looks like you are working on a large deck area that may not be at its full strength. You said it is pretty stiff/sturdy: consider whether support of the shape from the inside might be in order. While crawling on it, rolling out resin, etc might there be a risk of a flex or sag? It would be a shame to go to all the work and discover a sag in the middle crept into your deck!
 
Last edited:
As an IG enthusiast I feel duty bound to point out that the Island Gypsy's of that era are not from Taiwanese boat yards , they were built in Hong Kong under the Kong & Halvorsen name.
 
Our boat is a 1980 made in Taiwan. I don't know about the decks as I haven't been that far into them... but during repair of our built in holding tank (formed between the hull bottom and stringers, with the ends and a top added) I found that same white resin/fiberglass mat. They had made the end of the tank of a fiberglass/ply/fiberglass sandwich construction, and the inner wall of the tank was of this white fiberglass/mat. It was a bit of a quandry trying to figure out the material but the tests I did all pointed to polyester resin and chopped strand. Because it was forming the inside of the tank, I left assuming it was gelcoat or or tinted resin specifically to create the inner lining of the tank...maybe that same material/practice was used in other areas of the boats?

+1 on local ply used in construction of some of our boats. Most of the plywood I have had the opportunity to get at in my boat (the aforementioned sandwich constructed tank) and my stbd shaft/packing gland hatch located in the aft head appeared to be plywood made from layers of a really pretty hardwood - unfortunately subject to water damage over time like any other plywood.

Like you, for my repair I switched to modern materials (epoxy and 1708 cloth) for my repairs.

Good luck with the deck repair, and keep posting pics of it. I've found so many online documentation of repairs that have helped me, anything you can do to pass on what you learn will likely help someone else down the road!

My own boat appears to have had a DIY aft cabin top deck repair done at some point in the past. It appears the non-skid they put down is gel coat with crushed nut shells in it, and will have to be redone as its wearing poorly. I'm also worried about whether a compromised core was actually fixed or not, so may be in for a bit of a gut/rehab job rather than just skin over.

Also - food for thought - it looks like you are working on a large deck area that may not be at its full strength. You said it is pretty stiff/sturdy: consider whether support of the shape from the inside might be in order. While crawling on it, rolling out resin, etc might there be a risk of a flex or sag? It would be a shame to go to all the work and discover a sag in the middle crept into your deck!


Look at Kiwigrip for your nonskid. We did our decks 4 years ago and so far love it. Only downside I have found is if you need to remove it it is like iron. The PO did a poor repair on the deck and I didn’t notice it until after I had painted the deck. I tried a DA sander with 120, 80 and finally 40 grit paper and it barely touched the Kiwigrip. I went to a belt sander and when I got down to 40 grit it finally started slowly coming off. But when I did the repair is matched perfectly after a couple months.
 
As an IG enthusiast I feel duty bound to point out that the Island Gypsy's of that era are not from Taiwanese boat yards , they were built in Hong Kong under the Kong & Halvorsen name.
Well caught Andy. Had the OP been a tad more fortunate his boat might have a foam cored deck sandwich. My 1981 IG 36 and Brisboy`s 1983 did. Maybe IG reserved foam for Europa models.
 
Thanks for the thorough walk through on laying the glass.
It was Jamestown I spoke with.
I'm in SW FL w temps in the 90s so I'm guessing slow cure is the way to go?
With Polyester you can adjust how much hardener to adjust the cure time. From what I'm reading this sounds like it is not the case with epoxy resin?
I see people using bare metal rollers. Is this ok? I've used thin rollers from the hardware store for Polyester but they still seem to waste a lot of resin that soaks in and are only good for one use.
The glass comes 50 inch wide so i will be working in sections but not sure if i can get down a 15ft length of 50 in wide section before the epoxy starts setting up. I might need to reduce the length and error on smaller sections until I can figure out what I can handle.
Can I just lay it section by section and butt them together or do I need to wait until the joining section is cured before adding another section?

The existing deck itself is pretty stiff and sturdy. I wouldn't mind adding extra thickness though because the existing drainage from the deck was designed based on the Thickness of the Teak deck that i removed. The water was supposed to flow off the Teak toward each side of the boat and out little scuppers/holes drilled through the toe rail. The Aft deck is crowned higher in the back and front. Its lower in the middle to get sheet flow towards each side where the holes are located . The Teak was around 1/8 to 1/4 thick so with it gone the rain water collects along the toe rail because the holes are too high up. I still need to figure out the drainage obviously.

A

The ratio of epoxy cannot be changed. You MUST mix it only at the proper ratio. Any other ratio will result in incomplete cure or weakness. At 90 degrees you really have to use a slow hardening formula and even then you should try and work when it’s as coool as possible. Also you need to keep the epoxy as cool as possible before you use it.

The bare metal rollers are only for smoothing the glass and pressing the bubbles out after you get the epoxy down. You need to use a regular paint style roller with a short nap to spread the epoxy. Yes, some soaks into the roller, nothing you can do about that. I don’t like the skinny rollers. I greatly prefer using the standard diameter paint roller size especially on large areas like you’ll be working. As soon as you’re done with the roller, you need to remove the roller cover from the handle and then clean the roller handle in a small container of denatured alcohol to keep the epoxy from hardening on the handle.

As far as sections goes, you will absolutely want to put down smaller pieces at a time. I think no more than 3-5 feet long each. There should be no problem butting them together in this case. You don’t need to wait for the previous section to harden and in fact it will be easier if you don’t because you can get them to lay together better.

As far as the thickness and drainage is concerned, I don’t think you will want to build up as much as 1/4” thickness with glass and epoxy, that would be a lot of material. You said the deck is strong now so no gain to the extra glass.

Ken
 
Thanks for the feedback. I'm headed to the springs today but ill reply back later. Trying to keep up!
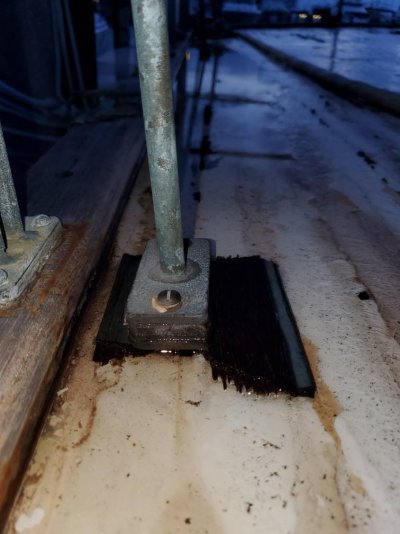
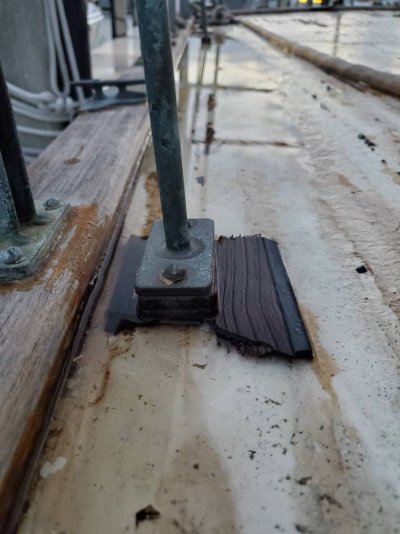
I've got to figure out glassing along the Toe rail for drainage along with under rail support brackets and deck fittings/cleats etc... Thinking of using pieces of Starboard.
In the meantime here are a few pics showing the deck, drainage holes on the starboatd side, and some of the fittings after this mornings rains...20200723_063623.jpeg20200723_063632.jpeg20200723_063639.jpeg20200723_063649.jpeg20200723_063707.jpeg20200723_063718.jpeg20200723_063726.jpeg20200723_063741.jpeg20200723_063751.jpeg20200723_064234.jpeg
 
Just got back from Crystal River. We paddled to 3 Sisters springs to check it out. Was not my favorite with all the development and boat traffic but its a Fl Spring so it was still awesome.

I have not read about IG history in a while. Totally forgot they were manufactured in Hong Kong.

I was dreaming I would cut into the core and find foam but at least I found solid wood.

I will look into Kiwi grip. Jamestown recommended Total boats non skid product.

Fractal- interesting with the white fiberglass. My gut is that this is Polyester and mat with an additive of some type that makes it white. To be safe it sounds like the epoxy is the best bet. The last thing I want to do is a repeat with all the other things I have on my to do list.

Sounds like I need nap rollers and metal roller to use in combo. Ill look into the Dove white.

I think I can handle the 3 x 5 sections. I'm going to try to finish or get close to finishing the prep work this weekend.
I'm not sure how to handle the fittings. We are living on the boat so I can't just remove them for a length of time. The stern cleats look like they are through bolted under the headliner inside. Would like to glass under without removing the cleats or removing the headliner.
Was planning on using Kings Starboard cut outs under the other fittings.

AView attachment 105376View attachment 105377
 
I guess I am not sure what you want to use Starboard for, but it probably won’t be good in this application since almost nothing sticks to it. The epoxy bond may stick for a short time but will fail in the long, if not short, term. If you need a pre made spacer look at G10 fiberglass. Jamestown Distributers sell it. It is structural fiberglass that will bond to your new work with fiberglass. I would also raise the fuel fill in one of the photos with some G10 inserted between the filler and the deck, that way water running down the deck isn’t as likely to get into your tank if the O ring fails.
 
While I like Jamestown Distributers and I buy there frequently, they tend to push the Total Boat products heavily. Makes sense since they own the brand. But in the case of nonskid, Kiwigrip is way above anything. It is way easier to use and will last longer than any paint with nonskid particles in it. And it will cover many many imperfections and by doing so will save you untold hours of finish work prior to painting.

There is no way I would go through all the work and aggravation you are going through and not do the job properly. And by that I mean getting ALL the fittings off the deck and make the fiberglass one solid piece from side to side. You really need to get them all off or you will inevitably have leaks around them. Make it all one piece and go to Compass Marine and follow his instructions on how to bed deck fittings. He is right on!!! Use the butyl tape he sells, it is very good stuff. Sorry to make more work but if you don’t do it right , you will have to redo it.
 
As to removing the headliner, I don’t know what you have but I typically cut it under the fitting and then cover the cut with a cover plate of some sort. Then you will always have access in case you need to tighten up the fitting in the future. An easy way to find where to cut the headliner is to take 2 large rare earth magnets. Put one on top of the deck and tape it down. Take the other one inside and hold it up close and it will find the one on the deck. You can then outline the fitting by moving one and the other one will follow it. You can mark the headliner where you need to cut. I put blue tape on the headliner so I can use a marker without marking on the headliner. I also use the magnets when I need to see what is on the other side of a bulkhead, tape one on one side and see where the second magnet clamps on. Works for drilling holes in the bottom or side too.
 
One trick to extend the working time of epoxy is to mix it and then pour it into a flat tray so it isn’t as thick and won’t generate as much heat inside itself, thermal runaway. So mix small batches. Also put the tray on top of ice packs to keep the epoxy cool and it will go off slower.
 
One trick to extend the working time of epoxy is to mix it and then pour it into a flat tray so it isn’t as thick and won’t generate as much heat inside itself, thermal runaway. So mix small batches. Also put the tray on top of ice packs to keep the epoxy cool and it will go off slower.

+1 on both.

concentrated batch = heat = fast kick. spread it out quick means more time to cure. Great tip!

Also on the small batches. Easy to do, find the appropriate sized dixie cups or other containers, and premeasure all the batches ahead of time, mixing right as needed...
 
Household white vinegar works as well as anything for (un cured) epoxy cleanup. Gojo or the like citrus hand cleaner to clean the epoxy off of your hands.
 
Im not sure what your final plan is but I used Interlux, Interdeck for my final coat. It is a great product, will probably take two coats but is non slip and applies easily with a brush or roller. It is available in a couple colors. I used white which does get dirty but generally cleans up well with a hose, sometimes a little brushing in high traffic areas.

It is definitely not slippery, sort of grainy. Not hard on barefoot though.

pete
 
Good Tips on extending the Epoxy kick and the Magnet trick.
I can feel something through the headliner right under the where the cleats are located on the deck. Of course it is right where there is a seam in the headliner so I would need to cut two pieces of headliner right where they connect. I was hoping I could pull out the teak pieces that I left underneath the Cleats and get some new Fiberglass under them without removing them but not sure.
Most of the other deck fittings are water fills. I'm hoping I can just unscrew these pull them up a little and Fiberglass around them and rebed/screw them back into the new fiberglass.There is a larger circular deck fitting almost in the middle of the deck that I opened a few weeks ago to see what is was for because someone had silicone it closed. It does not appear to go to anything that I can see for access. Just a big hole through the deck. Looks like where you would connect a Dorad vent on a sailboat. Not sure if these are common on older Island Gyspy's or what it is for. Was going to leave it since I don't know what is for and it is not hurting anything.
I was planning on laying down 1 layer of new glass and then cutting little sections of Starboard to use under the rail supports, Water fills, and the mystery fitting. Right now there is little rectangle pieces of Teak to bridge the gap between the old teak level and the bottom of the rail support. Screw the rail support into the starboard and into the deck using some type of bedding material. There is some type of brown Marine looking caulk on the rectangles of Teak now for waterproofing the screw holes but it does not seem to have any adhesive qualities.
The water fill and mystery fitting I was thinking it would be good to leave them a little higher. Basically where they are now with the old teak under them so they are higher than the overall deck height to help prevent water intrusion.

A
 
If the mystery fitting is near the stern it could be an access port to allow use of an emergency tiller. If it was such a thing it would be most likely directly above a rudder.

Ken
 

Latest posts

Back
Top Bottom