First things first. Nothing will work if the joint is moving. Can you cause or feel any movement when stressed? Any at all? If so, joint needs to come apart, get cleaned up and reassembled. When cleaned up, you need to try to preserve the close fitting parts, so be careful. To get the bungs out, start with a course screw dead center in the bung. If the bung hasn’t been epoxied it will come right out when the screw bottoms on the head of the screw holding the joint. If the doesn’t work, use a Forstner bit perfectly positioned. If it were me, I’d epoxy it back together, including the artificial channel.
You are using an out of date browser. It may not display this or other websites correctly.
You should upgrade or use an alternative browser.
You should upgrade or use an alternative browser.
varnish failure at seams
- Thread starter rlrrlrll
- Start date
The friendliest place on the web for anyone who enjoys boating.
If you have answers, please help by responding to the unanswered posts.
If you have answers, please help by responding to the unanswered posts.
angus99
Guru
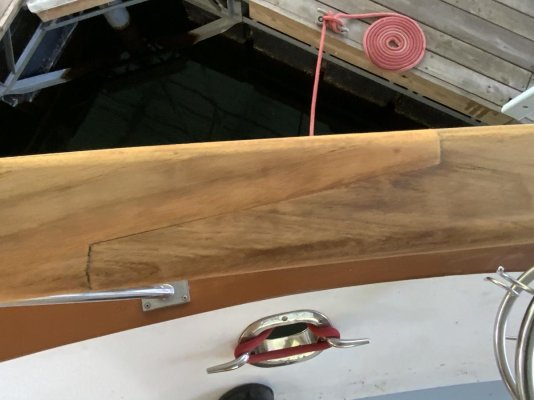
I’m in the final stages of prepping our rails for refinishing with Allwood. All of the joints, with the exception of the bow, are tight and immobile.
Thanks to this thread, I know what to do about the open joint. Can I assume that the tight joints can just be coated over? Seems like a waste to purposely open joints that are otherwise sound, but I don’t want to see the new finish fail at those joints either.
Allwood is, I read, more flexible than standard varnish.
Attachments

Nomad Willy
Guru
What??? Did you put Allwood on your mooring lines?
I’ve seen green, black ... but pink?
The joints are there to “allow” movement. If you don’t have the space for movement the fasteners may be ripped out. Or the cap rail may split up. Or even hull damage could occur.
An interesting thought is that if there were more (enough) joints (wide enough) movement may be so small varnish failure may may not occur.
Last edited:
angus99
Guru
What??? Did you put Allwood on your mooring lines?
I’ve seen green, black ... but pink?
Actually, they’re red. Came with the boat—literally dozens of eye-spliced docking lines. I’ve been looking for someplace to offload some of them. How many would you like?
angus99
Guru
The joints are there to “allow” movement. If you don’t have the space for movement the fasteners may be ripped out. Or the cap rail may split up. Or even hull damage could occur.
An interesting thought is that if there were more (enough) joints (wide enough) movement may be so small varnish failure may may not occur.
Thanks, Eric, I understand their purpose. Elsewhere on this thread, it was recommended to open up failing joints, clean them out, expose the newly clean joint faces and caulk with Sika 291 . . . and avoid varnishing directly over the new caulk.
My joints, with one exception, are not failing and show no signs of movement. Best I can tell they have been that way for 33 years. So, the answer is probably obvious, but I'm asking for the most prudent course for my situation.
I don’t touch joints that are solid. If feels solid but some indications of trace movement, remove the bung and see if it will tighten and put a new bung in. The joints can be difficult to work with on an otherwise solid rail, so lots of reasons not to touch them if you don’t need to.
Flatswing
Guru
- Joined
- Sep 21, 2016
- Messages
- 580
- Location
- United States
- Vessel Name
- River Girl
- Vessel Make
- 2004 DeFever 49 RPH
Basically all joints move due to the woods expansion & contraction. Many feel that any attempt to treat the jointed rail as a single piece will fail varnish wise-just a question of when .
My preference is to treat each piece as being separate- cut out all caulk & old varnish with a very sharp chisel. Ease (round) any sharp corners to maintain mil thickness at the edges. Apply your 10 coats or so of high solids varnish of your choice, scuff sanding the joints as carefully as u do the rest of the cap rail. Then re- tape & fill the joints with a high flex UV resistant sealant - basically performing as an elastic, cosmetic filler, instead of trying to seal the wood end grain or the varnish .My preference is Sikaflex 295UV Black. Annual /semi/annual coats of high gloss varnish can go over the caulk if it’s in good shape & no varnish peel. I don’t believe u can effectively seal the varnished rail with caulk. Nether can you prevent movement between 2 pieces of teak anymore than you can prevent expansion/contraction in each individual piece of teak unless it’s Indoors, out of the sun & climate controlled for heat & humidity year round.
My preference is to treat each piece as being separate- cut out all caulk & old varnish with a very sharp chisel. Ease (round) any sharp corners to maintain mil thickness at the edges. Apply your 10 coats or so of high solids varnish of your choice, scuff sanding the joints as carefully as u do the rest of the cap rail. Then re- tape & fill the joints with a high flex UV resistant sealant - basically performing as an elastic, cosmetic filler, instead of trying to seal the wood end grain or the varnish .My preference is Sikaflex 295UV Black. Annual /semi/annual coats of high gloss varnish can go over the caulk if it’s in good shape & no varnish peel. I don’t believe u can effectively seal the varnished rail with caulk. Nether can you prevent movement between 2 pieces of teak anymore than you can prevent expansion/contraction in each individual piece of teak unless it’s Indoors, out of the sun & climate controlled for heat & humidity year round.
mickand
Senior Member
From the look of the ‘white’ in the finish I think it is pure polyurethane which does not adhere well to wood. Strip, clean out seam, build up entire rail with multi-varnish coats then apply one topcoat of 3 part Awlbrite. Tape either side of seam and apply black or white marine caulk.
angus99
Guru
Basically all joints move due to the woods expansion & contraction. Many feel that any attempt to treat the jointed rail as a single piece will fail varnish wise-just a question of when .
My preference is to treat each piece as being separate- cut out all caulk & old varnish with a very sharp chisel. Ease (round) any sharp corners to maintain mil thickness at the edges. Apply your 10 coats or so of high solids varnish of your choice, scuff sanding the joints as carefully as u do the rest of the cap rail. Then re- tape & fill the joints with a high flex UV resistant sealant - basically performing as an elastic, cosmetic filler, instead of trying to seal the wood end grain or the varnish .My preference is Sikaflex 295UV Black. Annual /semi/annual coats of high gloss varnish can go over the caulk if it’s in good shape & no varnish peel. I don’t believe u can effectively seal the varnished rail with caulk. Nether can you prevent movement between 2 pieces of teak anymore than you can prevent expansion/contraction in each individual piece of teak unless it’s Indoors, out of the sun & climate controlled for heat & humidity year round.
Thanks. Problem is It would take a razor to cut into the seams. They’re extremely tight (except for the bow). I do like your idea of rounding off any edges at the joints to ensure mil thickness. No varnish will be used on this job: Awlwood.
angus99
Guru
From the look of the ‘white’ in the finish I think it is pure polyurethane which does not adhere well to wood. Strip, clean out seam, build up entire rail with multi-varnish coats then apply one topcoat of 3 part Awlbrite. Tape either side of seam and apply black or white marine caulk.
Not sure what finish you’re referring to. My rails are in post 32 and they’re bare wood.
cabinetman1955
Veteran Member
Varnish failure
I have seen it time after time. Finish especially Varnish failures are caused by moisture in the product being finished. If moisture is inside the joint and is sealed in there it will expand when exposed to heat produced by the sun shining on it. The joint needs to be dried to a point where the wood is dry. Any moisture inside the joint will continue to create problems. The movement
I have seen it time after time. Finish especially Varnish failures are caused by moisture in the product being finished. If moisture is inside the joint and is sealed in there it will expand when exposed to heat produced by the sun shining on it. The joint needs to be dried to a point where the wood is dry. Any moisture inside the joint will continue to create problems. The movement
angus99
Guru
I have seen it time after time. Finish especially Varnish failures are caused by moisture in the product being finished. If moisture is inside the joint and is sealed in there it will expand when exposed to heat produced by the sun shining on it. The joint needs to be dried to a point where the wood is dry. Any moisture inside the joint will continue to create problems. The movement

Flatswing
Guru
- Joined
- Sep 21, 2016
- Messages
- 580
- Location
- United States
- Vessel Name
- River Girl
- Vessel Make
- 2004 DeFever 49 RPH
Thanks. Problem is It would take a razor to cut into the seams. They’re extremely tight (except for the bow). I do like your idea of rounding off any edges at the joints to ensure mil thickness. No varnish will be used on this job: Awlwood.
Yeah I understand-but I took the advice of my local professional varnish guru & v’ed the butt joints even where they appeared tight (I have many wide scarf joints also on my toe rail identical to your pics also). I cut out all the old caulking where present; rounded, varnished 10 coats, then caulked with Sikaflex 295UV. time will tell but the varnish almost always peels at the joints-even when they look tight. Wood moves at least it did on my rails
Last edited:
rlrrlrll
Newbie
One more
After removing the black part what was below looked to me anyway, like thin coating of something that felt rubbery. I proceeded to dig it dug out. It was thick and felt like rubber. The second picture is what I dug out. Do you know what this is called? If you have a product name that would be great.
The first picture is what I have now. I need to fill it with whatever that rubber stuff was and then put the Zikaflex over that. Does that sound right?
Thanks.
Attachments
![20200719_160155[1].jpg](/data/attachments/95/95031-99b7bc236fa50a4ee132cd4e9b8a56fe.jpg)
![20200719_160213[1].jpg](/data/attachments/95/95032-a93acd9bce2a58abc11e604800f9ba7a.jpg)
Hippocampus
Guru
- Joined
- Jul 27, 2020
- Messages
- 3,915
- Location
- Plymouth
- Vessel Name
- Hippocampus
- Vessel Make
- Nordic Tug 42
Probably butyl. Have multiple boats with plenty of bright work. What I’d do.
Wood everything. Protect from rain and leave to dry for several weeks. Wait for multiple low humidity days. Those saying wood needs to be bone dry are right.
Get all the butyl out before drying time.. Use dental picks and multiple acetone washes if necessary.
Varnish including inside edges of joint but start with just one part varnish 3 parts thinner. Second through third 1 to 1 forth and firth 3 to one. sixth to eight straight varnish. Like old school epiphanes. Idea is to get maximal penetration and each side totally independent in their coatings. At that point whatever you put in the joint doesn’t much matter as long as it’s somewhat flexible and UV stabilized.
mike66
Guru
https://www.jamestowndistributors.com/mobileportal/show_product.do?pid=1518
This stuff is the ticket to refill. I would use tape on both sides of the joint with your project. Use a plastic scraper to smooth/force into the joint.
This stuff is the ticket to refill. I would use tape on both sides of the joint with your project. Use a plastic scraper to smooth/force into the joint.
Comodave
Moderator Emeritus
- Joined
- Jul 2, 2015
- Messages
- 21,297
- Location
- Au Gres, MI
- Vessel Name
- Black Dog
- Vessel Make
- Formula 41PC
+1 on TDS 440.
bgillroy
Senior Member
- Joined
- Mar 20, 2014
- Messages
- 313
- Location
- usa
- Vessel Name
- Maka Honu
- Vessel Make
- Ta Yang, 42 Tayana PH Trawler 1976
For bright finish check Awlgrip Awlwood clear prime and Awlwood gloss topcoat, as example, minimum 8 coats. Avoid common varnish. Read specifications and study performance information comparisons available online before just buying common varnish.
Similar threads
- Replies
- 0
- Views
- 254