Would a clogged vented loop

The friendliest place on the web for anyone who enjoys boating.
If you have answers, please help by responding to the unanswered posts.

Unclematt

Senior Member
Joined
Apr 9, 2020
Messages
318
Location
United States
Vessel Name
Seaview
Vessel Make
Sundowner 32
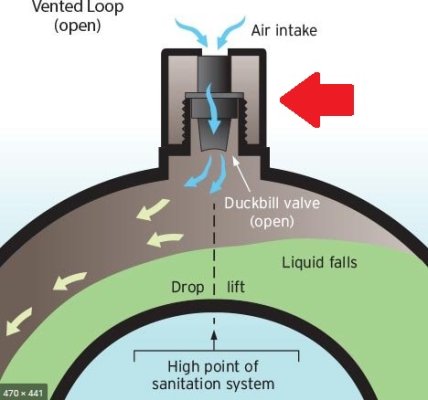
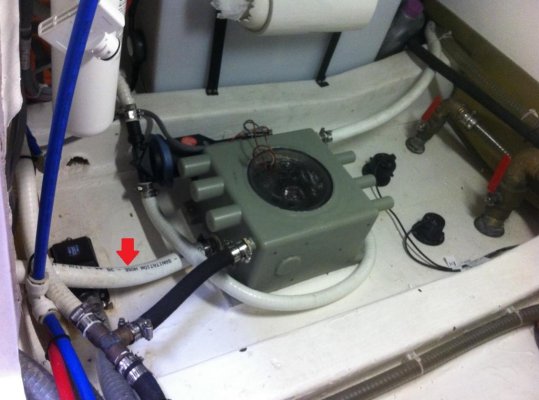
I have only has my boat 6 weeks and I know it needs some love. One repair at a time. My shower sump pump was blowing out the sides of the pump nothing was going out the sea cock. I thought clogged hose so I have replace the hose and checked to make sure the sea cock was clear. I replaced the pump with the same 800 gph pump on a float switch. Today I still have the same problem. So here is the question tonight I found that the vent loop vent was clogged so I have removed and cleaned it. Would that cause this issue? I wont be able to reinstall it until later this week. Thanks TF gurus;)
 
Confused with your terminology.
Shower dumps dont normally have vents "loops" or sea cocks?
Normally discharge via a thru hull above water line.
Pictures, diagrams or clarification?
 
Double check the discharge line. You should be able to blow through it easily. Try compressed air.

pete
 
My shower sump pump was blowing out the sides of the pump nothing was going out the sea cock.

As Bacchus already said, shower sumps discharge through ABOVE waterline thru-hulls, which don't have seacocks and therefore don't need a vented loop. If the hose from the sump pump goes to a below-waterline thru-hull, it's a pretty safe bet that it's been incorrectly installed. It's wild guess, but I wouldn't be surprised if whoever installed it connected it to an unused toilet discharge thru-hull.

You should be able to find the correct thru-hull if you carefully check for open thru-hulls low--but well above waterline--on the outside of the boat on near the head.

But to answer your question, a blocked vent on a vented loop wouldn't cause your problem even if it were installed correctly.

As one who restored a "project boat," it's fun ride during which you're met an amazing number of surprises that'll leave you wondering WHAT were they THINKING????" This sounds like one of 'em.


--Peggie
 
I found that the vent loop vent was clogged so I have removed and cleaned it. Would that cause this issue? I wont be able to reinstall it until later this week. Thanks TF gurus;)


I have three thoughts on this:

1) Do you have a small grey-water sump tank that your shower sump (and possibly sinks) dump into before being pumped out? If so, this probably needs to be cleaned out from gunk a couple of times a year. If you don't do this, I would expect that gunk could eventually form in the vented loop.
2) There's likely a little "joker" valve in the line near the pump (black rubber thing that looks a bit like a joker's hat). These need replacement every few years, as they can deform and fail, resulting in no water being pumped out the through-hull fitting. Have you checked/replaced this? See picture below for what a joker valve looks like.
3) If you do have a small grey-water tank that the the shower and sinks dump into, see what happens if you open the top of it a bit. If things suddenly begin to work correctly, then I would suspect you have a clogged air vent to this tank. Or, maybe there is no vent to this tank, in which case it would be good to add one. This was the case on my new boat from the factory. Once I added a vent, the entire grey-water system started to work much better.


I have a vented loop on my boat because the grey-water discharge IS actually below the waterline. I wish this weren't the case, but that's the way the boat was manufactured.
 

Attachments

  • joker.jpg
    joker.jpg
    23.6 KB · Views: 218
Last edited:
The through hull is above the waterline and it has a sea cock. I will remove the vented loop and give it a try. The head is on the starboard side the discharge is to port with about a 15 foot run with a few small ups and downs. I will keep you posted. Thanks
 
I wouldn’t remove the vented loop permanently if your through-hull is close enough to the waterline that it could spend a substantial amount of time submerged (i.e. due to list) in extreme wind/weather/wave conditions.
 
I wouldn’t remove the vented loop permanently if your through-hull is close enough to the waterline that it could spend a substantial amount of time submerged (i.e. due to list) in extreme wind/weather/wave conditions.

I was thinking the same thing as I was reading along. I don't remember the details anymore, but IIRC there is "static" waterline (basically anything below the waterline with the boat at rest in a millpond) and "dynamic" waterline (anything between the static waterline and X degrees above). These are things that may sometimes be below the waterline (list, aground, sea state). I wouldn't remove a seacock on something below the dynamic waterline.

(Obviously on sailboats, that's a huge range; but I think it still holds true to a lesser extent on powerboats unless I'm completely off base.)
 
If the new pump is "blowing out the sides of the pump " same as the old could the wiring have polarity switched and pump running backwards???

Take either pump and do a test in a bucket with a discharge hose attached - try wiring both ways and see if you can reproduce the outcome and pump normal w/ polarity switched.
 
I would never remove a sea cock I was wondering if I needed to remove the vented loop. The pump is pumping correctly. Tomorrow night I will get back out to the boat and give it another try. I can easily blow through the hose so maybe the vented loop is a bit to high. I will figure it out and let you know.
 
I'm not suggesting that this is, in any way, the cause of your current problem...but while you're fussing with the vented loop, carefully remove the the cap and check for cleanliness and condition of the rubber "valve" inside it. (Make sure you put it back pointing the same direction it was in before you took it out!). These can clog and increase the risk of siphon. I have this check on my spring launch check list.
 

Attachments

  • v1.jpg
    v1.jpg
    43.1 KB · Views: 16
While you're at the boat snap a bunch of pix with your phone, of as much of the plumbing systems involved as you can get at.

Fun-fact, some phones have an automatic shutter feature if you say "cheese" or "smile". I took quite a few pix that way down in some bilges where it would have been impossible for me to tap the button. Felt damned silly, arm all twisted and extended down in there... yelling CHEESE. But the pix helped me find a low spot that had settled in the waste tank vent line, allowing water to collect and form a trap, blocking proper ventilation (and resulting stink).
 
Well I am off the boat for the night so pic's will have to wait for another day. Here is a Peggy question. I can easily blow through the sump discharge. The new Rule 800 GPH pump, pumps like we the people until I put the hose on then no flow out the discharge. Yes there are a few ups and downs but no more than 18 to 24". I am thinking I have a weak pump. The big question is what is the best and most powerful pump I can install. I have spent way to much time on this one.
 
If you are considering a new refit I would suggest a Whale pump as they get rave reviews here on TF.

I'll second that. I've got several Whale "Gulper" 220 models handling our shower/sink sumps and they've been very reliable. They're designed to self-prime and not get clogged. The only thing in the sump box is a float switch, the pump is external, and in my install about a foot higher than the sump. If I were to retrofit new I'd take a hard look at Whale's integrated tank/switch setups. As it stands now, though, I just keep a spare Rule float switch onboard to replace the ones in the sumps. Damned things either last 10 years... or ONE.

I will NEVER have a sump box with a pump inside it ever again. Sumps are nasty enough on their own, keeping the pump in there just makes the inevitable clean out job that much worse.

I've got two gray water sump boxes, one for the galley sink and day head sink/shower. The other for the master stateroom sink/shower. The 220 are rated at 3.5 gallons per minute (210gph) and they each have no trouble keeping their respective 8L gray tank empty. My concern with a larger/faster pump is short cycling. Where the pump runs faster than the in-flow and it ends up running/stopping/running/stopping all the time. Mine tend to come on once a shower or sink had begun being used and will run continuously until about 15 seconds after flow stops. No surging pump sounds.

What model pump is it you have now?
 
I will be the third to recommend a complete whale gulper & waste tank setup if you're going to do your system over. The integrated switch in the tank is nice because it does not have any moving parts, but I've learned a few things about it:


- Gunk needs to be cleaned off the switch every 2-3 months (assuming you're living full time on the boat).
- avoid pouring, for example, olive-oil/salad dressing and other oily residue down the drain, as it increases the frequency with which you have to clean the switch
- do not pour scalding hot pasta water down the drain. Pour it overboard or mix it with cold water. Early on, I had to replace my switch a couple of times and somebody suggested to me to take care with scalding hot water. I stopped with scalding hot water and the switches stopped failing.


One final tip. The Whale tanks come in 8 & 16 liter sizes. I originally had an 8 liter tank in my boat. Due to some carelessness on my part, I broke one of the integrated tank connections and had to replace the tank. I replaced it with a 16 liter tank. If you have the space, I recommend the 16 liter tank, as it further reduces the frequency with which the gulper pump comes on (i.e. reducing annoying pump noises).


Explanation of pictures below:
1) Original 8 liter tank. Red arrow is shower sump line draining into the whale tank. The black hose entering the tank is for both the lavatory drain and the air conditioner condensate.

2) New 16 Liter tank - mid project.


I carry a complete set of spare rubber parts for rebuilding the gulper pump. Just for peace-of-mind, as I want to be able to fix any problem with this system quickly if I'm in a remote location.
 

Attachments

  • W1.jpg
    W1.jpg
    94.8 KB · Views: 10
  • W2.jpg
    W2.jpg
    82 KB · Views: 15
Last edited:
This I knew, and it's worth sharing:
- avoid pouring, for example, olive-oil/salad dressing and other oily residue down the drain, as it increases the frequency with which you have to clean the switch

This I did not know, make sense. We don't often have boiling water going, but now I know it avoid letting it go down the galley drain while still that hot.
- do not pour scalding hot pasta water down the drain. Pour it overboard or mix it with cold water. Early on, I had to replace my switch a couple of times and somebody suggested to me to take care with scalding hot water. I stopped with scalding hot water and the switches stopped failing.

I have two 8L tanks, each with their own pump. I've had floats fail, and have since changed the wiring to allow for a temporary over-ride (just a plug with a jumper, to manually activate the switch). That and now all the wiring to the pumps uses the same connector (mish-mash of different kinds, presumably from past replacements). So now I can at least rearrange things relatively easily if/when there's a failure.

I've been tempted to arrange some sort of cross-connect hose between the sumps to allow one to take over for the other, but my to-do list is already long enough. There are unused inlet ports on the tanks, I guess I could just snake a hose between them, but it's pretty close quarters in there.
 

Attachments

  • 20180428_110916.jpg
    20180428_110916.jpg
    133.4 KB · Views: 12
This I knew, and it's worth sharing:


This I did not know, make sense. We don't often have boiling water going, but now I know it avoid letting it go down the galley drain while still that hot.

I have two 8L tanks, each with their own pump. I've had floats fail, and have since changed the wiring to allow for a temporary over-ride (just a plug with a jumper, to manually activate the switch). That and now all the wiring to the pumps uses the same connector (mish-mash of different kinds, presumably from past replacements). So now I can at least rearrange things relatively easily if/when there's a failure.

I've been tempted to arrange some sort of cross-connect hose between the sumps to allow one to take over for the other, but my to-do list is already long enough. There are unused inlet ports on the tanks, I guess I could just snake a hose between them, but it's pretty close quarters in there.


Hmmm...
I wonder why GB went with TWO separate 8L tanks vs. 1 16L tank. If it were for "redundancy" then I would have expected the clever option you mention of a valved crossover to already be there. Anyway, the crossover sounds like a clever idea, if you can find a way to make it fit!
 
I think the cross-over could be as simple as a few pieces of hose and two elbows. Come out one, elbow, over to the other, elbow and into the other. The inlet ports are at the high end of the tank, so gray water would only overflow if the box was nearly full. I've had the float die in one, leading to the box overflowing and leaking out the round hatch port. This leading to sour water sitting in the bilge below for a bit, making a stink. Now I open that hatch and look down every time we take the boat out.

As for two tanks, the space in-between is pretty tight, I don't know if there's enough room for the larger tank (or whatever was available at the time this was built). The larger tank would be too wide to fit into the same space. That and my hoses are all designed to feed into those center inlet port locations. I'd be replacing a lot of hoses to re-route for changed inlet locations. But there is enough room that if I had to use a new tank, it could be raised to allow the hoses to come in from the outboard ends.
 
There is no room to install a gray water tank in this boat. My shower drains directly into the forward part of the bilge which is intended to be the sump and is pumped from there. I will be installing the new pump this weekend with a float switch.
 
There is no room to install a gray water tank in this boat. My shower drains directly into the forward part of the bilge which is intended to be the sump and is pumped from there. I will be installing the new pump this weekend with a float switch.
If you can access the area you might consider the Whale shower pumps. They have options that do not require a sump. Shower hose connects to the sensor that triggers the pump when water is present.
I would prefer having the bilge area dry vs stagnant shower water that tends to get ugly and smelly.
 
There is no room to install a gray water tank in this boat. My shower drains directly into the forward part of the bilge which is intended to be the sump and is pumped from there. I will be installing the new pump this weekend with a float switch.

I've never seen the bilge areas on a Sundowner, so I can't speak to "no room".

Just that I've never liked having a shower drain straight into a bilge. Hair and soap products tend to gum up the works of most typical bilge pumps. But at least when they're inside even a small Rule or Attwood shower sump box the crud is at least contained. And if the bilge is actually expected to handle seawater or other leaks, then at least you know the pump isn't likely to malfunction due to being gunked up.

Shower Sump Pump Systems : Attwood Marine
https://www.xylem.com/en-us/brands/rule/rule-products/shower-drain-systems/specifications/
 
If you can access the area you might consider the Whale shower pumps. They have options that do not require a sump. Shower hose connects to the sensor that triggers the pump when water is present.
I remember reading about those. After I'd already replaced a setup with a sump box. The drain area in mine would have not have been at all simple to install the Whale integrated drain. But the Gray IC with manifold would have worked, shame it wasn't available then.

https://www.whalepumps.com/marine/product.aspx?Category_ID=10020&Product_ID=10040&FriendlyID=Grey-IC
 

Latest posts

Back
Top Bottom