Packing Glands

The friendliest place on the web for anyone who enjoys boating.
If you have answers, please help by responding to the unanswered posts.

dstong

Member
Joined
Jun 18, 2020
Messages
13
Location
United States
Hello everyone. I'm new to the Trawler Forum, but a 12 year owner of a 1985 GB 42 Motoryacht, lifetime boater/sailor, located in Oceanside CA (25 miles north of San Diego), and largely a DIY'er. I've been relatively active for years on the GB Owner's Forum...but that seems to have gone dark of late.

I need help! I have not serviced my prop shaft packing glands since I bought the boat. I am ready! I've cleaned them up but have discovered they just don't slip apart...far from it. I've tried tapping on them with a block of wood and mallet - no luck. Not really budging...

Any ideas? Is there a puller designed for this? Will water start flooding the boat? I understand people do service/re-pack them while in the water.

Thanks in advance for any/all comments/suggestions. Much appreciated!

Dave
 
Picture...

This might help = picture!
 

Attachments

  • IMG_0906.jpg
    IMG_0906.jpg
    114.2 KB · Views: 224
The piece nearest the prop shaft should slide towards the engine. Water will start to flow into the boat. You should have the correct size packing on hand and cut to the correct length before you start the work. You can use the exposed prop shaft to cut the packing to lenght. If it hasn’t been repacked in that long it may be really hard to get it to move. I would start with something like PB Blaster for a few days prior to trying to take it apart. After spraying it in tap around the fitting to help work the Blaster into the joint.i don’t know of any tool made specifically to pull this. Just keep after it with the Blaster. Maybe some heat on the rearward fitting.
 
Oh, BTW, welcome aboard. If you don’t know what the size of packing it is, get the forward fitting to slide forward and then take drill bits and see what size will fit between the shaft and the gland. I like GFO packing but there are a lot of them out there. Get everything ready before you start to pull out the old packing and then use a packing pick to screw into the old packing and carefully pull it out. There will be multiple layers of packing in there. Most have 3 or 4 layers but mine have 6. Have a few rags to stuff into the gland if something doesn’t work at first. You should make sure the bilge pump works before you start...
 
I'm no expert, but I wanted to mention that (unless it's a trick of the camera) that stuffing box looks fairly pink. That means de-zincification which I believe makes the bronze weak. May be worth checking into before servicing it? (Perhaps others will confirm or deny,)
 
Good catch on the pink Frosty ......though pictures can be deceiving...... but if the boats out of the water it would be a good idea to test it.

I would just try to force a screwdriver between the two parts and lever them apart. Once it breaks loose a little bit, probably sticking from the old packing ,it should come right off
 
Looks like someone tightened the gland all the way and jammed it. I would spray a good anti seize solution on it, double nut the adjustment screws and remove them. Then tap on the side screw protrusion to try to twist it loose. Tapping will let the anti seize break through the frozen gland.
 
Thanks everyone - lots of good info/ideas/suggestions. Another related question...

As you can see I disconnected the raw water supply hose from the elbow on top of the gland. A mechanic told me that the water should be flooding out of it at high pressure...it's not. Water comes out - would probably fill a glass of water in about 10 seconds, but not high pressure and not going to sink my boat. I removed the elbow as well, same thing...I can see the shaft, it looks clean and no apparent blockage. Same for both port and starboard glands.

Is this a sign that something is wrong/restricting flow? Or, is the mechanic wrong and water should not be high pressure/heavy flow from that opening?
FYI - my glands do drip both in the slip and (more) underway.

Thanks again!

Dave
 
No... not high pressure necessarily....but it depends on how deep your shaft is. Either way, a modest flow is probably good enough.
 
I agree with psneeld - you should see flow, but not a geyser. A cup in 10-seconds is fine. All a function of how far below waterline the outlet is. On a GB, probably 24-inches, tops.

I zoomed-in on the OPs picture. I assume that where I've shown the dashed red line is where the 'pusher' meets the housing ('pusher' being the part that descends when bolts are tightened). If so, I'd put PB Blaster along the dashed red-line; and then take a block of wood and a mallet and give firm taps on the ears, where the white circles are; one and then the other to 'rock' the pusher. Keep tapping for a while - it will hopefully eventually give way. If you have a large screwdriver with a broad enough tip, you may be able to insert and twist it to spread the pieces apart.

Good luck!

Peter
GB42 Stuffing Box.jpg
 
On a job like this always plan for the worst. What if you can’t get the new packing back in? Bilge pumps all good? Something to stop the leak like duct seal or bees wax? Have the right size and quantity packing? Have an extra ring?
 
Are you sure you want to start on this voyage of discovery while in the water? Nothing like a fountain of water spurting up to between your legs to help one contemplate how the machinery got in this predicament. Good advice on having the new packing cut and ready to go but how did you know what size to buy since you've never seen the inside of the gland? What if you're wrong?


Why not just drive it this year and put the new packing in over winter haulout. When you and it will be dry. And the marine store is open.
 
The elbow with the plug on the top of the gland is for water. Usually some of the exhaust water is plumbed to the fitting to ensure a flow of water to the stern bearing. It also helps keep the grooves in the stern bearing free of buildup.
I always change the packing in the water since the final adjustment is done there anyway. Not that much water comes in, it would take days to sink your boat.
There's probably a spot on the housing for a grease fitting. If waterproof grease is pumped in, water pressure keeps it up against the packing. Any leak forces the grease into the packing, lubing the shaft and stopping leaks. It stops wear on the shaft, allows the shaft to turn easier without leaks, and may save a minor amount of fuel.
 
Thanks again everybody!

Red line and white circles are spot on...thank you again! Will work on loosening things up. The gap is a little large for the screwdriver plan, but I will come up with something else.

Winter haul out? What's that??? Just kidding...but in SoCal we boat year round...haul out once every 3-5 years for bottom paint mostly. So kind of need to address while in the water...but being prepared for the worst is an excellent idea.

No grease fittings...I've seen those on a charter many years ago - but mine don't have them.

Will update when I have news. Thanks again...

Dave
 
Are you sure you want to start on this voyage of discovery while in the water? Nothing like a fountain of water spurting up to between your legs to help one contemplate how the machinery got in this predicament. Good advice on having the new packing cut and ready to go but how did you know what size to buy since you've never seen the inside of the gland? What if you're wrong?


Why not just drive it this year and put the new packing in over winter haulout. When you and it will be dry. And the marine store is open.

I agree, there’s something about experimenting with below waterline fittings without a proven functioning seacock/valve that makes me a bit apprehensive
 
Thanks again everybody!

Red line and white circles are spot on...thank you again! Will work on loosening things up. The gap is a little large for the screwdriver plan, but I will come up with something else.

Winter haul out? What's that??? Just kidding...but in SoCal we boat year round...haul out once every 3-5 years for bottom paint mostly. So kind of need to address while in the water...but being prepared for the worst is an excellent idea.

No grease fittings...I've seen those on a charter many years ago - but mine don't have them.

Will update when I have news. Thanks again...

Dave
If gap is too big for screwdriver, try a shim of some sort to reduce the gap.

The biggest risk is ripping the hose that connects the stuffing box to stern tube. Those hoses are usually pretty tough, but pay attention. If it's in decent shape, I wouldn't hesitate to work on the stuffing box. Not a lot of water comes in if you have an issue. A t-shirt stuffed in will abate. Flow from your water injection is worst case flow, and you've already said it isn't much.

Good luck and please update. First time I did a stuffing box in water I was terrified.
 
I'll agree. Working bilge pumps and something to block the flow if needed and it's not a big deal to do in water. The first time I opened up a stuffing box on my boat in the water my reaction was pretty much "that's it?" at the couple gallons a minute coming in under not much pressure.
 
I seriously doubt that I would try to do mine in the water since it is difficult to get to and I don’t fit in there well. I repacked my port side this winter while I had the engine and transmission out. Then it was easy to get to.
 
So, I successfully separated both packing glands tonight! Some rope/line, a crowbar, some muscle and leverage did the trick...

So time to clean up the parts some more, remove the old packing, install the new packing, and reassemble. But...questions:

With the glands apart no great flow of water occurred. The same dripping - about 1 drop every 5 seconds on one, and about 1 drop every 30 seconds on the other. How much water do we think will come out once I remove the old packing material? Will it be hard to push the new pre-cut packing material in place? The old/current packing material seems to be about 1/4 of an inch to 3/8 of an inch in from the opening - does that sound about right?

Big question - you will notice in one picture that the starboard gland has a broken stud. Needs to be replaced. Will it simply or otherwise come out? Just unscrew it? Heat it up? I don't see threads at the point it enters the gland...but maybe they are there?

Well, that's enough for tonight. I can't thank everyone enough for all of your help.

Dave
 

Attachments

  • IMG_0913.jpg
    IMG_0913.jpg
    123 KB · Views: 69
  • IMG_0912.jpg
    IMG_0912.jpg
    123 KB · Views: 58
So, I successfully separated both packing glands tonight! Some rope/line, a crowbar, some muscle and leverage did the trick...

So time to clean up the parts some more, remove the old packing, install the new packing, and reassemble. But...questions:

With the glands apart no great flow of water occurred. The same dripping - about 1 drop every 5 seconds on one, and about 1 drop every 30 seconds on the other. How much water do we think will come out once I remove the old packing material? Will it be hard to push the new pre-cut packing material in place? The old/current packing material seems to be about 1/4 of an inch to 3/8 of an inch in from the opening - does that sound about right?

Big question - you will notice in one picture that the starboard gland has a broken stud. Needs to be replaced. Will it simply or otherwise come out? Just unscrew it? Heat it up? I don't see threads at the point it enters the gland...but maybe they are there?

Well, that's enough for tonight. I can't thank everyone enough for all of your help.

Dave


No the current packing will stop the water flow until you disturb it because it is still packed pretty tightly. I took a piece of PVC piping with the same ID as the diameter of the shaft and cut it into 2 pieces lengthwise. I use it to push the new packing into the gland so it goes in evenly. You need to stagger the cuts in the packing so they don’t line up. The new packing will go in easily with the PVC to push it. You absolutely need to make sure you get the correct size packing, too big and it won’t go in, too small it will never tighten up and keep the water out. Now that you have the inside end off get a set of drill bits and see which one fits tightly and that is the size of the packing you need. It must be the right size. You will get a flow of water when you start getting to the last layer of packing and even more when it is all out. Just be prepared and have everything you will need at hand and don’t panic. Be methodical and plan it all out in your mind before you start. Have some rags to stuff in and duct tape on hand.

As to the broken stud, good luck. It is a case of finding the correct method of getting out. Maybe PB Blaster or the like, start now dosing it periodically. Maybe heat. Maybe double nut if you can get a nut on the stud, hopefully when you got the old nut off it chased the threads for you. Maybe a combination of all the above along with periodically.tapping to help work the lubricant into the threads on the rear piece of the gland. Maybe it will just back out with vice grips but I wouldn’t go there first because it will screw up the threads.
 
You will be really overwhelmed!

Overwhelmed at how little water flows given the worry most bring to the idea. Bigger worry is leaving that hard crusty packing in the gland and tightening it in a misguided attempt at getting to the next season. I might work on that stud first, while the packing is keeping things nice and sealed.

I would get the right packing, but here is a little tip if you find that it’s not quite the right size. If you tap the packing with a hammer you can flatten it just a bit, making one side thinner and the other fatter, so you can make it the right fit. Sometimes this effect has already happened in the packaging, so adjust if you like. You want it to go in as close to the right size as possible. It will slide in easily if you do. You want at least 3 rings and an extra ring is allowable if you have the room. Main thing is to not get over zealous as you tighten it the first time. If you go too tight, you cant just release the tension, you will have to pull the rings out, adjust them and put them back in.

Also old packing can get quite hard. Be sure you have it all out before repacking.

Also, get an extra corkscrew tool, or two. If you find rock hard packing, it can be easy to break a tool. Try to pick out small amounts at a time. If you crank it in a long ways, you will be trying to remove multiple rings at once and the tool will fail. Look for an edge, probe with a thin screwdriver. Once you get it started it will go easier.
 
I agree. Mine has 6 layers of packing. I couldn’t even reach the last two with the corkscrew tool. It would go in but wouldn’t turn because of the hex area on the tool was 3/8” and that is the size of packing it takes. So the tool wouldn’t turn and the smaller size tool wasn’t strong enough to pull it out. I got the last 2 layers out when I pulled the back end of the gland off the shaft. I don’t recommend doing that in the water...
 
Maybe PB Blaster or the like, start now dosing it periodically. Maybe heat. Maybe double nut if you can get a nut on the stud, hopefully when you got the old nut off it chased the threads for you. Maybe a combination of all the above along with periodically.tapping to help work the lubricant into the threads on the rear piece of the gland. Maybe it will just back out with vice grips but I wouldn’t go there first because it will screw up the threads.

Comodave has it right - looks like you have plenty of thread to get double nuts on it, which is lucky. And I definitely agree about not going the vice-grip route. Double nut will give you more torque, and as he states, no damage to threads.

Comodave: I have never seen a stuffing box with more than three, maybe four rings of packing. At first, sounded like a good idea - more is better. But after thinking.....I wonder. Is there risk that the inboard rings are running dry and heating-up?

Peter
 
I have broken a few of the corkscrew packing tools through the years.


I switched over to long, fine thread drywall screws. Screw them in, use vice grips to pull out...the vice grips can be levered against a piece of wood, or hit with a hammer to make it real easy coming out..
 
I have broken a few of the corkscrew packing tools through the years.


I switched over to long, fine thread drywall screws. Screw them in, use vice grips to pull out...the vice grips can be levered against a piece of wood, or hit with a hammer to make it real easy coming out..
Great tip!
 
Number of rings depends a lot on the box. Mine take 5. When I repacked them it looked like 4 would be enough, but they didn't tighten up properly with 4. So I added a 5th ring and they've worked great since (don't get hot, hardly ever drip while stopped, etc.)
 
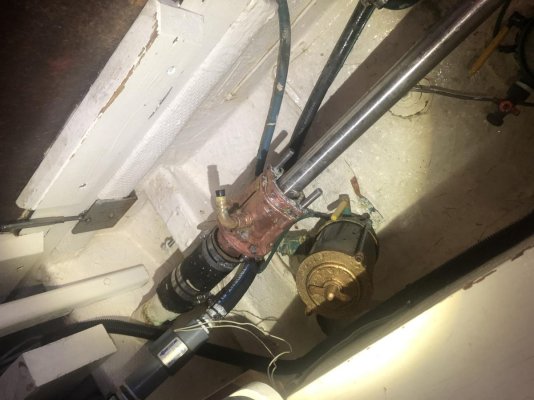
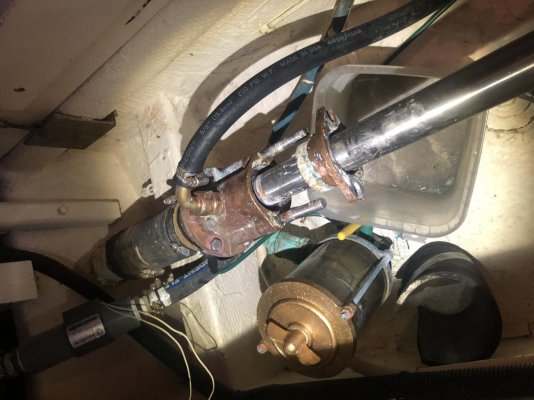
There appears to be some scale on your shaft and salt on the follower. Wire brush the heck out of everything.

I agree to double-nut the stud, unless you can find a stud puller (the collet type), but I would also heat the flange area of the stuffing box and mechanically agitate both the flange body (radially) and the stud (axially) with a few hammer taps to break the set stud threads free. A little penetrating oil overnight ay help too (I like Kroil). Bronze and SS usually come apart relatively well, but it is likely an interference fit, so it will be tight.

Getting the packing out might be a tough as it looks like it hasn't been serviced or has been over tightened in the past. Have fun with that use patience and take breaks. Use screws, packing pullers, and picks (dental picks if you can get them). It's the worst part of the job.

As there is a cooling/flushing water connection on the box you may find a lantern ring in there too. Old school ones are bronze. Consider fitting a PTFE replacement one that wraps on like a piece of packing. You can buy a chunk that you cut to size and wrap it on like packing. Garlock, John Crane, etc make them. They are way better than the original metal one. If you don't have a lantern ring in there, someone may have already removed it. In this case, the water connection probably doesn't do anything at all as all of the radial clearance for flush flow will be taken up by the packing. Honestly in this application, with modern packing, lantern rings are of negligible value, unless you boat in skinny water with sand intrusion. It is quite common for the old metal ones to be missing, as they are a pain to deal with, and often just wear the shaft.

Chamfer cut the packing to size. If you have a piece of pipe the same size as your shaft that works well. If not, you appear to have enough shaft away from the gland to cut a few pieces. It's not correct, but it is better than having the wrong size packing. Emery cloth out any knife marks you make.

When you put it back together, stagger the rings and slide each piece down as far as you can before put in the next piece. A little water soluble lube works great too. I use a chunk of plastic pipe (well actually I used a nylon hose barb) that I slotted longitudinally. I snap this over the shaft and drive the packing in to the gland with this tool. Highly recommend this. It works great as it gets the packing set straight and tight into the gland.

If the box is radially concentric to the shaft, you shouldn't have to hammer the packing to fit. Instead, support the gland so that it is concentric and not sagging, after all, it is "hanging" on a hose. An easy way of measuring packing size is with a dowel or pencil chunk.

Keep in mind that the packing follower imparts an axial load onto the packing to compress it radially inwards to the shaft and outwards to the stuffing box. The frictional drag makes it so most of the load and therefore compression happens on the ring closest to the follower, and NOT the ring deepest in the gland. This is somewhat counterintuitive. Save your best fitting packing ring for last.

Snug it up and run it. Let the packing break in, heat up and swell a bit. Tighten it slowly, bringing up the gland nuts a flat or half a flat at a time. Most people don't spend enough time letting the packing break in. Once you tighten the packing and compress it, it doesn't "uncompress" or rebound back into shape, if you back off on the gland. Take your time and do it right and modern packing will last a long time.

I like GFO. Real GFO with the letters GFO, printed on the packing.
 
Comodave has it right - looks like you have plenty of thread to get double nuts on it, which is lucky. And I definitely agree about not going the vice-grip route. Double nut will give you more torque, and as he states, no damage to threads.

Comodave: I have never seen a stuffing box with more than three, maybe four rings of packing. At first, sounded like a good idea - more is better. But after thinking.....I wonder. Is there risk that the inboard rings are running dry and heating-up?

Peter

I have not opened the starboard side yet, I am going to pull the starboard engine this winter to do all the routine maintenance and cleanup a lot of things. Rebuilding the stuffing box is on the list so I will see how many layers is in that one. They don’t run hot or drip at all underway or sitting at the dock. The port shaft looked great where the packing rides so it doesn’t appear that having the 6 layers of packing hurts at all. I was surprised when I found that many layers also.
 
Boat I built 35 years ago had a 3 inch shaft.
I used an Easthope stuffing box and stern bearing.
The stuffing box took 13 rings of 1/2 inch packing.
The stern bearing used rubber? rings. The inside looked like a cuttless bearing.
The out side had 2 square tabs that fit into the bronze housing. They were
about 1/2 inch thick. Adjusted them the same way as the stuffing box. .......when adjustment ran out, add another ring. After 2 rings, pull and replace them all
 

Latest posts

Back
Top Bottom