Baba Yaga
Veteran Member
- Joined
- Mar 15, 2019
- Messages
- 62
- Location
- San Diego
- Vessel Name
- Baba Yaga
- Vessel Make
- 1979 Californian 34 LRC
Hey there everyone,
I figured this place has been so quiet I would add some content with lots of pictures, who doesn’t love pictures in a post? **Disclaimer-I’m not a woodworker, don’t own a shop, not in the marine industry, just a normal kind of guy with some basic tools**
With everything going on in the world I decided to do a salon refit and tackle some things on the boat I have been wanting to get done. Just to catch everyone up still reading this, and not familiar with things…I have a 34 LRC Californian, no lower helm, running twin turbo Perkins. Inside you will find nothing but wood everywhere you look, not to be confused with her sister boats that have wall coverings throughout (not a bad thing just pointing out differences). She was super clean and in fantastic shape, the PO, John, former member on here, took great care with her. You’re caught up now, let’s get going.

We decided we didn’t like the yellow tint to all of the wood in the salon, were missing the original sette, and wanted to update the look a bit. So, we decided it would be a good time (covid-19) to get our hands dirty. Since we try to do all of the work ourselves, we knew it was going to be very challenging.

We started with the removal of the brown stove, sink, and counters. Since the counters had three different heights we leveled and reset the fridge. We also removed the cabinet that filled the area where the lower helm should have been.
Next, since a cabinet was in the place where the ac/dc panel would have been located if it had a lower helm, it was relocated by the factory on top of the counter under the front facing starboard window (a total pain in the a** to see when switching breakers). We decided to move the vhf down in the same area along with the stereo (which was mounted in the middle of the countertop facing up by a PO).

Next up was to build in a new sette. We decided we wanted to add some curves to the design to modernize it subtly. So, after many drawing and measurements we came up with a design and built it. For the curved section I used ¾ inch marine plywood and did a series of kerf cuts, used epoxy in the cuts and place in the jig I made on the floor to keep it in place until it was dry. I boxed in all the storage compartments and went back over the top edge and kerf with resin reinforced with fiberglass. I did a lot of sanding and painting, then skinned it with African mahogany veneer.

Now for the sanding, lots and lots of sanding. Not just any old sanding, but the kind of sanding on veneer that if you went a tad to deep you blew threw it and the project was ruined. (I got a quote and it was 30k just for the sanding and they said it would be easier and cheaper to reskin the whole inside). Since I’m either a dumba** or not afraid of a challenge I went for it. After the whole project of sanding was done, I found only three dime sized spots I blew through and they all were in location that will not be noticed, yup got lucky. In all, the sanding alone took me 3 ½ weeks of being on the boat Monday through Friday from 9-3. The level of concentration during sanding was mind numbing and I really had to focus on the grain and when it popped out from under about 25 coats of varnish.

I decided I needed to get out of the inside of the boat for a bit and started restoring the upper helm seating. This included making new hard backed cushions and sewing everything up, after all we are trying to do it all ourselves, remember? Restoring the upper helm also included taking out all of the old snaps and screws, replace trim on bottom that was missing, fill, sand, prime, and paint. For painting we are using Interlux Brightside. Also included with the upper helm is the wood backrest and foot rest. After hours of sanding I used TotalBoat Lust.

I also took this break to sand, prime, and paint the generator since the color it was, was not an original Yanmar color and was driving me nuts (quick 3 day project).
After the sanding was complete and I could move my arms again, I next focused on building in the new microwave and design a catchy built in wine rack. For the wine rack I wanted polished stainless rings giving the effect of a P51 exhaust or something like that. It also doubles as a place I can put my Apple TV and PlayStation and it not be seen or sit on a countertop. With that out of the way I next decided to build in a TV which raises out from the rear of the countertop and can be see in the whole salon. I then focused on sanding and painting all of the areas inside the new sette, lockers, cabinets, and drawer areas in the upper salon. That was so much fun :/ I plumbed in all new outlets and boxes to allow us to have USB ports at every plug.


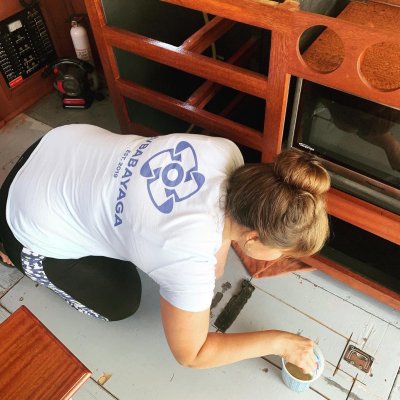
Our next step was to decide if we were going to stain, not do stain, use varnish, or go a mixed method. We chose to stain in a light mahogany because we wanted that red hue from the mahogany to really come back to her glory. We have just finished the staining and totally dig it. It might not be everyone’s taste but it is ours and love the look.


This is the point we are at in real-time. I will try to update this post as we move further along. We also have a website dedicated to all the things we are doing to BabaYaga, including the parts we are using and the parts or tools we didn’t like during the project. We would love if you had a look and followed us through this journey.
MVBABAYAGA.com
Thanks for reading and looking at the pics, hope you enjoyed!
I figured this place has been so quiet I would add some content with lots of pictures, who doesn’t love pictures in a post? **Disclaimer-I’m not a woodworker, don’t own a shop, not in the marine industry, just a normal kind of guy with some basic tools**
With everything going on in the world I decided to do a salon refit and tackle some things on the boat I have been wanting to get done. Just to catch everyone up still reading this, and not familiar with things…I have a 34 LRC Californian, no lower helm, running twin turbo Perkins. Inside you will find nothing but wood everywhere you look, not to be confused with her sister boats that have wall coverings throughout (not a bad thing just pointing out differences). She was super clean and in fantastic shape, the PO, John, former member on here, took great care with her. You’re caught up now, let’s get going.
We decided we didn’t like the yellow tint to all of the wood in the salon, were missing the original sette, and wanted to update the look a bit. So, we decided it would be a good time (covid-19) to get our hands dirty. Since we try to do all of the work ourselves, we knew it was going to be very challenging.
We started with the removal of the brown stove, sink, and counters. Since the counters had three different heights we leveled and reset the fridge. We also removed the cabinet that filled the area where the lower helm should have been.
Next, since a cabinet was in the place where the ac/dc panel would have been located if it had a lower helm, it was relocated by the factory on top of the counter under the front facing starboard window (a total pain in the a** to see when switching breakers). We decided to move the vhf down in the same area along with the stereo (which was mounted in the middle of the countertop facing up by a PO).
Next up was to build in a new sette. We decided we wanted to add some curves to the design to modernize it subtly. So, after many drawing and measurements we came up with a design and built it. For the curved section I used ¾ inch marine plywood and did a series of kerf cuts, used epoxy in the cuts and place in the jig I made on the floor to keep it in place until it was dry. I boxed in all the storage compartments and went back over the top edge and kerf with resin reinforced with fiberglass. I did a lot of sanding and painting, then skinned it with African mahogany veneer.
Now for the sanding, lots and lots of sanding. Not just any old sanding, but the kind of sanding on veneer that if you went a tad to deep you blew threw it and the project was ruined. (I got a quote and it was 30k just for the sanding and they said it would be easier and cheaper to reskin the whole inside). Since I’m either a dumba** or not afraid of a challenge I went for it. After the whole project of sanding was done, I found only three dime sized spots I blew through and they all were in location that will not be noticed, yup got lucky. In all, the sanding alone took me 3 ½ weeks of being on the boat Monday through Friday from 9-3. The level of concentration during sanding was mind numbing and I really had to focus on the grain and when it popped out from under about 25 coats of varnish.
I decided I needed to get out of the inside of the boat for a bit and started restoring the upper helm seating. This included making new hard backed cushions and sewing everything up, after all we are trying to do it all ourselves, remember? Restoring the upper helm also included taking out all of the old snaps and screws, replace trim on bottom that was missing, fill, sand, prime, and paint. For painting we are using Interlux Brightside. Also included with the upper helm is the wood backrest and foot rest. After hours of sanding I used TotalBoat Lust.
I also took this break to sand, prime, and paint the generator since the color it was, was not an original Yanmar color and was driving me nuts (quick 3 day project).
After the sanding was complete and I could move my arms again, I next focused on building in the new microwave and design a catchy built in wine rack. For the wine rack I wanted polished stainless rings giving the effect of a P51 exhaust or something like that. It also doubles as a place I can put my Apple TV and PlayStation and it not be seen or sit on a countertop. With that out of the way I next decided to build in a TV which raises out from the rear of the countertop and can be see in the whole salon. I then focused on sanding and painting all of the areas inside the new sette, lockers, cabinets, and drawer areas in the upper salon. That was so much fun :/ I plumbed in all new outlets and boxes to allow us to have USB ports at every plug.
Our next step was to decide if we were going to stain, not do stain, use varnish, or go a mixed method. We chose to stain in a light mahogany because we wanted that red hue from the mahogany to really come back to her glory. We have just finished the staining and totally dig it. It might not be everyone’s taste but it is ours and love the look.
This is the point we are at in real-time. I will try to update this post as we move further along. We also have a website dedicated to all the things we are doing to BabaYaga, including the parts we are using and the parts or tools we didn’t like during the project. We would love if you had a look and followed us through this journey.
MVBABAYAGA.com
Thanks for reading and looking at the pics, hope you enjoyed!