varnish failure at seams

The friendliest place on the web for anyone who enjoys boating.
If you have answers, please help by responding to the unanswered posts.

rlrrlrll

Newbie
Joined
Jul 8, 2020
Messages
4
Location
near Puget
Hello. I have a 34' trawler with bright work. There is a cap rail that runs all the way around the boat. I stripped and sanded it down years ago and varnished it. Each year I patch problem spots and put 3-5 coats on. It is not covered.


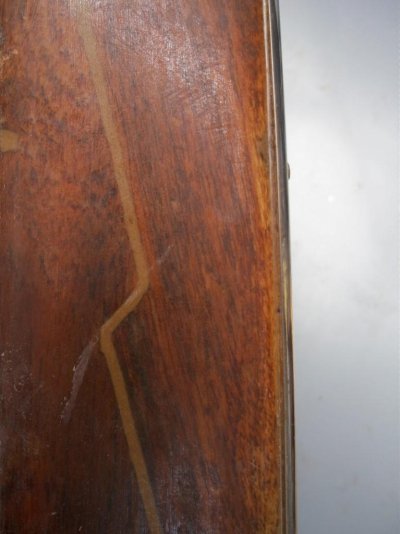
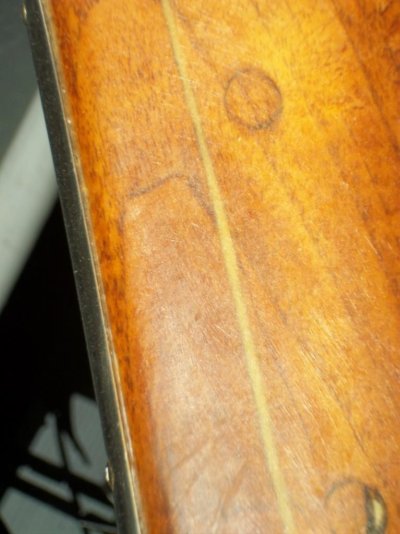
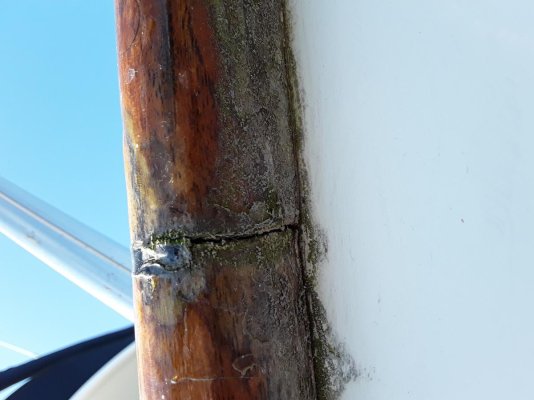
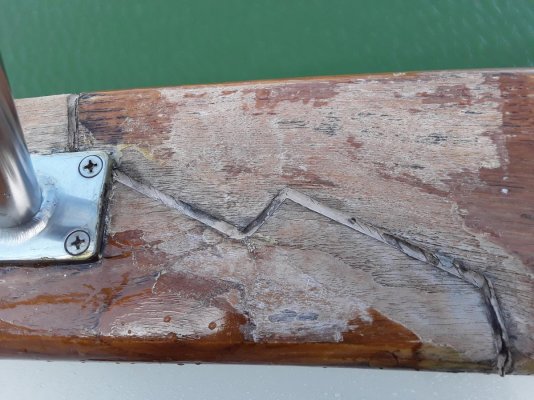
There are a few places that fail every year. They are at the seams where it appears to be two pieces of teak spliced together with some black stuff in between. Every year water gets in and the varnish fails.


attachment.php


Really though, these are not seams but small grooves cut in the wood with the black stuff in the grooves.


attachment.php


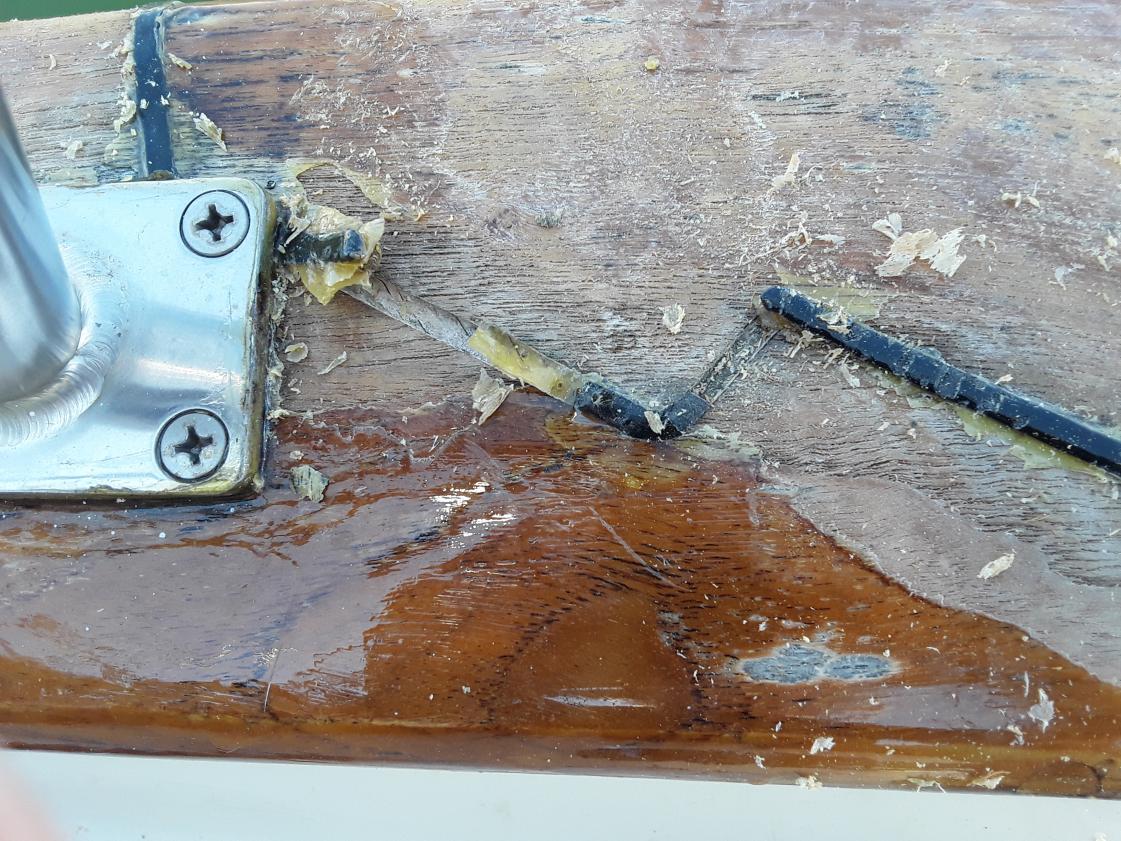
Why they did this I have NO idea. But they did.

What would be a good way to seal this area so it doesn't fail every year? I did have the black stuff replaced once but it still failed.


I'm tempted to just remove the black stuff and sand the grooves and just varnish over it.

Do any of yall have an idea on either what to use to fill in the seams that won't get water under it, or some way I could possibly put something over these spots to seal them?

Thanks for viewing.
 

Attachments

  • 20200705_142624[1].jpg
    20200705_142624[1].jpg
    138.1 KB · Views: 807
  • 20200705_143253[1].jpg
    20200705_143253[1].jpg
    198.2 KB · Views: 794
The caulking seals timber joins. It`s likely leaking, failing at the edges. You could dig it out and replace with fresh polyurethane caulk, like Sikaflex 291. Then redo the varnish, covering the caulk as well. Tape the edges of the area to be filled before caulking.
 
The joint in question is a scarf joint between two separate pieces of timber, it is not merely a decorative groove. With changing temperature and moisture content the two pieces of teak move slightly and over time it cracks the varnish and allows moisture to then get under the varnish at the joint.

In theory a flexible high-oil varnish is less prone to the cracking than a hard or polyurethane finish. In practice is not as clear cut. Even with the best finishes I think that every couple of years the joint areas will need to be re-done. Well, that seems to be the case for the joints on my rails.

I bought my boat near Seattle, and in due course shipped it back to Australia. On some rails the joints that had been as tight as a drum, with wood touching wood, opened up to a 1/8" gap after I had been back for a while. I've used some black caulk in the joints since then (probably Sika 291) and the the joint looks good with smooth black caulk, but it still fails regarding moisture ingress after a few years. I woul love someone to come up with a solution that lasts longer!
 
The caulking seals timber joins. It`s likely leaking, failing at the edges. You could dig it out and replace with fresh polyurethane caulk, like Sikaflex 291. Then redo the varnish, covering the caulk as well. Tape the edges of the area to be filled before caulking.

Clean out the caulking
wash with thinner / acetone
sand Groves with 80 grit
couple coats of thinned varnish in the groves to seal the wood
Re caulk with Sikaflex...taping as stated above
Now varnish the rails.
 
Of course I don't know the make of the caulk you are using. But a very common one is Life Seal. There is a big difference between their caulk and their seal. The seal can be painted the caulk can not. I suspect that your caulk is not paintable, it may look like the varnish is adhering to the caulk but it probably is not. Once it releases a little or cracks, you get moisture penetration and failure.

Read the caulk tube carefully, it must be paintable.

pete
 
Also look underneath the cap rail, the faulty caulk may be on the bottom, allowing moisture to come up from below.

Also that stanchion could be introducing moisture into the groove. You should remove and rebed it.

pete
 
I spoke to a couple of Awlwood factory reps at last years Miami Boat Show about this very same issue , cap rail scarf joints. Their opinion is that there is no long term solution. The joint is going to move , you can't do anything about that , and all wood clear coats that we use are going to crack because of the movement if you try to overcoat the joint. Just another PIA of maintaining exterior wood on our boats.
 
In an earlier thread regarding cap rails a forum member recommended scraping the grooves clean, then applying the clear finish, then reapply the seam sealer. If the seam sealer is not UV tolerant, do something to make it so...perhaps a 2-part product over the sealer, or maybe something like 301 protectant. I used Interlux Perfection Plus, which is highly UV tolerant compared to any varnish product, and liberally worked it into those cleaned joints. A polyurethane sealant is next...then I’ll try the 301 product applied with Q-tips.
 
We use a high oil varnish that apparently is flexible enough as we have little trouble w the water ingression at the cap-rail joints. That is: McCloskey’s Mano’War Marine Spar Varnish.

The OP has wide seams but he was probably using hard varnish to keep feet from scuffing the finish. I had that issue 12 years ago using a water based West System varnish. It failed soon and badly. Then I decided the scuff marks on the cap-rail were just fine w me. Been using McClosky’s varnish ever since.
I don’t like appearing to be selling a brand product but in this case it’s justified IMO because it’s hard to identify a high oil varnish from a high resin varnish. Years ago the paint manufacturers were required to put the ingredients on the can and the prtcentages of each element included. One just picked a varnish w a high oil content. Now short of asking a manufacturer like Interlux or Petitt what can one do? And who knows what Interlux or Petitt will tell you over the phone.
But re the McClosiy’s Spar varnish I know from experience. I was taking a class in college (industrial Education) on finishes such as paint. I asked the proff what the best varnish would be for my planked wood boat. He said to find a varnish made w phenolic resin and a high percentage of oil .. Tung oil or Linseed oil w a slight preference to Tung oil. So it was simple then as they put all the ingredients on the can. This was in 1969. Somewhere down through the years they dropped that requirement and one was left to salesmen, hearsay and product hype to choose finishes.
So w my newfound knowledge I found that, after much shopping that McCloskey’s Mano’War Marine Spar Varnish fit the professor’s recommendations. I’ve been using it all these years. It was called “Boat Coat” then. Now it also says “maximum UV protection”.

Short of wide seams and high oil varnish there’s not much one can do about water under the varnish at the seams problem. It isn’t limited to the seams though as everywhere the varnish coating has been penetrated (Like w screws) water will get in and under the varnish, turn it a milky whitish color and loosen the finish around the seam or bolt/screw hole. And where it’s not whitish it will be black.

About this last comment I don’t have experience but I highly suspect that many coats of varnish around seams and screw penetrations may make the finish much stronger and able to withstand much more flexing and movement. The experts like Rebecca Whittman advise many coats (like 7-10) of varnish to be the minimum. I don’t think I’ve ever gotten to ten coats. More like 4-5. Others may be only putting on 2 coats. Looks great after 2-3 coats and many will not have the time for 10 coats. But refinish time will be much sooner. THIS MAY WELL BE THE REASON MANY TO MOST HAVE SUCH A NEGATIVE OPINION ABOUT VARNISH. Just not enough coats.

Another thought is to varnish up to the caulk but not over it. Again a wide seam to be caulked may allow for the movement.

Another thought is to grind out the seams in a wider “V” shape so the seam is wide on top.

But grinding out the seams can’t be reversed. Just can’t put the wood back.
But a combination of wide seams, flexible high oil varnish and many coats may be a very satisfactory solution. If one can stick to the job at hand for 8+ coats ducking wet weather and windy days w lots of dust. Sanding can fix that too .. not to mention more coats.
 
Last edited:
We are getting ready to do a few rails with like seams. My neighbor's look perfect so I asked him how he did it.

Removed all the black stuff, sanded everything down including the joints with 80 grit. Used Perfection plus to build it smooth, including in the joint itself but not over filling the joint. Then he added 5 coats of varnish. Then he taped it up and put the black stuff back in, but did not over coat it with varnish as he said it will just crack as its a joint that moves. Time will tell if its the way to go or not.
 
The joint in question is a scarf joint between two separate pieces of timber, it is not merely a decorative groove.

Normally, yes, but in this case it is decorative, as the OP says. Look at the grain. Stupid detail.

Anywhere the varnish ends, moisture gets under. The caulk in the joint it causing the varnish to bridge the joint between the wood and caulk, which have very different movements. The long term fix would be to remove the caulk, and have a shipwright patch the groove with a graving piece. Shorter term, remove the caulk, sand down in the groove, varnish the groove, then recaulk. You will have continuous varnish on the wood.
 
I have a couple joints like that.

I took out the caulk and sanded the seam to clean wood, Then masked around the seam and brushed epoxy into the seam. Kept brushing the epoxy on to soak into end grain. Let it get tacky and applied more epoxy. Let that dry over night. Mixed WEST 404 High Density Adhesive Filler and 403 Microfibers into epoxy and filled the seam with the mixture. Squeegee the epoxy flush and smooth. After a weeks cure, sand seam lightly and varnish.

The epoxy creates a strong bond between the two pieces of wood and since it is not flexible, will not crack the varnish over it. The epoxy filler expands and contracts about the same as the wood.

The joints that I did the above to has not cracked in 12 years. I did remove the varnish about 8 years ago and epoxied the teak before varnishing.
 
I knnd’a like RonR’s neighbor’s solution.

What the difference is, is that he’s varnishing the caulking groove before caulking (if I read it right). This means that the caulk will mate w the varnish rather than the wood. Paint and probably caulking prefer a textured surface to bond to and the caulk to varnish join surface may not hold being a smooth surface. And there is a very narrow strip at the bottom of the groove of varnish that will be very prone to failure as well as it’s so narrow. And then the varnish over the top is just as prone to fail as if he just caulked first and varnished later w the caulking attached to the wood. And the caulk to varnish inside the seam groove joint may or probably will fail and let water in and down to the almost certain to fail “varnish joint” at the bottom of the groove. Then there’s water in the joint thereafter.

But if it works for him it may work for others.
I wonder if any shipwrights do it that way?
 
1) sand and repair every year or two
or
2) inlay a 1/4" brass butterfly joint on top of the zig zag to stop movement.
 
syjos wrote;
“ The epoxy creates a strong bond between the two pieces of wood and since it is not flexible, will not crack the varnish over it. The epoxy filler expands and contracts about the same as the wood. ”

Sounds really good but if the filler expands and contracts w the wood the top coat of varnish will need to flex the same amount as if he just caulked the seam and top coated as usual. You can’t stop the cap-rail plank form expanding and contracting. The varnish on top of the filler will need to expand and contract the same as w regular caulk.
The problem isn’t that the caulk fails it’s that the varnish film fails. So making the seam wide and using a flexible varnish seems the answer to me.
What are some of the other variables in your method? Like #of varnish coats?
 
Hi rlrrlrll,

You're going to get as many opinions on this issue as Carter has Little Liver Pills. And everybody's got their own version of snake oil and/or mouse milk to make your life better. So here's my $.02:

As BigTime said,
I spoke to a couple of Awlwood factory reps at last years Miami Boat Show about this very same issue , cap rail scarf joints. Their opinion is that there is no long term solution. The joint is going to move , you can't do anything about that , and all wood clear coats that we use are going to crack because of the movement if you try to overcoat the joint. Just another PIA of maintaining exterior wood on our boats.

Mother Earth will have Her way, regardless of what mortal man chooses to combat Her desires. Yup, wood moves. Yup, wood clear coats don't move the same way. Result? A PIA for those of us that chose to maintain exterior wood. You've asked a good question, but doubt you'll get a good answer.

So, another $.02 opinion: covered moorage may help, a boathouse may help more.

Regards,

Pete
 
syjos wrote;
“ The epoxy creates a strong bond between the two pieces of wood and since it is not flexible, will not crack the varnish over it. The epoxy filler expands and contracts about the same as the wood. ”

Sounds really good but if the filler expands and contracts w the wood the top coat of varnish will need to flex the same amount as if he just caulked the seam and top coated as usual. You can’t stop the cap-rail plank form expanding and contracting. The varnish on top of the filler will need to expand and contract the same as w regular caulk.
The problem isn’t that the caulk fails it’s that the varnish film fails. So making the seam wide and using a flexible varnish seems the answer to me.
What are some of the other variables in your method? Like #of varnish coats?

Because the epoxy filler is hard and similiar in density to the wood, it expands and contracts about the same as the wood. Instead of the flexible seam experiencing the majority of the movement, the expansion and contraction is taking place in the whole length of the wood. The varnish is flexible enough to move with the wood, as long as the wood is protected from excessive moisture intrusion.

The epoxy in the seam turns the two pieces of wood into one continuous length, expanding and contracting equally through it's length.
 
I have a couple joints like that.

I took out the caulk and sanded the seam to clean wood, Then masked around the seam and brushed epoxy into the seam. Kept brushing the epoxy on to soak into end grain. Let it get tacky and applied more epoxy. Let that dry over night. Mixed WEST 404 High Density Adhesive Filler and 403 Microfibers into epoxy and filled the seam with the mixture. Squeegee the epoxy flush and smooth. After a weeks cure, sand seam lightly and varnish.

The epoxy creates a strong bond between the two pieces of wood and since it is not flexible, will not crack the varnish over it. The epoxy filler expands and contracts about the same as the wood.

The joints that I did the above to has not cracked in 12 years. I did remove the varnish about 8 years ago and epoxied the teak before varnishing.


This seems (no pun) the best solution. Using West's G-Flex would make it even better as the final filler b/c it has great flexibility and often won't crack when regular epoxy will. Once the end grain is saturated with epoxy I don't think your varnish will lift even if the caulking fails if you want to continue to use caulking
 
You cannot sand out the grove without having to level the rest of the rail. Then you will be left with the much thinner wood-to-wood joint which the filled groove was covering. I had a Grand Banks with wooden hand and cap rails with several joints, but none were grooved and filled like yours. There would occasionally be a crinkle at a joint a year or so after the last coat of Epifanes varnish, but never anything as serious as the drying out and bleaching in the photos you show. That may have been thanks to the fact that when I wooded out the rails I applied a couple of coats of clear penetrating epoxy sealer. This stuff takes a full 24 hours to cure. I waited 16 hours after the CPES went down (with extra applied to the joint areas) and applied the first coat of varnish to get it to chemically bond to the CPES. Six coats minimum of varnish in order to have sufficient UV protection and a maintenance coat at least once a year thereafter. To resolve your issue, I would remove the caulk from the joints and sand the groove well before applying CPES liberally to the area. Then varnish and sand the groove before applying thee black caulk.
 
This seems (no pun) the best solution. Using West's G-Flex would make it even better as the final filler b/c it has great flexibility and often won't crack when regular epoxy will. Once the end grain is saturated with epoxy I don't think your varnish will lift even if the caulking fails if you want to continue to use caulking

Using G-Flex is a great idea! Never considered it as a seam filler.
 
It is a seam. Not just decorative. You can even see the bung on the edge where the fastener is holding the joint together.

The problem with joints is that the two pieces of wood are going to expand at slightly different rates, thus the caulking attempting to flex. In this case the grain is not that different. I’ve always found the fasteners loosen up a little over the years. Just removing the bung and tightening things up might help. Personally I’d try to rebed The whole thing as who knows when I’ll get to it again. I’ve had good success using epoxy on these joints, but then I am under cover most of the time. I absolutely would build an extra thickness of varnish there. Thin varnish lifts.
 
Here are pictures of the epoxied joints that were done 12 years ago. As you can see, the joint has not moved.

The wood was wooded 8 years ago and epoxied. Varnish was applied over the epoxy. It's in need of varnish. I'm probably going to paint it white.
 

Attachments

  • 000_0007 (Medium).jpg
    000_0007 (Medium).jpg
    73.8 KB · Views: 23
  • 000_0008 (Medium).jpg
    000_0008 (Medium).jpg
    81.9 KB · Views: 26
Thanks !!

Thanks everyone for the great input.


I think my next step is to dig the black stuff out and get a better look at what I have. I like the idea of sanding the groove and then varnishing it and then replacing the black stuff and then varnishing the rail.


It is a seam. Not just decorative. You can even see the bung on the edge where the fastener is holding the joint together.


What do you mean by "the bung on the edge where the fastener is holding the joint together"? Maybe it's my ignorance but I'm not seeing it.
 
1st post, second picture, bottom right of picture. On the side of the rail a round bung outline can clearly be seen. Also looking at the grain.
 
Thanks everyone for the great input.


I think my next step is to dig the black stuff out and get a better look at what I have. I like the idea of sanding the groove and then varnishing it and then replacing the black stuff and then varnishing the rail.


What do you mean by "the bung on the edge where the fastener is holding the joint together"? Maybe it's my ignorance but I'm not seeing it.


Just to be clean on my side.
My neighbor did not varnish over the black stuff. He says its to flexible, to wide to bridge with varnish. I'm not saying this is the right way or not, I'm not sure myself as I have not tried it.
 
Just to be clean on my side.
My neighbor did not varnish over the black stuff. He says its to flexible, to wide to bridge with varnish. I'm not saying this is the right way or not, I'm not sure myself as I have not tried it.

Well I think it makes a lot of sense, and will not varnish the caulk next time. I'll need to get hold of some pinstripe tape, and it will fiddly to setup.

My caulk is in good condition. It appears to be well bonded to the teak on both sides, so I wont remove it to varnish the teak end grain. However, it likely does have a small cracks. I'll try and leave the tiniest sliver of caulk exposed so that the teak/caulk contact gets varnish, but definitely avoid having varnish bridging across to the other contact point.
 
I went back down to boat over the weekend and dug the failed black caulk or whatever is out. It seems there is some rubber like stuff in the grooves.


I then walked around the dock and looked at other boats with a teak rail to see how their seems were. Most had a simple splice with a very thin section of black caulk in between. Not the big ones like I have.


I then looked at mine again and agree it IS a seem where 2 pieces of wood are connected. I found it is a combination seem and cosmetic. If I look under the rail I can see a small seem that is then rounded out and filled with caulk on the top.


What is this process of re sealing the seems called? Is there a technical term for it? Does anyone know of some good videos that shows the process of re sealing?


Looks like I need to dig all the caulk out. Sand it. Put new caulk in.


I have seen several references to "taping" in the responses. Does this mean to tape around the seem sort of like masking tape?


I have added more pictures. The first is the seem from the with the caulk removed and the second is the seem from the bottom. I can see where the 2 pieces of wood come together at the bottom of the photo.
 

Attachments

  • 20200712_164244.jpg
    20200712_164244.jpg
    99.3 KB · Views: 18
  • 20200712_163137.jpg
    20200712_163137.jpg
    180.4 KB · Views: 20
Last edited:
I'm guessing, but I suspect originally there was just a tight scarf joint, perhaps with glue in it. Then the varnish kept on failing - water ingress at the joint as it moved slightly over time with heat/humidity changes. So a PO came up with the bright idea of a putting a groove of caulk in in an effort to prevent water ingress.

As discussed above, you need to avoid varnish spanning across the caulk for that to work best.

From now, I would clean out the groove and sand, and if possible to slide sandpaper into the scarf below the groove then sand both side of the joint. Once clean, then with a fine brush or perhaps a syringe put some penetrating epoxy into the joint. Try to avoid epoxy in the thick part of the groove. I would consider using some hand carving chisels to extend the groove down to the GRP although that is probably not all that important to do.

Having removed the stanchion that touches the groove, mask each side of the groove and lay in something like Sika 291 as caulk. When cured, sand both the teak and caulk.
Then as discussed in earlier threads, put some pinstripe tape over the caulked groove (I would leave a tiny bit of caulk unmasked on each side) and varnish the rail, probably 6-8 coats. One trick will be removing the pinstripe without peeling up the varnish on either side. You could try removing it after each coat of varnish when the varnish is tacky. New pinstripe before next coat. Alternatively a sharp blade and delicate touch could work after the final coat of varnish is dry.

Finally, use some butyl tape to re-bed the stanchion.
 
Pic 2 seems to show cracked caulk in one section. It may not have been the best product for the job,I`m wondering about silicone, a high quality caulk may give better results. The area looks badly "festered" in pic 1.
My last boat came with a decorative line of unidentified black caulk of some kind (I never had to renew it in 10 years) on the bowsprit. Every year or so I sanded and re-oiled and recoated wood and caulk alike with a polyurethane varnish, Deks Olje 2. The wood and the black material had previously been saturated with Deks Olje 1(the oil).
There was never a failure of the varnish in terms of its joining the caulk.I`m sure it didn`t involve a scarf, but it`s still caulk set into wood.
 
Looks like a joint that is used in classic post and beam construction. The traditional joint didn’t use fasteners. Wedges were driven in from each side pushing the two beams apart and locking the joint. In this rail application I think it should have been glued with epoxy. No idea why it would be caulked.

I would not varnish over the caulk. It just moves too much. I’d tape the caulk, varnish the rail, then remove the tape before the varnish drys. Repeat several times.
 

Attachments

  • E3D58248-ED43-483C-90FD-FCCB9727705A.jpeg
    E3D58248-ED43-483C-90FD-FCCB9727705A.jpeg
    25.4 KB · Views: 15
Back
Top Bottom