Windlass Help Needed

The friendliest place on the web for anyone who enjoys boating.
If you have answers, please help by responding to the unanswered posts.

menzies

Guru
Joined
May 11, 2014
Messages
7,233
Location
USA
Vessel Name
SONAS
Vessel Make
Grand Alaskan 53
I need some additional thoughts on how to resolve this before I go to more drastic solutions.

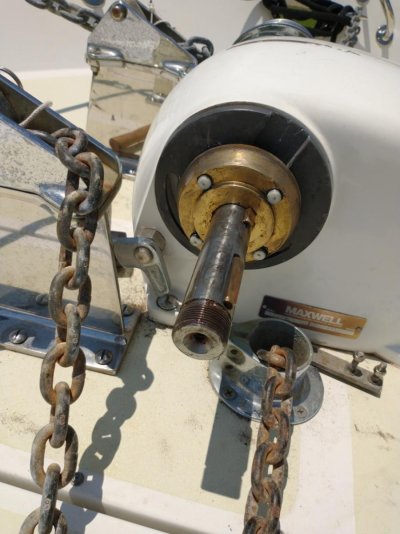
I am working on my Maxwell HWC 3500 windlass. Everything was well greased and slid off until I got to the inner clutch wheel. It is seized hard to the shaft. I have levered a large screwdriver against it and the collar and hit it solid with a mallet, I have run a Stanley knife around the edges between it and the shaft as much as I could and sprayed PB Blaster liberally, and thumped it again. No movement.

Even tried a piece of 2X4 against the shaft end and hit that to try and move the shaft in. No good.

It may be I have to saw it off and replace. Maxwell tell me that they have all of the parts available except the cover.

Any ideas? It's 91, feels like 96 degrees right now. Probably hotter on the white fore deck. So I need a rest while you guys think about it anyways! :D
 

Attachments

  • Clutch wheel 1.jpg
    Clutch wheel 1.jpg
    115.2 KB · Views: 114
  • Clutch wheel 2.jpg
    Clutch wheel 2.jpg
    94.8 KB · Views: 95
Did you try taking out those screws?

2-jaw cheap puller.
 
The 4 grey studs in the bronze clutch wheel, are they in fact studs that you that you have removed the nuts from?

How much clearance is there between the clutch and the windlass housing?

Can you work a puller with the arms around the edges ? Three arm types are best, rather than two arms, here as the pull is more even.

Can a bearing splitter be worked behind the wheel. They are often effective where the arms can't be used due to clearance issues.


Have you tried heat? If it is corrosion that has frozen the clutch to the shaft then heating may expand the clutch enough for a release. It may take a good torch to pour the heat into the clutch quickly to expand it a bit but not heat the shaft. The bronze should expand quicker than the shaft but even so the more quickly you can apply a lot of heat the better the chance.

Often applying heat to one spot is more effective than trying to heat the entire thing.

If it frees then be prepared to pull it immediately. If it freezes to soon then let it cool entirely and go at it again later.

If there is no acetylene available then two Mapp gas torches may suffice so you may need help. Make two holders for the torches of use a metal plate as you don't want the hot torch[es] rolling around. You can bet your bottom dollar they will fall over and even if off the tip will be hot enough to burn something.

I made holders of plywood about three inches high and 8 or 10" square and heavy enough the wobbling torch won't tip it.


When reassembling use some NevRSeez or similar to prevent this happening again.


Last but not least do you have the exploded parts view. They will often show more than enough to enable you to figure out if something else is causing trouble. If not then get the mfgr. to Email you one.
 
Last edited:
If those four posts are bolts, by all mean back them out. If they are just locating studs they won't help much.

It looks like there is a groove in the clutch, can you get a three jaw puller into the groove?

Stop "banging" on it, you will ruin something. Use brains rather than brawn.

Maybe the marina has a couple prop pullers you could look over and select one which might work.

pete
 
I'd heat the brass collar with a propane torch. It will expand before the shaft does.
Put a crayon on the interface as soon as you remove the torch. The wax should suck into the gap then try prying it off before it cools.
Use 2 either screwdrivers or mechanic's prybars (better) 180 degress apart.
 
I would use a 3 arm gear puller. Make sure the stainless bolts in the pic aren't holding it on. Propane doesn't get very hot, I would use map gas minimum or Oxy/acetylene if you are experienced enough not to destroy the brass. The secret is then to heat and quench with water numerous times to break the corrosion then tighten puller with all the parts in a cold state and use kroil to penetrate. That's like my opinion, man!

Gary
 
I'd love someone to show me how you would get a 3-jaw on that thing?
 
Folks those four things are rubber bumpers sitting on springs. There are no screws or other fittings under them.

I do have the full schematic showing that the wheel is sitting on the shaft without anything holding it. It is simply pressed/corroded/jammed onto the shaft.

A prop puller won't work because the shaft is too long (a prop sits nearer the end of a shaft). There is about a foot of shaft the puller would have to be big enough to clamp onto.

The gap between the wheel and the collar is about 1/4 inch. Not sure I can get a gear puller in there.

I am thinking of two options, maybe even both at the same time.

Get a strap down behind it with a ring I can attach a comealong to, then have the other end of the comealong connected to the bow cleat on that side. And try that. If that doesn't work (without pulling the cleat off) tighten the comealong and use heat so that the comealong moves it once the heat has popped it.

Will try this week.
 
You could make a prop puller like I did that will fit if you have 1/4” behind the ring. I made it out of 3/8” steel plate but it could have been made out of 1/4” plate. You slide the plate with the slot behind the ring and put the solid plate on the end of the shaft. Then tighten the bolts and it will pull the ring off.
 

Attachments

  • 132B6BCF-1CDF-465E-B3E1-4688DED4D7F5.jpg
    132B6BCF-1CDF-465E-B3E1-4688DED4D7F5.jpg
    123.1 KB · Views: 49
You could make a prop puller like I did that will fit if you have 1/4” behind the ring. I made it out of 3/8” steel plate but it could have been made out of 1/4” plate. You slide the plate with the slot behind the ring and put the solid plate on the end of the shaft. Then tighten the bolts and it will pull the ring off.

Interesting. I'll keep that in my back pocket.

One other option. The boat is going down to Huckins in a few weeks to have the teak swim platform and steps replaced. And the Portuguese door mended. I may send them the photos and ask them if they can free the wheels. They probably have a myriad of tools and heaters for the job.
 
Hit it with a mallet? Like a rubber one? I don't know if there's any truth to it, but I always liked a metal hammer with PB blaster. Ball peen or Carpenter's. And lots of little taps, with even more PB applied.

If you do heat, bring a couple big whiskey ice cubes and put them on the shaft after you've heated up the bronze.

Finally, you can"rent" gear pullers from many automotive stores. They're free or very cheap as long as you bring them back. And that would be the right too for the job

Good luck, let us know how you do.
 
Hit it with a mallet? Like a rubber one? I don't know if there's any truth to it, but I always liked a metal hammer with PB blaster. Ball peen or Carpenter's. And lots of little taps, with even more PB applied.

Both. Directly hit with a rubber mallet, indirectly with a small sledge on a piece of 2/4. No movement. I will keep soaking in PB Blaster and trying.

One other thing. Yesterday it was 98 here. I took off all of the other gypsy wheels etc. and laid them on a drop cloth on the fore deck. When it came time to put them back on I couldn't even touch them, they were so hot. Had to cover them for a while before getting them back on!
 
I would think 1/4" s plenty for a gear puller, which can be an el-cheapo little one from a discount store. No question it is the right tool for the job. Invariably the wheel will pop off quite easily with one. Been there done that a few times before the penny dropped.
 
Disconnect power, remove from boat, transport to machine shop, have a Corona, avoid heat stroke, boat fire, and having to replace a perfectly good windlass.


:)
 
I didn’t think that anyone was buying Corona now...
 
Those four bumpers with springs are odd because they don't show in the parts diagram in the manual. If you pull them out (assuming you can), is there any chance the holes are threaded deeper in? If so, you could use them in conjunction with a puller.


I'd try heat first, even if only with a propane torch. But you will still need some way to get a puller or other solid mechanical advantage pulling on it.


And if you feel the cone needs to be sacrificed, I would first drill holes in the face (or use the existing holes), tap them, and try a puller. If you are careful with the holes, the cone may well remain usable.

I agree they are not on the schematic. They can be removed easily by finger and there is nothing behind them, nor are the holes threaded.

I will go to Harbour Freight I today and see if they have a gear puller that would fit, maybe even try Advanced Auto.
 
Last edited:
Disconnect power, remove from boat, transport to machine shop, have a Corona, avoid heat stroke, boat fire, and having to replace a perfectly good windlass.


:)

Well if it all happens in that order I won't need to replace the windlass! :D

Not a fan of removing it - it is pretty substantial. I would rather let a yard handle it.
 

Attachments

  • unnamed.jpg
    unnamed.jpg
    36.6 KB · Views: 32
You could try using 3-4 hardwood wedges between the body and the clutch.

Tator
 
The manual shows the 4 fastner's as threaded long slot headed screws.
 

Attachments

  • P19076_8.00_doc_Manual - Maxwell 3500 HWC Series.pdf
    2.4 MB · Views: 64
Are you referring to the bolts on page 23? If so, I think those are behind the clutch cone and hold the case together.

Correct, they bolt to the gear case and are beyond the clutch cone. In fact those are what I am trying to get to as they have come loose.
 
Yep you guys are right about the bolts. How about using some CRC freeze off on the shaft close to the cone? I've seen freeze off work were Wd40 did'nt.
 
I told my mechanic that I had measured what I needed in a gear puller and was off to get one. He said hang on. Let's try MAPP gas and try heating it first so I won't risk damaging the shaft. So he is sourcing some. If that doesn't work then I will try a gear puller.
 
Are you referring to pge 23, part SP 3203. THese bolts appear to hold the side of the case together going through the gear case to hold in the other side plate. THey appear to me to be behind the brass cone clutch
 
Disconnect power, remove from boat, transport to machine shop....
I once removed my Muir Cheetah (are cheetahs faster than cougars?) horizontal to have it repaired. Seriously heavy. Repair in place if possible.
 
The parts diagram normally shows the new style clutch cones you have the old ones. The four bolts mentioned (not the pins on the clutch cones) hold the gearbox to the side of the casing casing.

I think your key may be damaged and jamming in the slot in the shaft and the clutch casing. Try and rotate it backwards and forwards a little and it may release the pressure on the key.

I rebuilt our old one this time last year. Lots of fun. The clutch cones I had (old style) slipped straight off the shaft.

Have you messaged Will Vroomans from Maxwell? He is very helpful.
 
If you get really desperate take the windlass off the deck and turn it over. There are two circlips on the shaft that hold the shaft in place. If you can get one or both off the shaft you can hopefully slide it the right way, remove it and take the shaft to a shop to have the clutch removed.

Get a collection of good quality circlip pliers. It is like doing brain surgery through your rectum.
 

Latest posts

Back
Top Bottom