rgano
Guru
- Joined
- Oct 8, 2007
- Messages
- 4,995
- Location
- USA
- Vessel Name
- FROLIC
- Vessel Make
- Mainship 30 Pilot II since 2015. GB-42 1986-2015. Former Unlimited Tonnage Master
I have cobbled together a delay circuit for the non-park feature windshield wiper on my MS Pilot II. This design applies only to wiper switches which interrupt a SINGLE 12-volt power wire going to the wiper motor.
Parts I used:
Spade connector expander for the panel Carling rocker switch at the helm - https://www.amazon.com/gp/product/B0071NCJ44/ref=ppx_yo_dt_b_asin_image_o00_s00?ie=UTF8&psc=1
6 mm universal joints - https://www.amazon.com/gp/product/B07R482X86/ref=ppx_yo_dt_b_asin_title_o03_s00?ie=UTF8&psc=1
Brass knob - https://www.amazon.com/gp/product/B07122JS83/ref=ppx_yo_dt_b_asin_title_o03_s01?ie=UTF8&psc=1
Push on/off button - https://tinyurl.com/y87aseef
Plastic box to contain circuit board - https://tinyurl.com/y8olunk2
Delay circuit board - https://tinyurl.com/y77f9p3u
6mm brass rod
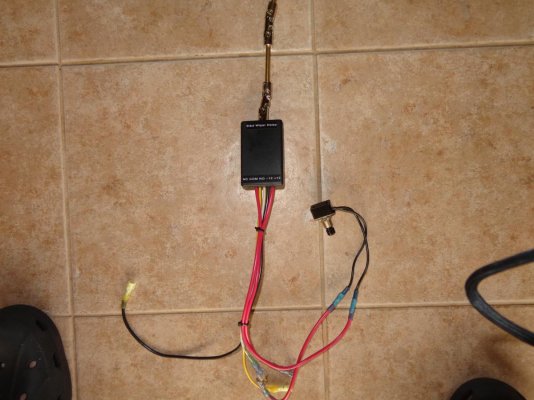
Below is what it looks like ready to be installed on my boat. All connections on the back of my wiper motor switch (Carling lighted rocker) are spade type, and no existing wires were required to be cut or modified. Only two small holes in the console are required for the installation. The box can be wire tied or glued into place behind the console.
The push on/off switch is required in the wire between the normally closed contact on the circuit board and where that wire ties into the normally open wire and the power wire heading out to the wiper motor to enable switching between delay wipes and continuous wiping action.
The roughly one-second time for the wipe is not controllable on this circuit board which for my motor means a single wipe from one side to the other PLUS a bit. Without a park feature, the wiper never ends up in the same place; so if this would bother you, this circuit is not for you, and you need to go to the very expensive solution of ripping out your non-park motor and install one with that feature. However, for me, it eliminates me having to have my hand on the switch all the time when conditions required an occasional swipe (often the case on this wet riding boat).
Parts I used:
Spade connector expander for the panel Carling rocker switch at the helm - https://www.amazon.com/gp/product/B0071NCJ44/ref=ppx_yo_dt_b_asin_image_o00_s00?ie=UTF8&psc=1
6 mm universal joints - https://www.amazon.com/gp/product/B07R482X86/ref=ppx_yo_dt_b_asin_title_o03_s00?ie=UTF8&psc=1
Brass knob - https://www.amazon.com/gp/product/B07122JS83/ref=ppx_yo_dt_b_asin_title_o03_s01?ie=UTF8&psc=1
Push on/off button - https://tinyurl.com/y87aseef
Plastic box to contain circuit board - https://tinyurl.com/y8olunk2
Delay circuit board - https://tinyurl.com/y77f9p3u
6mm brass rod
Below is what it looks like ready to be installed on my boat. All connections on the back of my wiper motor switch (Carling lighted rocker) are spade type, and no existing wires were required to be cut or modified. Only two small holes in the console are required for the installation. The box can be wire tied or glued into place behind the console.
The push on/off switch is required in the wire between the normally closed contact on the circuit board and where that wire ties into the normally open wire and the power wire heading out to the wiper motor to enable switching between delay wipes and continuous wiping action.
The roughly one-second time for the wipe is not controllable on this circuit board which for my motor means a single wipe from one side to the other PLUS a bit. Without a park feature, the wiper never ends up in the same place; so if this would bother you, this circuit is not for you, and you need to go to the very expensive solution of ripping out your non-park motor and install one with that feature. However, for me, it eliminates me having to have my hand on the switch all the time when conditions required an occasional swipe (often the case on this wet riding boat).
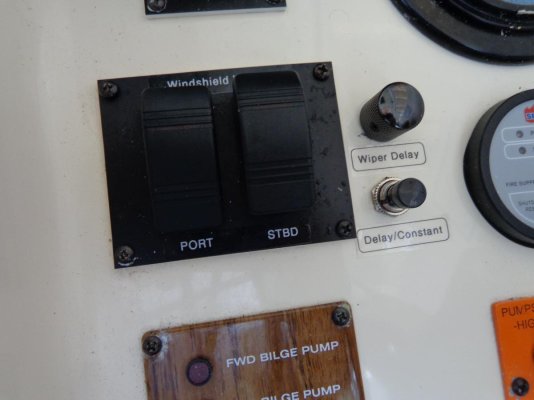
") However, you could run them both off the one control by just moving the power lead from the port wiper from its Carling switch and joining it to the stdb lead. OR put in an on/off switch connecting the two Carling switches and by having the port Carling switch off and the stbd switch on, you delay both wipers. With switch off and both Carling rockers on, you get delay stbd and no delay port. How many switches do you want is the question.
However, you could run them both off the one control by just moving the power lead from the port wiper from its Carling switch and joining it to the stdb lead. OR put in an on/off switch connecting the two Carling switches and by having the port Carling switch off and the stbd switch on, you delay both wipers. With switch off and both Carling rockers on, you get delay stbd and no delay port. How many switches do you want is the question.