New Salon Table build

The friendliest place on the web for anyone who enjoys boating.
If you have answers, please help by responding to the unanswered posts.

fryedaze

Guru
Joined
Sep 4, 2011
Messages
1,721
Location
USA
Vessel Name
Fryedaze
Vessel Make
MC 42 (Overseas Co) Monk 42
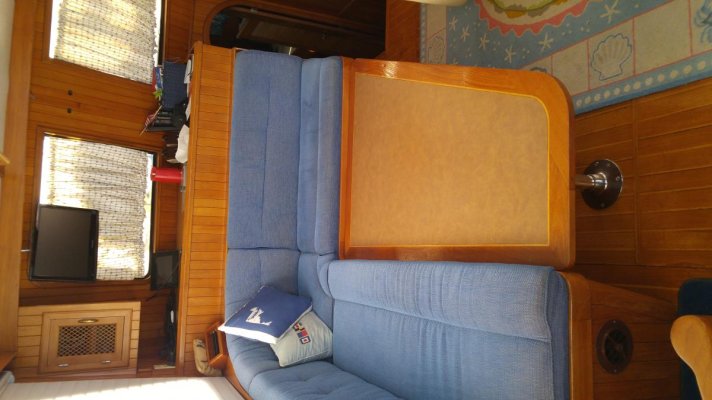
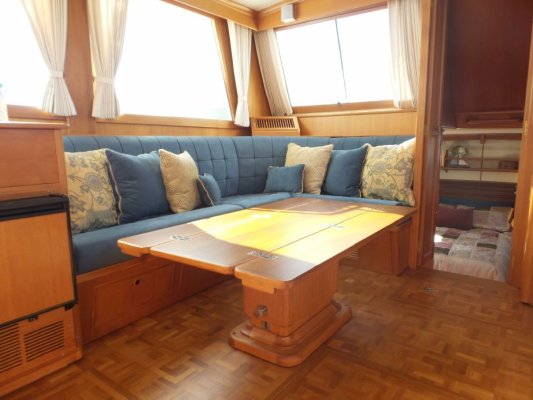
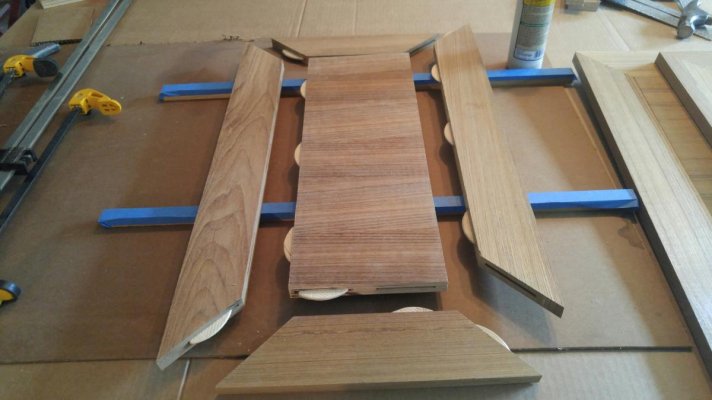
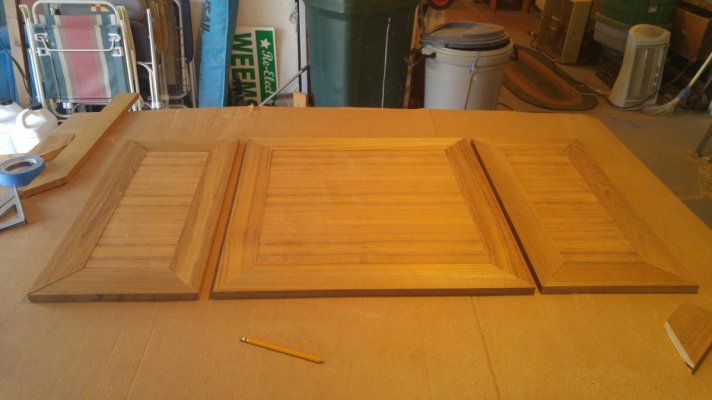
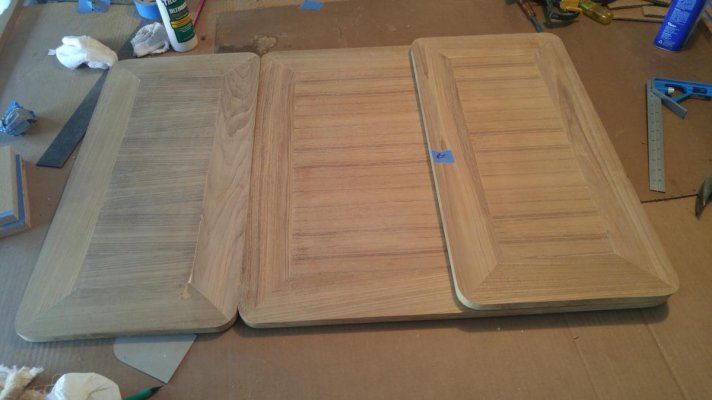
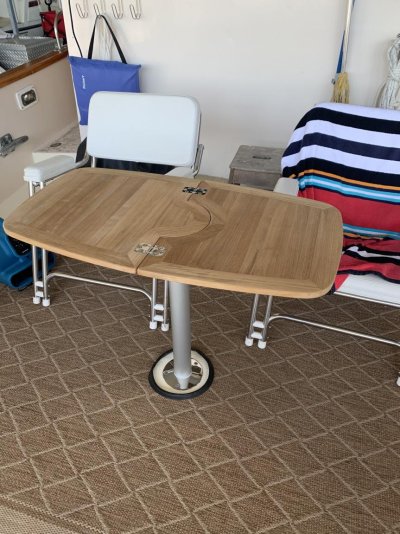
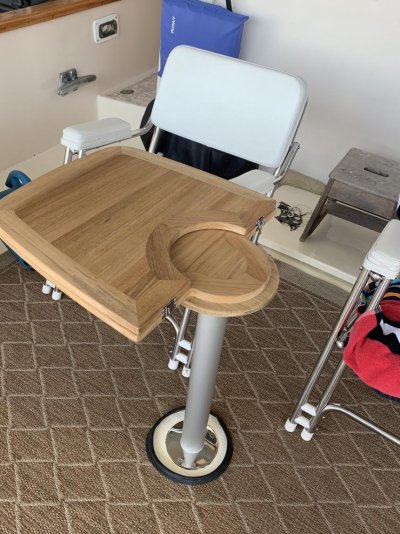
After several years of procrastination I pulled the trigger on a new Salon table. We have a large free standing table that is designed to lower and provide another bed. The area can easily sleep two. We have only used it twice in ten years. Having a smaller table will open up the Salon space. We have wanted a smaller table with fold over leaves. I finally decided to build it myself when I got a $9K estimate from a shop on Savannah. Teak is $29.50 a bf and a 4x8 sheet of two face teak is $335. When I am done I will have about $1300 in materials.The table will have an enclosed gas assist pedestal that lowers to 20" and raises to 28" for dining.
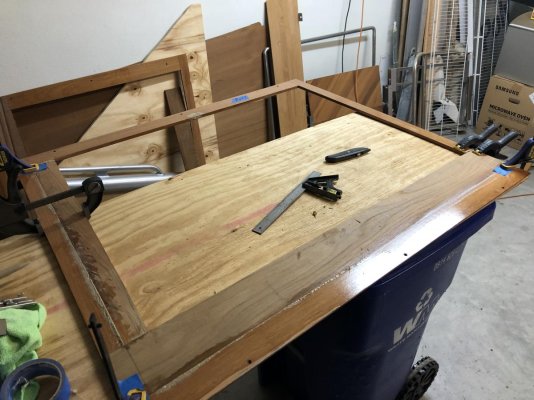
After hours of getting my saw adjusted to make the precise cuts the project has been going well. I will post some pics as I go.
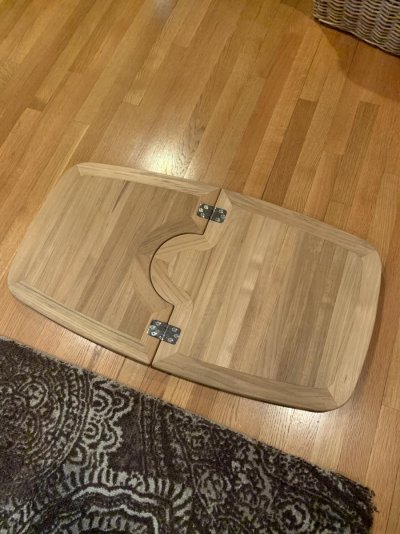
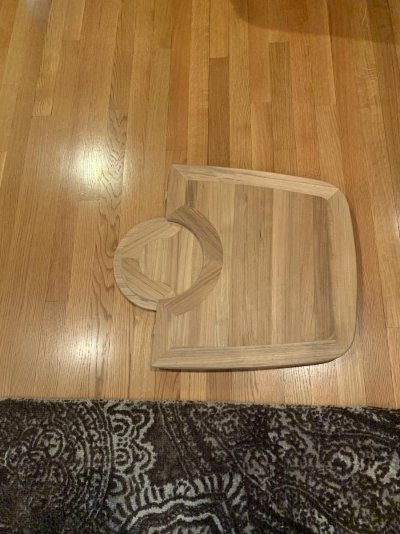
The new table will be 26x26 folded over and 26x52 opened.
I have attached a picture of the old table, an example of the new table style and progress pictures.
 

Attachments

  • 0724160829a.jpg
    0724160829a.jpg
    101.4 KB · Views: 146
  • 5426169_20151202155800475_1_XLARGE.jpg
    5426169_20151202155800475_1_XLARGE.jpg
    79.5 KB · Views: 158
  • 0606201402b_resized.jpg
    0606201402b_resized.jpg
    82.6 KB · Views: 146
  • 0606200951b_resized.jpg
    0606200951b_resized.jpg
    81.5 KB · Views: 142
  • 0609200928_resized.jpg
    0609200928_resized.jpg
    74.6 KB · Views: 134
Very nice Dave. Love the design. That’s some dang good joinery. Getting those miters right is tough.
 
Very nice Dave. Love the design. That’s some dang good joinery. Getting those miters right is tough.

Thanks Mule,I have never done any furniture. I did a lot of test cuts before I pulled the trigger on cutting that pricey teak.
 
I love the feel and smell of waxy new raw teak .
 
Nice, Dave. If you’re still at Longboat Marina, I could bring horses, table saw, routers ir scrap teak if needed. Nice biscuits there too. Doing my contemporary teak pilothouse window frames now.

May as well dive into these projects, considering the limits of cruising.
 

Attachments

  • 9692D59E-2883-4F3B-AAE1-B3527A07911D.jpg
    9692D59E-2883-4F3B-AAE1-B3527A07911D.jpg
    135.6 KB · Views: 102
Last edited:
I cheated guys I just ordered this the other day from Defender . It was way beyond my skills to build.
 

Attachments

  • E568D191-4D10-4E2D-8EEE-D7CA0AEF4377.jpg
    E568D191-4D10-4E2D-8EEE-D7CA0AEF4377.jpg
    157.3 KB · Views: 112
  • 5E741FD3-AAB8-47AC-9D4A-5EED2CEA0880.jpg
    5E741FD3-AAB8-47AC-9D4A-5EED2CEA0880.jpg
    158.5 KB · Views: 102
Nice, Dave. If you’re still at Longboat Marina, I could bring horses, table saw, routers ir scrap teak if needed. Nice biscuits there too. Doing my contemporary teak pilothouse window frames now.

May as well dive into these projects, considering the limits of cruising.


Larry, we have been gone for a month now. Always something to work on. These boats keeps us out of trouble[emoji41] Enjoy your project.
 
Dave:

I too have a convertible table that has been in the down position (for sleeping) once in 26 years. I damaged the teak on one side about 15 years ago and have longed to build a beautiful replacement, but of course haven't managed to find a round tuit. Now, will your gorgeous project push me over the edge? I seriously doubt I could build anything as gorgeous as yours and I commend your bravery tackling this as a relatively new furniture maker.
 
Last edited:
Dave:

I too have a convertible table that has been in the down position (for sleeping) once in 26 years. I damaged the teak on one side about 15 years ago and have longed to build a beautiful replacement, but of course haven't managed to find a round tuit. Now, will your gorgeous project push me over the edge? I seriously doubt I could build anything as gorgeous as yours and I commend your bravery tackling this as a relatively new furniture maker.
Koliver, I am a hack. Anyone with a miter saw and a table saw can do this with, thought, patience and lots or internet research.
 
"Anyone with a miter saw and a table saw can do this with, thought, patience and lots or internet research."

No problem , if the piece doesn't fit , simply make a new piece.

IT does pay to learn how to set up a table saw or chop saw for accurate 90 deg cuts. Our of the box is fine for house building , but NOT for fine well fitting joiner work.
At $29.50 bf making too many new pieces can get pricey. [emoji33]
 
After I miter in the SOSS invisible hinges I will start finish work. I am looking for thoughts on applying finish. I want a satin finish. I am looking at videos of West System build up and then varnish or polyurethane final coats. Anyone know how to finish new work salon furniture?
 
Pedestal enclosure glue up pic.0611201135c.jpg
 
Dave, it looks very nice! I've been looking for a new folding table to do double duty in either the saloon or on the back deck. That teak stuff ain't cheap.

Ted
 
Very well done! Our long-gone-at-the-hands-of-a-previous-owner setee table must have looked like your original. The ragged holes in out Teak and Holly sole were still there, until I fixed them.

We're happy to have loose furniture in the salon for flexibility. And, we never have need for the additional berth.

Our table was mounted on one of the four, heavy lift-out ER access panels. I cannot imagine lifting that panel with the table mounted on it!
 
Last edited:
I built a coffee table out of mesquite, then finished it with Awlwood satin. I stained it with Minwax Early American first, because I use that for qtr sawn oak.

Excellent finish. I did spray the final coat, laid out like glass.
 
After I miter in the SOSS invisible hinges I will start finish work. I am looking for thoughts on applying finish. I want a satin finish. I am looking at videos of West System build up and then varnish or polyurethane final coats. Anyone know how to finish new work salon furniture?

Dave:

If you have the time, Fine Woodworking magazine frequently has articles on finishing. You can buy digital editions, and it is searchable.
In my home, I have several bits of DIY furniture. On my boat, I have only a very few, as the original build was fairly complete. My finishing is the same in both places. I have tried various different finishes, including learning to do French Polishing. That gives a great finish, but is the most difficult to get right. I prefer multiple coats of wipe-on polyurethane. Use only a non shedding cloth to apply, when the quality of the finish doesn't change upon applying another coat, you have enough on. In my home, furniture I have built and finished in this way hasn't called out for a re-coat for many years.
In my boat, I had to refinish when I bought the boat in 1994. At that time I experimented with several different finishes. Most worked well enough, but the section I did with a water based Varathane watermarked terribly and I had to grind it off. I have had very good results with oil based polyurethanes, both in satin and gloss finishes. In some locations I prefer gloss, my wife prefers satin, so there is lots of both aboard.
 
I have used exterior finishes on both interior and exterior surfaces on our boats. There's enough sunlight inside a boat to have recommended that choice to me. That's particularly true, of course, where the interior surfaces are close to windows, doors and hatches.

I prefer the satin sheen. The brush-on satin urethanes look OK to me but it's more difficult to get an even thickness and sheen. The mfr's selling point is quick drying, but that makes working, tipping, and dealing with wet edges harder. The wipe-on urethanes and Tung oils are not (I think) available in exterior quality. They, too, flash too quickly.
 
I cheated guys I just ordered this the other day from Defender . It was way beyond my skills to build.

Marty: i figured you & Heckrotte to be the woodworkers among us, turning your nose up at the thought of actually purchasing woodwork!:ermm:

So what is your plan for that table? Where will it end up and with what kind of leg for support? Will you leave the finish as is?
 
Took the plunge and did the mortise for the SOSS 101 Invisible hinges. I was really worried I would muck them up. Made a fence jig for a trim router. Measured ten times and checked several more. I spent three hours making eight simple two depth mortises. Glad it is done.0616201144a.jpg0616201524.jpg
 
Took the plunge and did the mortise for the SOSS 101 Invisible hinges. I was really worried I would muck them up. Made a fence jig for a trim router. Measured ten times and checked several more. I spent three hours making eight simple two depth mortises. Glad it is done.View attachment 103958View attachment 103959

Don't you just love the sound of a router when plunging into $30/bf teak?
Great Job!
 
Marty: i figured you & Heckrotte to be the woodworkers among us, turning your nose up at the thought of actually purchasing woodwork!:ermm:

So what is your plan for that table? Where will it end up and with what kind of leg for support? Will you leave the finish as is?
The table top was only $203 at defender. I liked the design and it was beyond my skills as a woodworker. I bought a norsap twist lock base with fixed height pedestal that has a swivel for table top. I mounted it in the cockpit and bought another locking base for pilot house. I’ve got to work out the base mount in pilot house .
 

Attachments

  • 7D76FAB7-4644-4404-8E80-48916B853F1E.jpg
    7D76FAB7-4644-4404-8E80-48916B853F1E.jpg
    195.2 KB · Views: 62
  • 6A946EAD-00D1-4650-AE79-146BB777CA53.jpg
    6A946EAD-00D1-4650-AE79-146BB777CA53.jpg
    197.1 KB · Views: 65
  • 9CD1E70C-435B-4EBE-BE39-E60F8801B661.jpg
    9CD1E70C-435B-4EBE-BE39-E60F8801B661.jpg
    147.8 KB · Views: 64
The table top was only $203 at defender. I liked the design and it was beyond my skills as a woodworker. I bought a norsap twist lock base with fixed height pedestal that has a swivel for table top. I mounted it in the cockpit and bought another locking base for pilot house. I’ve got to work out the base mount in pilot house .
That's a cool table. Defender gave that away. The teak is worth more than $203
 
To do an epoxy varnish finish.

After sanding and cleaning, I move the table top to a dust free area. I mix the epoxy gently to avoid air bubbles and pour the mixed epoxy on to the table top and use a WEST 809 notched spreader to spread it around evenly. I use the 1/8" side of the spreader. Scrape excess epoxy off the table top and away. The epoxy will level out and when tacky, apply another coat. Let dry overnight and sand with 100 grit paper working up to about 220 grit. Don't oversand and use a dust free sander.

I use a spreader instead of a roller because the roller will create fine air bubbles that will sometimes cloud the epoxy. The notched spreader insures an even coat.

Let the top sit about a week until the epoxy is completely cured.

Apply varnish of your choice. Two part polyurethane varnish would be the most durable and over the epoxy will look like it's 20 coats thick.

Syjos:

This tabletop folds over onto itself. No room for a thick surface finish as you are suggesting. Simple to finish with a good quality varnish, interior if away from teh sun, exterior, with UV inhibitors if exposed.
 
Syjos:

This tabletop folds over onto itself. No room for a thick surface finish as you are suggesting. Simple to finish with a good quality varnish, interior if away from teh sun, exterior, with UV inhibitors if exposed.
Koliver, you just saved my bacon! I had not considers the build up thickness. I could have done the build up if I would have waited to miter the hinges in after finishing the table. In hind sight that is probably what should have happened. Details, details, details.
 

Latest posts

Back
Top Bottom