Vacuflush trouble shooting

The friendliest place on the web for anyone who enjoys boating.
If you have answers, please help by responding to the unanswered posts.
Joined
Oct 19, 2015
Messages
2,445
Location
United States
Vessel Name
Pacific Myst
Vessel Make
West Bay 4500
I could use some tips on finding a vacuum leak. I've installed new duck bills, new diaphragm and new O rings in the pump. Everything cleaned out the pump body and duck bill holders and installed carefully.

The symptom is the pump cycles every 1 min 20 secs. The toilet bowl seals are holding, the level doesn't drop.

So, I've got a vacuum leak somewhere and no idea how to find it.

The system is a T pump and a separate vacuum tank. I suppose it could be the seal on the vacuum switch?
 

Attachments

  • tank.PNG
    tank.PNG
    158.8 KB · Views: 85
Peggie, The Head Mistress, will probably chime in on this but in case she misses it you could PM her. She has a guide for Vacuflush heads.
 
Portage,
I am not an expert but I do own one (Vacuflush). From my understanding the likely places for vacuum leaks are: hose connections (clamps), duckbills, bowl or floor seal (but the toilet should not hold water if leaking - may take a while to show), and the vacuum switch. You replaced the other potential issue, the diaphragm and seals. One way to find leaks is to "coat" all hose connections with shaving cream (can) and look for bubbles.
Best advice, is contact or wait for Peggy or the other Vacuflush guy (sorry can't remember his name, but he lives near me).
Good luck
 
you too can become a VacuFlush expert

Hi,
Hunting pressure leaks is one of the joys of Vacuflush ownership. The good news is that once you get everything right, the damn things will hold pressure for weeks! I know... I didn't believe it either.

As suggested above, check hose clamps and other obvious places. If it still leaks I suggest a complete rebuilt. Do it once...or do it piece by piece and hate life each time you need to work on it. I bought the parts, took the toilet out of the boat, washed it real good, and put it back together will all new parts. There are tons of videos on youtube showing how this is done. Nothing here is very hard. These are the kits I bought:

- water valve assembly
- floor flange seal
- base to bowl seal kit
- ball/shaft/cartridge kit

And for good measure:

- duck valve kit

If your Vacuflush is really worn out you may need to purchase a new bellows kit. Recently they bundled the 'bellows kit' into a 'quiet pump and bellow kit' which is like $300. I bought this too - no reason - and it really isn't much quieter. Hopefully the kits above will fix everything.

Pete
 
Tightening the floor flange seal is simple, not messy, and worth a try. Water will stay in the bowl if that flange leaks, but you lose vacuum. Even with new O rings in the pump the clamp (or bolts, depending on model) also need to be pretty tight.
 
Thanks all for your input. I'll respond here enmass rather than to each message. Let me start by saying I'm not new to Vacuflush having taken care of a system on the work boat for more years than I care to admit. And once they're all tuned up they're great systems.


Portage,
I am not an expert but I do own one (Vacuflush). From my understanding the likely places for vacuum leaks are: hose connections (clamps), duckbills, bowl or floor seal (but the toilet should not hold water if leaking - may take a while to show), and the vacuum switch. You replaced the other potential issue, the diaphragm and seals. One way to find leaks is to "coat" all hose connections with shaving cream (can) and look for bubbles.
Best advice, is contact or wait for Peggy or the other Vacuflush guy (sorry can't remember his name, but he lives near me).
Good luck

Hose clamps have been given great attention. All new, double clamped with screws on opposite sides. Tightened, re-tightened until no more movement.

Duckbills are new.

Bowl seals are good, the bowl level never drops.

The floor seal is a new idea to me. The system I cared for the bowl discharge wad directly into a hose. No bowl seal.

I don't understand using shaving cream. Vacuum leaks in, not out. Can't see how that will make the shaving cream bubble.

Hi,
Hunting pressure leaks is one of the joys of Vacuflush ownership. The good news is that once you get everything right, the damn things will hold pressure for weeks! I know... I didn't believe it either.

As suggested above, check hose clamps and other obvious places. If it still leaks I suggest a complete rebuilt. Do it once...or do it piece by piece and hate life each time you need to work on it. I bought the parts, took the toilet out of the boat, washed it real good, and put it back together will all new parts. There are tons of videos on youtube showing how this is done. Nothing here is very hard. These are the kits I bought:

- water valve assembly
- floor flange seal
- base to bowl seal kit
- ball/shaft/cartridge kit

And for good measure:

- duck valve kit

If your Vacuflush is really worn out you may need to purchase a new bellows kit. Recently they bundled the 'bellows kit' into a 'quiet pump and bellow kit' which is like $300. I bought this too - no reason - and it really isn't much quieter. Hopefully the kits above will fix everything.

Pete

I don't mean to pick nits, but vacuum systems are just that, vacuum not pressure.

Ball shaft cartridge kit, good idea. I'll replace that. The rest of your excellent suggestions please see my response above.

Tightening the floor flange seal is simple, not messy, and worth a try. Water will stay in the bowl if that flange leaks, but you lose vacuum. Even with new O rings in the pump the clamp (or bolts, depending on model) also need to be pretty tight.

I'll look to see if this toilet has a floor flange seal. I'm not familiar with that.

I've taken the pump apart and installed new seals twice. Pretty sure I got that right.


Again, thank you all for helping! Really appreciate it!
 
Do you have a vacuume switch? If so, can you adjust it?
 
Yes there is a vacuum switch. However Seland now Dometic strongly recommends not messing with it. I don't think it would solve this problem of loosing vacuum. Only change the set points and thus the cycle time.
 
I don't understand using shaving cream. Vacuum leaks in, not out. Can't see how that will make the shaving cream bubble.

It doesn't. Squirt a little shaving cream around every hose connection...flush the toilet. The suction will pull the shaving cream into any connection that's leaking, it'll just sit there on any connection that isn't.

Now that we've cleared that up...

The system is a T pump and a separate vacuum tank. I suppose it could be the seal on the vacuum switch?

Nope, If it were the vacuum switch, it would be the diaphragm IN the it. It's rubber and over time it wears out, developing a leak that's a tiny pinhole at first, causing to run longer and longer after each flush until it finally won't shut off at all. It wouldn't cause the pump to cycle. The vacuum switch is NOT adjustable and that little diaphragm isn't replaceable...you'd have to buy the entire vacuum switch. The good news is, it's an easy swap out. It threads into the end of your vacuum tank like an inspection port cap.

If you've eliminated air leaks in hose connections AND the bowl holds water (in which case you do not need a bowl, shaft and cartridge), check your new duckbills...it's not unheard of for one or more to be defective, not closing tightly. If you're being as sparing with water as a Dometic (nee SeaLand) wants you believe you can, a bit of solid waste or TP caught in a duckbill can create an air leak that can cause the pump to cycle. That can also clog the pump (aka bellows)...or, if the pump has some age on it, the diaphragm could just be worn and leaking.

--Peggie
 
Last edited:
I don't understand using shaving cream. Vacuum leaks in, not out. Can't see how that will make the shaving cream bubble.

It doesn't. Squirt a little shaving cream around every hose connection...flush the toilet. The suction will pull the shaving cream into any connection that's leaking, it'll just sit there on any connection that isn't.

Now that we've cleared that up...

The system is a T pump and a separate vacuum tank. I suppose it could be the seal on the vacuum switch?

Nope, If it were the vacuum switch, it would be the diaphragm IN the it. It's rubber and over time it wears out, developing a leak that's a tiny pinhole at first, causing to run longer and longer after each flush until it finally won't shut off at all. It wouldn't cause the pump to cycle. The vacuum switch is NOT adjustable and that little diaphragm isn't replaceable...you'd have to buy the entire vacuum switch. The good news is, it's an easy swap out. It threads into the end of your vacuum tank like an inspection port cap.

If you've eliminated air leaks in hose connections AND the bowl holds water (in which case you do not need a bowl, shaft and cartridge), check your new duckbills...it's not unheard of for one or more to be defective, not closing tightly. If you're being as sparing with water as a Dometic (nee SeaLand) wants you believe you can, a bit of solid waste or TP caught in a duckbill can create an air leak that can cause the pump to cycle. That can also clog the pump (aka bellows)...or, if the pump has some age on it, the diaphragm could just be worn and leaking.

--Peggie


Peggie,

Thank you for the reply!

Now I understand the shaving cream approach and will give it a try.

I may replace the vacuum switch assembly just because it's old. Yes, I understand it can't be adjusted.

Good to know I don't need bowl seals or cartridge, but I will add them to my spares kit.

I have inspected the duck bills. And because I've just put this system back together I've only been running fresh water through it and will only run fresh water until I've got it sorted out and working right.

The diaphragm is new so probably not at fault.

Don't know when I'll get back to the boat, next week probably.
 
And because I've just put this system back together I've only been running fresh water through it and will only run fresh water until I've got it sorted out and working right.

I'm guessing that a remote sea water pump has been added to the system that allows you to switch between fresh and sea water. If you've been using sea water, salt and sea water mineral buildup may account for your problems. However...


It's not the type of flush water, it's the amount that matters. At least 90% of VF problems are a result of using too little water because too many owners interpret "can use as little as one pint of flush water" to mean that's all it needs. I've written a piece I call "VacuFlush 101" that explains how it works (an amazing number of owners think they know, but actually don't) and how much water it actually needs to keep it working trouble free that I'll be glad to send you--and anyone else who wants it--if you'll send me a PM that includes you email address (no way to attach anything to a PM). You may not learn anything new from it , but I think you'll find it interesting. Fwiw, I was a distributor dealer for nearly 10 years and VF was the toilet on my last two boats, so I'm intimately acquainted with it.


--Peggie
 
Hey Portage,

Please let us know how you fixed it when you are done.


I had a vacuum leak in my system and after doing all the stuff Peggie suggested, I found a hole in the hose and had to replace 35ft of new poop hose in cold February.
 
Hey Portage,

Please let us know how you fixed it when you are done.


I had a vacuum leak in my system and after doing all the stuff Peggie suggested, I found a hole in the hose and had to replace 35ft of new poop hose in cold February.
Will do. I've got a lot of experience with vacuflush but this one has me stumped.

How did you find the hose pinhole?
 
There is a vacuum tester available from them (via their regional distributor, out east here it is Environmental Marine), that ,makes this a pretty easy process. You start at the toilet and work your way downstream.

https://www.environmentalmarine.com...CwlUBM0ycEtK5LNSQJMy9wJHmWygdldgaAtYlEALw_wcB
Thank you for letting me know about the tester. I was thinking of rigging something up myself. Buying this device will be much easier than cobbling together bits n pieces and needing to test my homebrew gizmo.
 
Listen to your system

At a minute and 20 second cycle you should be able to hear that leak. Run the pump up to full vacuum and remove power to the pump (so you can hear the leak without the pump running). Use a tube held up to your ear to listen around suspect joints or parts if you need to.
 
There is a vacuum tester available from them (via their regional distributor, out east here it is Environmental Marine), that ,makes this a pretty easy process. You start at the toilet and work your way downstream.

Which do you think is easier: disconnecting and reconnecting every connection, one at a time to use the vacuum tester gauge, or squirting a little shaving cream on all of 'em, just flush the toilet and then inspect every connection to see if the suction pulled in the shaving cream on any of 'em?

And btw, the vacuum tester gauge is $75+...you can buy a can of Barbasol for $1 at any of the dollar stores...

Just sayin'...


--Peggie
 
At a minute and 20 second cycle you should be able to hear that leak. Run the pump up to full vacuum and remove power to the pump (so you can hear the leak without the pump running). Use a tube held up to your ear to listen around suspect joints or parts if you need to.


I had the same thoughts. No joy. Haven't found the leak that way.
 
There is a vacuum tester available from them (via their regional distributor, out east here it is Environmental Marine), that ,makes this a pretty easy process. You start at the toilet and work your way downstream.

Which do you think is easier: disconnecting and reconnecting every connection, one at a time to use the vacuum tester gauge, or squirting a little shaving cream on all of 'em, just flush the toilet and then inspect every connection to see if the suction pulled in the shaving cream on any of 'em?

And btw, the vacuum tester gauge is $75+...you can buy a can of Barbasol for $1 at any of the dollar stores...

Just sayin'...


--Peggie


Everything passed the shaving cream test. Still stumped.
 
The shaving cream method does not always pinpoint the leak.

When the pump is put back together, sometimes the O rings on the lid or inside the bellows will get twisted. Lots of vaseline on the O ring prevents twisting.

The duckbill's need to be vaselined before installing too.

When the bellow is pushed onto the lid, it has to be pushed in evenly and flat or the O ring inside the bellow will distort.

The vacuum gauge tester will locate the leak if the shaving cream method was not successful.

If the bowl holds water for several hours, then the ball seal is fine. Turn off the water and Vacu Flush pump. Open the ball and insert the testers cone into the hole at the base. Smear dish wash soap on the cone first. Turn on the pump and let it cycle. If it holds vacuum for 10 minutes or longer, the problem is at the toilet. Water valve, pedal shaft seals, bowl/base seal or flange seal.

If it doesn't hold vacuum for 10 miutes the leak is downstream. Disconnect the hose at the pump and insert the soaped testers cone into the pump inlet and start the pump. Make sure pump has water in it to wet the duck bills. If it does not holds vacuum, the leak is in the pump. If it holds vacuum, the leak is between pump and toilet.

Connect pump and test vacuum at the inlet to the vacuum tank with tester. If it holds vacuum, the leak is in the line between tank and toilet. If not, the leak is in the tank - vacuume switch or hose connection.

To check for leaks in the hose, I plug both ends with home made adapters, one end has an air chuck to hook up a compressor. Charge the hose with 10 to 20 psi and check connections with liquid soap.

On hard to locate leaks, I tested pumps and vacuum tanks for leaks by plugging outlets, removing motor, connecting a compressor to them and 10 to 20 psi pressure to locate a leak by submerging in water.

If you need a vacuum tester, Marine Sanitation in Seattle has them. PM me and I can get it for you at dealer price.

If you get a vacuum tester, don't be concerned about the vacuum reading. The gauge is not accurate. It is used to see if the system holds vacuum or not.
 

Attachments

  • IMG_0002l_2__69951.1338295846.jpg
    IMG_0002l_2__69951.1338295846.jpg
    47.6 KB · Views: 45
Last edited:
Will do. I've got a lot of experience with vacuflush but this one has me stumped.

How did you find the hose pinhole?

There is a vacuum tester available from them (via their regional distributor, out east here it is Environmental Marine), that ,makes this a pretty easy process. You start at the toilet and work your way downstream.

https://www.environmentalmarine.com...CwlUBM0ycEtK5LNSQJMy9wJHmWygdldgaAtYlEALw_wcB

Everything passed the shaving cream test. Still stumped.

So I did the shaving cream test on all joints. No issues.

So I started just above the pump and broke the line loose and did a vacuum test, Held vacuum. Went down line (toward the head) and broke the next fitting, check good. On to the next one. This was at the toilet and a long run (32 feet) to the previous joint. Would not hold a vacuum. Pulled the hose and it had a hole in it. It was old, so I decided to rebuild the entire system.
 
If you find that your hose is leaking, you might consider using PVC DWV (Drain, Waste, Vent) plastic pipe instead of hose. It it a lot less expensive than sanitation hose and will never permeate odor.

Long sweep elbows, 45's and other bends are available for DWV. Marine Sanitation sells the special hose cuffs that are used to connect hose to the pipe.
 
Excellent write up on troubleshooting. Thank you.
The shaving cream method does not always pinpoint the leak.

When the pump is put back together, sometimes the O rings on the lid or inside the bellows will get twisted. Lots of vaseline on the O ring prevents twisting.

The duckbill's need to be vaselined before installing too.

When the bellow is pushed onto the lid, it has to be pushed in evenly and flat or the O ring inside the bellow will distort.

The vacuum gauge tester will locate the leak if the shaving cream method was not successful.

If the bowl holds water for several hours, then the ball seal is fine. Turn off the water and Vacu Flush pump. Open the ball and insert the testers cone into the hole at the base. Smear dish wash soap on the cone first. Turn on the pump and let it cycle. If it holds vacuum for 10 minutes or longer, the problem is at the toilet. Water valve, pedal shaft seals, bowl/base seal or flange seal.

If it doesn't hold vacuum for 10 miutes the leak is downstream. Disconnect the hose at the pump and insert the soaped testers cone into the pump inlet and start the pump. Make sure pump has water in it to wet the duck bills. If it does not holds vacuum, the leak is in the pump. If it holds vacuum, the leak is between pump and toilet.

Connect pump and test vacuum at the inlet to the vacuum tank with tester. If it holds vacuum, the leak is in the line between tank and toilet. If not, the leak is in the tank - vacuume switch or hose connection.

To check for leaks in the hose, I plug both ends with home made adapters, one end has an air chuck to hook up a compressor. Charge the hose with 10 to 20 psi and check connections with liquid soap.

On hard to locate leaks, I tested pumps and vacuum tanks for leaks by plugging outlets, removing motor, connecting a compressor to them and 10 to 20 psi pressure to locate a leak by submerging in water.

If you need a vacuum tester, Marine Sanitation in Seattle has them. PM me and I can get it for you at dealer price.

If you get a vacuum tester, don't be concerned about the vacuum reading. The gauge is not accurate. It is used to see if the system holds vacuum or not.
 
I've replace hose with PVC pipe on the work boat I retired from. A definite improvement. But not easy where there are a lot of bends and twists in hard to reach places as is the case with the current boat
If you find that your hose is leaking, you might consider using PVC DWV (Drain, Waste, Vent) plastic pipe instead of hose. It it a lot less expensive than sanitation hose and will never permeate odor.

Long sweep elbows, 45's and other bends are available for DWV. Marine Sanitation sells the special hose cuffs that are used to connect hose to the pipe.
 
I've replace hose with PVC pipe on the work boat I retired from. A definite improvement. But not easy where there are a lot of bends and twists in hard to reach places as is the case with the current boat

It's not easy but you only have to do it once.
 
Ten years ago I had a similar problem, vacuflush unit just behind a bulkhead by the head of the bed, drove us to turning off the breaker until the next flush. After much experience as a confined space marine toilet mechanic, I found a leak (hole) in the vacuum tank itself, slapped on some “Shoe Goo” used to repair running shoes and never had the problem again.
 
Had that problem once and it was the gasket to the base. Held water fine but leaked vacuum. Replaced the gasket and had to tighten the clamp incredibly tight but all better now.
 
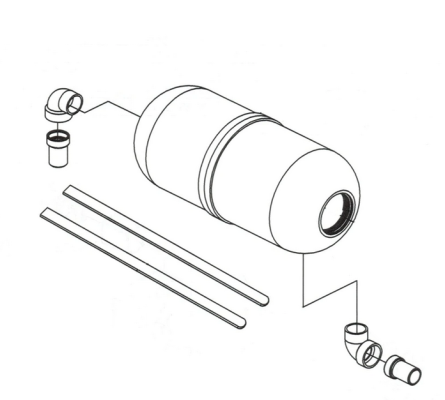
Let me start with when the vacuflush system works, I love it. Now that that’s done, I can also say that of all the subsystems I have on my ’93 GB42, the one that I have the most experience in repairing is the vacuflush system. I've owned my boat for 5 years, I have two completely independent vacuflush systems (forward and aft, two pumps, two accumulators, two heads, etc...) feeding a common holding tank and both locations suffer from the same issues, specifically, that there are just WAY too many potential failure points leading to problems; Every gasket, every hose clamp/fitting, every O ring, the bellows piston, essentially anywhere two different components come together is a potential source of a vacuum leak, and all that’s after ensuring that the duckbills are functioning (replace all four of them on each pump every year is a must). Unless you have 10” of vacuum HOLDING, you’ll have a cycling pump. Chasing all these issues is a lifetime job. Unfortunately, I don’t see any way to eliminate the litany of issues, but here’s what I learned/did. I decided to manage the condition vs spending my life working on my toilet system:

1) Before I work on any part of the system, I always add a few pumps of hand soap to the bowl and flush it a few times (assuming it’s not the motor that failed on the pump). Each flush I add a little more soap. It doesn’t take much soap (or more than a few flushes) and pulling apart a “soapy” pump is very much preferred than a, well, not so soapy one….
2) I have purchased “30 second gaming hour glass timers” (from amazon) that guest use to time how long to hold the flush mechanism (ensuring extra water flows through the system each flush) to eliminate the potential of plugs/clogging. In my opinion, you can’t flow enough water through the system on each flush of “solids” to keep the duck bills clear. When people not familiar with the system are on board an extra pump out or two is a much preferred trade off. If people understand the system, they don’t need to use the timer.
3) Now, the most important one and specifically to your original question. When I bought my boat I was fortunate that there are independent vacuflush pump power toggle switches installed at each sink, in each head, so I can control the power to the pumps. I don’t know if that was standard or not, but I do have them. When my pumps cycled constantly my initial fix was to tell everyone to (a) flip the switch on, (b) do your business, (c) wait about 60 seconds after you flush, then (d) flip the switch off. I was very successful with steps a & b, but not so much with steps c & d. Three falls ago (before I started the loop), I swapped out the toggle switches to momentary push button switches and wired in a variable-time delay 12V relay and a 12V LED on each of the two switch cover plates. When someone wants to use the head, they simply press the push button switch, the relay automatically latches applying power to the pump, the LED lights up (showing that the power is applied to the pump) and that’s all they need to do. I have set the relay so that the pump is powered for 6 minutes (then the relay drops out cutting power to the vacuflush pump) and can cycle as much as it needs during that time, but won’t keep running when not needed. PM me if you would like the details on parts/wiring.

I’m happy to say that I’m through the 6,000 mile loop and several boating seasons, I’ve had multiple visitors on board and my toilet problems have all but disappeared. Each time someone uses the head that “popping & whooshing” sound is music to my ears (how sick is that). I’m sure I have minor vacuum seeps that will prevent the 10” of vacuum from holding for prolong periods, but that’s okay for me. The extra water and pump-outs are non-events…. The annual changes of duck bills have even been extended and an occasional failure of a component (switch or bellows or…) will still occur, but I’ve been spending my time boating vs head work. Hope this helps….
 
Back
Top Bottom