Prop shaft coupler

The friendliest place on the web for anyone who enjoys boating.
If you have answers, please help by responding to the unanswered posts.
I had a solid coupler and would not come off no matter how hard I tried, various pullers and heat did not move it. Had to cut it off. Used a split coupler to replace it. When it first went on there was a little more vibration than with the solid coupler. This was fixed by fixed by tightening the split coupler slowly at each bolt and rotating. It took some doing but got it sorted.
 
I had a solid coupler and would not come off no matter how hard I tried, various pullers and heat did not move it. Had to cut it off. Used a split coupler to replace it. When it first went on there was a little more vibration than with the solid coupler. This was fixed by fixed by tightening the split coupler slowly at each bolt and rotating. It took some doing but got it sorted.

Did you take it and the shaft to a machine shop?
 
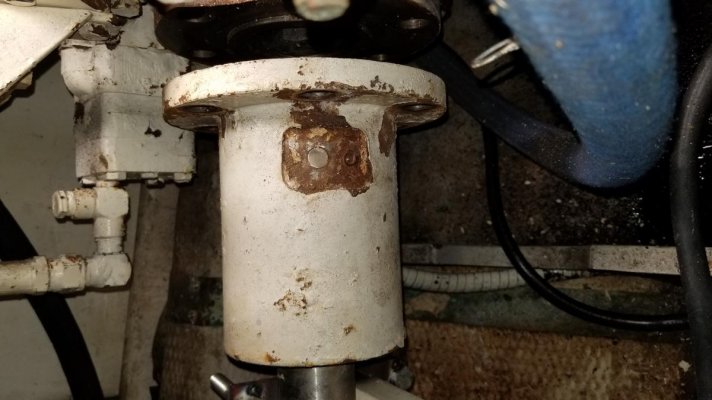
Doing my first DIY stuffing box replacement at next haul out. I understand that the toughest part is the removal of the shaft coupling which I bought a Buck Algonquin flange puller for. But my question is on reinstalling the coupling. Are there any tricks like lube with soap or does it just slide in? Thanks for your help.

What type of coupler is it, straight bore, tapered, split. All work and are installed differently. Among other things, if tapered you should install without key, scribe and then reinstall with key to ensure there is no binding.

Never, ever use grease or any viscous lube on a coupling bore, a light coat of light lube, light oil or 6-56 is all that;s needed to prevent binding (not soap, it is hygroscopic and can promote rust).

More on couplings here https://stevedmarineconsulting.com/wp-content/uploads/2019/06/ShaftCouplings179FINAL-PBB.pdf
 
If using a solid coupler with a morse taper, you should lap both the male taper and female cone surfaces with 2 coarseness of valve grinding compound medium/fine to marry the surfaces perfectly. Use prussian blue to id low spots and to assure a complete secure fit. Clean completely prior to dry fitting mark then install key and assemble with NO LUBE. The strength of the connection is the fine married fit of the tapers. This is the same process to seat a prop onto the shaft.
 
I put my new shaft coupling on today. I had to press the old one off so I was dreading putting the new one on. I bought a split coupler and when I went to put it on, it took one whack with the hammer and it went right up to the line. Amazing. I was prepared to fight with it all day.
 
Thanks all. The coupling is solid/straight bore. Haul-out is in a couple of weeks. I will report back with the good, the bad and the ugly.
 
Did you take it and the shaft to a machine shop?

yes the shaft was checked by machine shop, also worked on the prop at the same time, seems to me to make sense while I had it off. All is well now so a good outcome..
 
Thanks all. The coupling is solid/straight bore. Haul-out is in a couple of weeks. I will report back with the good, the bad and the ugly.

OK, in that case it's a interference fit. Most importantly, make sure key, keway, bore and pilot bushing (all detailed in the article I shared) are clean, rust free and in good shape, no dings, dents etc. You should have a set screw or screws that retain the coupling, the shaft should be dimpled to accept them. You may have a clevis or roll pin.

You can warm up the coupling to expand it, and as someone noted,m cool the shaft end with ice, but that's rarely necessary.

(In Taiwan)
 
The tool worked. I helped it by removing the set screws and spraying the holes with PB Blaster 2 weeks prior and again a week before the job which I think helped a lot.

The tool
0866E362-63E5-47F9-9690-6BA322FDFEAB.jpg

14825867-FF61-40E0-821F-24C32BC0C0D4.jpg
Pressing the coupling backyard mechanic style
BD22E03D-C041-44E4-B6A0-D0ADC6D1A9ED.jpg
Before
E8A1DCAC-FFA2-4416-A12D-EBF2BB46C720.jpg
After
CD643BE3-D181-4910-A383-EE2533828F6A.jpg
 
Thanks Steve. The tool is a Buck Algonquin 5" flange puller https://www.deepblueyachtsupply.com/5-inch-50mcp00500-flange-puller

All of the mating surface was wet with PB blaster. How it travelled upwards on the shaft and coupling is beyond me - it defied gravity. That stuff is amazing. As you suggested, I used a light coat of 6-56 to press the coupling back in. That helped a great deal. I left the collar from the PYI unit for two purposes - as a safety stopper instead of a hose clamp and I also used it to press the coupling back on with a c-clamp. I don't see any negative to this, but since I've not seen it before, is there any? Thanks again and to all for all the help.
 
No, I don’t see any problem with leaving it on the shaft. Innovative way to press the coupler onto the shaft. Good job!
 
Thanks Comodave. I got the idea of using a C-clamp when you suggested it earlier in the thread to someone to press out a pin.
 
Thanks Steve. The tool is a Buck Algonquin 5" flange puller https://www.deepblueyachtsupply.com/5-inch-50mcp00500-flange-puller

All of the mating surface was wet with PB blaster. How it travelled upwards on the shaft and coupling is beyond me - it defied gravity. That stuff is amazing. As you suggested, I used a light coat of 6-56 to press the coupling back in. That helped a great deal. I left the collar from the PYI unit for two purposes - as a safety stopper instead of a hose clamp and I also used it to press the coupling back on with a c-clamp. I don't see any negative to this, but since I've not seen it before, is there any? Thanks again and to all for all the help.

I see no issues, it all looks good, and I was unaware BA sold that tool, great company.
 
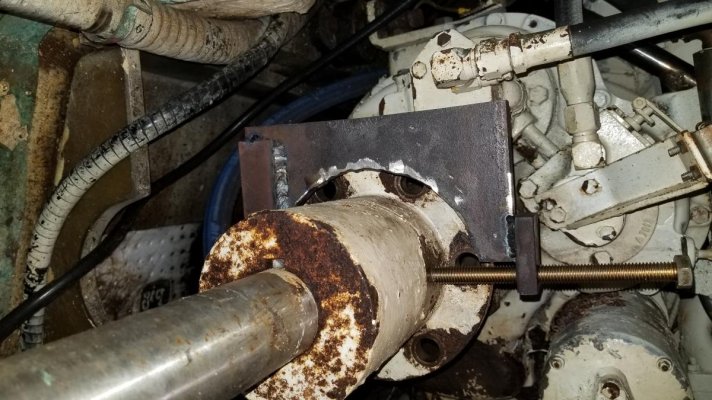
Yes, I'm working on a press setup now. I might try my biggest C clamp first and see if that has enough push. Otherwise, I've designed a custom 'portable press' using a bottle jack that will be useful for a number of jobs.


sbman, did you ever make that portable press? I'm undertaking this job now and am having no luck drifting the pin out.
 
I talked with a machinist at local prop shop. He said pounding the pin out wouldn't hurt anything. It just won't budge. soaking it with blaster now.
 

Attachments

  • 20211203_153436.jpg
    20211203_153436.jpg
    95.9 KB · Views: 30
Be careful pounding....that can expand the pin and tighten the fit.
 
I ended up discovering this thing:

https://www.amazon.com/OrionMotorTech-Heavy-Removal-Adapters-Trucks/dp/B01N7CO50E

I put that on there and then used my electric impact to drive it. It slid right out. It had enough reach for my coupler, you'd want to measure to make sure it will fit over yours,but man it made it easy. I didn't end up making the hydraulic one I designed, which was basically an attachment for a 20 ton electrical lug cripmer.
 
sb, That link doesn't find the tool in amazon. Searched Orion Motor Tech, but I'm not sure what I'm looking for. Would you please post the name of the tool and/or a pic, or both.

I tried hammering it today and nothing. I'm afraid to bring out the BFH and damage the pin, as ps mentioned.
Hoping I don't have to split the darn thing with a cut off disc.

I was pleasantly surprised how easy mine cut off...literally in a minute or two, not as I had dreaded.

Gave me the excuse to get a split coupling.

If cutting off, the tip is to cut through where the key is so you can't damage the shaft if you go a little deep.
 
It will take two cuts, being that the 1/2" pin is perpendicular to the key, yes? Then the shaft(s) have to go to the machine shop for dimples, yes?


I'm running into the cruisers dilemma of the calendar. The St. Lucie lock closes for 3 mos. Jan. 2nd and I'm on the wrong side.

May just put it back together and do this job on the next haul-out.(Replace the 30 yr old rubber hoses on the packing glands)
 
It's basically a super heavy duty C clamp with a hole in one end so you can press the pin right through it. I used some steel rods to extend it's reach into the hole as the pin moved down into the hole. YOu might be able to rent one at the auto parts store. I drove it with an electric impact and it worked well. Lube the threads.
 
Thanks I'll give it a try!
 
Good luck, Steve. Let us know what you end up doing.
 
Well, turns out fhe ball joint press didn't have a deep enough reach, so I decided to make one.
It seems the 1/2" steel plate I used is not quite stiff enough, resulting in the plate starting to bend. Today's job is to straighten it and weld .250x1.25" stiffeners to each side and try again. Wish me luck.
 

Attachments

  • 20211209_154020.jpg
    20211209_154020.jpg
    148.4 KB · Views: 19
hard to say if cheek plates will strengthen it up enough to press that pin out.
fully encircling the coupler, maybe with a bolt on piece to complete the circle might be needed. fine threads might have been a good idea too.
i made a similar tool once using a teardrop shape made of 1/4x2 flat bar that worked very well. it was a two piece, bolt together thing so it could go around a captive shaft.
 
Maybe time for a grinder?

yeah, splitting the coupler is always an option. just a messy one. but seeing how tough it's been for him to get the pin drifted out, i wonder how hard it will be to press out the shaft. i spent two days on one like that only to give up and cut up the shaft to get it all out.
 

Latest posts

Back
Top Bottom