Prop shaft coupler

The friendliest place on the web for anyone who enjoys boating.
If you have answers, please help by responding to the unanswered posts.

mahal

Guru
Joined
May 26, 2010
Messages
651
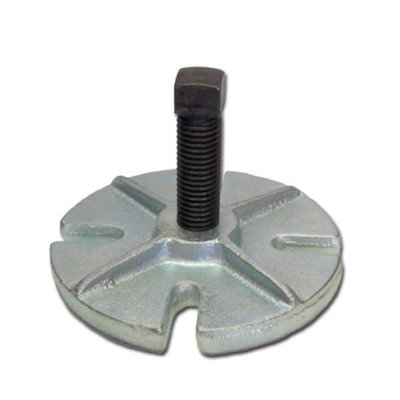
Doing my first DIY stuffing box replacement at next haul out. I understand that the toughest part is the removal of the shaft coupling which I bought a Buck Algonquin flange puller for. But my question is on reinstalling the coupling. Are there any tricks like lube with soap or does it just slide in? Thanks for your help.
 
Doing my first DIY stuffing box replacement at next haul out. I understand that the toughest part is the removal of the shaft coupling which I bought a Buck Algonquin flange puller for. But my question is on reinstalling the coupling. Are there any tricks like lube with soap or does it just slide in? Thanks for your help.
I like to dry fit the coupling first to be sure it's not too loose from cleaning the bore/shaft. Place a bag of ice around shaft for an hour, and heat the coupling in the oven. I don't like to use any lubricant on the interface.
 
This belongs in the "why you're at it" category:
Hows the props condition?
How about the cutlass bearings?
 
I like to dry fit the coupling first to be sure it's not too loose from cleaning the bore/shaft. Place a bag of ice around shaft for an hour, and heat the coupling in the oven. I don't like to use any lubricant on the interface.

Thanks for the tip. Didn’t even know that being too loose is a possibility. I like the oven idea to heat the coupling instead of my plan of using a torch which I may need for the removal.
 
This belongs in the "why you're at it" category:
Hows the props condition?
How about the cutlass bearings?

In addition to doing bottom paint, the yard will be replacing the cutlass bearings and stabilizer fin seals. The props are fine. Thanks.
 
Are you using a solid or split coupling?
 
For anyone planing on using splits, I have been taught truing them up at a machine shop is recommended, the shop can dimple the shaft for the set bolt which will give the proper insertion depth and with splits, and the hot/cold treatment shouldn't be necessary.
 
For anyone planing on using splits, I have been taught truing them up at a machine shop is recommended, the shop can dimple the shaft for the set bolt which will give the proper insertion depth and with splits, and the hot/cold treatment shouldn't be necessary.

Good to know. Thanks.
 
Another "while your at it" Have a shop true the face of the coupling while mounted on the shaft. They can make sure it fits the shaft okay and when you do the engine alignment you'll know the shaft and coupling are true. If they dimple the shaft you'll know the coupling is aligned the same as when it was faced off. Good time to check shaft straightness too.

If the coupling gives you fits coming off get longer bolts, slide the shaft back and put a socket the same diameter as the shaft in between and tighten the bolts evenly. Hopefully you'll have enough room.
 
I am working on the stuffing box on my boat, actually it is almost done. In order to get the old coupler off I took a piece of 1/4” steel plate and drilled 6 1/2” holes in it that line up with the holes in the coupler. Put a socket in between the coupler and the steel plate. Tightened the bolts and pressed the coupler off the shaft. It took 3 times with progressively larger sockets in between to get it off. No way it will go back on since I can’t press it on. I bought a split coupler to replace it. Also had a spacer machined to replace the drive saver that was there originally. The split coupler goes on fairly easily compared to the original coupler. In theory the coupler should go on without too much effort. It should be an interference fit. On a previous boat nothing I did would get the old coupler back onto the shaft. After heating the coupler and packing the shaft in dry ice it still would not go on. Gave it to a friend with a lathe and he found that the inside of the coupler got smaller by .006” about 3/4 of the way in. He machined it and then it slide on properly. I would not count on being able to get the old coupler back on to your shaft without some machine work. I have taken 2 off and both would not go back on. Maybe just a coincidence...
 
The old school guys say that a proper solid coupler won't go back on without machining is because of corrosion....therefore shouldn't be reused unless machining can bring it back to spec.
 
The rudder will not be removed. I was hoping that the yard was going to remove the shaft as part of the cutlass bearing replacement job which would make my job of replacing the stuffing box child’s play, but they’re not.

I am hoping the coupling puller I ordered will work since I’m worried of damaging the transmission flange if I use it to pull the coupling. If it doesn’t come off with the tool, I will just give in to the yard doing it at 5 hours per side at $135 per hour.
 
Last edited:
Here's the puller

0006034_5-inch-50mcp00500-flange-puller_510.jpeg
 
That puller may work, but I would be concerned about only having 1 threaded bolt to push with. I made my own out of flat steel plate. Very easy and cost about $25. And I had 6 1/2” bolts to push with. I used a 1/2” impact driver to tighten the 6 bolts so it did it quite well.

I agree that the old coupler may not fit without machining, that is my experience.

It helps to have the engine and transmission out to have access. My port engine and transmission are out so I had pretty great access. While it was out I changed the transmission damper and transmission oil cooler. The damper plate was in decent shape but it was starting to break in 2 places so obviously it was time for replacement.
 
Not being able to reinstall the coupling to the shaft is a big concern for me hence the plan B of getting split ones.

If the puller doesn’t work as designed, I can always use the plate the same way as you (Comodave) did with yours except that I will only have 4 bolts to push with not 6. And I will just use the center bolt instead of sockets. The puller was only $50 including shipping.
 
I took some emory cloth and polished up the end of the prop shaft. Not sure if it helped or not but I figured it couldn’t hurt...
 
While I doubt sanding the shaft can really change much in the scheme of things...it's not recommended by the guidelines I have read...if replacing couplers, a machine shop is recommended anyway so it should be shiny when one gets it back.
 
The rudder will not be removed. I was hoping that the yard was going to remove the shaft as part of the cutlass bearing replacement job which would make my job of replacing the stuffing box child’s play, but they’re not.

I am hoping the coupling puller I ordered will work since I’m worried of damaging the transmission flange if I use it to pull the coupling. If it doesn’t come off with the tool, I will just give in to the yard doing it at 5 hours per side at $135 per hour.

Damage to the flange is a very real danger, be very careful to snug up bolts equally, then draw them up equally against the spacer in small increments.
I’ve run across a fair number of damaged transmission side couplings too, so check that face while you’ve got it open.
 
I prefer split couplings too. But I like flexible couplings even more.

I replaced the split coupling with the Federal Flexible Coupling and it's not available split.

Boating compromises.
 
Not really sanding it much, just cleaning it up.
 
This is something I'm working on with my boat right now as well. I've tried all manner of pulling the coupler off the shaft with no success. Heat, several standard pullers, a custom puller made out of steel plate, etc... It would NOT move.

I finally discovered mine has a 1/2" steel pin driven in 90 degrees off from the keyway, through the coupler and the stainless steel shaft up near the flange. Under the paint and grease I thought it was just a bump in the casting of the coupler. After burning all the paint off, I finally realized that it was a steel pin. Now I'm working on getting the pin out, which I've only been able to move 1/8" with a brass drift and a hammer.

The lesson there is to really examine the thing and make sure nothing else is holding on before engaging the pullers. I thought I had understood the thing thoroughly but missed the pin.
 
Sounds like you need to press the pin out instead of hammering. Put something smaller than the pin on one side and a socket on the other side so the pin can be pushed into the socket. Then try a big C clamp and push the smaller thing into the pin and have the socket on the opposite side to let the pin come out into the socket. You may have to grind a curve on the socket to help keep it from sliding off when you tighten the C clamp. Before you start use your best rust solvent like PB Blaster on it several times. Also heat it up and let it cool several times to help break it free. Good luck.
 
Sounds like you need to press the pin out instead of hammering. Put something smaller than the pin on one side and a socket on the other side so the pin can be pushed into the socket. Then try a big C clamp and push the smaller thing into the pin and have the socket on the opposite side to let the pin come out into the socket. You may have to grind a curve on the socket to help keep it from sliding off when you tighten the C clamp. Before you start use your best rust solvent like PB Blaster on it several times. Also heat it up and let it cool several times to help break it free. Good luck.

Yes, I'm working on a press setup now. I might try my biggest C clamp first and see if that has enough push. Otherwise, I've designed a custom 'portable press' using a bottle jack that will be useful for a number of jobs.

Thankfully I can get the pin started by using the brass drift and hammer, so I've got the pin down in a hole on one side about 1/8" so push in items won't be slipping off.

In relation to the OP, I really just wanted to point out to pay really close attention to the design of the coupler, I have missed recognizing that the little bump in it was not just a part of the casting for a long time and even other people that looked at it missed it. I've wasted a lot of time on it until realizing that the pin exists.
 
Greetings,
Mr. s. "I've wasted a lot of time on it..." I disagree. You've learned something and that is NEVER a waste of time. Just file it in the old brain cell and hope you remember it for the "next" time.


giphy.webp
 
Don’t beat yourself up too badly about it. I doubt that many of us here would have thought to look for a pin, I know I would not have. At least you found the problem. Now the thought is if you are able to press it out, how about getting it back in??? Maybe a bolt that will be easier to get out next time.
 
Another tip if the coupler won't slide on. Piece of wooden dowel. Use a hacksaw to cut a slot in it. Put a piece of sandpaper in the slot and mount it in an electric drill. Spin it inside the coupler to remove any grubbies....

The trouble with that puller is sometimes you can't get the shaft to slide back far enough to get the puller mounted. Center bolt is too long.

Good luck !!

Re-read the post.. If the yard is doing the cutlass bearings they will have to pull the props. No reason you can't pull the shaft too and get the coupling to fit..
 
Last edited:
This approached worked on 20+ year old 2” dia shafts. Used a 10ton porto-power with a pancake cylinder placed between a 1/2 “ steel plate. The plate was bolted to the shaft flange with long bolts to accommodate the thickness of the pancake cylinder, applied pressure and heated the coupler with a propane torch. Both shafts came free with minimal effort. All prior efforts with pullers etc didn’t work. Also I did not want to risk using the trans flange bolt method for fear of bending the $500 Alison trans flanges.
 

Latest posts

Back
Top Bottom