Overhauling a J&T Detroit 671N

The friendliest place on the web for anyone who enjoys boating.
If you have answers, please help by responding to the unanswered posts.
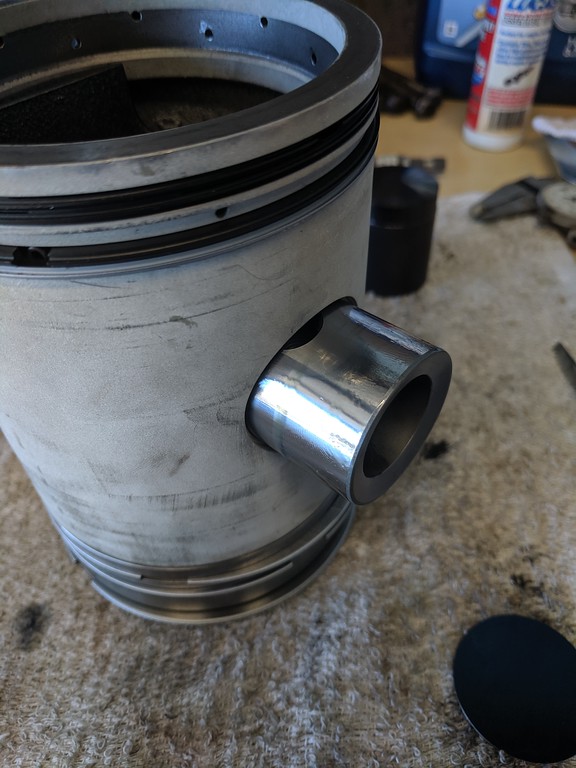
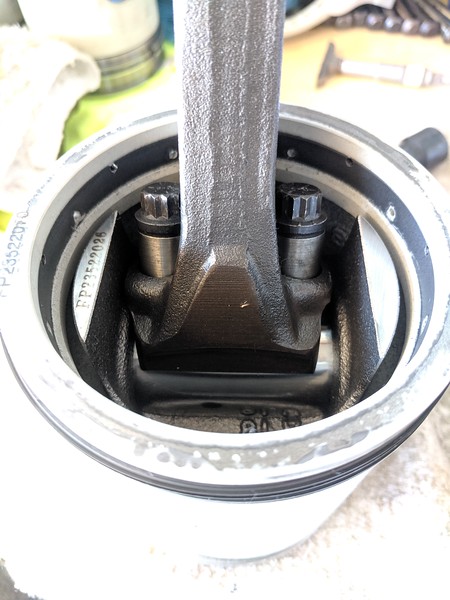
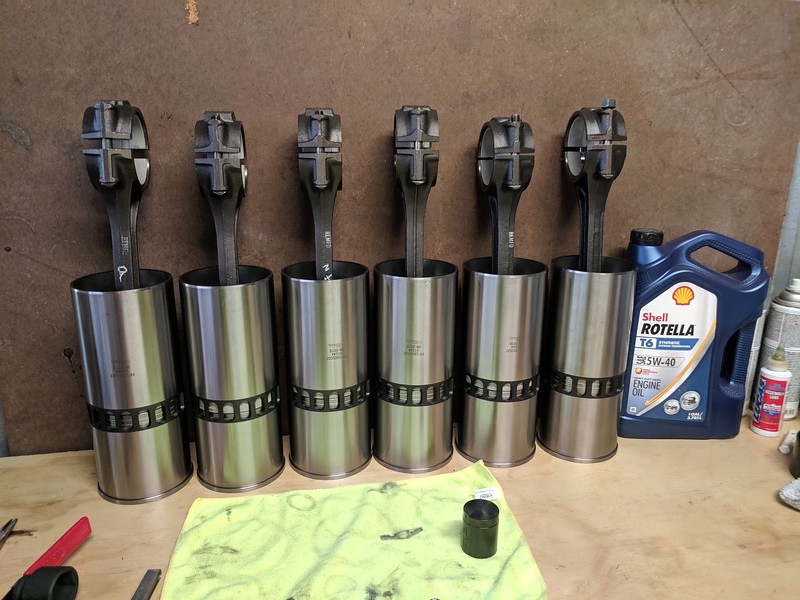
Nice. Always liked that "cross-head" piston design.

Note the six cyl two stroke has an inherent imbalance, so getting all the masses exactly the same is not real important. Not the same as a six cyl four stroke. That's the reason for the eccentric weights on each end of the cam and balance shafts. They "mostly" cancel the first order vibe, but engine still has a wiggle.

Understood, that's why I didn't go to the lengths I would go to on most engines. I figured I'd at least match up the components to get the weights as close as I could and they ended up coming out really close.
 
When you put the air box covers on, torque them to spec (I think 35 ft pounds). Over tightening the holding bolt will pull the cylinder out of align when the engine is hot and cause premature wear of the liners, etc.
I've seen a couple engines damaged when unknowing mechanics were chasing air box leaks and just started over tightening cover bolts until the sound went away instead of using a new gasket or a sealer on the old gasket.


Next up I dry fit the liners. This allows me to check the height of the liners below the deck prior to final installation and order up any shims that are required to get them to sit below the surface of the cylinder block deck by the specified value. I used a depth gauge to measure them.

i-wwxChKS-XL.jpg


With that done, it's back to the piston/rings/rod/liner assemblies.
 
With all the rings installed, I slide the wrist pins in. There is a rubber seal that goes between the piston crown and the skirt. This makes for a tight fit. I use engine assembly lube on any moving parts as I put them together.

The wrist pins just slide into place easily once things are lined up.

i-9jvNDc8-XL.jpg


With the two stroke design, it is important to keep oil out of the cylinders because it will burn just as well as diesel fuel. Oil can come out of the wrist pin interface and be put onto the cylinder walls. The upper compression rings are not designed to remove oil from the cyliner walls, the lower rings do that. So we have to seal off the wrist pin. A metal plug is installed in the piston skirt.

i-L2bDdSn-XL.jpg


The plug is then formed into a dished shape that locks it into place to seal things up using special die and a hammer.

i-vbN682m-XL.jpg
 
After dishing the covers, they are tested with a special suction cup attached to a vacuum pump with a built in gauge. If they hold vacuum they are sealed.

i-4pnNxqH-XL.jpg
 
Now the pistons are ready to have the rods bolted on.

i-6mj3QHJ-XL.jpg


They get torqued down with a torque wrench and the rods are installed.

i-sPJC7JX-L.jpg


All six assemblies completed.

i-5PdRzvV-L.jpg
 
Now I can put the cylinder assemblies into the liners. I use a ring compressor that is the proper size for the 71 series detroit, 4.250". I bought a $50 ARP brand one, the 'proper' tool is over $400 for the name brand. It's nicer, but this got the job done.

i-7N2JBVc-L.jpg


The tool is tapered so it's larger at the open end and exactly 4.250 at the installation end. The taper compresses the rings to fit the cylinder walls with some spring tension. I line up the ring gaps to match the specifications and then place the piston into the tool and get it ready to install into the liner.

i-tzS3WQD-L.jpg


I then line the tool and piston assembly up on the BOTTOM of the cylinder liner and give a firm quick push to install it into the liner. You have to use a smooth, firm motion or the rings can pop out between the tool and liner and refuse to go in and then you have to start over. With the design of the rings, you need to insert the pistons into the bottom of the liner.

i-ZmFr8Z9-L.jpg


With that completed 6 times, along with pushing the rod bearings into place that completes the cylinder assemblies and they are ready to go into the cylinder block.

i-99zSGCT-L.jpg
 
Last edited:
Haven't posted in a bit, but I've been busy working on the engine with some progress.

i-WKNMhdJ-XL.jpg


Getting the cooling system together and will be ready to fire it.
 
sbman, I noticed that your original post was from last April. Are you just working part time with no hurry on your boat rebuild, or spending more time on the hull bottom, flybridge, etc., instead of the engine?
 
I thought my F.L. pistons were big, those are HUGE. Are they new or were you able to reuse any of the original, bet they were costly

pete
 
DD pistons are 4.25" dia, about the same bore (??) as the Ford. But the DD ones are much taller as they have to cover the intake ports fully when the pistons are all the way up.

They are also cast iron which is different. Most small diesel pistons are Al.

And not expensive at all. A full set of liners/pistons/rings/bearings/seals/gaskets/etc for a 671 is something around $2k, but it has been a while since I looked one up. Much less than other engines.
 
Great post, thank you for sharing your work so far.
 
Great photos and your comments are very educational.
 
This will be aprox. my 10th full size engine rebuild. Over the years, I've rebuilt multiple Toyota engines (including their big 1FZ-FE inline 6), a couple of ford 390 V8, a couple of honda engines, a Lycoming aircraft engine, a datsun, and a couple of others that slip my mind...

I, too, find this very interesting and appreciate your extra effort in posting this. My last boat had 892TAs (J&T, 790hp), that had to be rebuilt twice. I didn't think I was up to the task although I had successfully rebuilt several small block chevys and a Jaguar in-line 6 (and its transmission). How much more skill is necessary to a Detroit rebuild?
Thanks,
Rick
 
Mako: the boat project is a hobby for me, I work on it in my spare time so with all the projects that need done, working by myself after work and after family commitments, etc, it takes a long time to get things done. I probably have 150 hours into the rebuild so far. I'm also reconditioning most of the parts myself. Cleaning hardware, making hydraulic hoses, even just the gasket scraping requires more time than you would think. Dealing with rust has been the hardest part.


Pete, Ski has it right. The rebuild kit included pistons, rings, liners, bearings, wrist pins, and a full gasket kit, it was about $1500. It cost $1800 to have the head rebuilt at a machine shop. I also had the blower rebuilt for $800. In all I expect to have about $7000 in the overhaul total.

MyTraveler: This engine Is actually simpler than most of the other ones I've done. The challenge is just in the weight of the parts. Having a lift to move the parts is necessary. I also had to get some larger tools just because things are big. If you have done V8 engines, a Detroit is no problem, just get the shop manual and study it.
 
The challenge is just in the weight of the parts. Having a lift to move the parts is necessary.


Yep I remember when I in-framed my 6-71’s. I couldn’t budge the heads and there wasn’t really enough headroom to build a pulley system. So I hired two big gorillas to lift and then set the new heads.

There’s something to be said for an engine with individual heads!
 
We had J&T 6-71N’s in our 1977 42’ Uniflite SF , loved them, my all time favorite Detroit’s. Rebuilt at 4000 hours in Costa Mesa. Those engines took us through thick and thin, never let us down or missed a beat.

Not sure if I missed it, but are you marking each torqued bolt head with a white pen to keep track of your torque sequence?

I did a survey on a rebuilt 6-71N out of a 43 Viking Double Cabin out of Marina Del Ray in the 90’s that had a low hour failure after one of the rod cap bolts were missed in the torque sequence.
 
I can't believe I didn't see this thread until now. It's really interesting to see how differently these engines are put together compared to a gas engine which are the only things I've rebuilt.


What is a typical rebuild interval for a 2-stroke DD? One person said his had been rebuilt twice, and just now someone said at 4000 hrs. That seems quite frequent compared to modern engines where I think 10k hrs is a min expected interval, and many run 20-30k hrs. Now granted, marine (harsh environment) and pleasure (intermittent use) is probably the worst use case, but the rebuild interval still seems low. I realize that in this particular case the rebuild is all because of abuse so isn't a good example by itself.
 
SB
I too think this is a marvelous thread. Not only is Ski's great knowledge and experience exemplary, but on boatdiesel Randy Sparks is a wonderful DD source.

Years ago I managed a place that had many different diesels in service, one being the 6-71s. Due to shift schedules the rebuilds didn't always go well with different hands getting involved. The best results were to assign one and only one mechanic to each engine. In following your thread I'm again reminded as to the old adage "too many cooks spoil the broth."

BTW, the Uniflite model you have is pretty well laid out. You'll have many happy cruising years in front of you. Keep up the posts and especially regarding the sea trials.
 
Last edited:
MakoBuilders: Yes the head is something around 250 pounds. The flywheel is also quite heavy and I had to use my gantry crane to lift it, as is the rear housing. Installing the cylinder head with a gantry crane was easy. At some point I'm going to build myself a portable gantry crane for use in the boat that I can bolt together/break down and keep on board in case I want to do anything that requires heavy lifting. Uniflite was generous with the engine access hatches as well as building in a huge hatch in the Flybridge so nothing had to be cut to get the engine out.

PacificBlue: No I'm not marking them with paint, just using a methodical approach as well as triple checking before sealing up access to any area. When torquing to 185 ft. lbs each bolt is an experience in and of itself.

TwistedTree: I've followed your blog for a long time and have been wondering how the new Nord is coming along.

I'm not sure about the rebuild interval in a boat. On the road, they were known to do 500,000 miles in a truck/bus if well cared for. J&T tended to really extract a lot of power from them which increases wear and reduces life expectancy. With the N80 injectors my particular engine is equipped with, it's rated at 290 HP. The 92 series V motors were known for wearing out main bearings which needed to be changed at regular intervals.

For this particular engine, it was rebuilt sometime in the 90's, the liners I pulled out had 1990's dates on them and someone had noted the hours on one of them, it had less than 500 hours on it since then. Rust and corrosion in the cylinders from non use caused it to need rebuild.

If you are going to have an extended period of non-use in your detroit, one thing you can do is block off the exhaust and intake so that no sea breeze blows through the thing. It's better to run it every couple of weeks but keeping the ocean breeze out of it will also help a lot. Mine has the emergency shut down flaps and I plan to keep them in the closed position just like a sea cock when not using the engine. There is always at least one cylinder that has intake ports and exhaust valves in the open position so there is a free path for a breeze to flow right through the engine pretty much all the time.

Sunchaser: Yes I really like the layout of the aft cabin Uniflite. I know it's not a trawler, but it is well suited to a live aboard couple. This particular boat was used as a live aboard for many years and the house systems were in pretty good shape as is the cabinetry.

Unfortunately the running gear was neglected, but that's why I got the boat for a very low price, realizing it would be my hobby to bring back those systems before the boat could be used. Something happened with the port engine and the previous owner didn't address it and started using only the starboard engine. It sat for at least 10 years unused. The starboard engine is in good shape since it was run fairly regularly.
 
As part of overhauling the engine I'm also replacing all of the hoses. Fuel, coolant, raw water, oil and trans cooler all have hoses of various types and sizes.

All of the fuel, oil and trans cooler lines are pressure hoses made of re-usable hydraulic fittings. I have replaced the hose in these fittings by buying bulk hose from a hydraulic hose shop. I asked fora quote to have all new hoses made with crimp fittings so I could just bolt them on, they estimated around $1,000 for the hoses. By re-using the fittings I have and assembling the hoses myself, it is less than $300 for the same hoses. They said that the fittings I have and the hoses they use are good for 2500 psi (in general, it varies by size of the hose) and are rated about 10X higher than I need for engine oil pressure duties.

i-wLvmNTN-L.jpg


Here is a couple I've redone. It doesn't take very long to do.

I spent three hours last night dry fitting all of the coolant lines, fittings, hoses, clamps, etc... and making a list of any hardware I want to replace due to corrosion. Once I get those parts together it should get final assembly pretty quickly.


I take it you were able to sort out what hose type is compatible with each fitting type? The few times I've looked at this my eyes started to glaze over trying to figure it out. Each manufacturer will tell which of their fittings work with each of their hose types, but trying to match each to an SAE or ISO standard, and cross between manufacturers is where I lost it.
 
I take it you were able to sort out what hose type is compatible with each fitting type? The few times I've looked at this my eyes started to glaze over trying to figure it out. Each manufacturer will tell which of their fittings work with each of their hose types, but trying to match each to an SAE or ISO standard, and cross between manufacturers is where I lost it.

The hose shop figured that out for me, they knew exactly what worked with what.
 
Those reusable fittings are nice. If you keep reusable hose onboard you can repair a hose anywhere you are yourself. All you need is a decent vice and wrenches.
 
"Those reusable fittings are nice. If you keep reusable hose onboard you can repair a hose anywhere you are yourself. All you need is a decent vice and wrenches."


If purchasing these fittings , be sure to purchase swivels on BOTH ends .
 
i-3DTLnFx-L.jpg


Very close to startup now, all that remains is to complete a couple of small hoses/connections in the cooling system, pressure test it, then hook up/prime the fuel. Starter spun it over last night very nicely and all the adjustments have been made (valve clearance, injector timing, rack controls).
 
Need to see Video with good sound of the first time run!!!!! Great work.
 
Added some dial gauges for the test run.

i-VxhkncV-XL.jpg


i-zHGMjjc-XL.jpg
 
To prep for a first startup, I hooked up an electric diesel pump to prime the fuel system, filled the fluids (10 gallons coolant, 7.5 gallons Delo 100 Oil), wired up the starter with a push button and plumbed the fuel from a jerry can of diesel.

I put vice grips on the rack and disconnected the governor. This is done so that you have direct control over the fuel and can start/stop the motor with the vice grips. I had never done that before on a detroit, so this was a new experience. This allows me to crank it with the full 'off' a bit and prime the injectors. The injectors are a through flow so a lot of return fuel goes to the tank which really helps purge the air.

I had cranked about 2 seconds before my friend started videoing, with the fuel in the cutoff position. In the video, the first part of the cranking, I kept the fuel at cut off and then about 5 seconds in I started opening the injectors up a bit and it fired pretty much right away. The second time cranking it I opened it up more and it fired up.

https://youtu.be/d8wLLwONlII
 
Back
Top Bottom