You are using an out of date browser. It may not display this or other websites correctly.
You should upgrade or use an alternative browser.
You should upgrade or use an alternative browser.
Carpet Replacement
- Thread starter Mike3034
- Start date
The friendliest place on the web for anyone who enjoys boating.
If you have answers, please help by responding to the unanswered posts.
If you have answers, please help by responding to the unanswered posts.
- Joined
- Aug 29, 2012
- Messages
- 2,680
- Location
- Good Ol' US of A!
- Vessel Name
- Pau Hana
- Vessel Make
- 1989 PT52 Overseas Yachtfisher
Does anyone in Washington State have recommendations for Marine Carpet Installers. We have a 41' (41-09) American Tug and are thinking of replacing the carpet.
Yup- Jason Hennerberg of Carpet Specialties. 425-422-3197. Did a great job on our previous vessel at a very reasonable price.
STB
Guru
I used the 18" square tiles from Lowe's on my current and prior boat:
-- https://www.lowes.com/pd/Pebble-Path-15-Pack-Chestnut-Pattern-Peel-and-stick-Carpet-Tile/1000578593
They cut and stuck down quickly and easily, held up well, and are washable. I gave some extra to my boat neighbor with two pit bulls and he used them in his boat -- and they are holding up well there, too.
In some places where I had thin fingers near movable panels I used glue or two-sides carpet tape to make sure it stayed stuck, but otherwise the self-stick was perfect, even on stair treads.
- Joined
- Nov 8, 2012
- Messages
- 2,315
- Location
- USA
- Vessel Name
- Sandpiper
- Vessel Make
- Bluewater 40 Pilothouse Trawler
Is your carpet glued down, hooked or just laying on the subflooring covering up hatches?
My carpet on the boat lays on the floor, not fastened and covers hatches.
I use a high quality commercial berber with a thick heavy backing. Backing that is solid and does not crumble or lose debris.
I lay the new carpet face down on top of the garage floor covered with visqueen.
I lay the old carpet face down on top of the new carpet and trace it's outline on the back of the new carpet with a Sharpie pen.
I cut along the outline with a hot knife sliding a 1/4" board under the carpet to provide a soft cutting surface. The hot knife melts the edge of the carpet, sealing it from unraveling making binding the edges unnecessary.
The new carpet is placed on the boat floor. I heat the area as hot as I can get it for a couple hours, which settles the carpet flat. If there are any humps or curled corners, I'll place boards or boxes over the spot until they flatten. Some trimming may be required but wait a few days until the carpet has settled and also walked on.
For the hot knife, I use a Weller soldering gun with a rope cutting blade.
Attachments
Last edited:
STB
Guru
Both of my boats had carpeting that was cut-and-dropped like this. It looked nice, but was really hardnfor me to roll up when I needed to open a hatch. There wasbtoo much around to be able to easily roll it. I ended uo getting it half out of the way, crawling under tents or not, etc. I once fell in when it flopped back over a hatch on a West Marine run when I came back, forgot, and walked across the camoflagued hole.
That was when I decided it was gone and self-stick with backing would be installed and just cut around hatches.
Now when I want to open a hatch -- I open a hatch. Confess. No mess. Easy access to the mechanicals.
Two owners ago had nice roll carpetting, professionally installed, and cut and bound around the hatches. It was Nice, but probably cost a pretty penny. And, I'll bet it didnt have much longer a lifespan.
Tator
Guru
- Joined
- Feb 16, 2015
- Messages
- 514
- Location
- United States
- Vessel Name
- Oz
- Vessel Make
- Bluewater 40' RPH 1979
Curious as to how easy the self adhesive squares are to remove?
Tator
Tator
STB
Guru
Hey Tator,
They aren't super hard to remove. They seem more to have a grid of thin gummy adhesive on the back than bet totally covered in adhesive, which is why they stick down well normally -- but a really thing piece, such as I have between the galley bar and a hatch, might have almost no adhesive and need to be glued or taped.
Other than thin strips that lose the adhesive grid lottery, when I've put them down, they've stayed down and in their exact place and alignment, even when I've lifted and closed hatches, walked on them, dragged furniture across them, etc.
But, if I've pulled one up and put it back down, for example to trim it differently or change the directional alignment, it sticks the 2nd time -- but not nearly as well. There isn't a 3rd shot for the self-adhesive.
When I first bought the tiles, I thought there was no way thy would work. The adhesive just din't seem that strong or like there was enough of it. And, I quickly vacuumed and cleaned, but the floor was far from perfectly clean. None-the-less, I gave it a shot and it worked. I ended up gluing the thing strips and L-shapes, but mostly it just worked.
My neighbor with 2 put bulls on his 55' Monk put my left overs as stair treads from the 1st floor to the 2nd floor (which on his boat has been entirely enclosed) on his boat. It has been about 3 years now -- and it is holding up nicely and staying in place. He and I were both surprised.
Like I said, I've been really happy with it. I wouldn't have used it, but stuff seemingly just like it is almost always used at the university where I work these days. I forget the details, but there is some type of fire code restriction preventing the use of carpet padding, except when it is integrated into the carpeting (and maybe the carpeting is self-stick). The upshot is that since people want the foot-feel of padding -- it is used in all of the offices and office area hallways, and even many of the public academic building classrooms and hallways. It doesn't hurt that individual squares can be replaced -- but, honestly, I don't think that happens too often.
So, back to your question, I have pulled them up in three cases. I have pulled them up immediately when I goofed. I had to pull hard, but they came up cleanly and easily. I've also had to pull them up weeks to a few months later when I have had to move fixed furniture around. In these cases, I've had to pull harder, but they still came up cleanly. And, I've had to pull them up after initially miscutting or misplacing them and they came up well -- but didn't stick nearly as well the 2nd or especially 3rd time.
Cheers!
-Greg
wpc691
Senior Member
Hey Tator,
They aren't super hard to remove. They seem more to have a grid of thin gummy adhesive on the back than bet totally covered in adhesive, which is why they stick down well normally -- but a really thing piece, such as I have between the galley bar and a hatch, might have almost no adhesive and need to be glued or taped.
Other than thin strips that lose the adhesive grid lottery, when I've put them down, they've stayed down and in their exact place and alignment, even when I've lifted and closed hatches, walked on them, dragged furniture across them, etc.
But, if I've pulled one up and put it back down, for example to trim it differently or change the directional alignment, it sticks the 2nd time -- but not nearly as well. There isn't a 3rd shot for the self-adhesive.
When I first bought the tiles, I thought there was no way thy would work. The adhesive just din't seem that strong or like there was enough of it. And, I quickly vacuumed and cleaned, but the floor was far from perfectly clean. None-the-less, I gave it a shot and it worked. I ended up gluing the thing strips and L-shapes, but mostly it just worked.
My neighbor with 2 put bulls on his 55' Monk put my left overs as stair treads from the 1st floor to the 2nd floor (which on his boat has been entirely enclosed) on his boat. It has been about 3 years now -- and it is holding up nicely and staying in place. He and I were both surprised.
Like I said, I've been really happy with it. I wouldn't have used it, but stuff seemingly just like it is almost always used at the university where I work these days. I forget the details, but there is some type of fire code restriction preventing the use of carpet padding, except when it is integrated into the carpeting (and maybe the carpeting is self-stick). The upshot is that since people want the foot-feel of padding -- it is used in all of the offices and office area hallways, and even many of the public academic building classrooms and hallways. It doesn't hurt that individual squares can be replaced -- but, honestly, I don't think that happens too often.
So, back to your question, I have pulled them up in three cases. I have pulled them up immediately when I goofed. I had to pull hard, but they came up cleanly and easily. I've also had to pull them up weeks to a few months later when I have had to move fixed furniture around. In these cases, I've had to pull harder, but they still came up cleanly. And, I've had to pull them up after initially miscutting or misplacing them and they came up well -- but didn't stick nearly as well the 2nd or especially 3rd time.
Cheers!
-Greg
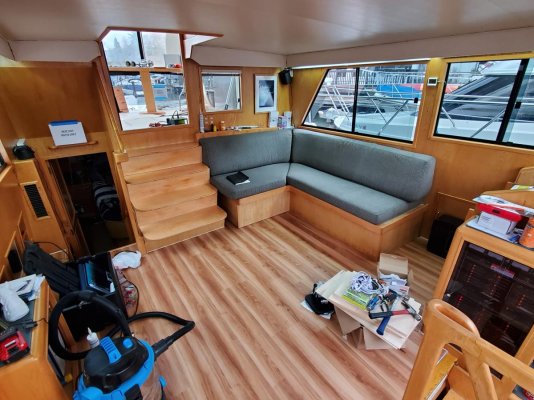
Greg, you’ve inspired me to finally decide on carpet squares. My boat came with nice, but older wall-to-wall with the engine and generator hatches carpeted shut. One day I lost my mind trying to replace a hose clamp on the far side of the stbd engine, and ripped it all out. Now, watering batteries and changing oil filters is a snap - I’m never going back. I haven’t been able to find an installer to even show up and give me a quote for new wall-to-wall, so I’m going with the squares. One question: did you cover the whole floor with the hatches in place then cut the hatches open, or did you stick the tile to the hatch (or floor), cut along the edge, then stick the leftover piece in place?
Thanks!
Mike
STB
Guru
Hi Mike,
On my last boat, the '77 Californian, the floor was plain plywood and the hatches seemed to be cut with a circular saw. The fit was "sloppy". My best guess is that, sometime after the boat was built, someone needed to do some real work and made them much larger than the originals using tools and skills readily available. It didn't even have hatches -- just finger holes for lifting.
So, when I did that boat, I laid down a square, and if it needed cutting, just cut it with a utility knife and a straight edge as needed, and moved on to the next one. This always gave me a place to easily see where to start a cut with the knife. I normally accessed the engine room from the door forward, so I didn't bother to add latches and didn't want the finger holes. When I sold the boat, the seams were so seamless that the new owner actually called me up a month later and asked me if there was a way to take the floor apart without damaging it, because he was tired of being a hunch back down there. I explained that the hatches were already there, and the carpeting was already cut, it was just hard to see, and I pushed it up from the inside for major work. He was pleased -- and added latches to lift from the top without delay!
But, as he learned, one challenge in this particular installation is that, because the plywood was a "sloppy" fit The carpeting had an overhand of about 1/4"-3/8" on some sides. If not very carefully when putting the hatch back down, this liked to get caught in the "crack" and pinched. It still worked nicely. And, I was back on the boat a couple weeks ago and it still looks good.
In that boat I went with the dark brown color and, in the salon, threw down a light colored white wal-mart or target throw rug to brighten it up. When I was back on the boat, they had changed to a more colorful throw rug. I didn't ask, but my guess was either that white wasn't a great color on a boat, that they felt it too much of a contrast with the dark floor, or just wanted something more colorful.
In the new boat, half of the hatches were original and fine carpentry. The other half of the hatches had been replaced when the engines had been removed for rebuild. They basically cut out the floor by the galley and threw three large pieces of plywood over it. It is too bad about the nice teak sole that was once there (I have the pieces, but they no longer fit as they also had to move the bar a foot aft). I was originally sad. But, then when I worked on the engines for the first time I realize that it is for the best.
Regardless, when doing the new boat, I had a different problem. The gap around the hatches, especially the originals, was approximately 0". I couldn't fit a knife blade into it. So, when I tried my original trick of laying the carpeting down first and then cutting it -- no go.
For this boat, I didn't have as consistent a way of doing it. The easiest pieces were where I had a line on both sides, e.g. middle pieces with a cut on one adjacent neighbor and the other side exposed. In these cases, I just put the piece down and cut with a straight edge from the adjoining cut to the visible interface. It somehow seemed that, more often, I was covering a corner, leaving me no reference on one side. In these cases I pulled the hatch out, put the piece down, cut it, put the floor back, and put then put cut piece back down, and moved on. In these cases I did make the cut using both feel and a straight edge. I'd start the cut by "plunging" in the hidden corner, and then go an inch or two to get a nice short line, and then finish using a straight edge so I didn't accidentally get wiggly or cut into the wood.
The more pain in the neck things were actually cutting regular room corners, bump outs, and things like that. When measuring, I sometimes assumed squareness -- when there wasn't. In these cases, I often resorted to using a roll of blue masking tape to make a template on the floor, using as much and as many tiny pieces as needed to get an exact fit. Then, I peeled it up, stuck it down on top of the carpeting, and cut away. For big pieces that just had a complex edge, I "outlined" the space, first, getting straight tape lines on the normal corners and edges and a really approximate line on the complicated one and made a big "X" across it with 1.5" or 2" tape. Then I used all the tape I needed to get a couple of inches worth of solid template at the complex edge. Then I peeled it up and off to the races. One trick I learned it to make sure that one edge is "underneath". That way, when pulling up the template, one can start there and the whole template peels up. Sometimes early on I out down a piece of tape here and a piece of tape there was no place that was a good starting place to pull.
In each installation I probably ended up templating 2-3 pieces like this. It didn't take as long as it sounds, maybe 2-3 minutes all in. And, it made for a true perfect fit.
In the new boat when it came to latches, some were real lift-up-ring recessed boat latches (the originals). And some were bolts with dome-type heads with lock nuts and washers on the bottom. Surprisingly, that nickle hack works really nicely. Grab the bolt head and the bolt pulls through and gives you a pull, holding on the inside by the washers and lock nut. Drop it and the bolt falls down leaving only a 5/8" or so low-profile dome-type bolt head visible.
In the case of the bolt heads, I took them off before I started, laid the carpeting, drilled the holes through the carpeting from the bottom right through the original holes in the wood, and put the bolt pulls back on.
In the case of the traditional pulls, which had a rectangular frame and were recessed, I really had no choice but to carpet over them and then cut them out. In the best cases, a single piece of carpeting didn't complete cover the latch. In these cases, using what I could see, I would just cut out a bunch of the middle of the latch to debulk it. Then, I carefully cut the straight edges cut out pieces slowly until I found the corners, and then cleaning up. It took a minute or two of patience. Not bad.
When I came up to the point where the original teak sole bull-nosed over the first step, just stopped the carpeting so it didn't cover the bull-nose. I was originally going to put trim over the edge -- but it wasn't needed. The edges don't unravel, even where cut. The same is true of the step below that one. I just put it there covering everything but the bull-nose. When my neighbor did the steps leading to his 2nd level, he did the same (that's where I got the idea).
I already mentioned the only case that really annoyed me, which was where I had narrow strips or L-shapes of carpeting, such as along or between the bar and the hatches. Where this happened along a wall, it was fine. The little bit of stickiness held the carpeting okay. But, where this happened near a hatch, the movement of the hatch shook it loose within an opening or two. I initially fixed this with double sided gummy carpet tape, which worked great -- and instantly. But, I noticed that if you really looked, you could see the carpeting was a little higher where I did that. So, the next couple of these that came loose, I just glued and theft things alone long enough for the glue to dry. If I'd ever need to take those up, I'd need to scrape that glue off. But, there just aren't very many of those cases.
I saw some pictures of my boat two owners ago with what looked like custom installed dense, high-pile carpet with all of the edges trimmed for the hatches, all glued down. It looked really great. But, I think this looks 90% as good, is probably more cleanable, and I am 100% sure cost a lot less and took a lot less of my time (to track down and manage installers), never mind installer time.
I'll be back on the boat in about a week. I can take some pictures of how it looks overall and of some of the edges, pulls, and steps, if you'd like.
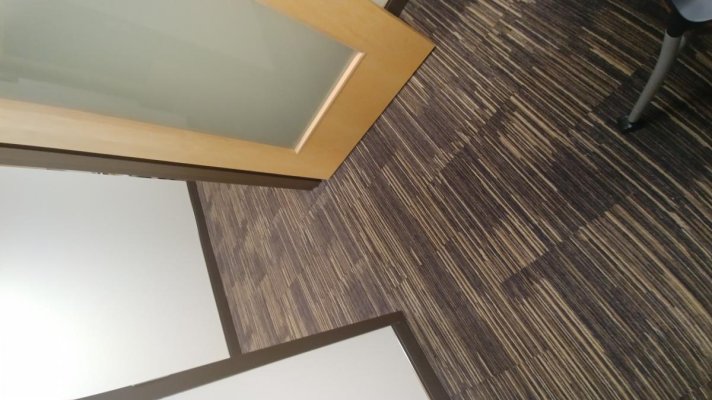
Attached here, because it is all I have, is a similar carpet tile installed in an academic building office and hallway.
Hope this helps.
Cheers!
-Greg
On my last boat, the '77 Californian, the floor was plain plywood and the hatches seemed to be cut with a circular saw. The fit was "sloppy". My best guess is that, sometime after the boat was built, someone needed to do some real work and made them much larger than the originals using tools and skills readily available. It didn't even have hatches -- just finger holes for lifting.
So, when I did that boat, I laid down a square, and if it needed cutting, just cut it with a utility knife and a straight edge as needed, and moved on to the next one. This always gave me a place to easily see where to start a cut with the knife. I normally accessed the engine room from the door forward, so I didn't bother to add latches and didn't want the finger holes. When I sold the boat, the seams were so seamless that the new owner actually called me up a month later and asked me if there was a way to take the floor apart without damaging it, because he was tired of being a hunch back down there. I explained that the hatches were already there, and the carpeting was already cut, it was just hard to see, and I pushed it up from the inside for major work. He was pleased -- and added latches to lift from the top without delay!
But, as he learned, one challenge in this particular installation is that, because the plywood was a "sloppy" fit The carpeting had an overhand of about 1/4"-3/8" on some sides. If not very carefully when putting the hatch back down, this liked to get caught in the "crack" and pinched. It still worked nicely. And, I was back on the boat a couple weeks ago and it still looks good.
In that boat I went with the dark brown color and, in the salon, threw down a light colored white wal-mart or target throw rug to brighten it up. When I was back on the boat, they had changed to a more colorful throw rug. I didn't ask, but my guess was either that white wasn't a great color on a boat, that they felt it too much of a contrast with the dark floor, or just wanted something more colorful.
In the new boat, half of the hatches were original and fine carpentry. The other half of the hatches had been replaced when the engines had been removed for rebuild. They basically cut out the floor by the galley and threw three large pieces of plywood over it. It is too bad about the nice teak sole that was once there (I have the pieces, but they no longer fit as they also had to move the bar a foot aft). I was originally sad. But, then when I worked on the engines for the first time I realize that it is for the best.
Regardless, when doing the new boat, I had a different problem. The gap around the hatches, especially the originals, was approximately 0". I couldn't fit a knife blade into it. So, when I tried my original trick of laying the carpeting down first and then cutting it -- no go.
For this boat, I didn't have as consistent a way of doing it. The easiest pieces were where I had a line on both sides, e.g. middle pieces with a cut on one adjacent neighbor and the other side exposed. In these cases, I just put the piece down and cut with a straight edge from the adjoining cut to the visible interface. It somehow seemed that, more often, I was covering a corner, leaving me no reference on one side. In these cases I pulled the hatch out, put the piece down, cut it, put the floor back, and put then put cut piece back down, and moved on. In these cases I did make the cut using both feel and a straight edge. I'd start the cut by "plunging" in the hidden corner, and then go an inch or two to get a nice short line, and then finish using a straight edge so I didn't accidentally get wiggly or cut into the wood.
The more pain in the neck things were actually cutting regular room corners, bump outs, and things like that. When measuring, I sometimes assumed squareness -- when there wasn't. In these cases, I often resorted to using a roll of blue masking tape to make a template on the floor, using as much and as many tiny pieces as needed to get an exact fit. Then, I peeled it up, stuck it down on top of the carpeting, and cut away. For big pieces that just had a complex edge, I "outlined" the space, first, getting straight tape lines on the normal corners and edges and a really approximate line on the complicated one and made a big "X" across it with 1.5" or 2" tape. Then I used all the tape I needed to get a couple of inches worth of solid template at the complex edge. Then I peeled it up and off to the races. One trick I learned it to make sure that one edge is "underneath". That way, when pulling up the template, one can start there and the whole template peels up. Sometimes early on I out down a piece of tape here and a piece of tape there was no place that was a good starting place to pull.
In each installation I probably ended up templating 2-3 pieces like this. It didn't take as long as it sounds, maybe 2-3 minutes all in. And, it made for a true perfect fit.
In the new boat when it came to latches, some were real lift-up-ring recessed boat latches (the originals). And some were bolts with dome-type heads with lock nuts and washers on the bottom. Surprisingly, that nickle hack works really nicely. Grab the bolt head and the bolt pulls through and gives you a pull, holding on the inside by the washers and lock nut. Drop it and the bolt falls down leaving only a 5/8" or so low-profile dome-type bolt head visible.
In the case of the bolt heads, I took them off before I started, laid the carpeting, drilled the holes through the carpeting from the bottom right through the original holes in the wood, and put the bolt pulls back on.
In the case of the traditional pulls, which had a rectangular frame and were recessed, I really had no choice but to carpet over them and then cut them out. In the best cases, a single piece of carpeting didn't complete cover the latch. In these cases, using what I could see, I would just cut out a bunch of the middle of the latch to debulk it. Then, I carefully cut the straight edges cut out pieces slowly until I found the corners, and then cleaning up. It took a minute or two of patience. Not bad.
When I came up to the point where the original teak sole bull-nosed over the first step, just stopped the carpeting so it didn't cover the bull-nose. I was originally going to put trim over the edge -- but it wasn't needed. The edges don't unravel, even where cut. The same is true of the step below that one. I just put it there covering everything but the bull-nose. When my neighbor did the steps leading to his 2nd level, he did the same (that's where I got the idea).
I already mentioned the only case that really annoyed me, which was where I had narrow strips or L-shapes of carpeting, such as along or between the bar and the hatches. Where this happened along a wall, it was fine. The little bit of stickiness held the carpeting okay. But, where this happened near a hatch, the movement of the hatch shook it loose within an opening or two. I initially fixed this with double sided gummy carpet tape, which worked great -- and instantly. But, I noticed that if you really looked, you could see the carpeting was a little higher where I did that. So, the next couple of these that came loose, I just glued and theft things alone long enough for the glue to dry. If I'd ever need to take those up, I'd need to scrape that glue off. But, there just aren't very many of those cases.
I saw some pictures of my boat two owners ago with what looked like custom installed dense, high-pile carpet with all of the edges trimmed for the hatches, all glued down. It looked really great. But, I think this looks 90% as good, is probably more cleanable, and I am 100% sure cost a lot less and took a lot less of my time (to track down and manage installers), never mind installer time.
I'll be back on the boat in about a week. I can take some pictures of how it looks overall and of some of the edges, pulls, and steps, if you'd like.
Attached here, because it is all I have, is a similar carpet tile installed in an academic building office and hallway.
Hope this helps.
Cheers!
-Greg
Attachments
STB
Guru
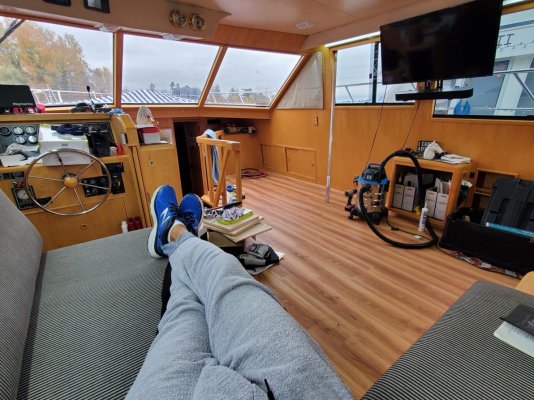
I just figured I'd update my post on this thread.
Since posting, I had an engine replaced, which involved the old one getting lifted into the galley, parts removed, and and fluids spilling everywhere and soaking in for days.
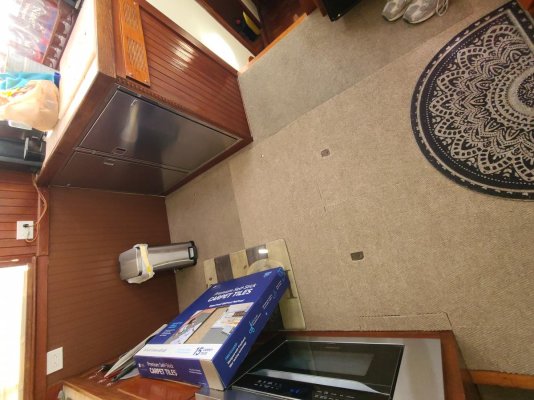
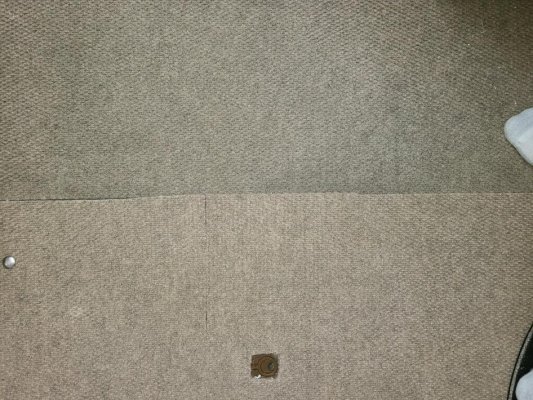
I cleaned the 2x2 carpet squares as best as I could with a handheld rechargable spot cleaner, but wasn't happy, so I decided to replace it a square at a time, as I have time, until the dirtier areas are gone.
Attached are pictures of the galley half way.
They should give an idea of how the carpet holds up to two years of hard use.
It also seems that I need to find a better way to clean the carpeting. Those tiles match under the settees. Maybe I spread the dirty around more than extract when trying to spot clean, but I suspect that is years of dirt ground in vs the result of that one event.
I'll also note that the seams were nearly invisible when I did it the 1st time, but cutting them one at a time, the replacements haven't been perfect, especially around hatches, etc.
Since posting, I had an engine replaced, which involved the old one getting lifted into the galley, parts removed, and and fluids spilling everywhere and soaking in for days.
I cleaned the 2x2 carpet squares as best as I could with a handheld rechargable spot cleaner, but wasn't happy, so I decided to replace it a square at a time, as I have time, until the dirtier areas are gone.
Attached are pictures of the galley half way.
They should give an idea of how the carpet holds up to two years of hard use.
It also seems that I need to find a better way to clean the carpeting. Those tiles match under the settees. Maybe I spread the dirty around more than extract when trying to spot clean, but I suspect that is years of dirt ground in vs the result of that one event.
I'll also note that the seams were nearly invisible when I did it the 1st time, but cutting them one at a time, the replacements haven't been perfect, especially around hatches, etc.
Attachments
Last edited:
Scottwb96
Senior Member
STB
Guru
I did. I used it in one of the heads in my last boat, specifically thick, hard cored vinyl plank. I loved it.
But, it seemed to get scratched too easily to have above the engine room, wasn't really repairable, and was difficult to replace in-place due to interlocking.
It also seemed to be less sound insulating for the engine noise, be louder when some people walked on it with heels,
And be harder on my feet when standing on it for extended periods of time.
It did install fast. I did a whole house at one point. But, not nearly as fast as the carpet tiles, and the install makes dust when cutting and trimming that the carpet install doesn't.
It also cost 2x as much, which would make me hesitant to replace pieces on a whim.
If I'd had half the engine work done with it in place that I did the carpeting, there would have been nothing left. The engines literally got set down on the carpeting and parts slid around. Day One, there were moving blankets. Days 2-4, not not much.
Life is.
I suspect that this is as much a personal preference as hard flooring vs carpeting at home. I do hard flooring everywhere on the lower level, and all bathrooms, but not upper level.living spaces. I don't like the foot noise underneath. Others wouldn't think of having dirty carpeting anywhere...and others wouldn't think of having cold hard flooring anywhere.
Different strokes! Different folks!
Similar threads
- Replies
- 4
- Views
- 367